
Repair or Replace – Pouring Concrete Steps
Updated: Feb. 22, 2023Rebuild damaged edges and corners to make your concrete steps look like new or surface concrete steps if possible
Overview: The recap solution, tools and materials
Concrete steps break up, especially in northern climates. Water soaks into the concrete, freezes and breaks off the outside corners. Once that starts, the damage spreads along the front edge of the step, eventually turning the step into a ramp. That’s not only ugly but mighty dangerous.
The best repair for severe corner and front edge breakage—short of completely replacing the steps—is to “recap” them. You break away the damaged areas, rebuild them with new concrete and then coat your entire steps to give them a uniform look. It takes about two days altogether and costs about $225 for tools and materials.
Tools and materials for forming concrete steps
Everything you need for this project is available at home centers.
- Segmented diamond blades for a circular saw and grinder.
- Irrigation system tubing, valves, elbows, tee and hose adapter. Don’t forget the GFCI extension cord!
- Concrete mixing tub, wood float, steel trowel and edger.
- Concrete bonding adhesive. We used Quikrete No. 9902.
- Concrete mix. A “crack-resistant” mix is best. We used three bags of Quikrete No. 1006.
- Resurfacer. We used Quikrete No. 1131.
Video: How to Pour a Concrete Slab
Bust off the old concrete step surface
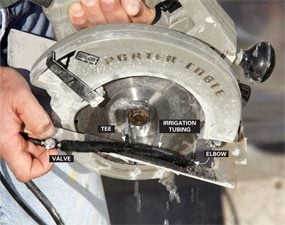
Photo 1: Turn your saw into a wet saw
Rig up a water line using irrigation system parts. Water keeps the blade cool and eliminates dust. In addition to the parts shown here, you’ll need an adapter to connect the tubing to a garden hose.
Caution: Plug your saw into an extension cord with built-in GFCI protection—or risk electrocution.
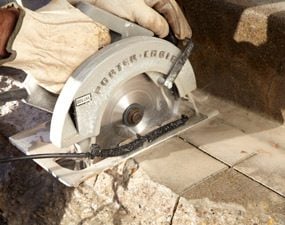
Photo 2: Slice up the damaged area
Cut the stair tread into a 4- to 5-in. grid pattern. Sawing concrete is no fun, but the more cuts you make, the easier it will be to break off the step’s surface.

Start by rigging up your circular saw and grinder with water supply lines (Photo 1). All it takes is a few bucks’ worth of sprinkler system parts from any home center to fabricate a water-cooling and dust-reduction system. Secure the assembly to the saw with hook-and-loop tape. Build another spray unit (with only one nozzle) for your angle grinder.
Set the circular saw blade to full depth and adjust the water flow. Then don your safety gear (goggles, hearing protection, knee pads and leather gloves) and connect your saw/grinder to a GFCI extension cord. Cut a grid pattern into the steps (Photo 2) and bust off the surface (Photo 3). You must remove at least 3/4 in. of concrete (3/4 in. is the minimum thickness for a cap). But a thicker cap is stronger, so try to remove 1-1/2 in. of concrete or more.
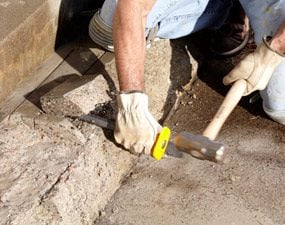
Switch to the angle grinder to cut the remaining concrete where the stair tread meets the riser (Photo 4). Once you’ve removed the entire stair tread, run the circular saw lengthwise down the front and side edges of the step. Break off the faces with the maul and chisel.
Repair or Replace Concrete Steps?
The very best way to fix concrete steps is to demolish the old ones and pour new ones. No repair lasts forever. And replacement is the only real fix for steps that are sinking or have deep cracks. But if your steps are level and have only the usual damage that goes a few inches deep, you can save yourself a ton of money and/or labor by patching or recapping them.
Patching works well for small, shallow chips and cracks (less than 1/4 in. deep). Simply fill them with premixed concrete patching material. To patch cracked corners, chisel them out to a depth of at least 3/4 in. Then drill holes and drive in concrete screws as anchors, apply a bonding adhesive and fill with crack-resistant concrete. The patch won’t match the color or texture of the steps, so you may want to recoat all the steps with concrete resurfacer for a uniform look.
If the cracks or voids extend over large areas of your steps, forget about patching. Go ahead and cap the steps following the procedure shown here.
Forming Concrete Steps: Pour a new concrete cap
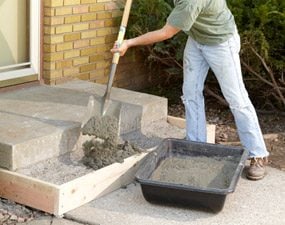
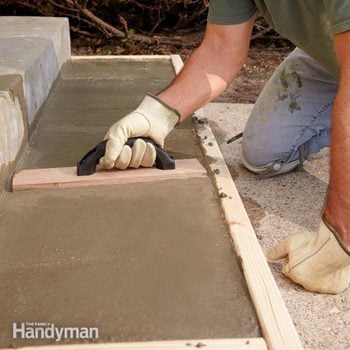
Photo 5: Fill the form
Work the concrete into the front of the form with your shovel or a stick. When the form is completely full, screed off the excess concrete.

Hose down the steps and let them dry. Then coat the chipped-out areas with concrete bonding adhesive.
Build a concrete form to match the original height of the step. Locate the front of the form about 1 in. out from the old face of the step. If that extra inch will cause the step to overhang the sidewalk, place a strip of 1/2-in.-thick foam under the form to create a gap between the step and the sidewalk. The gap will allow the sidewalk to rise during a freeze.
Next, mix the crack-resistant concrete and fill the form (Photo 5). Then finish the concrete (Photo 6). Remove the form after 24 hours.
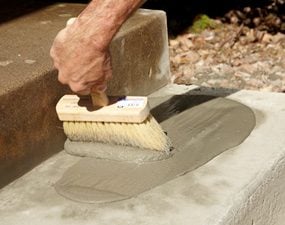
Wait a week and then apply the resurfacer. Mix it in small batches. Then wet all the steps with a water spray bottle and apply the resurfacer (Photo 7).
Video: How to Repair Concrete Steps
Usually, it’s cheaper to repair concrete steps than it is to build new ones. Rick Muscoplat, an expert at The Family Handyman, will show you how to resurface the concrete after you make the repair to make the old and new concrete match perfectly.
Required Tools for this Project
Have the necessary tools for this DIY project lined up before you start—you’ll save time and frustration.
- Angle grinder
- Circular saw
- Cold chisel
- Drill/driver - cordless
- Hammer
- Hearing protection
- Knee pads
- Safety glasses
- Sledgehammer
Required Materials for this Project
Avoid last-minute shopping trips by having all your materials ready ahead of time. Here’s a list.
- Concrete bonding adhesive
- Concrete mix
- Resurfacer mix
