
15 Car Problems You Can Diagnose (and Fix!) Yourself
Updated: Apr. 02, 2024
Some car problems require a professional diagnosis and repair. But there are many car problems you can diagnose and fix on your own. Here are the top 15 car problems any DIYer can fix.
Oil Warning Light is On
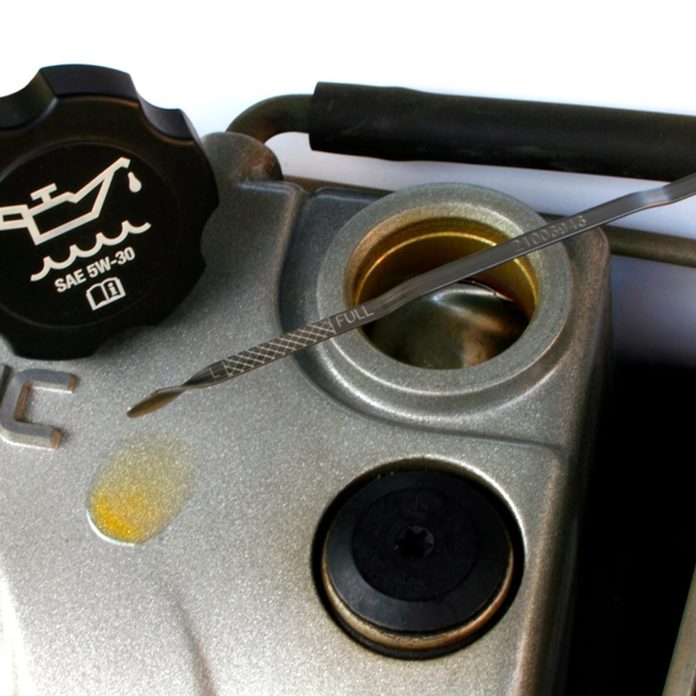
An oil warning light is one of the most serious car problems you’ll ever encounter. If the light (or oil icon) comes on, you should immediately pull over and shut off your engine. The low-pressure warning light can be mean you’ve got a bad oil pressure sensor, bum oil pump or a significant engine wear problem. But it can also mean that you’ve simply run out of oil. The good news is that you can check your oil level right there on the side of the road. Here’s how:
- Grab a rag or tissue, pop the hood and remove the dipstick (check your owner’s manual if you don’t know where it is).
- Wipe the dipstick with the rag and reinsert it into the dipstick tube, making sure it seats all the way (goes all the way in).
- Pull the dipstick out again to check your oil level. You’ll see marks, notches or holes on the dipstick indicating the “FULL” and “ADD” levels. If the oil appears below the ADD mark, you’re out of oil.
- Call a friend and ask them to bring you at least four quarts of the proper oil for your vehicle(find the oil specs for your car on the oil filler cap or in the owner’s manual).
- Add just enough oil to bring the oil level up to the full mark on the dipstick, then drive your car to a shop to have it checked for leaks or an oil consumption issue.
However, if your oil warning light is on and the dipstick test shows your oil level is above the ADD mark, the problem is too serious to address on the side of the road. Call a tow truck and have your car brought to a shop for a professional diagnosis.

Diagnose a Check Engine Light
“Check Engine“, “Service Engine Soon” or “Reduced Power” lights or warning messages on your dash mean your car’s computer has detected a problem with the engine or transmission and stored a trouble code in its memory. In most cases, the problem is caused by a faulty sensor that you can probably replace yourself. First, though, you have to get the trouble code from the computer.
Many auto parts stores will read the trouble code for free, or you can buy a scan tool/code reader and pull the codes yourself. Once you have the code, search the internet for advice on fixing that particular code. For example, a search for “P0171 Ford Focus” turns up hundreds of results; both step-by-step articles and YouTube videos. Follow that free advice and you’ll most likely get all the information you need to fix the problem.

Fix a Dim Headlight
Most DIYers think a dim headlight is caused by a poor connection on the power side of the circuit. That’s possible, but in most cases the dim headlight is actually caused by corrosion on the ground connection. To fix this problem you have to check the electrical connector for corrosion and then clean the ground connection. Here’s how:
- Remove the electrical connector that plugs into the headlight. Look for signs of corrosion or melted plastic from excessive heat.
- If you find corrosion, clean it using electrical contact cleaner and a small wire brush.
- If the connector is melted, purchase a new pigtail headlight connector from any auto parts store or dealer parts department and splice it into the wiring harness.
- Next, clean the headlight ground connection. To locate the connection, simply follow the ground wire to its termination on the frame or fender.
- Remove the screw or bolt, clean off the rust, apply a dab of dielectric grease and reconnect.
- Turn on the headlights. If they’re bright, you’re done. If not, you’ll need a professional diagnosis.

Fix a Slow Moving Power Window
A sticky, slow-moving power window can be really frustrating, especially when you pull up to a toll booth or drive-thru window. You can usually fix the problem by lubricating the window channels. But if you don’t fix the problem, the slow-moving window will stress the window regulator mechanism until it breaks, costing you around $400 to replace. Here’s the fix.
- Buy an aerosol can of dry Teflon spray. It sprays on as a liquid but dries to a white slippery Teflon powder.
- Shake the can vigorously to mix the Teflon particles with the solvent.
- Insert the straw into the nozzle and aim the spray into the window channels.
- Press the trigger and soak the front and rear channels until the spray runs down into the door.
- Wait a few minutes for the solvent to evaporate, then operate the window up and down several times to spread the dry Teflon spray through the channels.

Fix a Squealing Belt
Of all the car problems you might encounter, a squealing belt is potentially the most annoying. When the rubber belt loses its grip and slips around the pulleys it produces a high-pitched squeal. In rare cases, a worn slow-moving alternator, pump or AC compressor bearing or component misalignment can cause even a perfectly good belt to squeal. But most of the time the belt slips because it’s either worn down, is too loose or has been contaminated with oil or coolant. You can diagnose all those problems yourself with a visual inspection, a belt wear gauge and a spray water bottle.
- Check the belt for wear using a belt wear gauge.
- If the belt is worn, replace it. Next, try to recreate the conditions when the belt squeals (first thing in the morning when the engine is cold, when you accelerate, etc.).
- Start the engine and spray a stream of water on the ribbed side of the belt before it wraps around each pulley.
- If the noise disappears but comes back in a few minutes, the belt or the components it drives are misaligned. That’s not something you can fix on your own. Take it to a shop.
- If the noise gets louder after the water spray, the belt has too little tension.
- If your vehicle has an automatic belt tensioner, replace the tensioner.
- If it has manual tension adjusters, tighten the belt slightly and re-test.
Car Won’t Start
If you turn the key in the ignition and hear a single click or rapid clicking but the engine doesn’t turn, chances are you’ve got a weak or dead battery or corroded battery terminals. Since you probably won’t have the right tools with you when your engine won’t start, here are two easy ways to get up and running.
Warm Up the Battery
Car batteries make power through a chemical reaction and that reaction slows down in cold weather. If you can warm up the battery, you can increase battery output. You can warm up the battery simply by turning the key to start several times, with a 5-minute rest period between each try. Here’s how to do it.
- Turn the key to the START position and hold it in that position for about 5 seconds.
- Turn the key to off and wait 5 minutes.
- Repeat up to six more times.
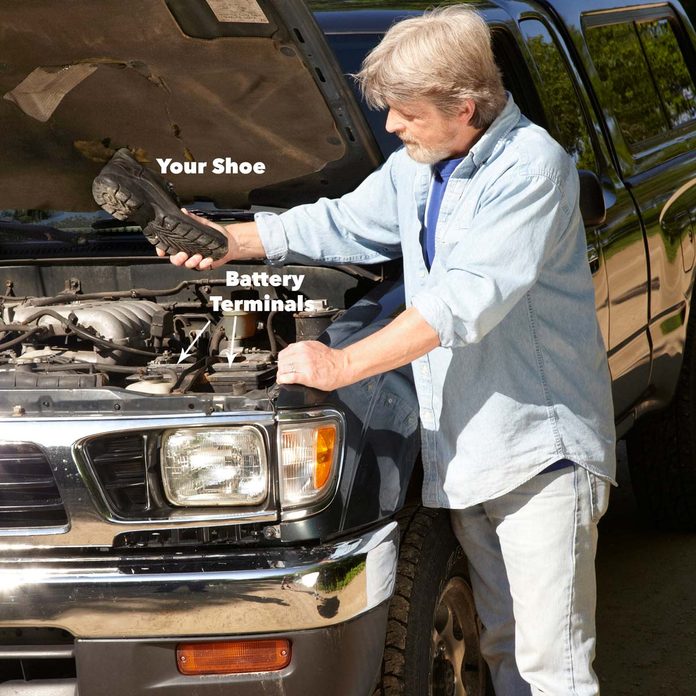
The Shoe Trick
If it doesn’t start on the last try, move on to this shoe trick.
- Remove your shoe and tap each battery terminal with the heel.
- Then try starting the engine. If it starts, clean the battery terminals as soon as you get home.

Fix a Sticking Hood Latch
Hood latches are pretty simple mechanisms, but they’re constantly exposed to water, salt and road grit, and that can make them gum up, rust and stick. Sometimes the problem is so bad you can’t even pop the hood. Here’s how to fix a sticking hood latch.
-
- Buy a can of aerosol rust penetrant and a can of spray white lithium grease.
- Start by soaking the latch mechanism with the rust penetrant.
- If you can’t open the hood at all, slide the spray straw into the grille and aim it up toward the latch.
- Then shoot about a half can of lube onto the latch.
- Let it soak for an hour. If it opens after that, move on to the next step. If not, repeat the procedure.
- Once the hood opens, soak the hood latch mechanism with white lithium grease.
- Then close and open the hood multiple times until the latch works smoothly.
- Apply fresh grease every year before winter.
Fix Poor Acceleration
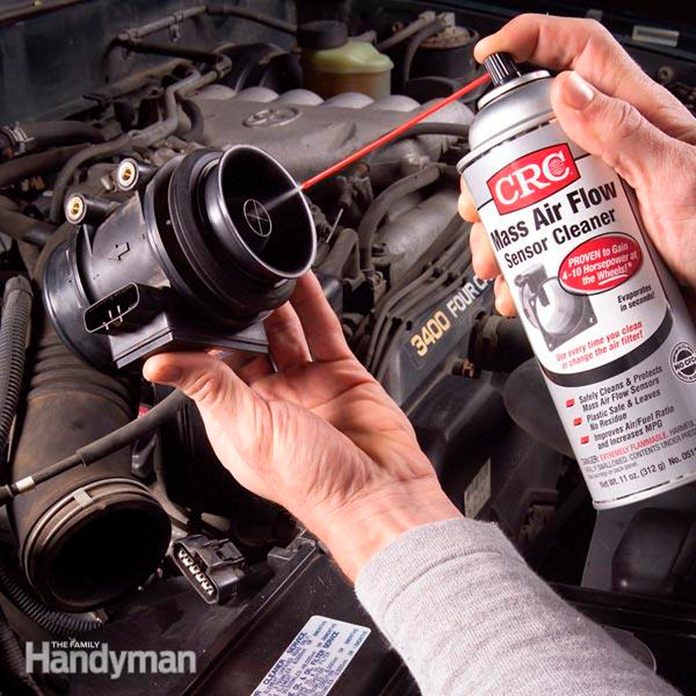
Your car’s computer relies on the Mass Airflow Sensor (MAF) to detect the volume, mass and temperature of the air entering your engine. It then calculates the proper amount of fuel to add. However, if the sensing elements inside the MAF are dirty, the computer gets skewed readings and miscalculates how much fuel to add, and that causes performance issues.
Most MAF sensors can be restored to full operating condition with a simple cleaning. To clean your MAF sensor, buy a can of MAF Sensor Cleaner from any auto parts store. Remove the sensor from the air duct by loosening the worm drive clamps with a screwdriver or socket. Then aim the spray cleaner directly at the sensing elements inside the MAF housing. Soak the sensing elements but don’t touch them with your fingers, rag or brush—they’ll break. Let the solvent dry, then reinstall the MAF.
If a dirty sensor was causing your acceleration problem, the cleaning should put you back in the groove. If not, get it checked out by a pro.
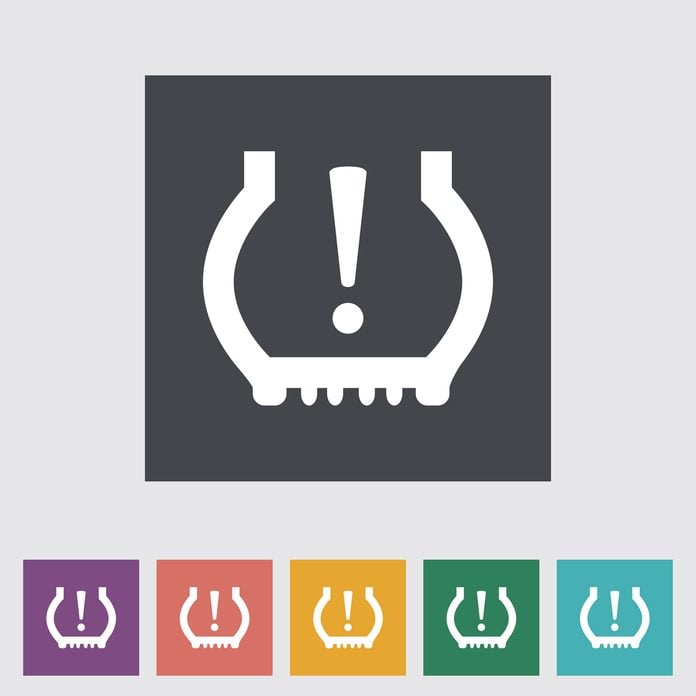
Fix a Tire Pressure Sensor Warning Light
Driving with extremely low tire pressure is one of the most common car problems and driving on low tire pressure can put your tires in a dangerous position. That’s why all newer vehicles include a Tire Pressure Monitoring System (TPMS). If you fill your tires to the pressure listed on the label near the driver’s door pillar but the light doesn’t turn off, here’s how to fix the problem.
- Drive your car at varying speeds for up to 10 miles to make the light turn off.
- If the light is still lit, double-check the spare tire’s pressure.
- Spare tires usually require a much higher inflation pressure. If a spare tire is low, your TPMS light will never turn off.

Fix a Sticking Car Door
In hot weather, the sponge rubber weatherstripping on the door can stick to the door frame, making it hard to open. Here’s how to fix it:
- Start by cleaning weatherstrip residue off the door frame with a household spray cleaner.
- Then coat the weatherstrip with silicone or dry Teflon lube.
- Spray the lubricant onto a rag and wipe it onto the foam weatherstripping, making sure you wet the entire surface.
- Let the solvent dry and your sticking door problems will be gone.

Fix Windshield Wiper Streaks
Windshield wipers are designed to squeegee the water off your windshield. If your wipers are causing streaking, they’re either dirty or worn out. You can try cleaning your wiper blades to fix this issue. But if that doesn’t work, buy new wipers at any auto parts store and install them yourself.

Unclog a Windshield Washer Jet
If you activate your windshield washers and washer fluid comes out of one jet but not the other, the wonky jet is probably clogged. Most DIYs try unclogging the jet by inserting a pin. That rarely works. Here’s a better way.
- Pop the hood and locate the rubber tube going up to the problem jet.
- Disconnect the tube by twisting it off. Then shoot compressed air backwards through the jet. That’ll dislodge the clog and shoot the crud out.
- Reconnect the tube to the jet and you’ll be in business. If fluid doesn’t come out of either jet, follow this troubleshooting technique.
- If the diagnoses turn up a seized washer pump, replace it yourself.
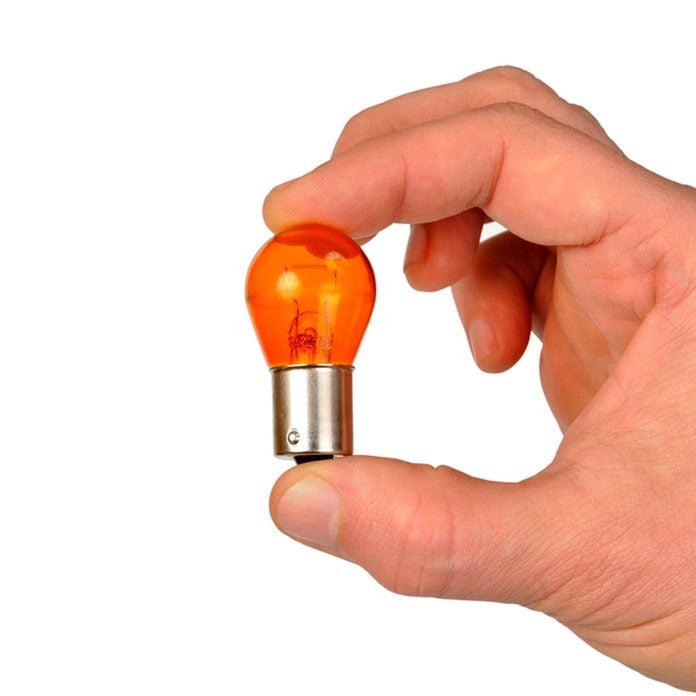
Fix a Rapidly Blinking Turn Signal
If one turn signal blinks faster than the other, it’s usually a burned-out bulb in the front or rear light assembly. Replace the bulb and your turn signals should return to normal operation. But what if both the front and rear bulbs on that side flash rapidly? That’s the sign of a bad flasher, right? Nope. It’s still a bad bulb. Here’s how that can happen. Some automakers use dual filament bulbs that provide both parking and turn signal illumination. Because the two filaments are stacked one above the other, a broken turn signal filament can land on the parking light filament. That’ll cause rapid flashing and dim illumination. Replace the dual filament bulb and you’ll be back in business. When in doubt, always replace the bulb first before suspecting either the flasher or turn signal switch.

Replace a Weak Hood or Hatch Lift
If your hood or rear hatch won’t stay up when you let go, chances are the gas lifts are shot. You can buy replacement lifts at any auto parts store and replace them yourself.
- The lifts attach to the hood, hatch and fender with spring clips and bolts. Have a friend hold the hood or hatch up while you replace the old lifts.
- To release a spring clip, simply insert a small flat blade screwdriver under the clip until it lifts up. Then pop the lift off the ball stud. Insert the screwdriver under the clip on the new lift and press it onto the ball stud.
- Repeat on the opposite end, if it’s equipped with a spring clip as well. If the lifts are secured with bolts, remove them with a metric socket and ratchet. Remove the screwdriver and the spring clip will lock the lift in place.
- Always replace gas lifts in pairs because they have the same amount of wear. Replacing just one lift will cause it to wear out faster.

Fix a Paint Chip
Every car gets paint chips from flying gravel. If you ignore the chips, the metal will rust and blister and you’ll wind up with major rust problems that cost a small fortune to fix. Avoid those problems by filling paint chips with touch-up paint before they start to rust. You’ll need touch-up paint from the dealer or an auto parts store, wax and grease remover and a rag.
- Clean the chipped area with wax and grease remover.
- Dab on a small dot of touch-up paint. The paint won’t match exactly, but it’ll look a heck of a lot better than rust!
- Wait the recommended time before applying a second coat.
- Wait 30 days for the paint to cure, then wax the area.