
8 Tips for Building a Deck That Will Last for Decades

Updated: Feb. 12, 2024
Wondering how to build a deck? DIYers and even many professional builders often get it wrong. Read our tips to make your deck last a lifetime.
Build Your Deck the Right Way
Thinking of adding a deck to your home? Don’t start before reading this article. Building a deck is one of the most common home improvement projects, but it’s also one of the most poorly executed. It’s common to see decks less than a decade old start to sag, rot and look prematurely ratty. Even among professional builders, 20 years is considered a long deck lifespan.
I disagree. If I can’t build a project in a way that will last 50 years minimum, I’d rather not build at all. Why spend time, money and effort on construction, only to be forced to redo it in a couple of decades?
There are many reasons for premature deck failure, and they all boil down to the same critical errors caused by trying too hard to save time, cut costs or both.
When I decided to build a new deck on my house a few months ago, I knew one thing for certain: I didn’t want to fix or replace it in my lifetime. That’s why I built my deck to be absolutely foolproof, in ways that some would likely consider massive overkill. The thing is, “overkill” in construction has a funny way of proving itself to be the bare minimum after a decade or two.
If you’re planning a deck project, keep reading for eight of my best strategies on how to make your deck look great and last a lifetime.

Start With a Proper Foundation
Getting the foundation wrong will compromise your entire deck and could lead to premature structural failure. Avoid the common, fast approach of laying down a couple of paving stones and building the deck directly on top. I used 12-inch Sonotubes to pour concrete piers that provided a solid foundation.
First, dig below the frost line in the spot where each foundation pier will go. When you pour, make sure each pier is plumb and reinforced with concrete fiber.
You can make the piers even stronger by using a concrete vibrator during the pour to increase density. It’s also vital that each pier sticks up above the soil enough to leave at least eight inches of space between the ground and the underside of your deck. Build too close to the ground and moisture rising from the earth will rot your deck quickly.
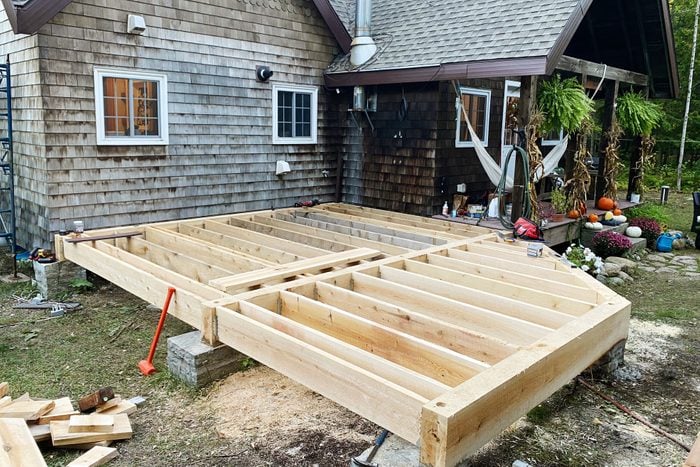
Build the Frame Strong Enough
This is the step where DIYers tend to fail spectacularly.
Weak, sagging and under-engineered decks are commonplace. The subject of deck frame strength isn’t a matter of opinion. Engineers calculated exactly how thick beams and joists need to be to span various distances.
Online span calculators like this one are the easiest way to determine how thick your perimeter beams and deck joists need to be. If you ignore these calculator’s recommendations, your deck will almost certainly sag within a few years.
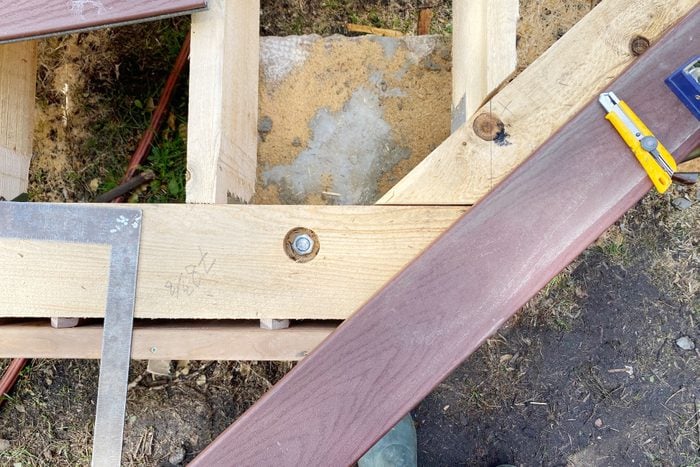
You’ll need to input the species of wood you’re using (most commercial lumber is spruce), as well as the dimensions of your lumber and your deck length and width. To make my 16-by 19-foot deck strong enough, I chose 6- by 12-in. beams and 2- by 10-in. joists. That’s some big timber, but it’s what was required for the size of deck I wanted.
Your calculations may reveal you need to pour more foundation piers before beginning the frame to reduce the span. It’s also crucial to use proper joist hangers to fasten your joists to the beams. Don’t toenail (i.e. driving nails diagonally through the joist ends and into the beams). It’s weak and imprecise.
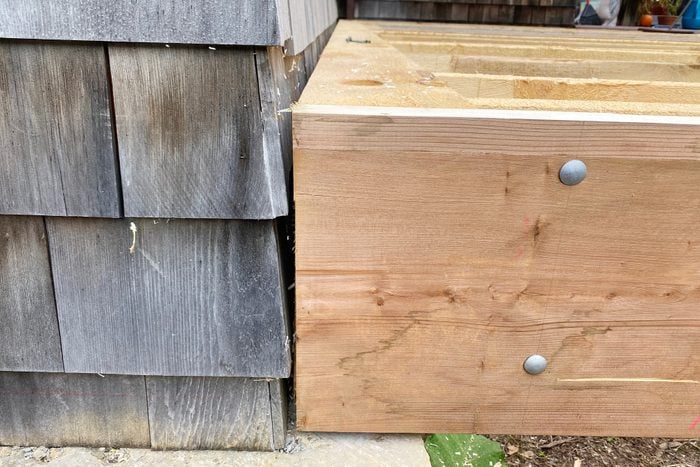
Don’t Cut Into Your Siding
It’s all too common for deck builders to tie deck frames into the adjoining building by cutting into the siding. This is a terrible idea. It’s almost impossible to stop moisture from wicking in behind your siding with this approach, causing mold, rot and loss of structural integrity.
Even with careful use of flashing to stop water from entering the wall, moisture will still most likely find an entry point. When it does, you may not notice the problem until it’s too late and the deck and wall are compromised.
Luckily, avoiding this problem is simple. Just pour foundation piers right next to the building. Then frame your deck right up to it, but don’t cut into the wall. Leave a small space of perhaps 1/4-inch between the siding and deck beam to allow moisture to escape. Do this, and the frames of your deck and house will stay dry and strong.
Choose Wood That Will Last
Nearly as important as choosing lumber thick enough for your deck is choosing the right sort of lumber. Most “regular” wood won’t stand up to the elements for long, especially if your deck gets rained on regularly. That’s why there are only two lumber options for anyone serious about deck longevity: Eastern white cedar or pressure-treated spruce.
Both have compounds within their fibers that stave off rot far better than other wood types. Cedar contains naturally preservative oils, and pressure-treated lumber has been bathed in chemicals so rot is much less likely to happen. I used cedar for my deck since it was available at a good price from a local sawmill.
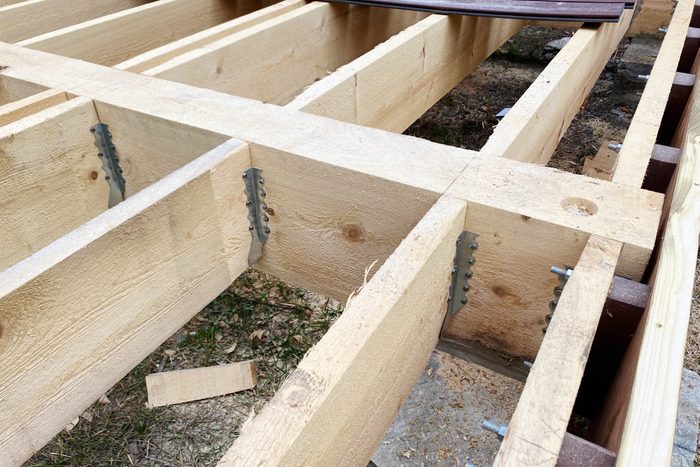
Minimize Wood-On-Wood Contact
Even rot-resistant wood won’t stop moisture from destroying your deck frame if it can’t dry out after each rain. That’s why it’s wise to minimize wood-on-wood contact as you build the frame.
Instead of building your beams tight to the joist, leave a small gap between their ends. This will let rainwater trickle down and escape, rather than being trapped against the end grain of your beams. Leaving these gaps won’t affect the deck’s strength, because the beams will be bolted into the foundation piers and tied together by the joists. Looking for a deeper foundation system? Check out our guide to helical piers.

Use Stainless Steel Or Galvanized Fasteners
If the nails or screws holding your deck together rust away, your deck will eventually fall apart. That’s why you should use fasteners that never rust or are extremely rust-resistant.
For my deck, I fastened all my joist hangers with large-head stainless steel nails. These are expensive but guaranteed to last. Another option: hot-dipped galvanized framing nails. When fastening decking to the top of the frame, if you go with screws, choose polymer-plated, not zinc-coated.
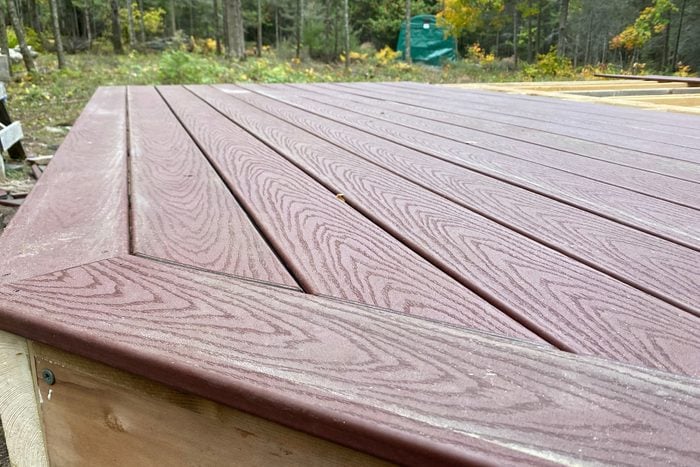
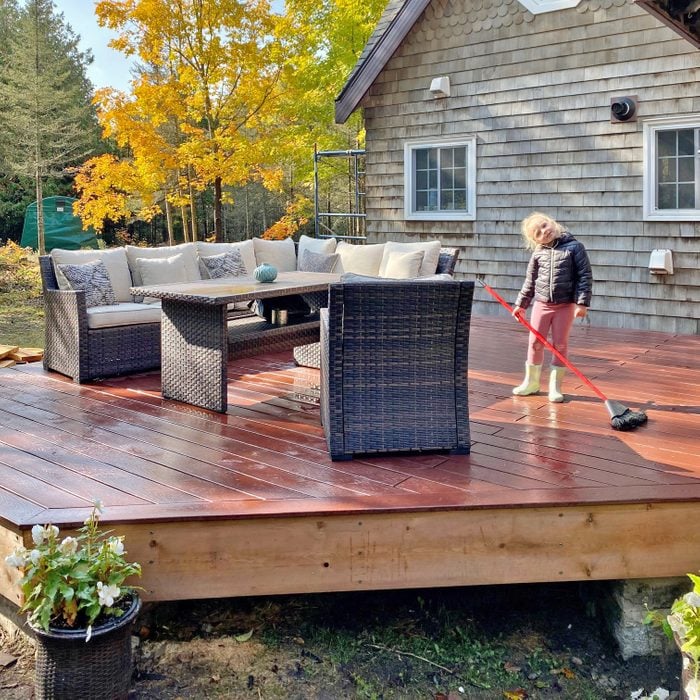
Use Composite Decking
Wood is still by far the most common choice for decking material. Trouble is, it’s rot prone and difficult to keep looking nice. That’s why I went with composite decking material for mine, and recommend you do the same.
It costs more than wood but will never chip, splinter or rot. It also doesn’t need finishing, unlike wood, which needs to be sanded and recoated every few years.
Some composite lumbers are also compatible with invisible deck fastening systems, so you won’t have ugly visible nails and screws. Just be sure to research different composite decking options before building your frame, since composites have specific joist spacing requirements.
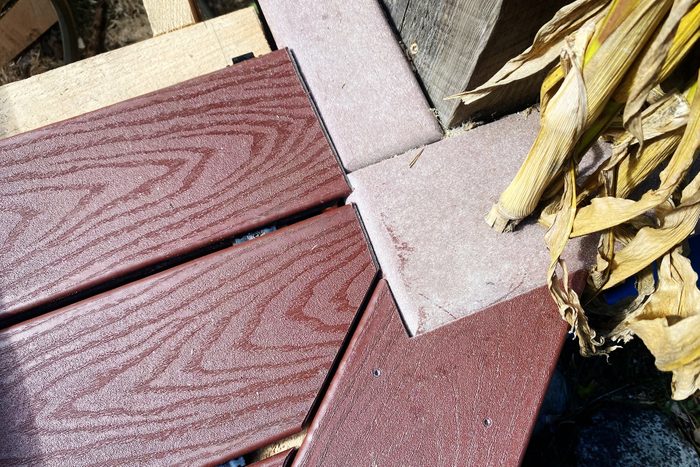
Leave Gaps For Water to Escape
Whether you go with wood or composite decking, never to make the joints super tight. Leaving at least 1/8-inch of space between all deck boards is a wise policy. The reason is rot avoidance.
Tight joints trap dirt and moisture, which will keep your deck boards wet indefinitely and cause rot if they’re wood. Even if you go with composite decking, tight joints will hold moisture against your underlying frame, increasing the risk of it slowly rotting beneath your feet.
Originally Published: October 24, 2022