
Easy Lawn Care Tips
Updated: May 16, 2022Get a greener, healthier lawn with less work!
Tip 1: Apply a preemergence herbicide to stop crabgrass
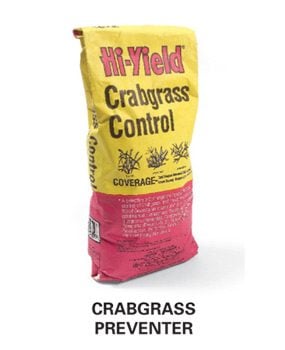
The easiest way to stop crabgrass is to nail it before it starts growing. Apply a preemergence herbicide after your second mowing in the spring. Crabgrass grows from seeds scattered in previous years. The herbicide keeps those seeds from germinating. The seeds may remain viable for several years, so it’s best to apply herbicide every spring. One springtime application will vastly reduce the need to attack crabgrass later in the year once it has sprouted. For more information on fighting crabgrass, type “weed” in the search box above.
Tip 2: Add mulch to protect trees and avoid trimming
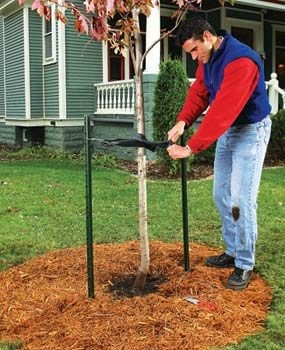
Clipping the grass around trees by hand is time-consuming. By adding a 4-in.-deep ring of mulch, you eliminate that chore. You’ll also better protect newly planted trees and bushes. Nursery pros report that the most common reason young trees die is that lawn mowers and weed whips damage the bark. For a neater look, surround the mulch with a plastic, metal or brick border.
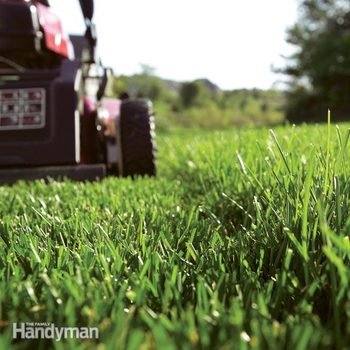
Tip 3: Set you mower blade at the right height to control weeds

Cutting grass too short weakens it. Longer grass grows stronger and thicker and crowds out weeds. Weed seeds can’t germinate easily since they don’t get much light. Established weeds have a tougher time competing with the surrounding turf.
Each type of grass has an ideal mowing height to maintain its health and thickness. It’s about 2-1/2 in. for most cold-climate species. Cut most warm-climate grasses a bit shorter: 1-1/2 to 2 in. If you’re not sure of your grass type, take a sample to a local nursery. Or type ‘identify grass’ into an online search engine for help. Although most lawns contain a mix of grass types, they should have similar ideal cutting heights.
Video: Mowing the Lawn to the Right Height
There is more to a healthy lawn than watering and fertilizing. Mowing the lawn to the right height is important for healthy grass. Travis Larson, senior editor at The Family Handyman, will show you how to determine what height is optimal for cutting your grass. Each type of grass has a recommended cutting height.
Tip 4: Plant hardy ground covers in shady areas
Grass is a sun-loving plant. It typically needs six to eight hours of sunlight daily for good health. While several shade-tolerant species may do OK under trees and in other sheltered spots, it’s more likely that you’ll end up with weeds, scraggly grass and bare ground. It’s much better to plant a shade garden or a shade-tolerant ground cover that in a few years will blanket the area like a green carpet. And you won’t have to mow. A local nursery expert will advise you on which plants and ground covers do best in your region.
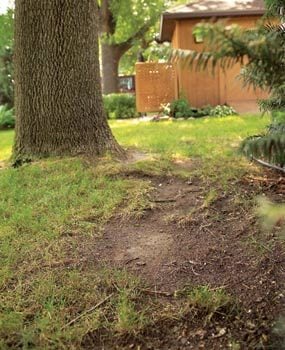
Tip 5: Build paths that you can mow right over
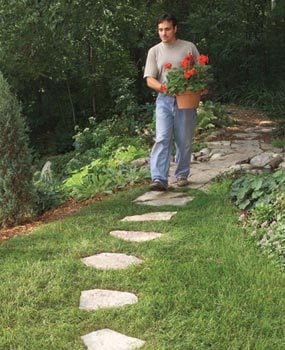
Paths that conform to the landscape require less upkeep than more formal paths that include steps, walls and curbs. The key is to set the stones or pavers no higher than 1 in. above ground level. Then you can mow right over them—no trimming!
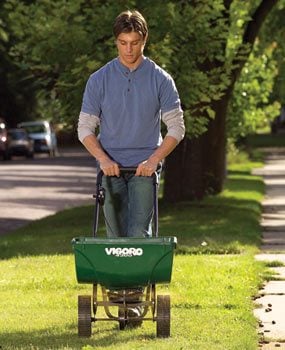
Tip 6: Fertilize in the fall
If you want the best lawn in town, fertilize four times a year. But you can keep it simple and still have a great lawn if you only fertilize once—in the fall. Choose a fertilizer that’s labeled 4-1-2. (Those numbers refer to the percentages of nitrogen, phosphorus and potassium in the fertilizer.) Better yet, ask an expert at a garden center for advice about the best fertilizer blend for your grass type and local soil conditions. Apply the fertilizer about three weeks before the last mowing of the season. Fertilizing in the fall provides energy and nutrients for the grass roots as they multiply in cooler weather before the grass goes dormant. The roots store food for the winter as well, which gives the grass an initial growth spurt when it emerges from dormancy in the spring.
Tip 7: Install mowing borders
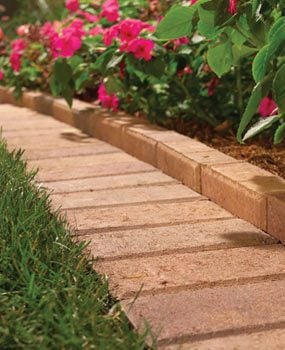
Brick mowing border
A mowing border eliminates the grass-clipping chore. If you don’t have mowing borders, a good lawn edger is key.
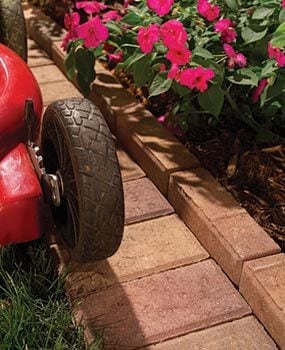
Mowing borders keep grass from growing along flower beds, walls, fences and other obstacles where your lawn mower can’t reach. You can run your mower right over the borders and clip off every blade of grass. You’ll save time and effort because you won’t have to go back and trim later.
For long-term success, follow these two guidelines: (1) Install a border that’s at least 4 in. deep.This keeps grass roots from creeping under the border and sprouting in the flower bed or along the fence. (2) Set the top of the border 1/2 to 1 in. above the ground. This keeps grass from creeping over the border.
Tip 8: Mulch planting beds for less weeding and watering
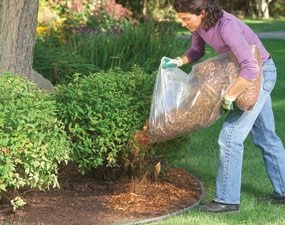

A layer of mulch, usually shredded wood or bark, vastly reduces gardening chores. It discourages weeds by shutting out light to the soil and keeping weed seeds from germinating. It reduces the need for watering by slowing evaporation. And it enriches the soil as it breaks down, reducing the need for fertilizer.
Apply a 4-in. layer of mulch to the bare soil for best results. It’ll gradually decompose, so you’ll have to replenish it every few years. For more information, type “mulch” in the search box above.
Required Tools for this Project
Have the necessary tools for this DIY project lined up before you start—you’ll save time and frustration.
- Tape measure
Required Materials for this Project
Avoid last-minute shopping trips by having all your materials ready ahead of time. Here’s a list.
- Border materials like bricks and pavers
- Fertilizer
- Mulch
- Preemergence crabgrass preventer
