How To Build a Super-Sized, Rugged Garden Cart
Updated: Jan. 03, 2024
Multiple Days
Intermediate
$51–100
Introduction
This DIY garden cart carries more than a wheelbarrow and is easier to load. We’ll show you how to build it in just a handful of steps.
Tools Required
- Adjustable wrench
- Angle grinder
- Belt sander
- Chalk line
- Circular saw
- Clamps
- Combination square
- Corded drill
- Cordless drill
- Countersink drill bit
- Drill bit set
- Drill/driver - cordless
- Extension cord
- Framing square
- Hammer
- Handsaw
- Hearing protection
- Miter saw
- Safety glasses
- Sawhorses
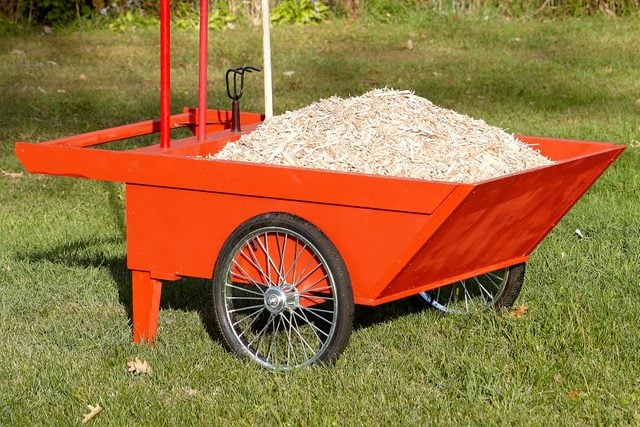
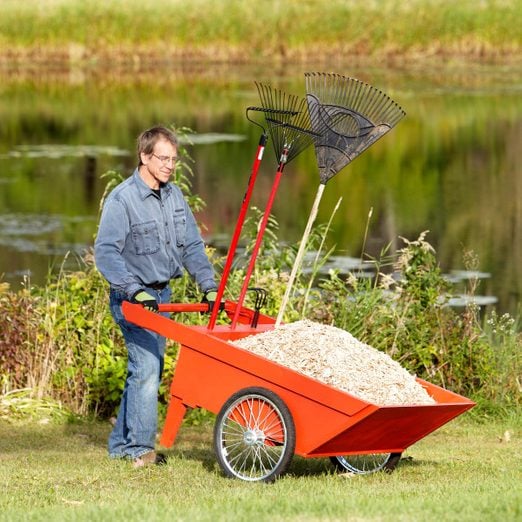
Wheelbarrows are great for hauling stuff around the yard, but they have their limits, especially if you’re working on a hill, trying to negotiate steps and rough terrain, or moving a lot of bulky material like leaves and branch trimmings. Make life easier with this large garden cart. Two wheels mean it doesn’t tip; large pneumatic tires mean it’s easy to push; a big box lets you haul bigger loads; and because the front tilts down for loading, you’ll have to do less lifting.
We designed this cart to be as rugged and durable as any cart you can buy at any price, yet the materials cost don’t cost much more than a hundred bucks. It’s one of the wisest landscaping investments you can make.
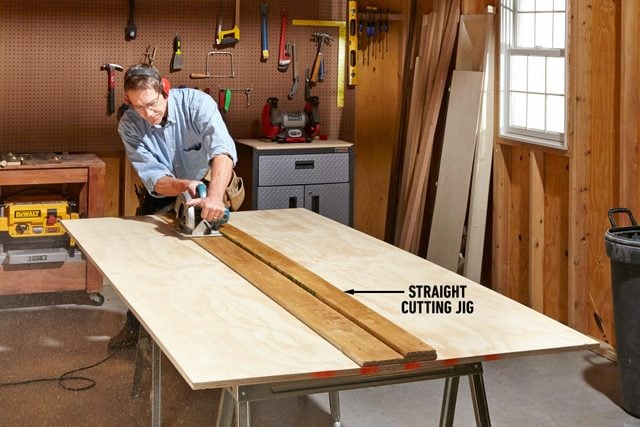
You’ll need a straight-cutting jig to cut the plywood with your circular saw. We used exterior plywood and standard pine boards for the structure. You can use treated plywood and lumber, but it may be hard to find treated material that’s dry and flat.
The wheels and threaded rod, washers and nuts should be available at home centers and hardware stores.
Project step-by-step (9)
Cut the parts
- A homemade straight-cutting jig turns your circular saw into a precision plywood slicer.
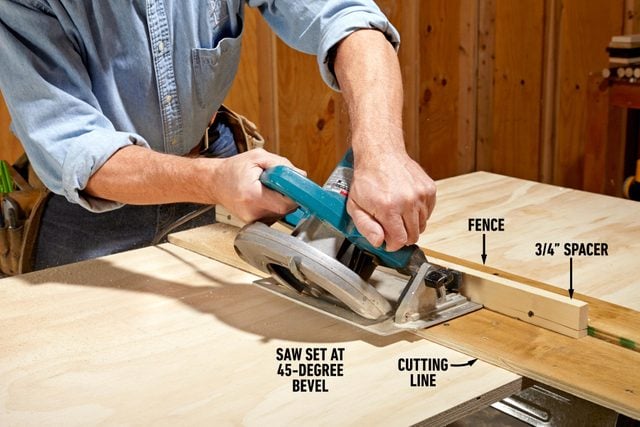
Cut the beveled edges
- Screw a spacer to the fence of your jig and line up the edge with your cutting line just like you would for a standard cut.
- Make the long 45-degree cuts.
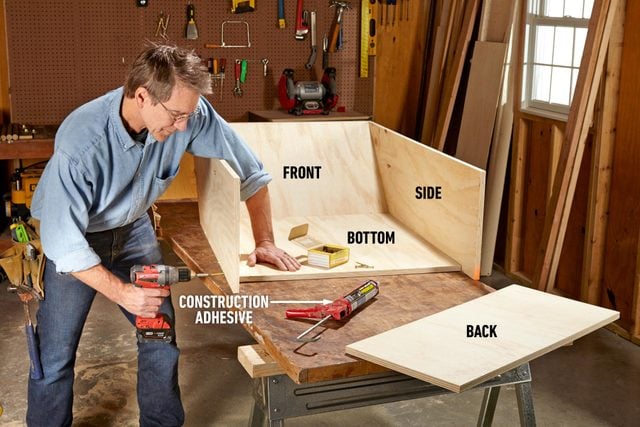
Build the box
- Secure the panels to one another using construction adhesive and 2-in. screws.
- Drill pilot holes to avoid splintering the edges of the plywood.
- Flip the cart upside down and install the three bottom braces (E).
- Lay out the plywood as shown in Figure B.
- Drill 1/8-in. holes about 3/8 in. away from the edges of the sides (A), spaced about 4 in. apart.
- Then secure the front with 2-in. exterior screws through the pre-drilled holes in the sides.
- Note: To ensure maximum sturdiness, use construction adhesive for all the connections—even for the metal corners.
- Install the bottom flush with the edges of the sides (A).
- Note: Make sure the front beveled edge of the bottom makes solid contact with the bottom edge of the front (C).
- Add the back (B).
- Pro tip: If you’ve cut and assembled everything correctly, there will be a 3-1/2-in. cavity at the back of the box to accommodate the tool rack. If it’s a little larger or smaller, no big deal.
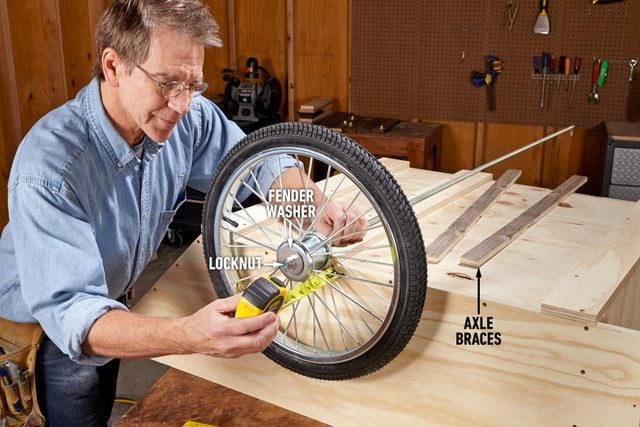
Install the wheels
- Install a washer, a wheel, another washer and a locknut on one end of the threaded rod.
- Measure the overhang required by the wheel assembly, add that length to the other end, then cut the rod to length.
- Install the cart axle braces and cover.
- Turn the cart box upside down.
- Secure the bottom braces (E).
- Secure the middle bottom brace so the center of it is exactly 20-3/4 in. away from the back of the back bottom brace (E).
- Note: If you don’t get this positioned right, it will affect the balance of the cart.
- Position this assembly snugly against one side of the cart and measure the amount of space it takes up.
- Transfer that measurement to the other end of the rod and mark the rod.
- Cut the rod and install the other wheel assembly.
- Pro Tip: Before cutting the rod to length, twist a regular nut onto it beyond the cut mark. After making the cut, twist the nut off; it will “recut” any damaged threads so the locknut will go on easier.
- Apply glue to the cart axle braces (F), snug them tightly against the axle, then secure them to the middle bottom brace (E) with 2-in. screws.
- Install the axle cover (G).
- Note: If you want to strengthen the wheel assembly for hauling heavier loads, use oak for the middle bottom brace, two cart axle braces and cover.
Install the legs
- Apply two beads of construction adhesive, clamp the legs into place and secure them with screws.
- Note: The spacer block positions the leg, leaving room for the tool rack.
Strengthen the corners
- Cut aluminum angle stock to length, then drill holes and countersink “dimples” for the screw heads.
- Install the corner braces using construction adhesive and screws.
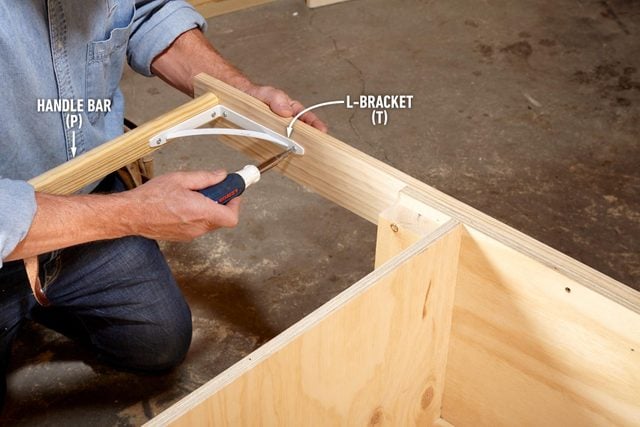
Install the handle bar
- Secure the handle bar by driving screws through each handle into the end of the rail.
- Add the L-brackets to beef up the connection.
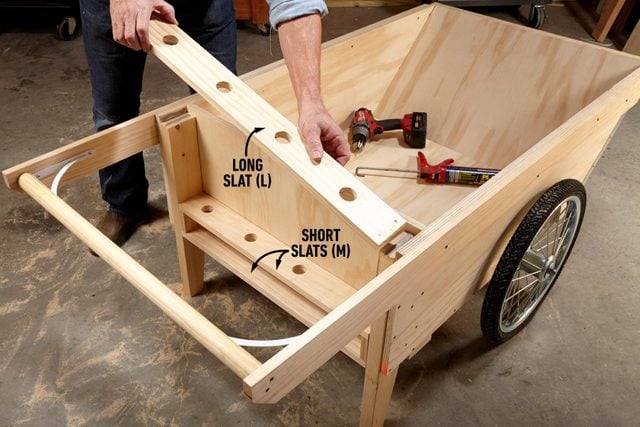
Add a tool rack
- Cut three tool rack slats and drill holes for to fit your garden tool handles.
- Use adhesive and screws to install the slats.
- Cut the legs and screw them to the protruding sides.
- Pro tip: Use the spacer block as shown so the legs can accommodate the upper tool rack slat.
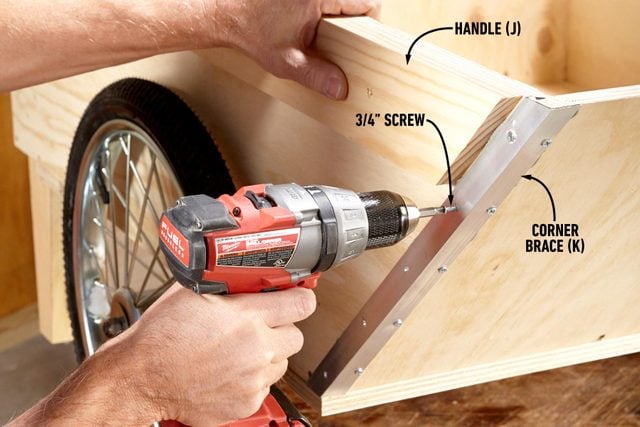
- Cut and install the handles (J), leaving space at the front for the aluminum angle.
- Cut two lengths of aluminum angle.
- Note: Don’t try to measure them; just hold them in place and mark them for cutting.
- Drill holes and drill countersink “dimples” for the heads of the screws to nest into.
- Install the aluminum using adhesive and 3/4-in. screws.
- Position the handle bar (P) and add the L-brackets (Photo 7) to reinforce the handle.
- Install the three tool rack slats.
Paint the cart
- Remove the wheels and apply a coat of high-quality exterior primer, followed by two coats of exterior paint.
- Pro tip: To keep your cart in good condition, store it inside; if it will be outside, flip it upside down on a couple of scrap 4x4s.