
How to Build a Backyard Oasis
Updated: Mar. 10, 2024
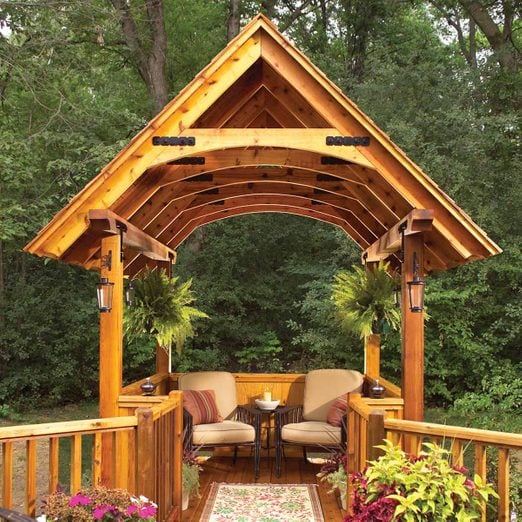
A shaded retreat that's surprisingly easy to build. Place it next to your deck or anywhere in your yard.
Multiple Days
Intermediate
More than $1000
Introduction
If you treasure your time outdoors, this simple shelter is the perfect retreat for you. It’s open and airy, yet it’ll shade you from that hot afternoon sun as well as keep you dry when it rains. We designed it so you can easily connect it to your existing deck. Or you could build it freestanding in your yard. In either case, it’ll quickly become your favorite destination!
In this article, we’ll show you how to assemble this structure step by step. Don’t be intimidated by the “post and beam” design. It’s not difficult to build, and we’ll walk you through the key details. We’ve simplified the difficult steps with goof-proof techniques—like positioning the posts with a 2x4 frame and shaping the ends of beams with a circular saw. If you’ve tackled jobs like basic deck building or wall framing, you can build this shelter. You’ll need a miter saw and a table saw to make the angle cuts on the walls. A brad nailer will save you time but isn’t absolutely necessary.
You’ll need at least three full weekends and occasional help from a friend to complete the job. Our total materials cost was almost $3,000, but you can save a bundle by choosing different building materials.
Materials Required
- 10d galvanized nails
- 1x12 x 8' cedar (wall boards) (12)
- 1x2 x 8' cedar (rails & battens & fascia) (30)
- 2-in. deck screws
- 2x10 x 12' (sister joists) (2)
- 2x10 x 8' pressure-treated (rim joists) (4)
- 2x12 x 12' cedar (collar ties) (3)
- 2x2 x 8' (wall plates and studs) (13)
- 2x4 x 12' (diagonal brace) (1)
- 2x4 x 14' (frame) (3)
- 2x4 x 8' (frame & bracing & stakes; see Photo 3) (6)
- 2x4 x 8' (joist ledgers) (2)
- 2x6 x 8' (floor joists) (5)
- 2x6 x 8' cedar (wall bases and caps and rafters) (19)
- 3" galvanized nails
- 4' x 8' T1-11 plywood (wall sheathing) (3)
- 4x6 x 8' cedar (short wall posts) (1)
- 5/4x6 x 10' (decking & roof sheathing) (49)
- 5/8" x 2-1/2" bolts and nuts (48)
- 5/8" x 2" lag screws (48)
- 6d galvanized finish nails
- 6x6 cedar (corner posts; lengths vary) (4)
- 6x6 x 10' (beams) (2)
- 8" tube forms (4)
- Anchor bolts (4)
- Angle brackets
- Concrete mix
- Construction adhesive
- Joist hanger nails
- Joist hangers (8)
- Post bases (4)
- Straps (24)
- T-straps (8)
Project Plans
Planning Your Shelter
The floor can stand as little as 14 in. above ground to about 8 ft. above ground. But if you build it more than 4 ft. above ground, you’ll have to add diagonal “knee braces” between the posts and the floor (consult a structural engineer on this detail). The floor can be level with the deck or stand higher or lower and include stairs.
When you apply for a building permit, ask your inspector about local requirements, including how deep to dig the footings. Be sure to include bridge plans. For a bridge more than 4 ft. long or 4 ft. wide, your inspector may require that you strengthen the deck itself. A few days before you dig the footing holes, call (888) 258-0808 to have utility lines marked.
Most home centers carry 6x6s only as treated lumber. If you want a different wood, you may have to special-order it.
Project step-by-step (12)
Set the Footprint: Position Posts Perfectly with a Layout Frame
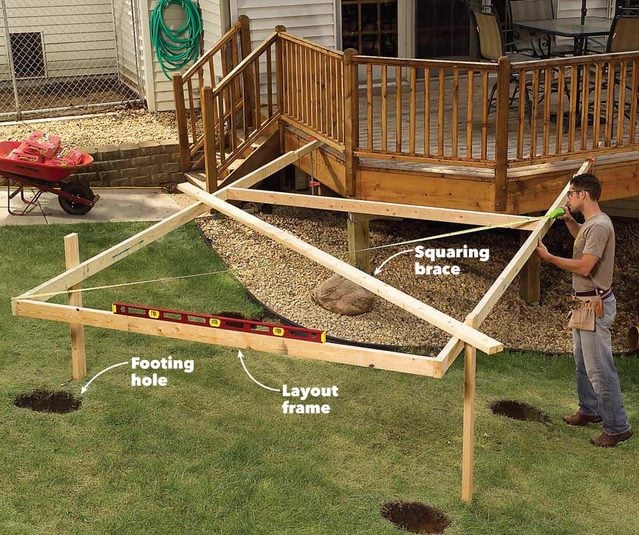
A layout frame makes positioning footings and posts foolproof. Later, it helps you determine post heights and position the floor framing (Photo 4).
Screw two 2x4s (94-1/2 in. long) between 14-ft. 2x4s to form a square with inside dimensions of 94-1/2 x 94-1/2 in. Square the frame by taking diagonal measurements and add a diagonal brace. Rest the frame’s “legs” on the deck, position the frame and make sure it’s parallel to the deck. Then clamp or screw the legs to the deck. Support the other end with upright 2x4s. Roughly level the frame.
Hang a plumb bob from each corner of the frame to locate footings (similar to Photo 2). The plumb bob locates the outer corner of each post, not the center. Mark the footings using spray paint. Buy a plumb bob on Amazon now.
Slide the frame out of your way so you can dig the holes. But first, trace around the frame’s legs on the deck with a pencil to mark their exact positions. When the holes are complete, move the frame back into position. Double-check to make sure the frame is square, perfectly positioned and level. Add extra vertical supports so the long 2x4s won’t sag.
Pour the Concrete Footings
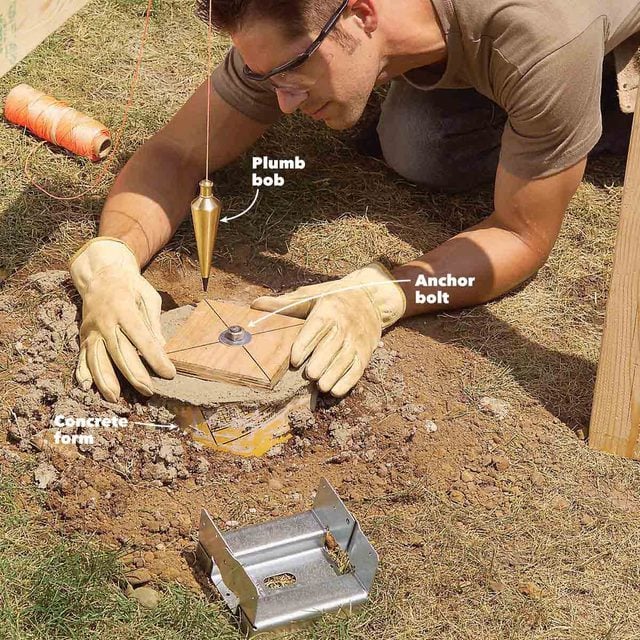
Pour 12 in. of concrete into each hole, set the tube forms into place, backfill around them and fill them with concrete. To position the anchor bolts perfectly, cut four 5-1/2 x 5-1/2-in. “bolt blocks” from plywood. Drill a 5/8-in. hole at the center of each block, insert the anchor bolt and add the nut. Set each bolt into the wet concrete. Then stand up and eyeball the block to make sure it’s parallel to the layout frame. The blocks leave impressions in the concrete. When the concrete hardens, use those impressions to position the post bases. Learn how to properly mix concrete here.
Attach the Vertical Posts
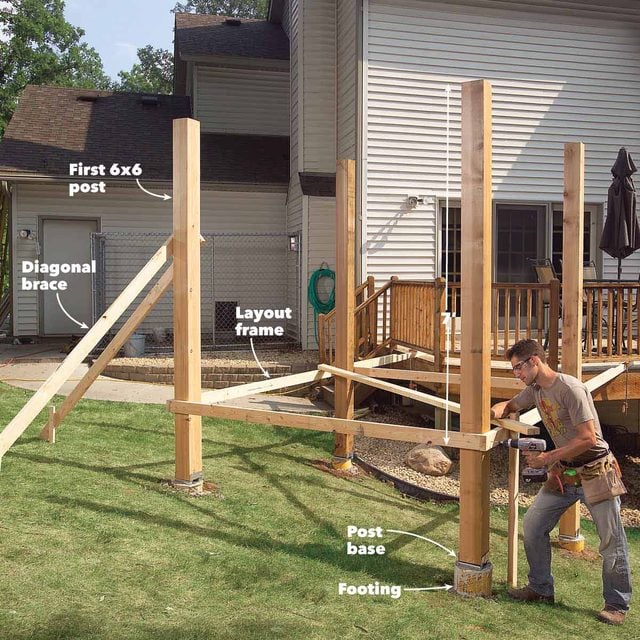
Next, cut the posts(A) to length. To determine the length of each post, measure from the post base to the layout frame. Then add 7 ft. to that measurement. A 7-1/4-in. circular saw won’t cut through a 6×6, so cut from all four sides and finish with a handsaw.
Recheck the position of the layout frame. Set one of the back posts first. Add braces to hold it plumb. Set the other posts, then check each one with a level. If a post is out of plumb, don’t simply shove it into position—the layout frame will push the others out of plumb. Instead, slip a wrench inside the post base and loosen the nut on the anchor bolt. The oversized bolt hole in the base lets you move the base slightly and plumb the post. Don’t forget to retighten the nut.
Frame a Sturdy Floor Fast: Install the Rim Joists
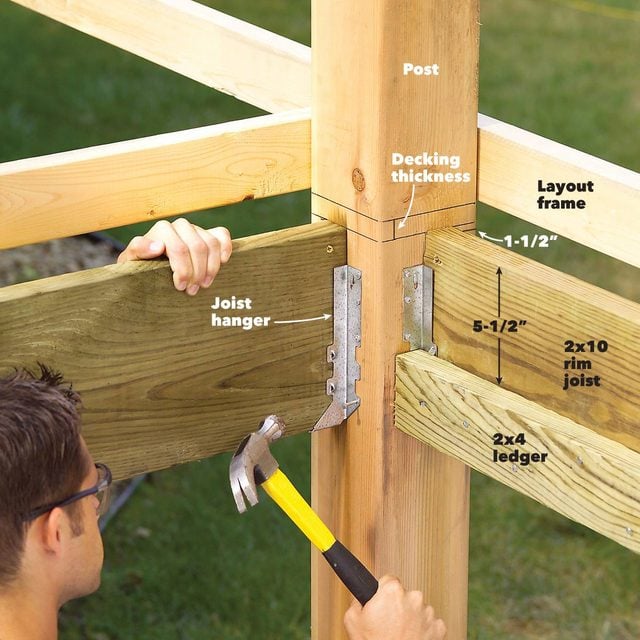
Measure down from the layout frame to mark the position of the floor framing on each post. Toe-screw each rim joist (B) into place and add the joist hangers. Be sure to inset the rim joists 1-1/2 in. from the outer edges of the posts. Remove the layout frame, but leave the post braces in place until you install the sidewalls.
Affix the Floor Joists
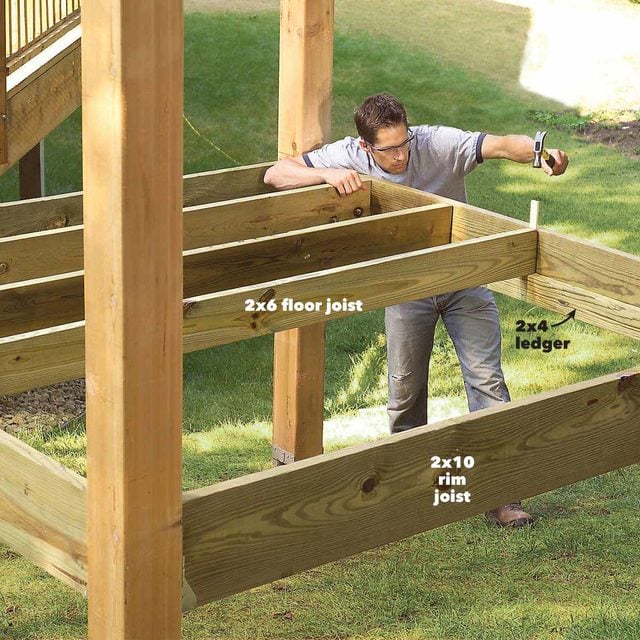
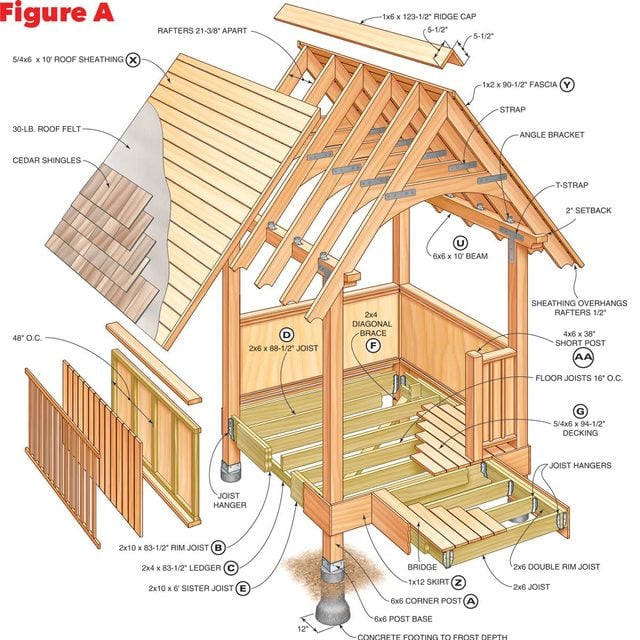
To support the floor joists, add ledgers (C) to two of the rim joists (Figure A), driving 10d nails every 4 in. Using ledgers is easier and faster than using joist hangers. Set the floor joists (D) on the ledgers and nail them into place. Then add the sister joists (E). Nail the diagonal brace (F) to the undersides of joists. Lay the deck boards as you would on any deck, flush with the sister joists. Check out more deck building tips here.
Frame the Walls
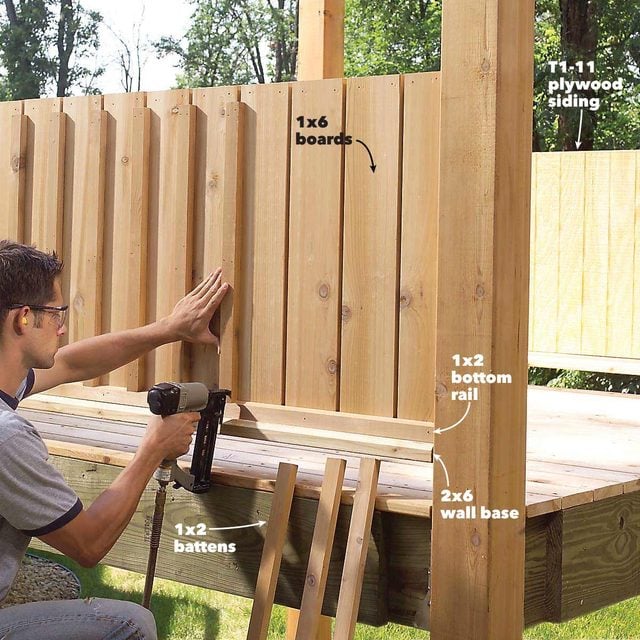
The walls that surround the alcove aren’t just for looks; they also stiffen the structure and make it safer.
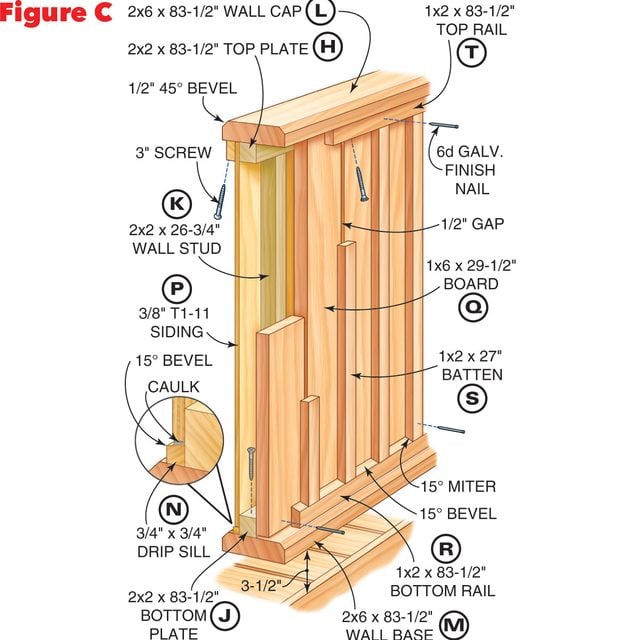
Build the sidewalls, but leave the rear wall off until the roof trusses are in place. Figure C shows all the details. To start, install the 2×2 wall framing (H, J, K). Chamfer the wall cap (L) and base (M) by tilting your table saw blade to 45 degrees. Check the posts for plumb before you nail on the plywood siding (P). Next, nail on the 1×6 boards (Q). Then tilt your table saw blade to 15 degrees and bevel the 1×2 bottom rails (R) so they’ll shed rainwater. Add the top rails (T) after all the battens (S) are in place. To install the wall caps (L), apply construction adhesive to the inner and outer top rails. Then predrill and drive screws up through the rails and into the cap. To avoid dents from dropped tools, we left the caps off until later.
Add Coves to the Beams
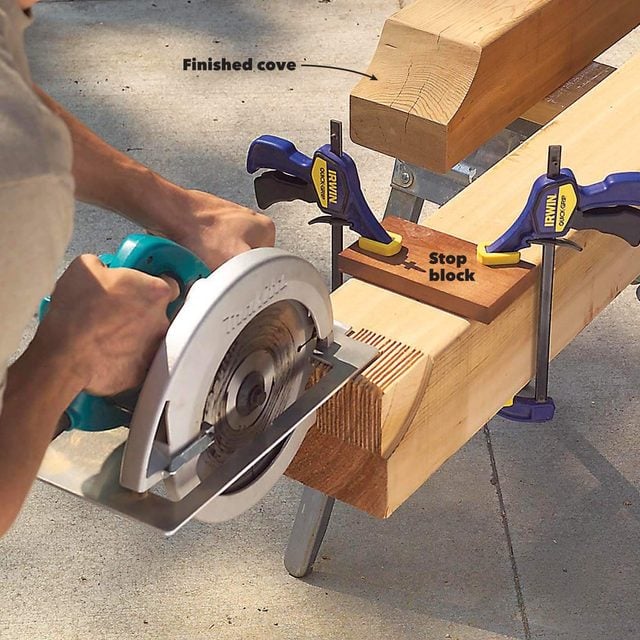
Coved ends give the beams (U) a more graceful look than square-cut ends. And there’s a fast way to do it using a circular saw. We first tried a 7-1/4-in. saw, but found that a slightly larger cove cut with an 8-1/4-in. saw looked better and was well worth the rental fee ($15).
Before you cut coves, determine the position of the stop block. We clamped our block 5-5/8 in. from the ends of each beam, but that measurement will differ with a different saw. Clamp your stop block to a 6×6 scrap left over from the posts. Cut until the saw bumps against the block, then measure the length and depth of the cut. Adjust the stop block until the length and depth are equal. Measure the position of the block and use that measurement to position the block on the beams. When you cut the coves, hold the saw flat against the beam; if you tip down the back of the saw, you’ll cut too deep.
Attach the Beams with T-Straps
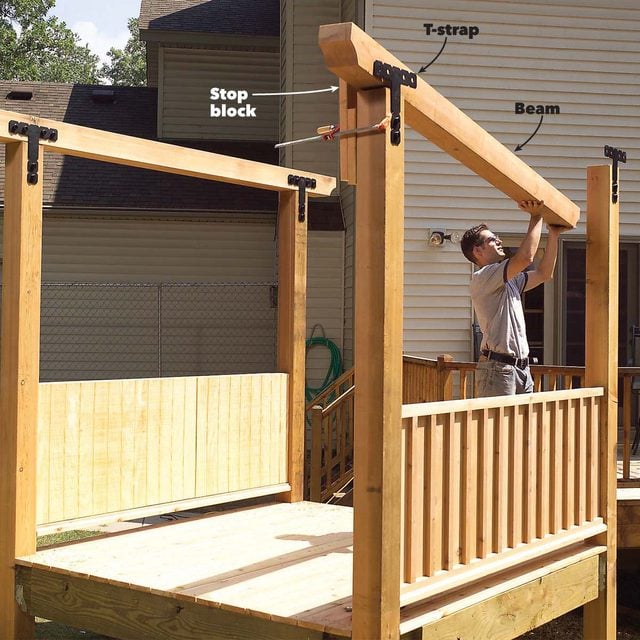
Set the beams on the posts and fasten them to the posts with T-straps. We spray-painted the heads of our lag screws black before installing them and touched them up with an artist’s brush after.
Cut the Collar Ties
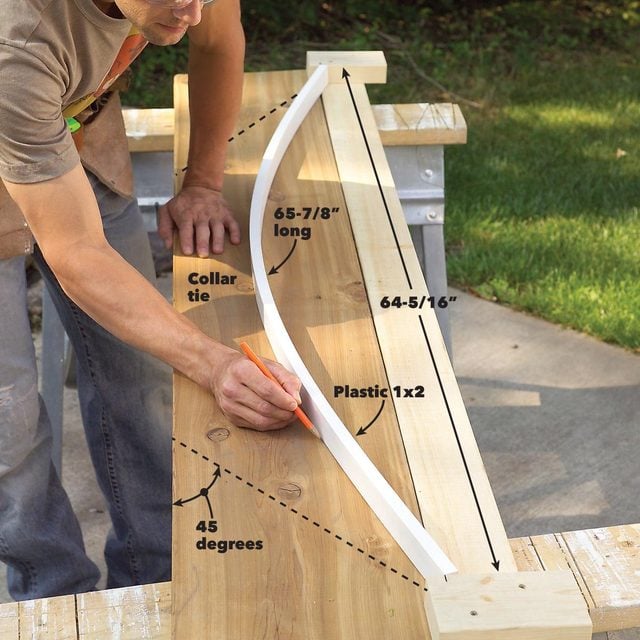
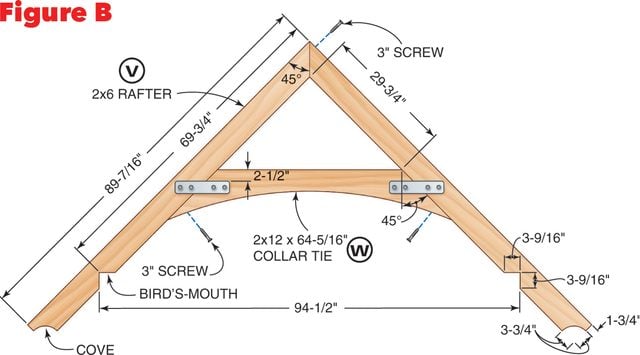
Building the six trusses is simple but time consuming. So consider building them in your garage before you break ground for this project. Figure B shows all the details.
First, mark an arc on the 2×12 collar ties (W). Screw blocks to a 2×4 and bend a “spring stick” between them. Plastic molding makes a perfect spring stick. Slide the jig to the left or right to avoid knots in the 2×12 and select the most attractive part of the board.
Assemble the Rafters
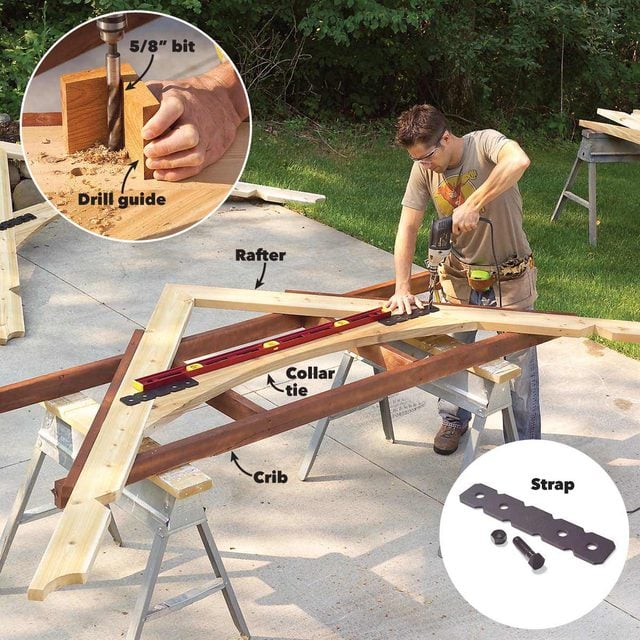
Next, cut the rafters (V). To assemble the trusses quickly and consistently, build a simple 2×4 crib that will hold the truss parts in position. Join the parts with 3-in. screws. Then line up the straps using a 4-ft. level. Mark the bolthole locations by drilling shallow holes. Then set the strap aside and finish the holes, using a guide to hold the drill bit perfectly vertical so the holes match up on both sides. The guide is simply two square blocks screwed together. Bolt on the straps.
Attach the Trusses
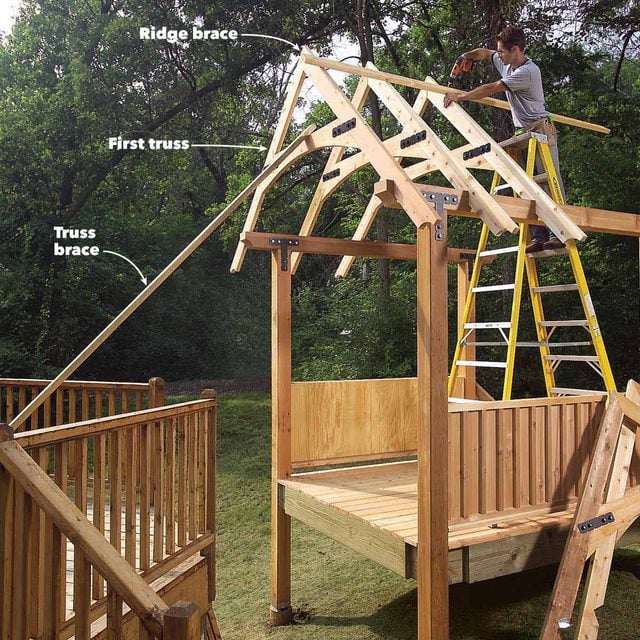
Mark the truss locations on top of both beams. Set the front truss first, fastening it with angle brackets (you’ll need 12 for this project – See Figure A).Then set and brace the remaining trusses.
Sheathe the Roof
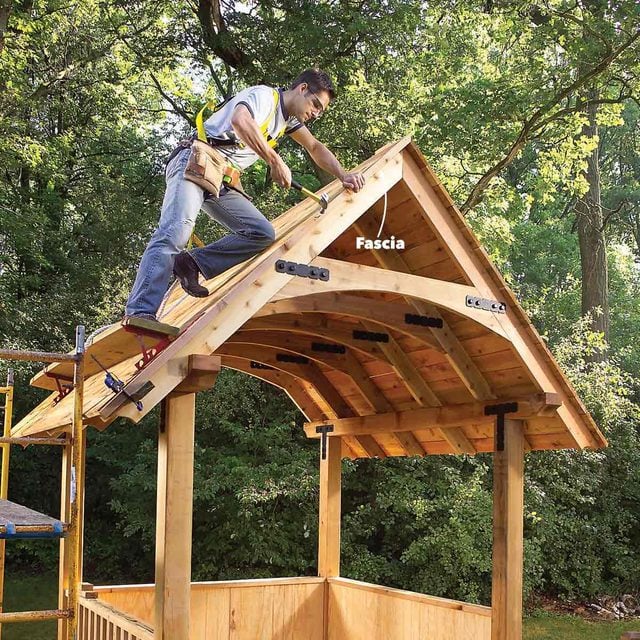
The bird’s-mouths may fit so tightly over the beams that it’s difficult to set the trusses. Here’s how to solve that problem: After the first truss, fasten only one side of each remaining truss. That way you can tug the beams inward as you set each truss. (To allow this, you must build the back wall only after the trusses are installed.) Fasten the loose side of each truss and build the back wall before you sheathe the roof with deck boards (X). Start at the bottom of the rafters, overhanging the first board by 1/2 in. and spacing the boards 1/4 in. apart. These boards will be visible from below, so be sure to lay the best side face down. Cover the ends of the roof sheathing with fascia trim (Y). Whatever type of roofing you choose, be sure to use short roofing nails that won’t pop through the underside of the roof sheathing.
The Bridge and Railings
The bridge is basically a small deck (see Figure A). After you frame and deck the bridge, add the 1×12 skirt boards (Z).
The front walls are just shorter versions of the walls shown in Figure B. If you can’t find 4x6s for the front wall posts (AA), you can cut them from 6x6s using a 10-in. table saw. To extend the deck railing, you’ll have to cut out a section of the existing railing and add two new railing posts, copying the existing ones. Then install the new railing, again copying the existing design. We finished all the exposed wood with transparent deck stain.
Next, learn how to build your dream shed with these full plans.