
How to Build a Wooden Walkway
Updated: Mar. 28, 2023
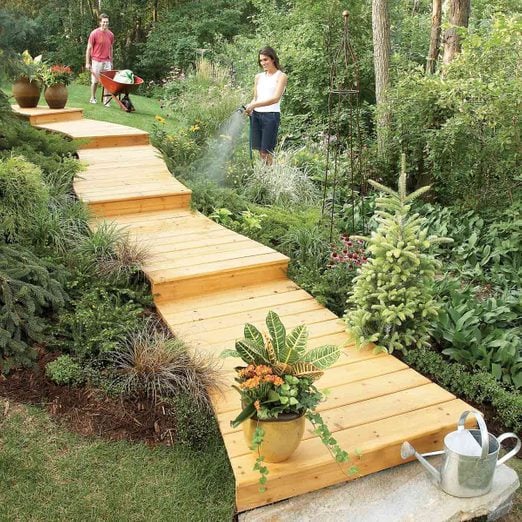
Create a boardwalk in your back yard
Multiple Days
Intermediate
$101–250
Introduction
A wooden walkway makes an attractive and inexpensive garden path, is simpler and less backbreaking to make than a stone or concrete path, and works well in sloping or wet areas.Tools Required
- Adjustable wrench
- Belt sander
- Circular saw
- Cordless drill
- Drill bit set
- Framing square
- Jigsaw
- Level
- Miter saw
- Posthole digger
- Router
- Safety glasses
- Sledgehammer
- Spade
- Speed square
Materials Required
- 16-ft. x 12-in. hardboard siding
- 2-1/2-in. stainless steel finishing screws
- 2x6 joist hangers
- 2x6 x 10-ft. (treated) boards
- 3-1/2-in. deck screws
- 4x4 x 10-ft. (treated) post
- 5/4x6 x 8-ft. deck boards
- Joist hanger nails
- Mason's twine
- Pea gravel
- Spray marking paint
Wooden Boardwalk Overview
Paths built with concrete, stone or pavers are expensive and labor intensive. They require a lot of digging, hauling of tons of materials and the disposal of tons of soil. If you’re looking for an easier path, consider a wooden walkway, especially for wet or sloped sites. Building with wood is far less backbreaking. You’ll have just a few holes to dig, and you’ll be hauling wood instead of stone. It can be cheaper, too. The walkway shown, topped with cedar decking, cost a few hundred dollars. (With treated wood decking, it would have cost less.) A wooden walkway also goes together much faster; this 40-ft. path took two of us two days to build. But enough chitchat—here’s how to build a walkway of your own!
Project step-by-step (14)
Figure A: Anatomy of a Boardwalk

Anchor each section of boardwalk with 4×4 posts. Overhang the decking enough to create room for curves.
This walkway design works best for a gradually curving or straight path—whatever length you need it to be. Generally, if it’s possible for you to pump your way up the proposed walkway route on a bicycle, you can build this project there. If the path has a steep slope in the middle and you’re skilled enough to build deck stairs, end your walkway at the top and bottom of the hill and bridge the hill with steps. If you just want a straight path, your job is simple. Just follow our instructions and skip all the business about curves. Place stakes at both ends and sides of the path spaced 30 in. apart. Next, string a line and mark your postholes every 8 ft. Then frame up each section using the same steps we show for a curved path.
Plan Your Walkway Path

This is true plan-as-you-go construction. Layout and construction start at one end of the boardwalk and proceed to the other. You determine the length and the number of level changes needed as you go. There’s no hard-and-fast materials list or cutting list; you’ll do a fair amount of shooting from the hip. Start by picking up a 16-ft. length of hardboard siding and laying out the path. If you can’t find hardboard, screw together strips of any 1/2-in. sheet good. Then you’ll be able to make up a preliminary materials list and get started.
Rip the 12-in. siding into two 6-in.-wide pieces and get some help to bend it to form the shape of your path. If you need longer lengths, overlap the siding a few feet and screw the pieces together to ensure a smooth curve. Only lay out one side of the walkway for this step. Start at the downhill end at the highest sloped side of your pathway, screwing the siding to stakes to hold the shape. Avoid tight curves if possible; gradual ones will simplify construction. When you’re satisfied, mark the inside of the form with marking paint and then pull it free. Store the siding indoors or moisture may ruin it. You’ll need it later.
This is a foot-traffic-only design—no Harleys or golf carts, please! For that reason, the footings are only 2 ft. deep, and the posts rest solely on gravel.
Buy the Materials

This walkway is made completely from treated 2×6 framing and 4×4 posts capped with 5/4×6 cedar decking, but you can use treated or composite decking if you choose. After you establish the length and shape of the walkway, it’s time to put together a rudimentary materials list. Because every site is different, we can’t provide a precise materials list. We can only give you a rough idea of what to get on your first trip to the lumberyard. We recommend spanning 8 ft. or less with every section even if you have long runs that don’t require steps. The truth is that you’ll be constantly adjusting the length of each section, and you’ll just have to try to use odd lengths of framing material as wisely as you can. But to get started, for every 8 lin. ft. of walkway, pick up:
- one 4×4 x 10-ft. (treated) post
- three 2×6 x 10-ft. (treated) boards
- eight 5/4×6 x 8-ft. deck boards
- two 2×6 joist hangers
- one 60-lb. bag of pea gravel
You’ll also need a box of screws or nails for joist hangers and special 3-1/2-in. construction screws to anchor the framing to the posts. We used the GRK brand, but you can use whatever construction screw is available at your home center or lumberyard. If you can’t find any, it’s OK to tack things together with 3-in. deck screws and then go back later and install two 3/8 x 3-1/2-in. lag screws wherever side and end joists rest at each post. And pick up decking fasteners. If you’re using synthetic decking, use whatever type is recommended. If you use wood, we recommend 2-1/2-in. stainless-steel finishing screws. They’re easy to drive and last forever, and the small heads will be almost invisible when you’re through.
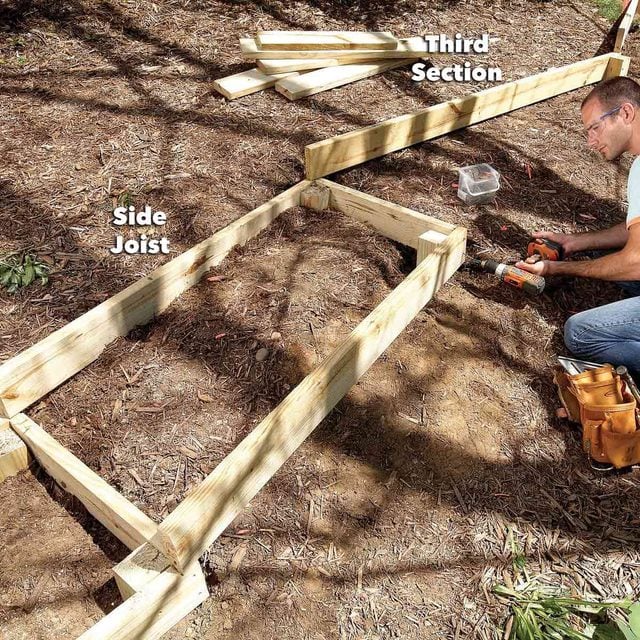
Start at the Bottom and Mark the First Joist
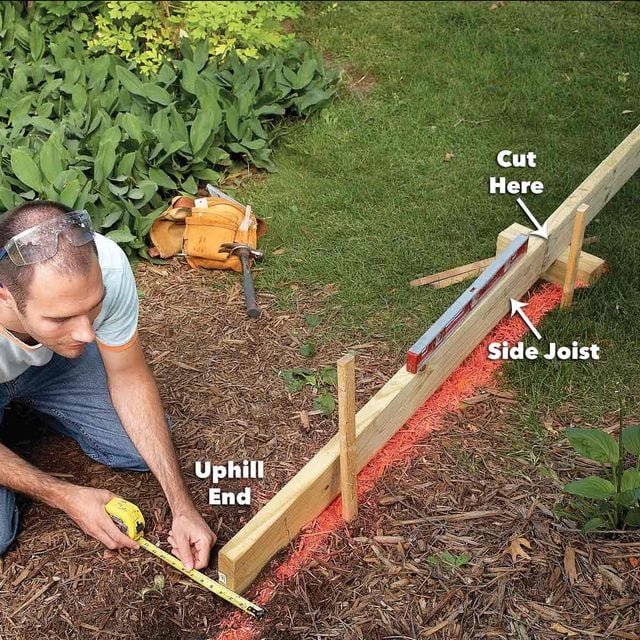
Use a 4×4 block to support one end of the first 10-ft. 2×6 side joist. Shift the joist up and down the hill until it’s level and spaced no more than 3 or 4 in. away from the paint line—anywhere. Mark the post positions and cut the side joist to length.
Dig Postholes

Mark the posthole using the joist as your guide. It’s OK to dig the uphill end of the board into the hill a few inches to make the section as long as possible. But don’t go above the top or your decking will be in the dirt. But don’t go above the top or your decking will be in the dirt. The uphill end of the board will define one end of the section; the 4×4 defines the other end. Cut the side joist to length and then replace it to mark the post locations. Stake posthole centers about 2 in. in from the board sides and 3 in. away from ends. Then move the joist aside and dig 2-ft.-deep postholes.
Level the Joist
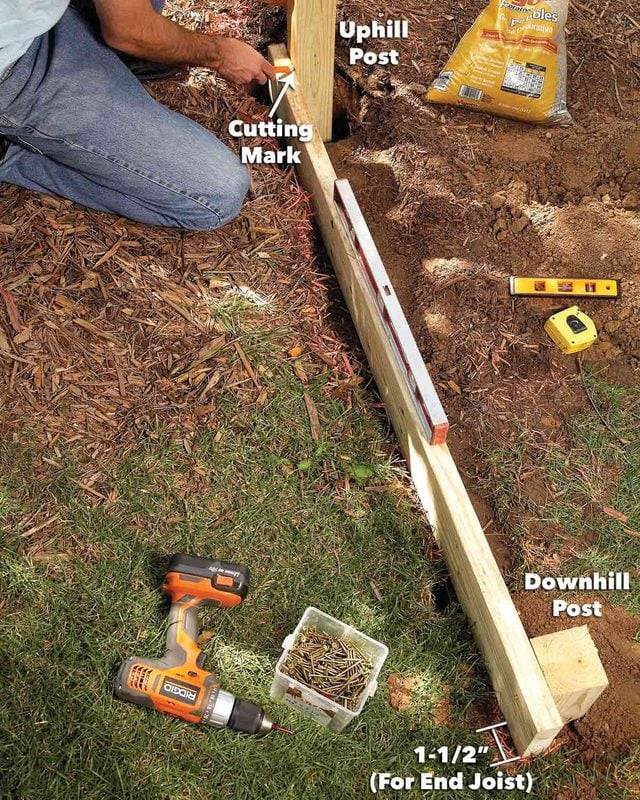
Dump about 6 in. of gravel into each hole and place the first post in the hole to mark the cutting height. (Rough-cut long posts shorter to make them easier to work with.) Remove the post, cut it to length and then fill around the post and screw on the side joist. Then level the side joist and use it as a guide for marking and then cutting the uphill post. Screw the side joist to the posts with two 3-1/2-in. construction screws and then start the next section.
Mark the Next Joist
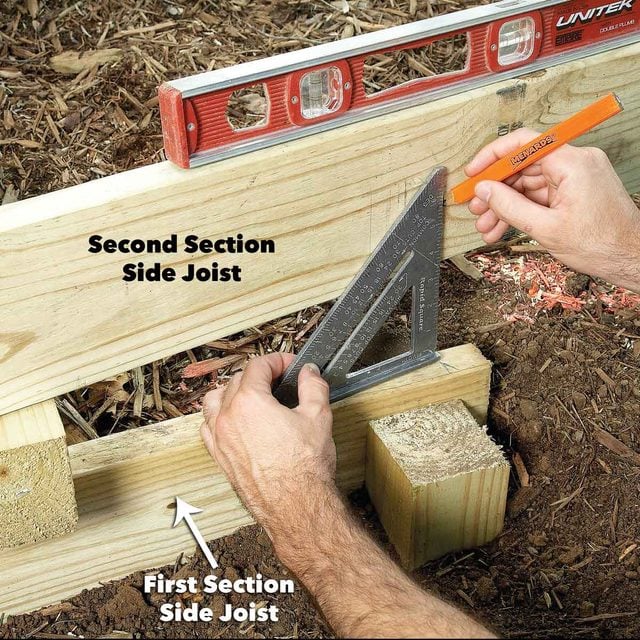
Rest the next stepped side joist on the 4×4 spacer over the first section’s side joist. Then adjust the position and cut it to length, allowing for a 1-3/4-in. overlap and toe-screw this end into place. Mark and cut the joist and assemble as before. Finish framing this entire side of the walkway before beginning the other.
Add the End Joists

Start on the other side of the walkway by cutting a 27-in.-long end joist for each step. Then use the joists to set each post location. At both ends of the walkway, set the posts so they’re square with the opposite side joist. On the others, position the posts so the angle between the end joist and the two side joists is roughly the same. You can just “eyeball it” to compare the angles. They don’t have to match perfectly, just close. Then dig each hole and cut and set the posts and end joists as you did on the other side.
Add the Other Side Joist
Cut and attach each side joist for each section before continuing to the next level.
Add Center Joists
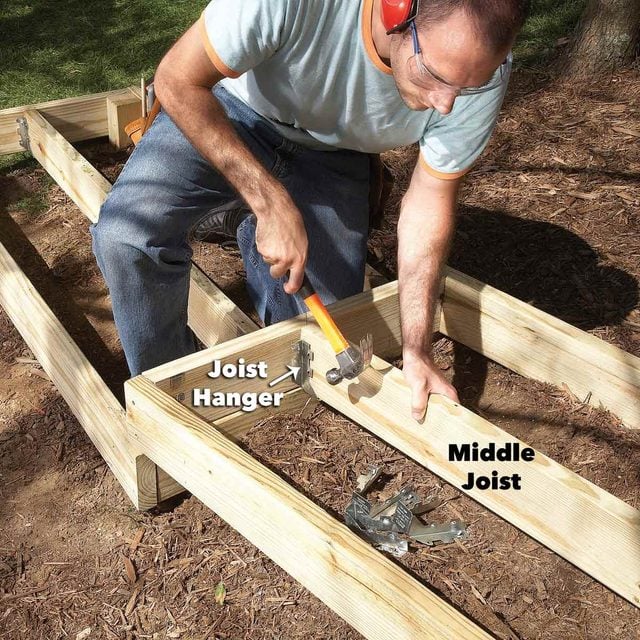
Finish up each section by adding the center joists and anchoring them with 2×6 joist hangers. Support the middle joists with joist hangers after centering and tacking them into place.
Install the Decking
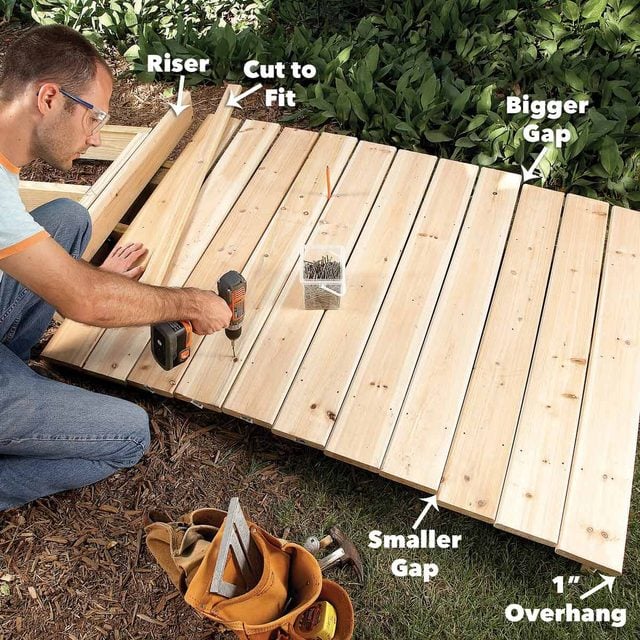
Cut the 8-ft. decking into 4-ft. lengths. Screw one board to each riser at level changes. Space the decking, tapering the gap as needed. The first board should overhang the riser by 1 in. and overhang equally at both ends. Then dry-fit the other boards, spacing them as needed to handle the curve. You’ll have to play with this for a bit on each section. Most of the time you’ll be able to simply open up the decking gaps at one side a bit more than at the other (see “Decking Tight Curves,” below). Once you’re satisfied, screw the boards down. You may have to taper-cut the last filler piece at the step to even everything out. Don’t beat yourself up striving for perfection. You’ll be the only one who’ll notice small variations in the size of the gaps.
Mark Curves for Cutting
Shape the curves by bending the hardboard siding and scribing against it. Do one section and one side at a time. Try to keep the curve 1 to 3 in. away from the joist below. Use blocks or grab a helper to hand-hold the curve while you scribe the first section. Cut off the ends with a circular saw for gradual curves or a jigsaw for tighter ones. At each step, you’ll need to remove the riser and the last deck board or two so you can cut them individually. Drive stakes against the cutoff ends of the first section. Screw the siding against them to form an even, flowing curve, then anchor the siding onto the next section with blocks while you trace the curve. Cut those ends off and repeat the process along the entire side.
Cut the Opposite End
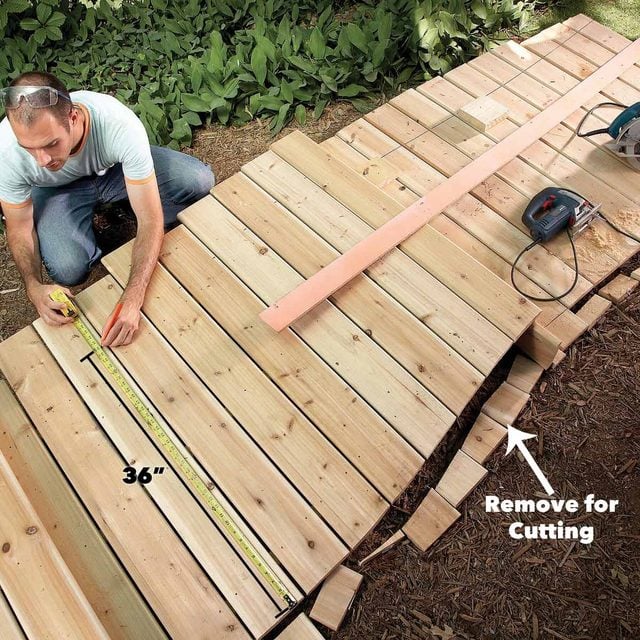
When one side is complete, transfer the curve to the other side by making a series of 36-in. marks on the other side. (Marking every other deck board is enough.) Then use the siding to “connect the dots” to scribe the cutting line on the other side. The last step is to cut the curves. Now your walkway is ready for finishing.
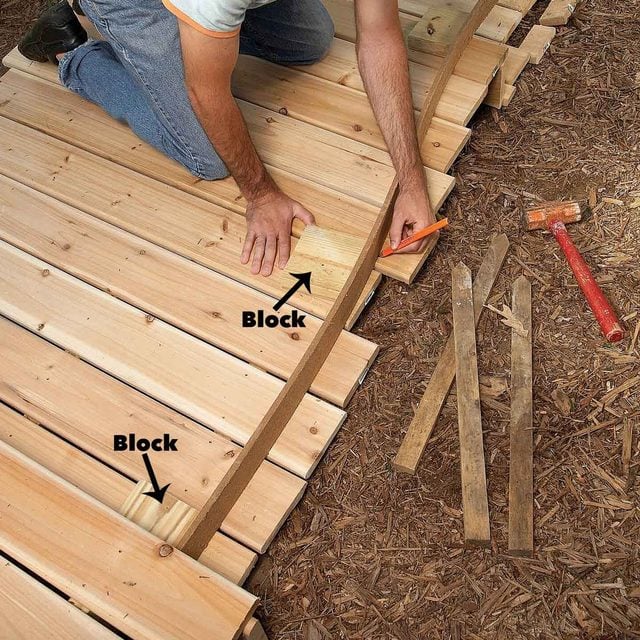
Decking Tight Curves

If it takes huge tapered gaps to follow a curve, the best-looking solution is to custom-rip each board. But this will require a lot of extra time. Start by laying out the decking in a “fanlike” fashion. Overlap all the decking equally at one end with the edges flush at the other. You’ll have to tinker with the overlapped ends until all the overlaps are nearly equal, then scribe the tapers and cut each board. It’ll look best if you belt-sand the cut edges to eliminate saw marks and then rout the edges with a round-over bit (we used a 3/8-in. bit) to match the profile on the other side.