Double-Duty Shelf Brackets
Shelf brackets designed to support clothes hanger rods aren’t just for closets. The rod-holding hook on these brackets comes in handy in the garage and workshop too. You can bend the hook to suit long tools or cords. Closet brackets are available at home centers and hardware stores.

Muffin Tin Hardware Bin
Work surface cluttered with miscellaneous nails, screws, hardware, whatever? Clean it up and still keep that stuff at your fingertips.
Attach a muffin tin under a shelf with a single 1/4-in. x 1-1/2-in. flat head machine screw. The tin pivots out from beneath work surfaces to organize and serve up any little doodad you frequently use. And you store all that little stuff without using up a single square inch of workspace. For best results when installing your muffin bins:
- Use muffin tins made from heavier gauge metal.
- Drill and countersink a 1/4-in. hole in the shelf top, so the top of the screw is flush with the shelf.
- Place 1/4-in. fender washers above and below the rim of the muffin tin.
- Tighten two nuts against each other on the underside so the threads won’t loosen.

On-a-Roll Pegboard Doors
Maximize hand tool storage in a tool cabinet with this slick DIY project. The key to this project is a 4-ft.-long by-pass sliding door hardware set (about $15 at a home center).You mount 1/4-in. pegboard onto it, making sure to provide enough room (2 in.) to hang tools on the pegboard and still allow it to slide by the door in front.
The trick is to insert 1/2-in. plywood spacers in the roller hardware as shown. You can use the floor bracket that comes with the slider hardware to maintain the same 2-in. clearance at the bottom of the cabinet. For door handles, simply drill a couple of 1-1/4-in. holes in the pegboard with a spade bit. Now pop in the pegs and hang up your tools.

Overhead Storage
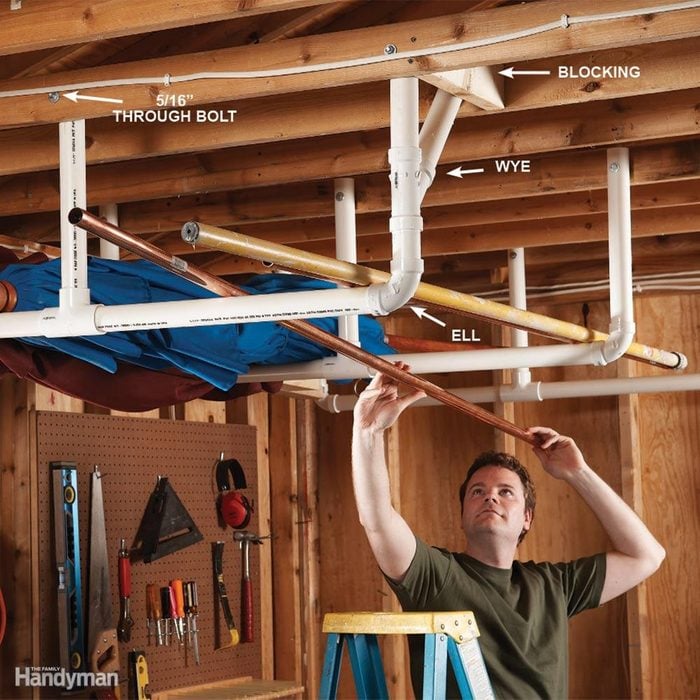
Stow bulky items overhead by cementing together a simple rack from 2″ PVC pipes and fittings. Bolt the straight pipe to the ceiling joists to support heavy loads, and screw the angled pieces from the ‘wye’ connectors into the cross brace to stabilize the whole rack. The PVC’s smooth surface makes for easy loading and unloading. If you wish to maximize the storage space, here are some ideas to help you in organizing your garage.

Painting Gear Hangout
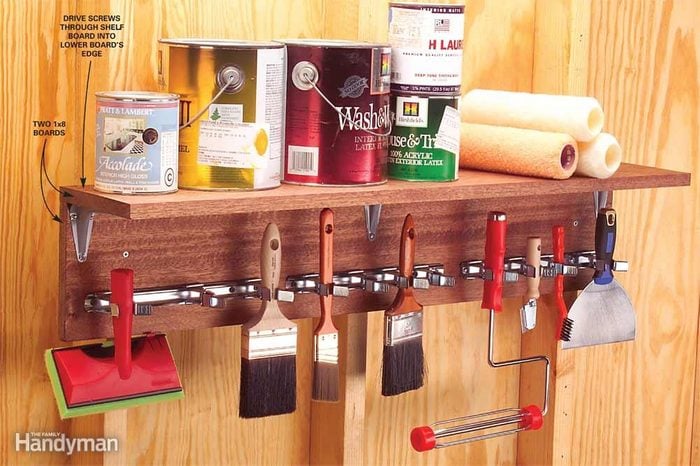
Organize your paint brushes, scrapers, roller frames, rags and paint cans with this shelf made from two 1×8 boards screwed together and reinforced with metal shelf brackets. We built ours 38 in. long to fit three brackets of sliding spring grips that we mounted under the shelf for tool storage. Build and attach this shelf to a shop or basement wall, and you’ll enforce orderly storage on all your far-flung painting paraphernalia.

Pegboard Cubbyholes
Here’s a tool storage technique for all those slender tools and shop accessories. Cut short lengths of PVC pipe (1-1/2-in. and 2-in.-dia. pipes work well for most items) and slide them over pegboard hooks. Then load them up with files, hacksaw blades, zip ties, pencils, stir sticks … you get the idea.

Tarp Marker
When unpacking a new tarp, write its size in all four corners with a permanent marker. When you sort through your tarps, it’s easy to find the right size without unfolding them all. Having the tarps labeled makes it easier to stow them away in a drawer or a cabinet too, saving a little more space. It works great for drop cloths too.

Wheelbarrow Rack
Hang your wheelbarrow on the garage wall to free up floor space. Center a 2-ft. 1×4 across two studs, 2 ft. above the floor. Tack it into place, then drive 3-in. screws through metal mending plates and the 1×4, into the studs. Leave about 3/4 in. of the plate sticking above the 1×4 to catch the rim. Rest the wheelbarrow on the 1×4 as shown, and mark the studs 1 in. above the wheelbarrow bucket. Drill pilot holes and screw ceiling hooks into the studs. Twist the hooks so they catch on the wheelbarrow lip and hold it in place.

Yard Tool Organizer
Create a simple long-handled tool hanger out of two 1x4s. On the first one, drill a series of 2-in. holes along the edge of the board. The trick is to center each hole about 1 in. from the edge. That leaves a 1-1/2-in. slot in the front that you can slip the handles through. Space the holes to accommodate whatever it is you’re hanging. Screw that board to another 1×4 for the back and add 45-degree brackets to keep it from sagging. If you wish, pound nails into the vertical board to hang even more stuff. No more tripping over yard tools!

Stacked Recycling Tower
Five plastic containers, six 2x2s and screws, and one hour’s work are all it takes to put together this space-saving recycling storage rack. The frame fits containers that have a top that measures 14-1/2 in. x 10 in. and are 15 in. tall.
You can also make a plywood storage rack and customize the size based on your own needs to store away in this awesome garage space saver.

Adjustable Drawer Partitions
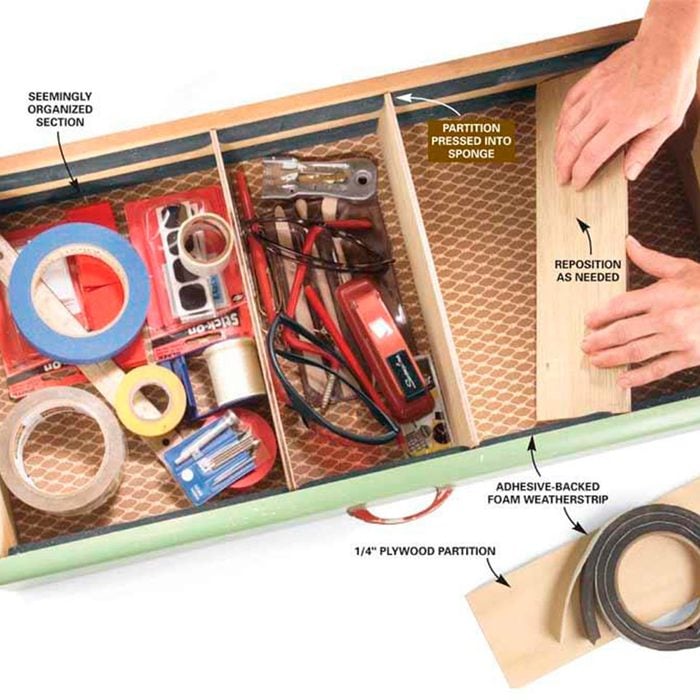
You can restore order in messy workshop drawers with 1/4-in. plywood partitions and self-adhesive sponge tape weatherstrip (sold at home centers). These clever drawer dividers will organize your tools, tape and twine, and you can easily inch them sideways to accommodate larger items. For the strongest grip, use spongy ‘closed cell’ weatherstripping.
Apply weatherstripping to the sides of the drawers as shown, then cut the partitions long enough so they squish firmly into the rubber on both ends. A good rule of thumb is to make the partitions 1/4 in. longer than the inside measurement between the weatherstripping.
To install a partition, hold it at an angle to the front and back sides, then rotate it into position.

DIY Storage Wall
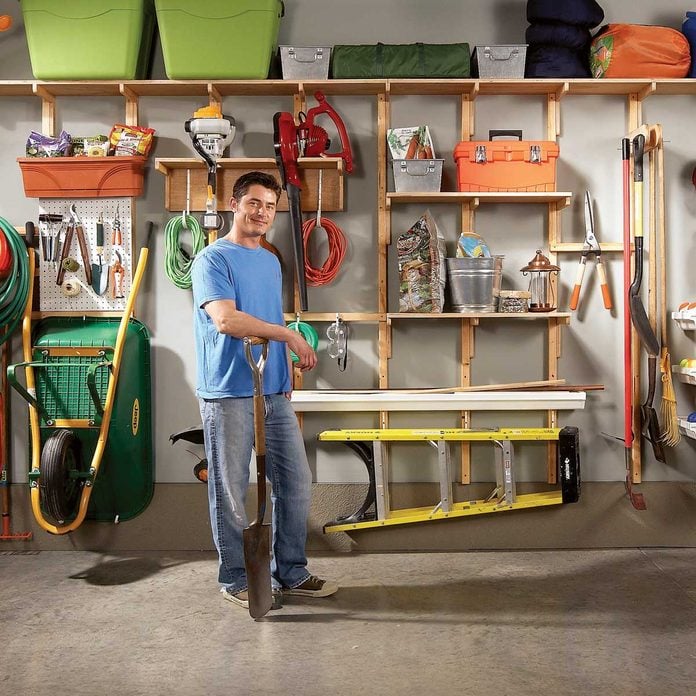
For just a few hundred dollars you can re-create this storage system yourself in one weekend. This project covers about 16 ft. of wall space and offers a multitude of ways to organize your garage.
Next: Checkout what not to do during garage remodeling.