
Garage Remodel Tips
Updated: Sep. 03, 2023Convert your drafty, dingy, spider-infested garage into a bright, comfortable work space
Garage Remodel: Add blocking and framing


Most rough-framed garages aren’t ready for drywall. Your garage may be missing studs at the corners and attachment points for the ceiling drywall. To see where framing members may be missing, inspect inside corners where walls meet and where the walls meet the ceiling. These are the most common areas needing additional framing. These two photos show how to add ceiling blocking.
While the framing is accessible and you have your carpentry tools out, you may want to add other framing or structural elements. Here’s a list of possibilities:
- Add blocking between studs for attaching shelving.
- Nail blocking between ceiling trusses for hanging lights, cord reels or bicycle hooks.
- Frame an opening for an attic access hatch.
- Frame a ceiling opening for a drop-down attic ladder.
- Cut a hole and frame an opening for a through-the-wall air-conditioning unit.
- Add windows or skylights.
CAUTION!
Turn off power before working on wiring.
Garage Remodel: Reroute wiring and add outlets
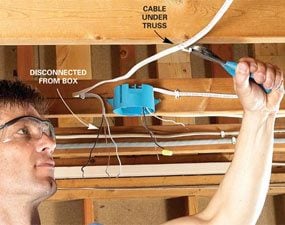
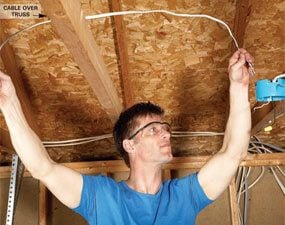
Most unfinished garages have the bare minimum of outlets and lights, so you’ll want to add a few. And in some cases, you’ll have to reroute wiring that’s attached to the face of studs or the underside of ceiling framing. We had to reroute phone wires, door opener control wires and plastic-sheathed cable in our garage. Remove surface-mounted wiring and move it into the stud space, or reroute it over the top of the ceiling joists or trusses.
You may have to drill holes through studs or through the top plate of walls to reroute wires. If so, be sure to center the holes on the stud. If the plastic-sheathed cables are too short to reach the next box when you reroute them, you can add a junction box and splice on a length of cable. The new box must be accessible either in the attic space or through a blank cover on the wall or ceiling.
This is also a good time to add outlets, lights and even another 20-amp circuit for power tools. Figure A shows some wiring improvements to consider.
Call the local building inspections department to get a permit before you add or change wiring, and have the wiring inspected before you cover it with drywall or insulation. Not up for doing the wiring yourself? Extra outlets and good lighting are well worth the cost of hiring an electrician.
Figure A: Plan Your Electrical Needs
Draw a sketch of where work areas, appliances and electrical devices will fit before beginning the wiring.
Garage Remodel: Ventilate and insulate
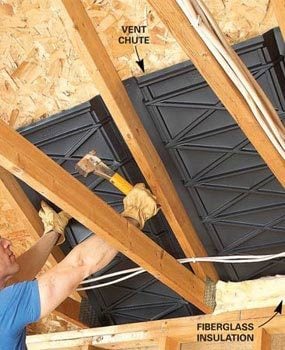
An insulated garage will stay cooler in the summer and warmer in the winter. The first step is to be sure the attic is well ventilated. Check to see how many attic and roof vents you have. A good rule of thumb is a total of 1 sq. ft. (144 sq. in.) of vent opening per 300 sq. ft. of attic divided between the soffit and roof vents. For a typical 20 x 22-ft. garage, you’d need about six 4-in. x 12-in. soffit vents and two standard square roof vents. Make sure your ventilation is effective by installing vent chutes between the trusses. Vent chutes have a channel that prevents blown insulation from blocking the airflow from the soffit vents to the attic space. Plug the area under the vent with wood blocking or plastic and a chunk of fiberglass insulation to prevent wind from blowing up through the insulation or insulation from filling the soffit.
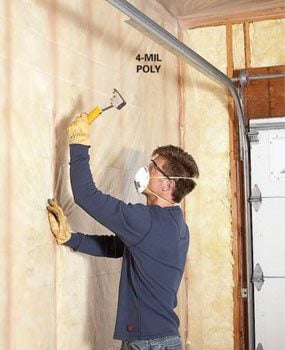
We recommend filling the stud spaces with friction-fit fiberglass batts, covering the walls and ceiling with a 4-mil poly vapor retarder, and blowing insulation (cellulose insulation is a good choice) into the attic after the ceiling drywall is installed.
Start by insulating the walls. Buy unfaced R-13 batts for 2×4 walls and unfaced R-19 batts for 2×6 walls. Match the width of the batt (15-1/4 in. or 23-1/4 in.) to the stud space. Cut batts carefully for a tight fit. Next, staple 4-mil poly to the walls and ceiling. Embed the poly sheeting in caulk around the perimeter of each piece to create an airtight seal. Seal the seams between sheets and seal the poly to electrical boxes with caulk or special sheathing tape (it’s typically red and looks like packing tape).
After the drywall is installed on the ceiling, you can blow insulation into the attic. Home centers and some rental stores sell blow-in–type insulation and often offer free or reduced rate rental on the blower if you purchase insulation from them.
Garage Remodel: Weather-strip doors and windows
Leaky doors and windows let in uncomfortable drafts and increase heating and cooling costs. Check your garage service door to be sure it has good weather stripping and a threshold that seals tightly to the bottom of the door. In most cases, if your service door is missing a threshold and weather stripping, it’s more efficient to replace the door with a new, weather-tight version. You can buy an inexpensive prehung metal exterior door at home centers and lumberyards.
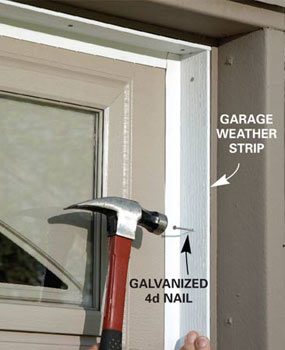
The overhead garage door can be a big source of drafts and heat loss. Recently installed doors usually include a weather-stripped stop around the perimeter. But older doors may be lacking a weather strip. Luckily, it’s an easy fix. Garage door weather stripping is available at home centers and hardware stores, and installation is straightforward. If your overhead door is uninsulated, search online for “garage door insulating kits.”
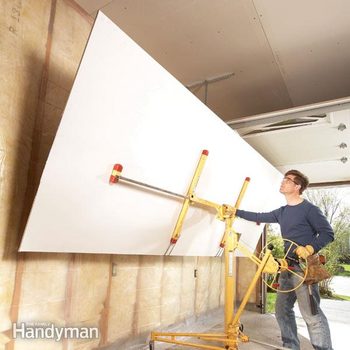
Garage Remodel: Finish up with drywall

Drywall is the easiest and most economical covering for your garage ceiling. Use 5/8-in.-thick drywall if your trusses or rafters are spaced 24 in. apart. We’ll show you a few tips to simplify drywall installation.
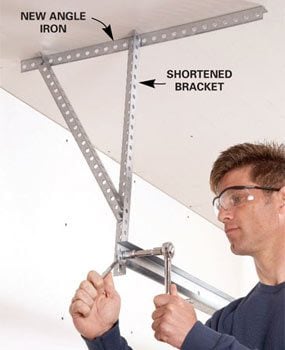
Before you install the drywall, temporarily remove the brackets that support the garage door tracks and opener. This will make it easier to install the 4-mil poly and ceiling drywall and will result in a neater-looking job. Start by carefully measuring and recording the position of the tracks and opener. Measure from the nearest wall and from the floor. Then close the garage door, lock it closed and unplug the opener to disable it. Unscrew or unbolt the brackets that support the garage door tracks and remove them. Also remove the garage door opener brackets and support the opener on a ladder. It may be easier to entirely disconnect the opener and set it aside. Reinstall the garage door track brackets using a new section of angle iron on the ceiling. Attach each new ceiling angle iron with four 5/16-in. x 3-in. lag screws driven into the center of the ceiling joist or into wood blocking that’s screwed to the adjacent ceiling framing.
The second tip that’ll simplify the drywalling job is to rent a drywall lift. They’re available at most rental centers. For ceiling work, load the sheet onto the lift vertically and then swivel the lift platform until the sheet is horizontal. Then crank the sheet to the ceiling while you roll it into position. The lift also works for walls. Here’s what you need to know if you’re thinking of converting your garage into a living space.
DIY Success Stories
The smartest thing I did in my garage was to add lots of outlets. I put them high on walls, low on walls, even a few switched outlets in the ceiling to power plug-in type fluorescent lights. Fourteen outlets in all! My wife thought I was nuts, but I’ve never regretted it. No matter what I’m doing, easy-access power is right there. Terry Wiley
I covered my garage walls with 5/8-in. OSB instead of drywall. It costs more and doesn’t look quite as good. But it looks fine with a few coats of paint, and I didn’t have to sand drywall mud (which I hate!). Better yet, I can mount pegboard, brackets or hooks anywhere. No need to hunt for studs. Phil Burkard
Required Tools for this Project
Have the necessary tools for this DIY project lined up before you start—you’ll save time and frustration.
- 4-in-1 screwdriver
- Adjustable wrench
- Caulk gun
- Chalk line
- Cordless drill
- Drywall saw
- Dust mask
- Level
- Miter saw
- Non-contact voltage tester
- Pliers
- Safety glasses
- Socket/ratchet set
- Stapler
- Stepladder
Required Materials for this Project
Avoid last-minute shopping trips by having all your materials ready ahead of time. Here’s a list.
- 1-1/4-in. drywall screws
- 10d framing nails
- 2x4s
- 3-in. drywall screws
- 4-mil vapor barrier
- Angle iron
- Cable staples
- Caulk
- Drywall
- Electrical boxes
- Electrical wire
- Insulation
- Vapor barrier tape
- Vent chutes
- Weather stripping
