
Luxury Vinyl Tile Installation
Updated: Feb. 17, 2023
A kinder, gentler tile.
A full day
Intermediate
Varies
Introduction
Learn how to install commercial-grade luxury vinyl tile with this simple step-by-step guide on how to use groutable vinyl tile.Tools Required
- 100-lb. roller
- Belt sander
- Caulk gun
- Chalk line
- Compass
- Dust mask
- Grout float
- Handsaw
- Heat gun
- Notched trowel
- Oscillating saw (optional)
- Tape measure
- Taping knife
- Tiling sponge
- Utility knife
Materials Required
- Carpet bar
- Caulk
- Floor patch
- Tape
- Tile spacers
- Vinyl tile
- Vinyl underlayment
What the heck is LVT?
Luxury vinyl tile (LVT) has been installed in commercial buildings for years, but now it’s finding its way into more and more homes. It looks like tile and is priced similarly, and both are waterproof and groutable vinyl tile, but there are big differences. If you’ve just got some small tears in your vinyl tile, here’s how to fix vinyl tile floors.
LVT is softer and feels warmer underfoot, which is especially nice in bathrooms. Ceramic is harder to scratch, however, LVT won’t crack if you drop your cast iron skillet. If a piece of LVT does get damaged, it’s much easier to replace. It has a lower profile, which makes it easier to work with around cabinets, existing door openings and transitions. LVT can be installed over some existing flooring and is far more DIY-friendly. If you’re looking to add luxury vinyl to other parts of the house, here’s how to install luxury plank flooring.
Meet the experts
Nate and Andy

Our expert installers show how to install luxury vinyl tile (LVT).
We wanted to find out what was behind all the buzz about luxury vinyl tile (LVT). Why are people opting for vinyl when they can get ceramic tile for about the same price?
So we tracked down Andy and Nate from Distinctive Flooring in Burnsville, Minnesota. They’ve been installing LVT floors for several years now and told us that it’s the fastest growing portion of their business. Andy says, “Our customers love it because it feels good under their feet and because there are hundreds of colors and patterns to choose from, and we love it because it’s easy to work with.” LVT is definitely a DIY project, especially with these tips from the pros. The following article will help you learn more about vinyl tile flooring installation.
Plus: Learn how to clean vinyl floors the right way.
Project step-by-step (13)
Luxury Vinyl Tile: Prep the floor
Fill gaps and seams
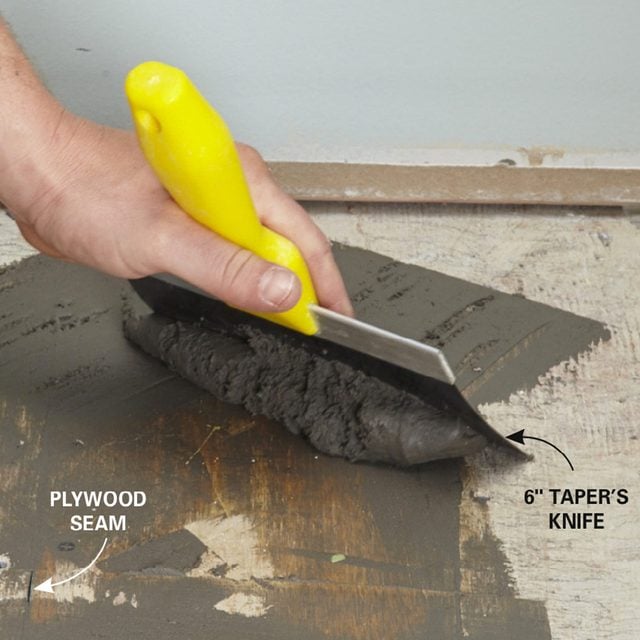
LVT will follow the profile of the existing subfloor, so make sure you fill in seams, low spots and large gaps with floor patch.
LVT can be glued down directly to plywood subfloors as long as the wood is smooth, flat and structurally sound, but not over wafer board, particleboard or oriented strand board (OSB).
Most floors aren’t perfect, so find high and low spots with a straightedge. Sand down the high spots with a belt sander using a 40- or 60-grit belt. This is a dusty job, so turn off your furnace to avoid spreading dust all over the house, and wear a dust mask.
Fill the low spots (1/4-in. dip in 3 ft.), gaps and seams in the plywood with floor patch (Photo 1). If the plywood is in pretty rough shape, the pros will skim-coat the whole floor with floor patch. This seems like a big job but takes only a few minutes. Andy prefers Ardex Feather Finish but says the products sold at home centers will work too. Buy a Portland cement-based product—the gypsum-based patches crack easier. Henry and SimplePrep are two other brands.
LVT can be installed directly over concrete, but the concrete must be at least six weeks old, proven to be dry, and free of powder and flaking. It also needs to be free of solvent, wax, grease, oil, paint and any other sealing compounds. Large cracks and expansion joints should be filled and troweled smooth. The same floor patch you would use on wood floors should also work for concrete.
Dealing with trim
Trim jambs and casing
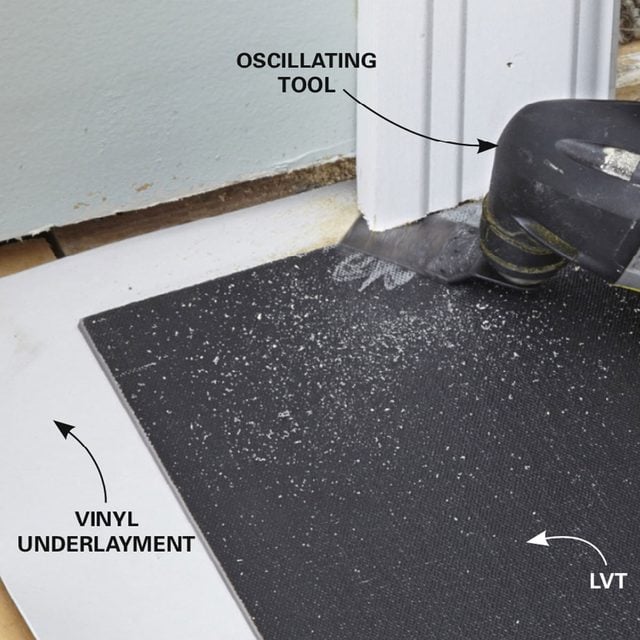
Undercut door trim so you can slip tiles underneath. Use a tile and underlayment as a guide. If you don’t have an oscillating saw, a handsaw will work just fine.
Your installation will be easier and you’ll end up with a cleaner look if you remove the base trim before you install the new floor. However, if the new LVT floor will be lower than the floor you removed, you may want to leave the base on. If the base trim is removed and reinstalled lower, there will be a noticeable gap on the wall, which may require painting. If you don’t want to mess with painting, install base shoe molding at the bottom of the trim.
There’s no reason to pull off door trim, unless the new floor is going to be significantly lower and you need to install longer casing or rehang the door. You’ll have to trim off a bit of the casing if the new floor will be higher. An oscillating tool works great to accomplish this task. An upside-down tile and whatever underlayment you plan on using are the perfect height for a guide (Photo 2).
Underlayment options
Install underlayment
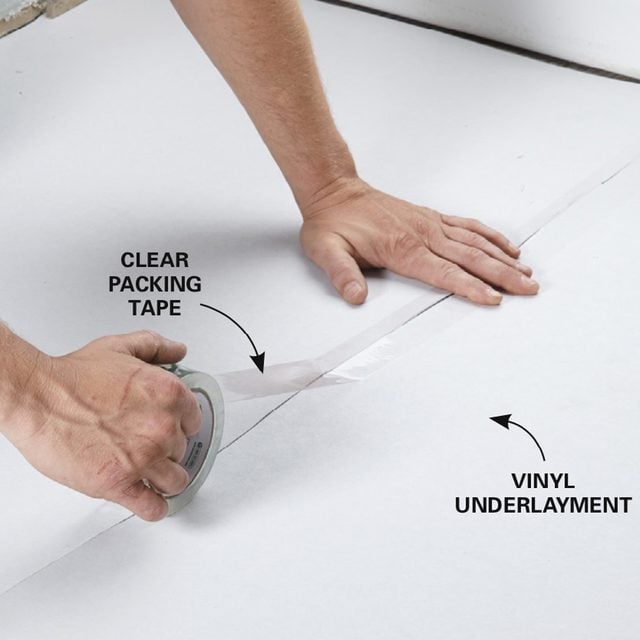
Roll out the underlayment and tape the seams. If your existing floor is in good shape, you might be able to skip this step and glue the tile directly to the floor.
If your wooden subfloor is in really rough shape, install 1/4-in. plywood underlayment over it.
Another option is to install a vinyl underlayment. This will allow you to lay LVT over all sorts of surfaces: plywood, particleboard, OSB, ceramic tile, sheet vinyl or painted cement. Buy the product recommended by the tile manufacturer. One thing to consider when using a vinyl underlayment: The tile is adhered to the vinyl, but the vinyl is not attached to anything else, so the floor will “float” above the surface. The only drawback to a floating floor is that it expands and contracts more than a permanently fastened floor. This means you’ll have to leave a 1/4-in. gap around the perimeter of the room and all floor vents to allow for expansion. And avoid setting more than one extremely heavy object (pool table, piano, large bookcase) in a room with a floating floor—pinning the flooring down in two or more locations won’t allow it to expand between those points, which may cause the flooring to buckle.
Vinyl underlayment is easy to install. Just lay it down, cut it with a knife or heavy-duty scissors, and tape the seams with packing tape (Photo 3). We used Mannington underlayment, which costs 40¢ per sq. ft.
Whichever underlayment you choose, you’ll still have to knock down ridges and fill in the severe dips in the subfloor. And underlayment is not a solution to a rotten or structurally unsound subfloor.
Lay out the pattern
Mark the first tile location
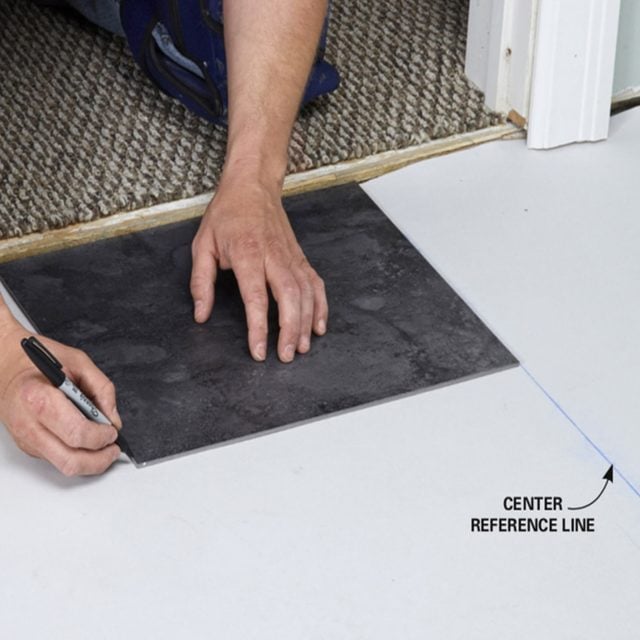
Once you have your layout figured out, use a tile to mark the location of the first tile. Make sure it’s by the door, where you’ll have to start tiling.
Balance is the key to any good layout. Try to avoid ending with a row of narrow tiles along any wall (Figure A). And if at all possible, center either a grout line or a full tile in the middle of the doorway (Figure B). Nate starts by snapping two centerlines dividing the room into four equal quarters. He measures from those lines to determine the layout. If math isn’t your strong suit, just lay a few tiles next to those lines at several places in the room to see how it will all work. Don’t forget to figure in the grout lines for groutable vinyl tile.
A room rarely works out perfectly, so expect to make compromises. In this case, Nate opted to start with full tiles near the door, which left almost full ones on the opposite side of the room. He also chose to center a tile in the door opening even though that left smaller tiles along the walls next to the tub. Nate was able to use the first centerline he snapped, but that’s rare. You’ll likely have to measure from that centerline to find the location for your first tile.
Once you’ve decided on your layout, mark a set of guidelines for the first tile to be installed. Make these marks close to the door; that’s where you need to start. Nate uses a tile to mark the location (Photo 4).
Figures A and B: Laying out the tile

When laying out the tile, avoid leaving skinny tiles at the edges. The layout in Figure A leaves too many skinny tiles around the edges. The layout in Figure B works better, with tiles that are at least half-width all around the edges. However, note that the edges all had to be cut to slightly different widths to make the layout work.
Check out this how to lay out tile video for more tips
Glue your way out
Spread the adhesive or vinyl tile glue
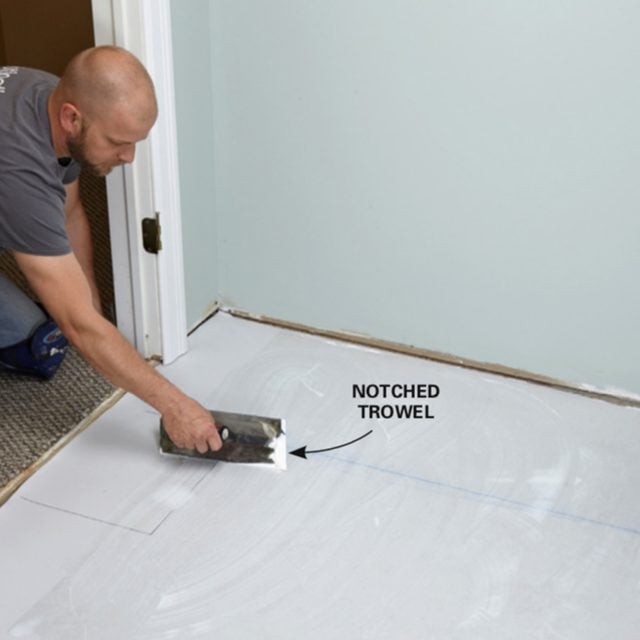
Spread the adhesive with a small notched trowel. Cover every inch, and don’t leave puddles. Start at the end of the room and work your way toward the door.
Start spreading the adhesive in the area of the room farthest from the door. If you don’t, you’ll literally glue yourself into a corner. Buy the adhesive recommended by your flooring manufacturer, and spread it with a trowel that has the recommended tooth size and spacing (usually 1/16 in. to 1/32 in.; Photo 5). Avoid creating puddles, and make sure every inch of the floor gets covered.
The drying time for the vinyl tile glue product Nate used was 15 to 45 minutes. Temperature and humidity greatly affect drying times. When the adhesive is ready for installing the tile, it will change to a lighter color. And if you press your finger into the glue, the floor should feel sticky, but no adhesive should stick to your finger when you pull it away. The adhesive should dry clear enough so that you can see your lines. Wet glue can be cleaned up with water, but you’ll need mineral spirits to clean it up once it’s dry.
Tile your way in
Lay the first tile carefully
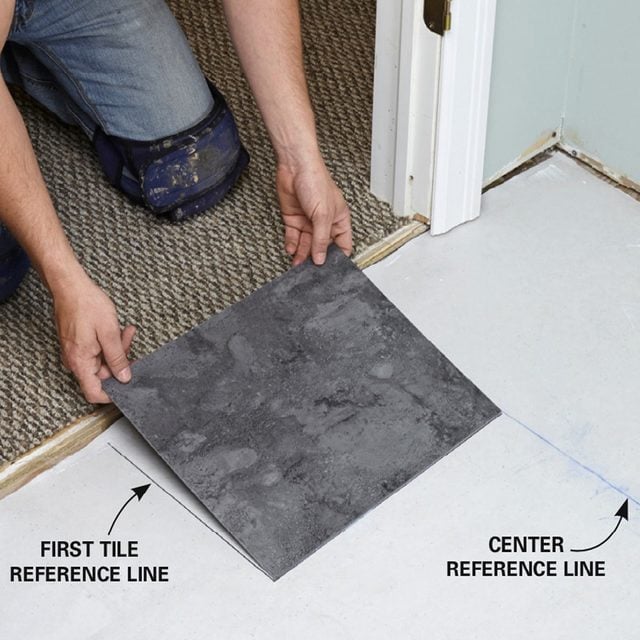
Position the first tile perfectly, because all the other tiles in the room will line up with that one. Continue laying vinyl tile squares as you work your way into the room.
Slide tiles under trim
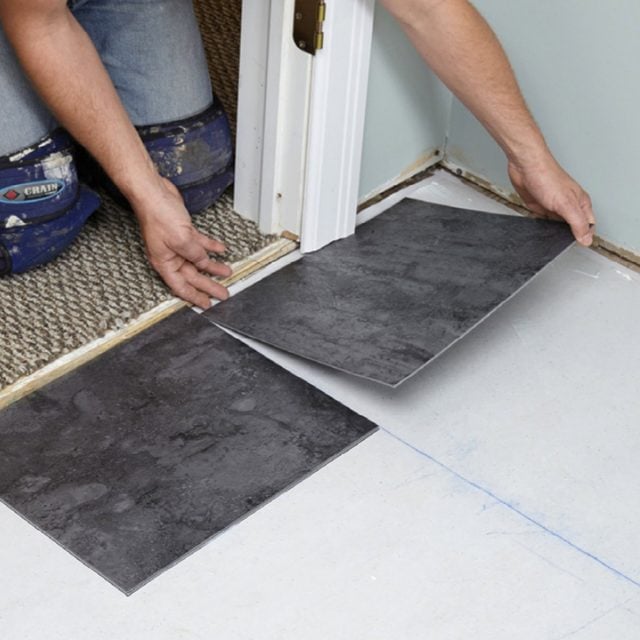
Once a tile is laid flat on the glue, it’s stuck. In order to set a tile under jambs and casing trim, hold the back side of a tile just barely off the floor and slide it into place.
How to Tile: Prepare Concrete for Tile
Position tiles with spacers
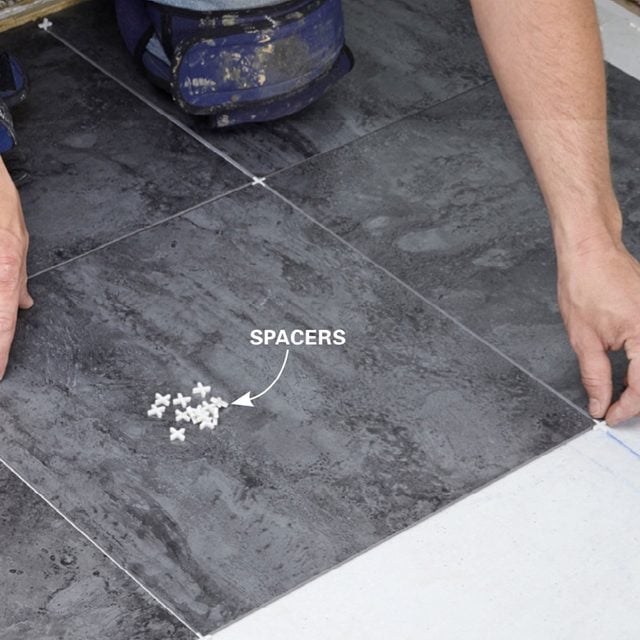
Set in tile spacers the same way you would for ceramic tile. The spacers will stick to the floor adhesive, so you’ll have to pry them out with a small screwdriver.
Heat tiles to cut curves

If you have to make a cut other than a straight line, heat the tile with a heat gun and you’ll be able to cut right through it. Straight lines don’t require heat—just score and snap. Protect the floor with cardboard and a spare tile.
Cut with a utility knife
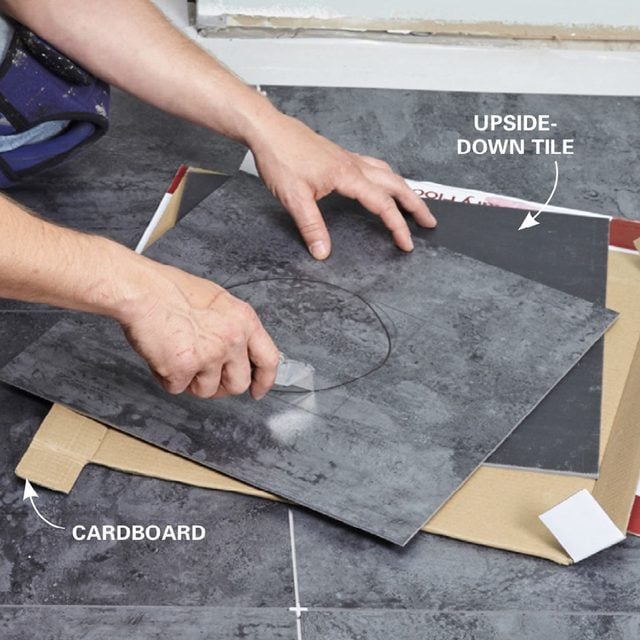
You can cut LVT with just a utility knife. That means you don’t have to run back and forth to a saw every time you need to make a cut. An upside-down tile and a little cardboard make an excellent cutting station.
Set the tiles with a roller
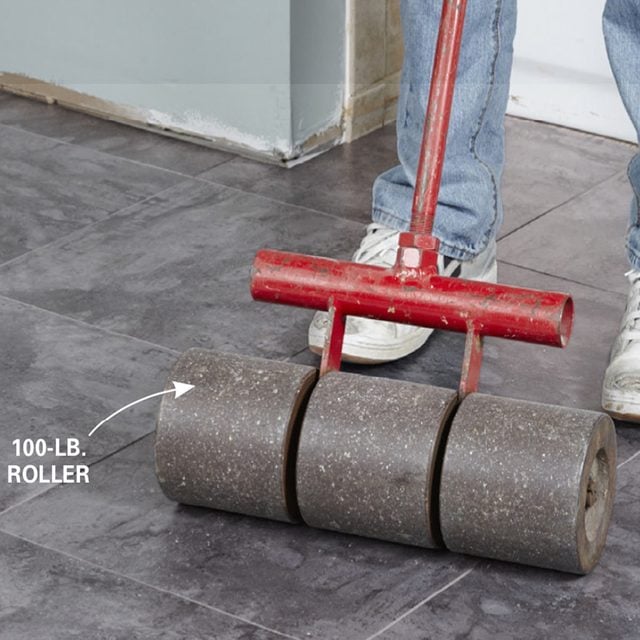
A 100-lb. roller provides consistent pressure to permanently set the tiles in place. Roll each tile from at least two directions.
Since all the other tiles rely on the position of the first one, it’s critical that you set the first tile straight (Photo 6). Unlike ceramic tile, LVT tiles stay put, so you can work your way into the room without waiting. When sliding tiles under doorjambs and door trim, lift up on the back of the tile and carefully slide it into place (Photo 7). You’ll only have a little wiggle room once you drop the tile flat.
Regular tile spacers work fine, but keep the grout lines smaller than 1/4 in. (Photo 8). Nate likes to pull out his spacers as he goes so he doesn’t need to use as many. The spacers will get stuck in the glue, so you’ll have to pry them out with a small screwdriver. Lay down all your full tiles first, and come back to finish the ones that need cutting.
Be sure the tiles are the same temperature as the room you’re putting them in, and check to see that the lot numbers on the containers are the same so you don’t get noticeable color variations. Mix tiles from different containers as you go. Also, there are arrows on the bottom of each tile. Some manufacturers have you keep the arrows all the same direction; others have you rotate every other tile a quarter turn. This is to ensure a varied pattern.
The best thing about installing LVT is how easy it is to cut. All you have to do is score it with a utility knife and break it in two: no wet-saw mess, no grinder dust, no trips to a cut station, and no broken tiles! If you have to cut a hole or a curve, heat the tile with a heat gun first (Photo 9). Protect the floor as you cut (Photo 10).
The last step before grouting is to press the tiles flat with a 100-lb. roller (Photo 11). Most tile manufacturers require this step with groutable vinyl tile; don’t skip it or cheat with a rolling pin or laminate roller. You can rent a roller at a rental center.
Easy Transition

There are a thousand and one ways to transition from one floor surface to another. Probably the easiest and cheapest is to install a carpet bar. A hammer and a hacksaw are all you need to install it.
Grout the tiles
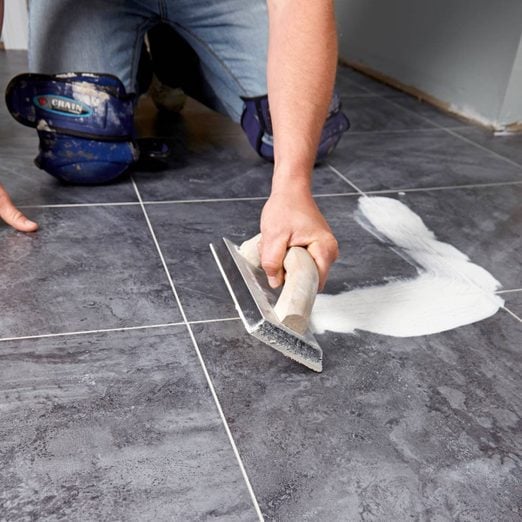
Spread the grout
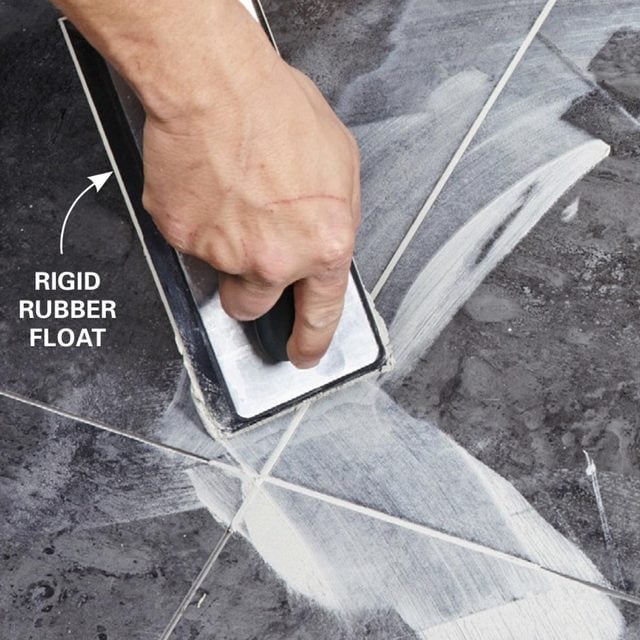
To lessen the mess with groutable vinyl tile, use the narrow end of a rigid rubber float to work the grout into the joints. Scrape off the excess in a 45-degree motion.
Buy the grout the manufacturer recommends. Never use cement-based grout with groutable vinyl tile; it’s too brittle and it will crack. Pack the joints with a rigid rubber float. Remove the excess at a 45-degree angle. To reduce the area that will have to be cleaned, don’t plow the grout all over the tile as you would with ceramic tile—use the narrow end of the trowel and cover only the gaps between tiles (Photo 12). Do a 15- to 20-sq.-ft. section at a time. Wait a few minutes before you clean the tiles with water and sponges.
When you clean up the grout, don’t use too much water. That can cause the grout to pull away from the tile. Just mist the tile with a spray bottle. Go back and wipe it with a thoroughly wrung-out sponge. Wipe gently—you don’t want to pull the grout right out of the joints.
Start in a closet or other inconspicuous area. If any tiles are still a little hazy the next day, clean them with mineral spirits or ammonia. Stay off the floor for 24 hours, keep pets off it and avoid washing it for a few days. You can either caulk or grout between the tile and showers, tubs and cabinets. Caulk all gaps larger than 1/4 in. Reinstall the trim and your toilet.
How to Tile Bathroom Floors