
How to Install In-Floor Radiant Heat
Updated: Apr. 10, 2024
In-floor heat is easy to install and cheap to operate, and your feet will love it!
A full day
Intermediate
$501-1000
Introduction
Warm up cold bathroom floors with electric in-floor heating mats installed under the tile. Use it as supplemental heat for comfort or as space heat to warm the entire bathroom. Installation is as easy as laying tile.Tools Required
- Cordless drill
- Hot melt glue gun
- Margin trowel
- Trowel
- Utility knife
- Volt-ohm meter (or continuity tester)
Materials Required
- Cement board underlayment
- Grout
- Radiant heat mat
- Thermostat
- Thin-set mortar
- Tile
Radiant Heat: Overview
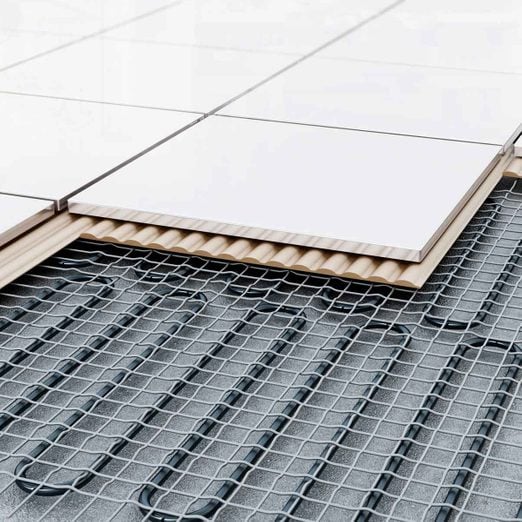
This in-floor heating system consists of one thin continuous cable heating element woven into a mat that you install under the tile.
These heated floors are a project best done when overhauling or changing the floor covering of an existing room, or when adding a new room. Heated flooring can be installed as supplemental heat to take the chill out of the floor, or as space heat to warm the entire bathroom. Heated flooring is also a great project for warming entryway and kitchen floors.
The benefits of heated floors:
- It’s easy to install. You embed a cable-laced mat in the mortar when you lay the tile. If you’re not comfortable with the wiring portion, hire an electrician.
- It’s safe. Once the in-floor heating system is installed, it’s nearly impossible to damage. The GFCI-protected thermostat instantly cuts power in the event of a short or other problem.
- It’s inexpensive. At 12 watts per square foot, our 30-sq.-ft. heated bath mat drew 360 watts of power — about the equivalent of an electric blanket or large TV.
- It takes up zero space. Got a big, clunky radiator? Remove it and gain valuable square footage by installing this stuff.
- It’s versatile. If your existing furnace or boiler lacks the oomph to heat a newly remodeled or added space, an in-floor heating system can do the job.
- It’s really, really comfortable. When your feet are warm, your entire body feels warm. You’ll find yourself reading and playing games with your kids on the bathroom floor.
Special-order your custom-size mat
Various companies offer electric resistance floor warming systems. Standard sizes are available at home centers and tile stores. You can also special order custom sizes and shapes by sending a detailed drawing of the bathroom floor plan and location of fixtures.
The mats come in 12-, 24- and 30- in. widths and increments of five feet in length (10 sq. ft. minimum). When in doubt, the supplier will specify a mat smaller than you need since the mat cable can’t be cut.
Project step-by-step (11)
Find Electrical Power
- For a heated floor area less than 20 sq. ft., you could (in most cases) draw power from an adjacent GFCI-protected outlet without overloading the circuit. (If the thermostat you purchase is already GFCI protected, like ours, you can use any outlet. In any case, the floor heating pad must be GFCI protected.) But a larger mat on an existing circuit that might accommodate a 2,000-watt hairdryer can cause overloads and nuisance circuit breaker trips. For our larger mat, we installed a dedicated circuit with its own wiring and circuit breaker. Both 120-volt and 240-volt mats are available.
- A programmable thermostat that turns the mat on during busy times, then off when you’re sleeping or away, costs more initially but will save energy and money in the long run.

Test the Mat for Continuity
- Test the heating cable for manufacturing or shipping damage with a volt-ohm meter. The resistance reading on the mat label and the resistance registered by the meter should be within 10 percent of each other. If not, see the manufacturer’s instructions. Digital volt-ohm meters like the one shown are inexpensive and are easy to operate.

Add Cement Board to the Subfloor
- Prep your floor as you would for any tiling job. Install 1/2-in. cement backer board, securing it to the existing subfloor with mortar and cement board screws. Make sure no screw or nailheads protrude above the cement board; a sharp edge can damage the cable. Tape and mortar the seams to create a solid, continuous surface. Snap tile layout lines on the floor once the mortar has dried.
Electric vs. Hydronic Radiant Heat Systems

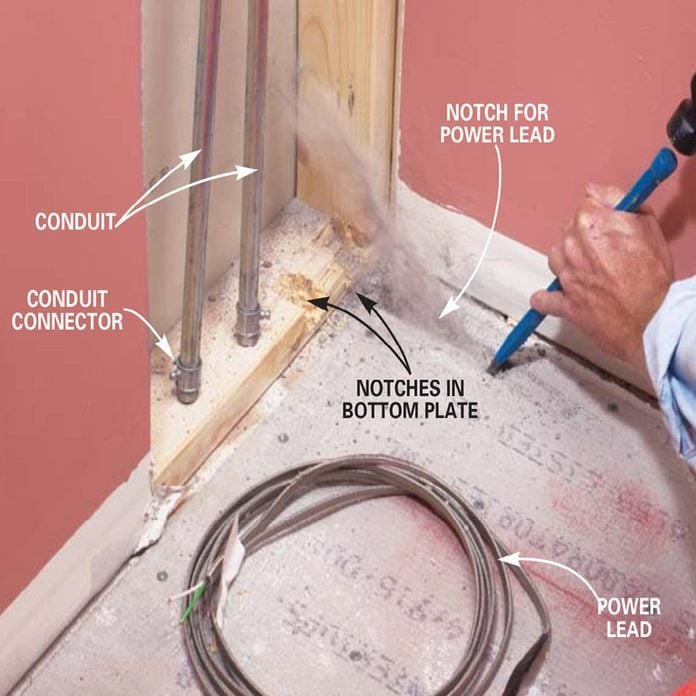
Notch for the Wires
- Following your preliminary layout, mark the path of the thick “power lead” between the mat and wall cavity and chisel a shallow trench into the floor. Notch the bottom plate to accommodate the two conduits that will contain the power lead and the wires for the thermostat-sensing bulb.
Test Fit the Mat
- Test fit the mat, keeping the cable four inches from fixtures and walls and two inches from one another. Give priority to those areas where you’ll stand barefoot the most. You must not cut or cross the cable, so make sure the mat fits.
- Before proceeding with the installation, do a test layout. Follow these basic guidelines:
- Install the mat up to the area where the vanity cabinet or pedestal sink will sit, but not under it; that can cause excessive heat buildup.
- Keep the mat four inches away from walls, showers, and tubs.
- Keep the mat at least four inches away from the toilet wax ring.
- Keep the blue heating cable at least two inches away from itself (Photo 5). Never overlap the cable.
- Don’t leave large gaps between the mats. Your feet will tell!
- If your mat is undersized, give priority to the areas where you’ll be standing barefoot most often.

Tape the Mat to the Floor
- Install the mat, securing it lightly to the cement board with double-face tape. To make turns, cut the mat between two loops in the cable, then flip the mat and run it in the opposite direction. Never cut, nick or stress the cable itself. Where the full-width mat won’t fit, or where you encounter angles or jogs, carefully cut the mat from around the cable and hot-melt glue the cable to the floor. Continue using the full mat again when you can.

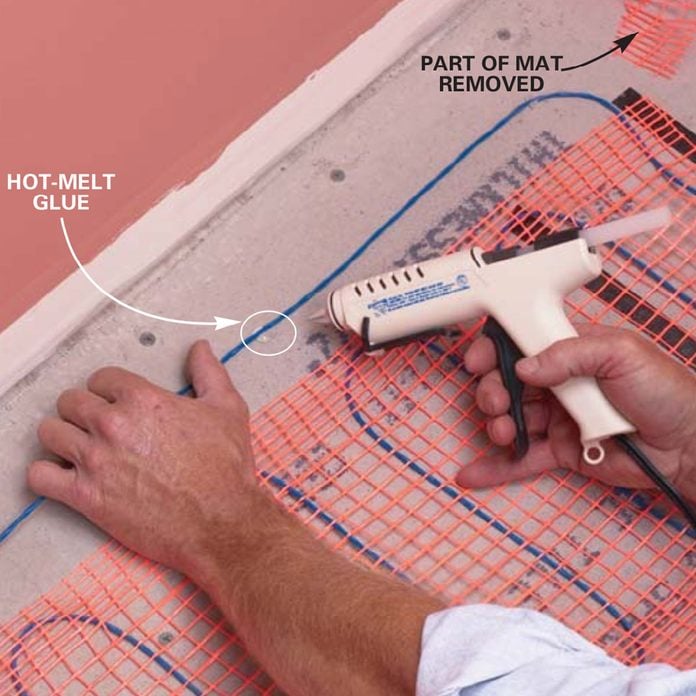
Glue Loose Wires to the Floor
- Secure individual removed cables to the floor using small blobs of hot-melt glue. Carefully cut and remove the orange mesh to free the cable. Do this to work around angles, obstacles and sections where full-width mats won’t fit. Do not overlap the cable. When the entire mat is fitted and installed, press it firmly into the tape and hot-melt glue any loose ends or humps in the mat. Perform a resistance test to check for damage.
- If you’re not going to tile right away, lay thick corrugated cardboard over the mat to protect the cable. You’ll be glad you did when your kid walks in wearing baseball cleats.
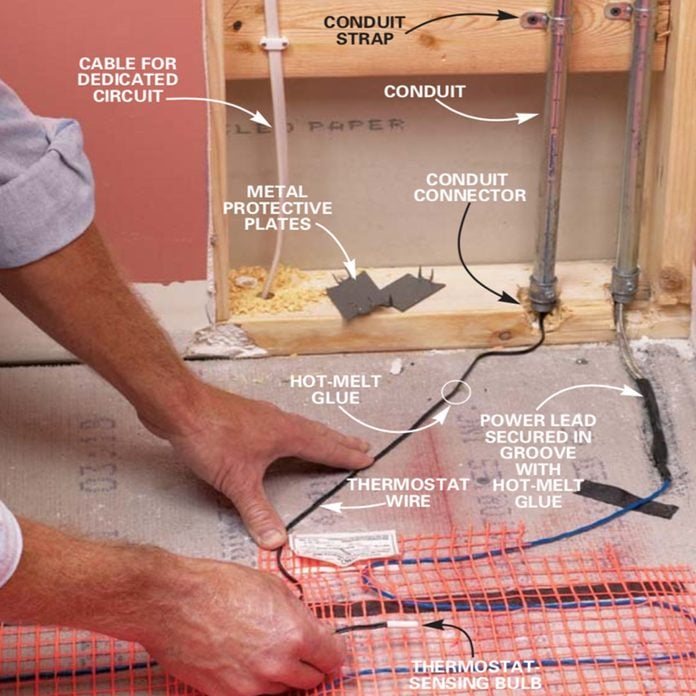
Wiring
- Install conduit connectors to both ends of two pieces of 58-inch long, 1/2-in. electrical metal tubing (EMT). Fish the power lead cable through one length of the conduit. Hot-melt glue the power lead into the groove. Fish the thermostat wires through the second piece of conduit, then weave it 12 inches into the mat, keeping it equidistant from the cable on each side.
- Secure the two lengths of conduit to a 4 x 4-in. metal electrical box. Secure this box to the studs so the lower ends of the conduits nestle into the notches you made in the bottom plate. Secure metal protective plates over the notches in the bottom plate to protect the wires and cable where they pass through.
- Install the wiring from the area of the main circuit breaker panel (or nearby outlet) to the area of the wall cavity where the thermostat will be located. Don’t do any actual wiring in the main panel yet.
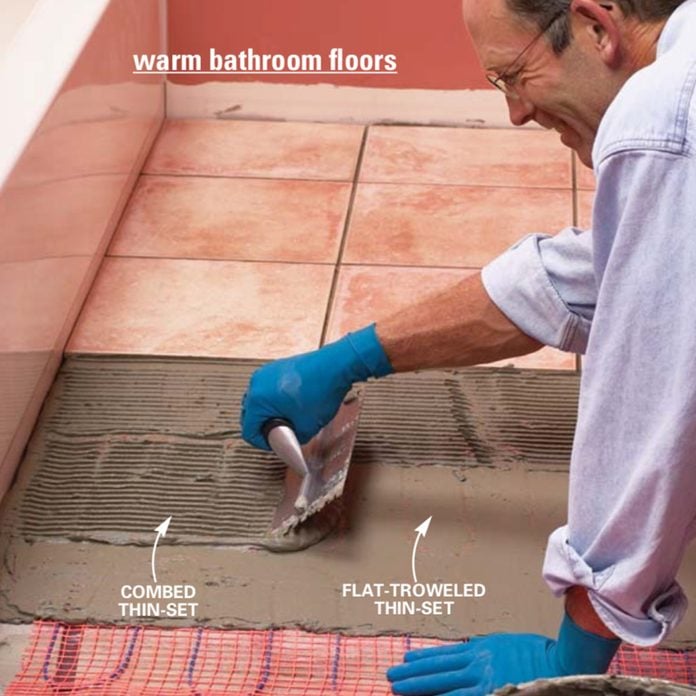
Spread the Mortar
- Apply the mortar, first pressing it firmly into the mesh and floor with the flat side of the trowel, then combine it with the notched side. Try to “float” the trowel just above the cable. Use care not to snag the mesh or nick the cable.
Place the Tiles
- Lay the tile using the chalked lines as your guide. Wiggle and tap the tiles firmly into place to create a level surface. Read just previously laid tiles so they remain in line and properly spaced; the thick mortar bed used to cover the cable and mesh allows for more movement than a standard tile installation. Grout the tile once the thin-set has properly set.
- Place the tile, then tap it firmly into place with a rubber mallet. Do two resistance tests while installing the tile to ensure you haven’t damaged the cable. (If the resistance test fails, see the manufacturer’s instructions to find the problem.) Once the mortar has dried, grout the joints.

Finish the Wiring
- Wire the thermostat according to the manufacturer’s instructions. Our thermostat had individual pigtails for securing the wires from the power lead and the cable running from the main panel. Have your electrician make the final connections in the main circuit panel.
- Power up the system for 10 or 15 minutes to ensure that the floor heat functions, then turn it off and keep it off for two to four weeks while the mastic and grout cure and harden.
Still looking for ways to keep your bathroom warm? Learn more about bathroom fireplaces and bathroom heat lamps. Also, check out these bathroom heaters.
