How Joists Work
Updated: Aug. 22, 2023
How to keep your floors stiff, strong and solid.
On This Page
Why drilling and notching rules matter
I once worked alongside a plumber nicknamed “Ethan the Terrible.” The name had nothing to do with his skills; he was one of the best plumbers around. But if a floor joist (Fig. A)—or anything else—stood in the way of his pipes, he’d break out a saw or drill, then slash or bore away until he made room. Fixing the ruins—at least for us carpenters— was the “terrible” part. Learn the basics of horizontal boring.
You can’t simply cut, notch and bore through structural members and expect your house to remain strong and your floors flat and solid. Building “from scratch” with smart planning can limit the need for most notching and boring. It’s during remodeling—when you have to run wires, pipes, gas lines and ducts through the joists already in place—that it becomes important to know the rules about tampering with joists.
Plenty of trial and error plus a healthy dose of engineering and testing have gone into the official rules in the building code. Here we’ll examine the rules.
Learn the most common electrical code violations DIYers make.
How joists support floors and ceilings
Joists—the horizontal members that span two walls and/or beams—have to carry the weight of the walls, people, furniture, appliances and other stuff we place on them. When a load is applied to a joist, the wood fibers along the bottom edge go into tension and those along the top go into compression (Fig. A). As long as the top fibers and the bottom resist these stresses, the joist will do its job of keeping your floor strong, straight and solid. But when you notch or drill a joist, you cut some of those fibers and reduce the joist’s ability to withstand compression or tension. And if you create a hole or notch too big or in the wrong place, you seriously weaken the joist, making it bouncy and saggy, and in a worst-case scenario, give it an easy place to crack and fail. In bathrooms and kitchens, water makes a beeline for these low spots, promoting rot and worsening the situation. And while catastrophic failure is rare, the sag and bounce you experience every time you cross a weakened floor is irritating. Plus, walls crack, doors stick and marbles roll under the dresser. That’s the real reason you want to follow the notching and boring guidelines.
Does your floor bounce too much? Check out this handy hint for fixing the problem.

Figure A: How Joists Work
When weight is applied to a joist, the top edge goes into compression while the bottom edge goes into tension. Improperly sized or placed holes and notches weaken the joist, make it bouncy and saggy, and provide an easy place for it to crack and fail.
Follow the rules to keep your floor solid
You can notch and bore joists without sacrificing critical strength, but you must follow the rules.
If your home is more than 20 years old, your floor joists are most likely solid wood 2x8s, 2x10s or 2x12s. The notching and boring rules of thumb for solid lumber are shown in Fig. B. Codes don’t directly address how many holes and notches you can cut in a joist. One rule of thumb is to provide twice the distance between holes as the diameter of the largest hole. Also, notching the top of a joist weakens it less than notching the bottom, and you should avoid locating holes (and notches) near loose knots.
Engineered wood I-joists have begun to replace solid wood joists during the last 20 years. If you’re remodeling or building with I-joists, your lumber supplier can provide you with a set of hole-drilling standards to follow. The guidelines for these are shown in Fig. B.
For those working with the less common open web or floor truss joists (Fig. B), the guidelines are simple: You can’t notch or drill them anywhere. Period. The cool thing about these, however, is that the space between cross members is usually big enough to accommodate big pipes, even ductwork.
The rim joist (Fig. B)—the framing member that runs around the perimeter of your house and that the floor joists butt into—often gets riddled with large holes. This space is the logical exit point for dryer and furnace vents, big electrical service wires and fireplace fresh air intakes. Since the rim joist is continuously supported by the walls or foundation it rests on, the strict notching and hole-boring rules don’t apply. Just don’t create a large hole or notch directly under a group of studs that support the end of a beam, or a window or door header above.
When in doubt, consult a structural engineer or your local building code official, who will have the final say.
Find out how to repair floor joists by doubling them up.
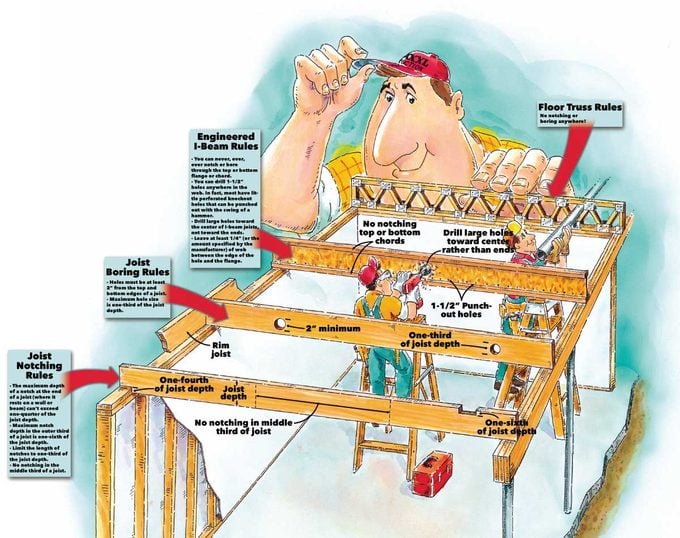
Figure B: Floor Joist Construction: Notching Wood and Boring Rules
Engineered I-Beam Rules
- You can never, ever, ever notch or bore through the top or bottom flange or chord.
- You can drill 1-1/2 in. holes anywhere in the web. In fact, most have little perforated knockout holes that can be punched out with the swing of a hammer.
- Drill large holes toward the center of I-beam joists, not toward the ends.
- Leave at least 1/4 in. (or the amount specified by the manufacturer) of web between the edge of the hole and the flange.
Joist Boring Rules
- Holes must be at least 2 in. from the top and bottom edges of a joist.
- Maximum hole size is one-third of the joist depth.
Joist Notching Rules
- The maximum depth of a notch at the end of a joist (where it rests on a wall or beam) can’t exceed one-quarter of the joist depth.
- Maximum notch depth in the outer third of a joist is one-sixth of the joist depth.
- Limit the length of notches to one-third of the joist depth.
- No notching in the middle third of a joist.
Floor Truss Rules
No notching or boring anywhere!
Joist Construction: Good planning means less notching wood and boring
If you’re building an addition or a new home, you can avoid most notching and boring by planning ahead to provide adequate pathways and space for pipes and ducts.
For plumbing clearances, follow the guidelines shown in Figs. C and D. The place where you’ll be most tempted to create oversize holes and notches—under the bathtub is the part of a floor you can least afford to weaken. A cast iron tub, with water and occupant, can weigh in at more than 800 lbs. If you need to cut through a joist, firm up the floor as shown in Fig. E.
To minimize problems with ductwork:
- Position bathroom vent fans so the ducts can run parallel to the joists—right up to where they exit the house.
- Make sure not to install joists so they run parallel to, and directly under, walls where you intend to install ductwork.
Finally, if all else fails, drop your pipes and ducts down below the joists and box them in with wood-framed soffits. They’re least obtrusive when run along an outside wall or center beam.
Click here to learn more about notching and boring through studs.
Figure C: Joist Clearances for Bathtub Drains
Leave at least 6 in. of clearance to one side and 3 in. to the other sides of the drain to provide room for the P-trap.

Figure D: Joist Clearance for Toilets
Leave at least 3-1/2 in. of clearance from the center line of the toilet to the nearest joist to allow room for the waste pipe.
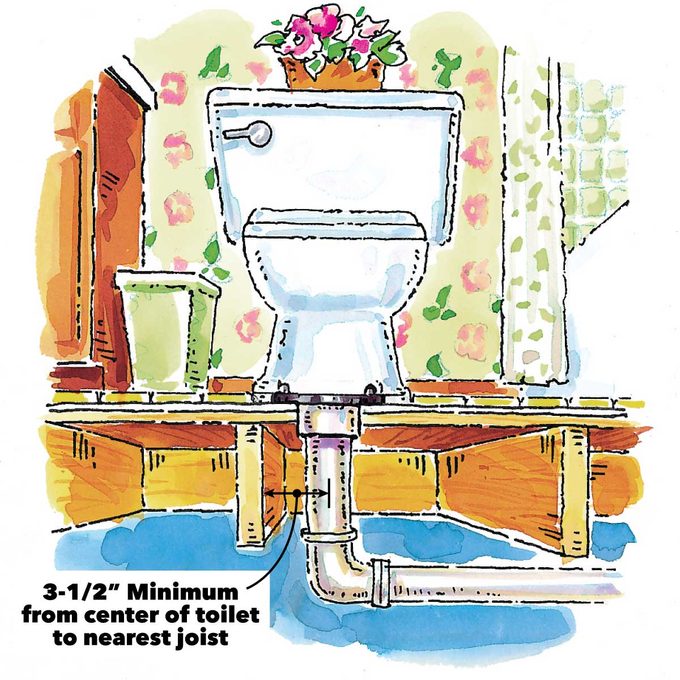
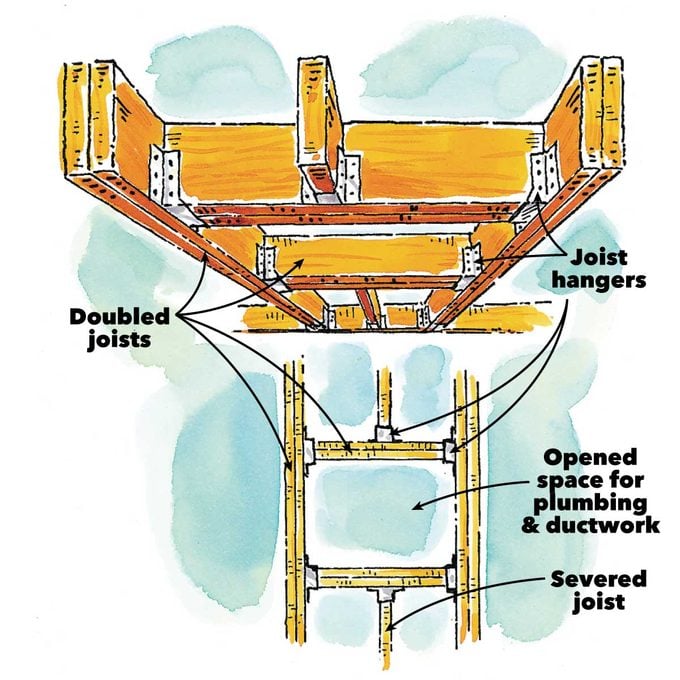
Figure E: Create Space by Doubling Joists
If you need to remove part of a joist, double the joists to each side, then add doubled joists between them to carry the load of the severed joist. Use joist hangers for all connections.