
How to Make Your Own Adjustable DIY Desk

Updated: Jun. 09, 2023
This customized DIY desk provides comfort whether you prefer sitting or standing.

Introduction
Finding yourself in need of a work-from-home space lately? Follow our step-by-step instructions and learn how to make a sturdy, adjustable desk that can accommodate you whether you prefer to stand or sit while working.Tools Required
- 1-1/14" spade bit
- 1/8" pre-drill bit
- 3/8" pre-drill bit
- Air compressor
- air nailer
- Drill
- Impact driver
- Mallet
- mitre saw
- Philips bit
- Sandpaper
- scraper
- Table saw
- Tape measure
- wood fill
Materials Required
- 1-1/4-in. 18-gauge brad nails
- 1-1/4" exterior wood screws
- 2 - 1x2 x 8 ft. pine boards
- 2 - 1x4 x 8 ft. pine board
- 3/8-in. dowel
- 4 - 2x4 x 8ft. spruce boards
- 5 - 1x6 x 8 ft. pine board
- 6 - 1x6 x 6 ft. pine boards
- Wood glue
Note: Pine lumber (1x) was used for everything except the base, inner legs and crosspiece. For those, we used 2×4 spruce.
- Pro tip: Be sure to buy extra lumber so you’re not running back to the hardware store in the middle of the project.
Project step-by-step (17)
Step 1
Build the Inner Legs
- Cut two 2x4s to 27-1/2-in.

Step 2
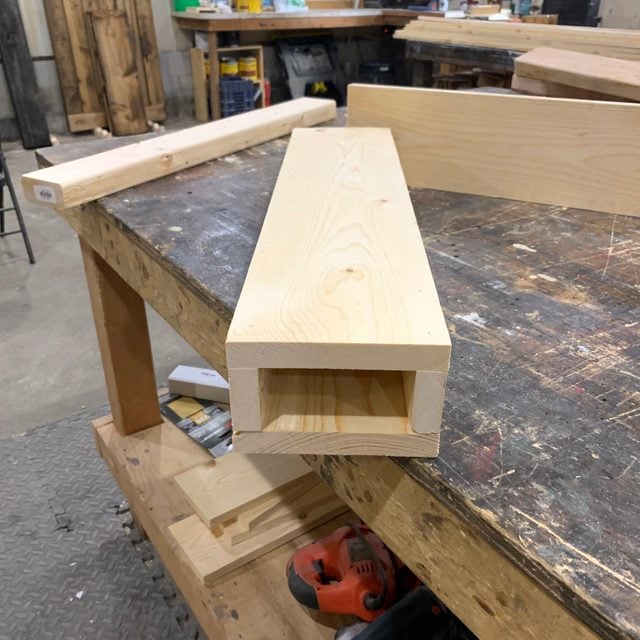
Build the Boxes For the Legs to Slide Into
- Cut four 1×6 (6 ft.) to 25-in. for the outside of the boxes.
- Cut two more 1×6 to 25-in.
- Cut four strips for the inside of the box to 1-3/4-in.
- Glue, pin nail, and clamp each box
- Let that dry overnight

Step 3
Build the Desk Top
- Cut three 1×6 (8 ft.) to 48-in.
- Glue each edge and clamp five 48-in. planks edge to edge (use a mallet to hammer lightly to make them as even as possible)
- Let everything dry overnight
- The next day, remove the top clamps and run each edge through a table saw to get a cleaner, more uniform edge


Step 4
Check the Fit By Putting the 2×4 Legs Into the Box.

Step 5
Add the Edging to Your Desktop:
- Cut two 1×2 to 27-3/4-in.
- Cut two 1×2 to 48-in.
- Glue, pin-nail and clamp 1x2s to each edge, leaving a slight lip underneath.
- Let that dry for the day


Step 6
Build the Legs
- Cut two base planks out of 2×4 to 28-1/2-in.
- I ended up cutting 1-1/2-in. off the boxes due to the base adding to the height. The legs are now 23-1/2 in.

Step 7
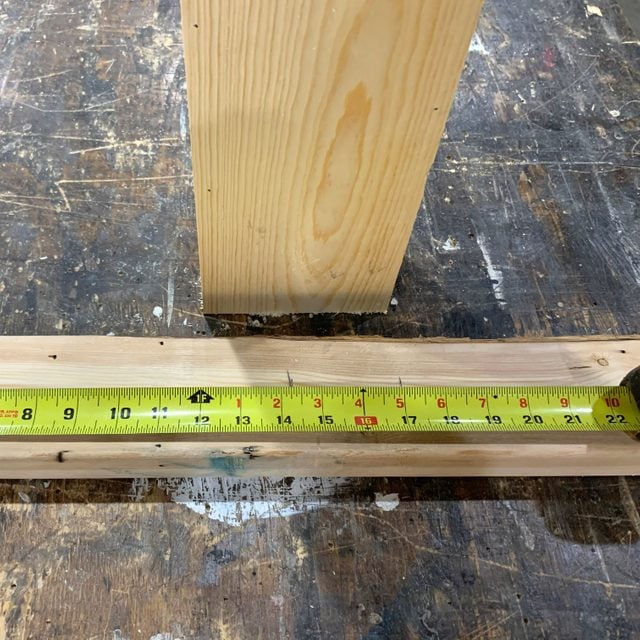
Attach the Boxes to the Base
- Measure 17-in. to the far side of the box from the closest edge of the base.
- The middle was 14-1/4-in. and then you add the other half of the box (i.e., 17-in.)
- Flip those upside down and glue them, pre-drill with a 1/8-in. bit
- Use four 2-in. screws to secure the box to the base.

Step 8
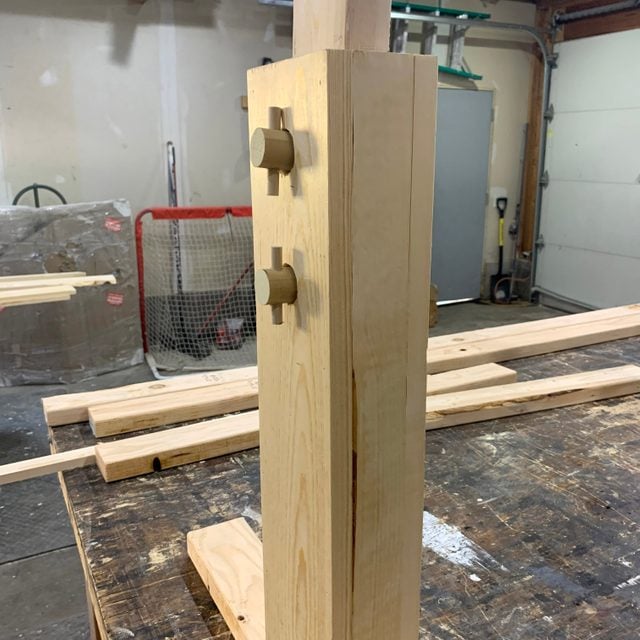
Prepare for the Pegs
- Drill large holes for the pegs using a 1-1/4-in. spade bit
- Holes should be located 2-1/2-in. and 6-1/2-in. from the TOP of the leg box
- Use the same spade bit to drill two holes 2-1/2-in. and 6-1/2-in. from the BOTTOM of the 2×4 inner leg
Make the Pegs
- Cut four pieces at 3-1/2-in. each. from the 3/8-in. dowel
- Clamp them and drilled a 3/8-in. hole in each
- Put a dab of glue into the small hole
- Slide four pre-cut to 3-1/2-in. dowel pieces into each existing hole


Step 9
Moment of Truth
Check if everything is even and fits together!
Step 10
Add Some Support to the Desktop
- Using the left over drop-off cuts from the 2×4 legs, cut a 50-degree angle on four pieces
- Cut the other edges at 45 degrees
- You should end up with a “Y” pattern for extra support

Step 11
Attach the Supports
- Screw the bottom of each brace into the leg using one 2-in. screw per side
- Pre-drilling with the 1/8 bit


Step 12
Add Some Extra Support
- Add a 1×8-in. brace to tie it all in
- Use four 1-1/4-in. screws to secure the brace

Step 13
Secure the Desktop
- Find the center of the top and make sure the top of the Y brace lines up
- Use 1-1/4-in. screws in the two angled predrilled holes
- Use 2-in. screws for the other predrilled holes
- Use wood fill to cover up the screw heads and to clean it up a bit

Step 14
Add a Brace Across the Top of the Box Legs for Extra Support
- Cut a 2×4 at 41-3/4-in.
- Attach it with 2-in. screws from the inside of the top of the box and toenailed from underneath

Step 15
Put It All Together
- Sand edges to avoid slivers
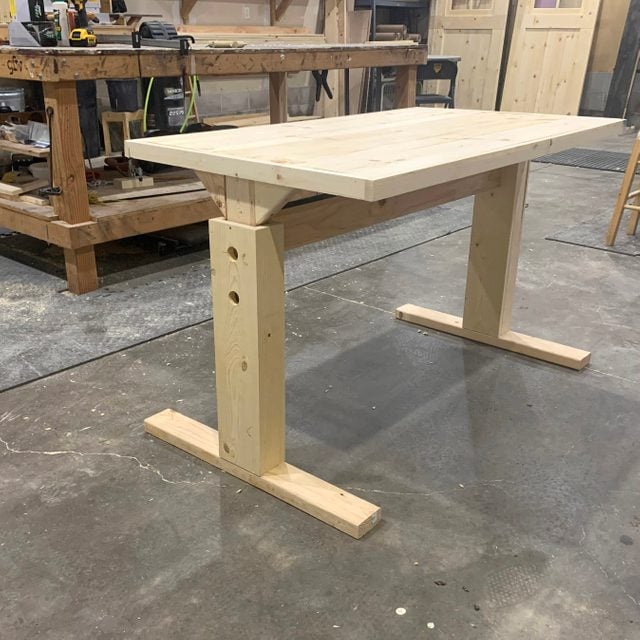
Step 16
Enjoy the Finished Product!

Step 17

Marty is a professional woodworker and the owner of Good From Wood, a custom woodworking shop located in Stillwater, Minnesota. Specializing in unique, vintage barn doors, custom skateboards and other innovative wood products, Marty hopes to always build the piece that everyone talks about. Click the links below to learn more about Marty.
Originally Published: April 06, 2020