
How to Build a Cedar Deck Railing With Glass
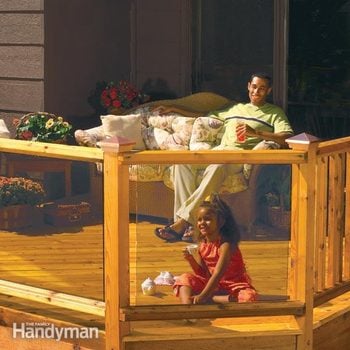
Updated: Feb. 01, 2024This see-through deck railing offers a clear view of your yard.
- Time
- Complexity
- Cost
- Multiple Days
- Intermediate
- $501-1000
Everything you need to get started
Whether you’re trying to keep track of your kids or to simply enjoy a soothing view of nature, most deck rails impede your view as you recline on your deck. To solve this challenge, we designed a cedar and tinted glass railing that not only improves your view but is strong and safe as well. And it adds a distinctive touch to your home’s outdoor living area.
This design can replace your current railing or fit nicely on a new deck. And you can customize it to fit any length between posts—you simply cut longer or shorter rails and plates, then order the appropriate glass size and number of spindles.
Like many glass deck railing systems, it features several classic rail components—4x4s, 2x4s and 2x2s—then adds the flair of routed 1x3s, 3/8-in. tinted safety glass and decorative post caps.
In this article, we’ll show you how to construct both the cedar spindle and the glass railing sections, as well as how to cut the posts and connect all the parts so they’re strong and safe.
This project involves basic carpentry skills. The only special tools you need are a router with a 3/8-in. corner round-over bit, and a 3/8-in. x 12-in.drill bit to bore through posts and rim joists. We also recommend an air-powered finish nailer. It will make your project go faster and help you nail close to the glass without cracking it.
Glass railing cost
Figure the cost of glass deck railing systems at about $37 for each 5-ft. section of the cedar spindle railing. The same size section in cedar and 3/8-in. safety tempered, tinted glass will cost about $240. This glass is pricy! Glass retailers also sell 1/4-in. tinted, safety tempered glass at less than half the cost of 3/8-in.,but call your local building inspector to see if it meets local codes. We recommend the 3/8-in. thickness because it can handle more abuse and span longer rail sections than 1/4-in. glass. Avoid clear glass; birds will bash into it because they can’t see it. Most glass companies offer a bronze (which we used) or a gray tint.
Start with post layout and plan each section
First, decide which rail sections need glass to improve your view. Use it to highlight a feature such as a lake, grove of trees, children’s play area or garden. Or it could correspond to a sliding door on the house to extend your view through the railing.
Next, plan your post locations for your cedar railing. Start with posts at all 90-degree deck corners and next to the house. For angles less than 90 degrees, place posts to one side of the angle to avoid complex notch cuts (opening photo and Photo 4). Then add posts in-between, so no rail section is longer than 6 ft. between posts. Now calculate all the materials you need (use Figure A) and place your order for delivery.
When you call a local glass retailer, make sure you request safety tempered, tinted glass with a height of 29 in., even though the actual space is 29-1/2 in. between the top and bottom rails. The length of the glass will be the distance between posts minus 3 in. (there’s a 1-1/2 in. gap between the post and the glass on each end). And don’t forget to obtain a building permit if needed in your area.
Figure A: Cedar Rail Assembly
These illustrations show how the rails are assembled and fastened to the deck.
Set the cedar railing posts first
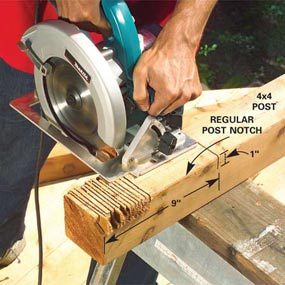
Photo 1: Notch the posts
Plan the number of 4×4 posts you need and cut them to length (Figure A). Notch the post by making a dozen crosscuts with a circular saw, and then use a wood chisel to chip out the notch until smooth.

If decking hangs out past the rim joists, mark the post locations and cut back overhanging decking with a jigsaw so each 4×4 post will attach flush to the joist. Then place posts for the cedar railing on sawhorses and cut each 47 in. long. Use a square as a guide for straight cuts. Then cut a 1-in.notch in the lower end of each post (Figure A). Set your circular saw to cut 1 in. deep and crosscut the post as shown (Photo 1).
Then place a wood chisel between cuts and snap off the pieces. Shave the cut area smooth with your chisel. To notch a corner post, cut a 1-in.deep saw kerf in each side. Then trim the notch with a sharp chisel.
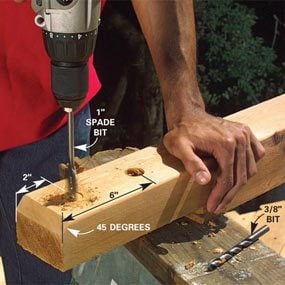
Set your circular saw at 45 degrees and cut a bevel 3/4 in. from the end (Photo 2). Center 3/8-in. bolt holes 2 in. and 6 in. from the bottom of the post (Figure A). For corner posts, a carriage bolt won’t work, so use a pair of 3/8-in. lag screws. Position one on each side so they enter the rim joist, and pre-drill with a 1/4-in. bit.
Now you’re ready to attach each post to the rim joist (Photo 3). Place the post upright in the notched decking and drive the 3-in.deck screws inside the upper 1/2-in. deep recess to hold the post in place. Plumb the post side-to-side and front-to-back at this point, then add the lower screw (Figure A). These screw heads will be hidden by the carriage bolt head. The screws allow flexibility when assembling the rail. But the rail won’t be strong and safe until you fasten the bolts later.
Attach top and bottom rails
We designed the framework for the glass railing and the cedar spindle railing to be identical. Measure between each pair of posts (at the decking level) and use this length for both top and bottom 2×4 rails, and top and bottom 1×3 plates (Figure A). (Note: if you can’t buy cedar 1x3s, rip 1x6s in half.)
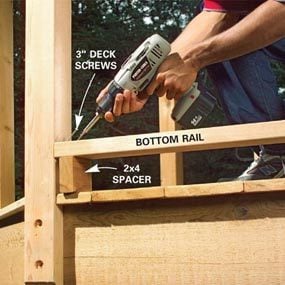
If rails meet posts at 45 degrees, keep the inside edge of the rail flush with the inside corner of the post. Cut off the outside edge of the rail so it’s flush with the post (Figure A). Cut the rails and plates and assemble the framework by toe-screwing the bottom rails into the posts using two 3-in. deck screws.
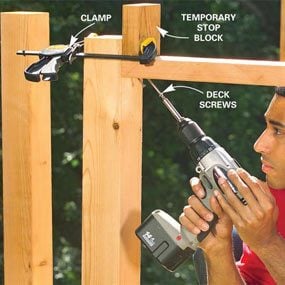
Pre-drill holes first (for both rails) using a 1/8-in. bit to prevent splitting. Use a scrap 2×4 spacer on edge as shown (Photo 4). Next, mark the posts at 31 in. from the top of the bottom rail and clamp a stop block at that mark. Push the top rail up against it and fasten it with a pair of 3-in. screws (Photo 5).
Now that the rails are installed and the posts are plumb, drive a long 3/8-in.drill bit through the posts and joists. Then install the carriage bolts (and lag screws on corner posts) and tighten.
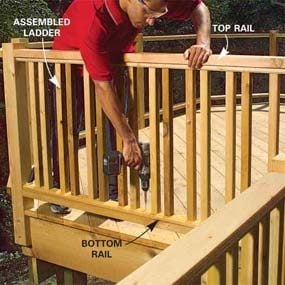
Assemble the cedar spindle ladder
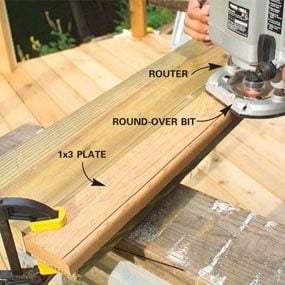
Photo 6: Rout the plates
Cut the 1×3 plates to match the rails. Clamp and rout their edges—good side up. Adjust the depth so the 3/8-in. corner round-over bit leaves a crisp line at the top.
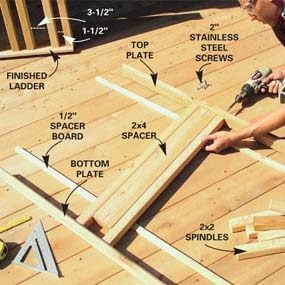
Photo 7: Assemble the rail ladder
Cut all spindles to length, then build the rail ladder by screwing through the top and bottom 1×3 plates into their ends. Use a 2×4 spacer board to get consistent 1-1/2 in. and 3-1/2 in. spindle spacing.
Next, install a 3/8-in. corner round-over bit in your router and round off the two edges of the best side of all 1×3 plates (Photo 6). You’ll have to move the clamps to complete each end. Then figure the exact length of the cedar spindles and cut them. In most cases, they’ll be 28 in. long (for a 36-in.-high top railing), but they might vary depending on the thickness of your 1×3 plates and 2x4s.
Now, set up your ladder building section as shown (Photo 7). Lay 1/2-in.-thick spacer boards under the 2×2 spindles to center the spindles on the 1×3 plates. Make sure the routed edge of both plates faces inward. To get a uniform spindle pattern from section to section, center your 2×4 spacer board on the top and bottom plates (Figure A), then add the spindles, working in both directions. The way the pattern meets the post will vary with the length of the sections. Be sure to leave no gap wider than 4 in.
Use one 2-in. stainless steel screw per spindle, placed slightly off-center to leave room for a nail. Use the same 2×4 spacer board, on edge, to achieve the 1-1/2 in. spacing for the next spindles. Tip: Flip the spacer board end for end as you add spindles to balance any irregularities.
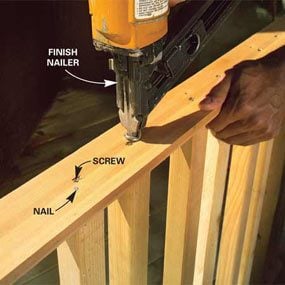
After you attach all the spindles, stand the ladder up and add a 2-in. galvanized finish nail to each spindle so it won’t rotate (Photo 8). Flip it over and repeat.
Finally, slide the assembled ladder between the top and bottom rails (Photo 9). Screw it into the top and bottom rails, using 2-in. stainless steel screws, spacing the screws about every foot.
Assemble the glass railing
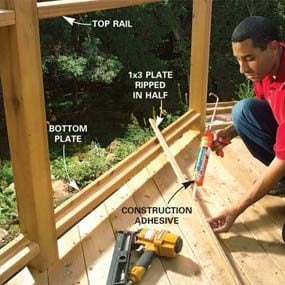
Photo 10: Install the top and bottom plates for the glass panel railing
Rip both top and bottom 1×3 plates in half to sandwich the glass. Then glue and nail the outside half to the bottom and top rails.
First, rip the 1×3 plates in half as shown, add construction adhesive to the outside pieces only and nail them to the top and bottom rails (Photo 10). Use the finish nailer to drive a 2-in. galvanized nail every 6 in.
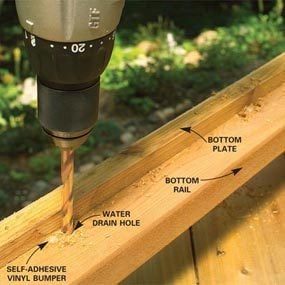
Take a rag and wipe the bottom rail clean along the plate. Now place 3/8-in. self-adhesive vinyl bumpers on the bottom rail against the plate every 18 in. as shown (Photo 11). The glass will rest on the bumpers. Next drill a 3/8-in. hole on each side of all bumpers, through the bottom rail, so water won’t collect where the glass and bottom rail meet. Then clean off all wood shavings. Next, place the glass on top of the bumpers, center it and press it tight against both top and bottom plates.
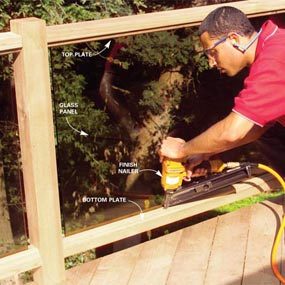
While an assistant holds the glass, place the top plate against the glass under the top rail and nail it carefully, making sure the nailer and nails don’t touch the glass. Then attach the bottom plate (Photo 12).
The finishing touch is selecting the post caps that rest on top of the posts. Home centers usually carry a few styles. We used an Internet retailer that carries a broad line of post caps.
Figure B: Cedar and Glass Rail Assembly
These illustrations show how the glass is installed between the rails.
Required Tools for this Project
Have the necessary tools for this DIY project lined up before you start—you’ll save time and frustration.
- Caulk gun
- Circular saw
- Clamps
- Cordless drill
- Drill bit set
- Hammer
- Hearing protection
- Level
- Router
- Safety glasses
- Speed square
- Tape measure
- Wood chisel
You’ll also need a 3/8-in. corner round over bit for your router.
A brad nail gun and air compressor are not necessary, but they’ll make the job go a lot faster. A miter saw can be used to cut the rail parts to length instead of a circular saw.
Required Materials for this Project
Avoid last-minute shopping trips by having all your materials ready ahead of time. Here’s a list.
- 1 x 3 in. plates
- 1/2 x 1/2 in. spacer boards
- 2 in. stainless steel screws
- 2 x 2 in. spindles
- 2 x 4 in. rails
- 3-in. deck screws
- 3/8 x 6 in. carriage bolts
- 4 x 4 in. posts
- Construction adhesive
- Tinted safety glass
