
How to Build a Wood and Stone Deck
Updated: May 04, 2023Combine veneer stone with a simple deck to create a striking, durable outdoor living room.
- Time
- Complexity
- Cost
- Multiple Days
- Intermediate
- $501-1000
Step 1: Overview
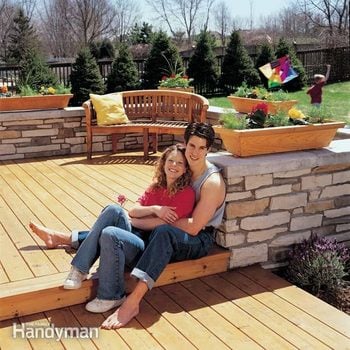
This small deck comes with big, eye-catching features that make it seem twice the size. We combined traditional decking with a natural-looking stone wall to limit foot traffic and get full use of the space for relaxation. The stone wall is set at a perfect bench height, so you have plenty of built-in seating. In addition, the manufactured stone veneer has the massive look of a solid stone wall but is much lighter and easier to build with. The wall looks great, needs almost no maintenance and will last for decades.
We’ll show you a foolproof way to lay out and construct this ground-level deck, and simple steps for preparing and installing manufactured stone walls.
This deck project is great for both intermediate and advanced do-it-yourselfers, since it requires only basic skills with hand and power tools. But you will need help lifting the heavy wall caps into place. Allow three or four full weekends for you and a helper to complete it.
Our deck has two platforms that connect to doors on different levels and provide for a gradual transition down to the yard. The main deck is about 14 ft. square and the second is slightly more than 8 x 9 ft.
You’ll need basic carpentry, concrete and masonry tools to build this project. You probably have the carpentry tools: circular saw, drill, hammer and level, and the concrete and masonry tools (Photos 10 – 19) are relatively inexpensive. Finally, round up a posthole digger, a shovel and a wheelbarrow.
Figure A: Deck Frame Dimensions and Materials
Draw out your plan in detail (or modify ours) and make a list of your lumber and other materials. Then shop at a full-service lumberyard and plan to have it all delivered. This will allow you to concentrate on building the deck rather than running to get the next load of materials. The framing is .40 pressure-treated wood and the decking is cedar.
Manufactured stone comes in a variety of colors and styles, ranging from random fieldstone to rectangular-cut slate. The stone we selected has the look of weathered limestone. The stone is actually lightweight concrete poured in molds cast from real rocks. It’s durable even in harsh climates and made to last for more than 30 years. Buy it from brick and stone suppliers.
Buy your mortar from your stone supplier as well. It’ll carry the stuff the pros use. These mortars tend to be more workable than varieties found at home centers and will give you consistent results.
Before you have any materials delivered, submit your plans to the local building department. The stone wall adds considerable weight, so if your plan varies from ours, hire an architect or structural engineer to calculate footing locations and sizes. The inspector will check the strength of the framing and issue a permit. It’s not uncommon for an inspector to make minor changes in a plan, so be prepared to adjust your lumber order if need be.
A printable Materials List for the deck shown here is available in Additional Information below.
Step 2: Set the ledger to get things started
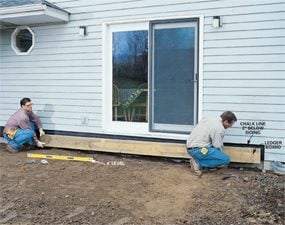
Photo 1: Remove the siding
Pry off the exterior siding. (Cut it to fit later.) Then cut the 2×10 ledger board to length and align it with a level chalk line about 3 in. below the door sill. Tack it in place with 16d galvanized box nails.
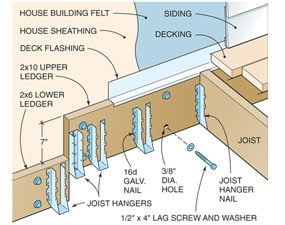
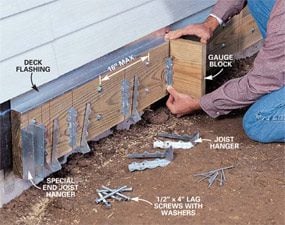
Photo 2: Drive lag bolts between hangers
Mark the joist positions according to your plan. Then predrill 3/8-in. holes for the 1/2-in. lag screws. Lag-screw the ledger board to the house, using two screws between each joist. Slip the deck flashing in place. Align each joist hanger with a joist scrap, and fasten one side with 16d galvanized nails. Purchase special joist hangers for the ends that have the flanges turned in.
The first step in constructing our deck was to cut the siding away from the house and fasten the ledger board (Photo 1). Cutting into your house might make you a little nervous. But if you follow our tips and measure carefully, you won’t ruin anything.
Position the top of the deck about 1-1/2 in. below the threshold to keep snow and water out of the house. Snap a level line on your siding 1/2 in. above that height for siding clearance. Then measure and mark the ends of the ledger according to your plan. If your siding is wood, set your circular saw to the depth of the siding and cut the top and sides. Then pry the siding off. If you have vinyl or aluminum siding, you may be able to cut it off with several strokes of a utility knife, or use a circular saw with a plywood blade. Another alternative is to simply remove a section of siding (as we did), cut it and replace it later, replacing the bottom and side channels as needed.
If you have brick, stucco or block walls, you can skip this step and hang the ledger board directly against the face of the masonry.
Select straight 2x10s for the ledger and outer beam. Cut them to length, then lay them side by side and, following the plan, mark the joist locations using a tape measure and square (Fig. A). Place an “X” on the side of the line where the joist will sit.
Lag-screw the ledger board to the house rim joist (Photos 1 and 2). Check local codes if you’re fastening into concrete or brick. Be sure to slip a piece of deck flashing, available in 10-ft. lengths from your lumberyard, on top of the ledger board and under the siding. (Some pros like to slip it under the building felt as well.) You may have to pull or cut a few nails to slip the flashing in place. Overlap additional lengths 2 in. and seal the seam with silicone caulk.
CAUTION!
Call 811, the national one-call number for underground utilities, and have the utility lines marked before you dig the holes.
Step 3: How to pour ‘dead-on’ footings
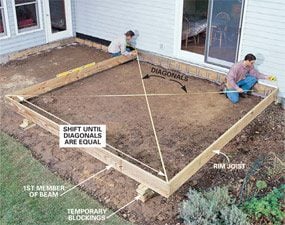
Photo 3: Assemble the frame
Cut and temporarily tack the outer frame of the deck together with 16d galvanized nails. Level the frame, using blocking to support it. Next, square the frame by shifting the outer edge side to side until the diagonal measurements are equal.
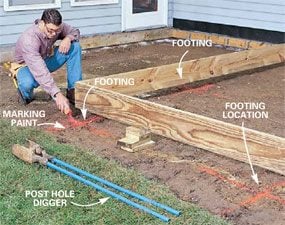
Photo 4: Locate the footings
Mark your footing locations, using the deck frame to accurately position them. Paint a cross with spray paint. Extend the cross beyond the diameter of the footing so you can easily keep the hole aligned as you dig. Disassemble the frame and dig your footings.
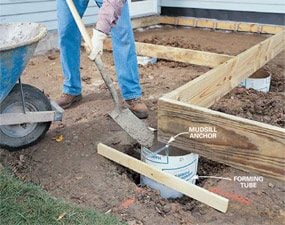
Photo 5: Pour the concrete
Insert forming tubes into the footing holes, then reposition the deck frame, again leveling and squaring it. Tack one side of the mudsill anchors to the frame. Slide the forming tubes up to the bottom of the frame and screw them to a pair of temporary 1x4s to hold them in place. Fill the tubes with concrete, smooth the tops and let the concrete harden overnight. Check the frame for level the following morning (the concrete may shrink slightly as it cures), shim if necessary to level, and double the beams where required. Then permanently fasten the mudsill anchors to the frame with joist hanger nails.
Misplaced footings are the most common mistake in deck construction. Use the method shown in Photos 3 and 4 and you’ll get exact footing placement on your first try.
This deck has only six footings, so you can dig them using a manual posthole digger. If you have more, consider renting a gas-powered auger. Dig them to the size approved on your plan and to the frost depth in your region (Fig. C). In most regions, the building inspector will want to measure the depth and width of your holes before you fill them.
Before pouring concrete, reassemble the deck frame and attach the anchors (Photo 5). If you feel confident in your concrete finishing skills, go ahead and order a truckload of concrete and pour the footings and wall caps at the same time. For our footings and caps, we ordered 1-3/4 cu. yds. of concrete, allowing about 10 percent extra for comfort. The pace is fast when you have a truck on site. Be sure to have at least two extra people to help.
If you’re a little unsure of your finishing skills, mix bagged concrete for the caps and footings. It’s more work, but it will allow you to move at a more relaxed pace.
When you pour the concrete into the footing holes, work it in with a stick or the handle of a shovel to fill any voids. Then, using a trowel, strike off the top even with the bottom of the framing.
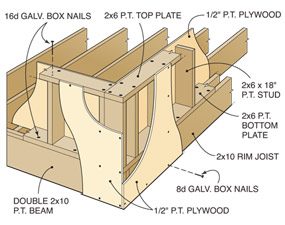
Figure C: Footing and Wall Framing
This cutaway details the wall construction from the footing to the cap.
Note: P.T. means pressure-treated.
Step 4: Framing goes fast
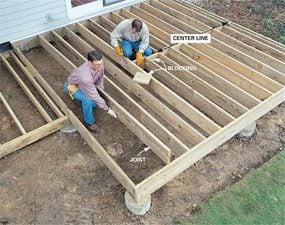
Photo 6: Add the joists
Cut and install the 2×10 joists, sliding them into the joist hangers. Drive 1-1/4 in. galvanized joist hanger nails into the joists and 16d galvanized box nails into the ledger, filling all the nail holes in the hangers. Nail blocking between the joists with 16d galvanized nails, alternating between the sides formed by a chalk line snapped across the center line of the deck.
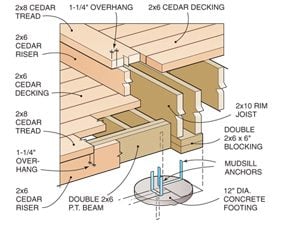
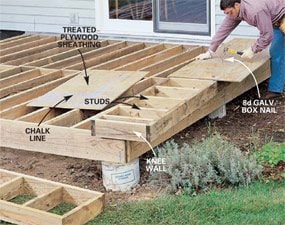
Photo 7: Build knee walls
Assemble the 2×6 knee walls according to the plan using 16d galvanized nails. Sheathe the outside with 1/2-in. treated plywood, securing it every 8 in. with 8d galvanized box nails. Snap chalk lines on the plywood at every stud to make sure your nails hit solid wood.
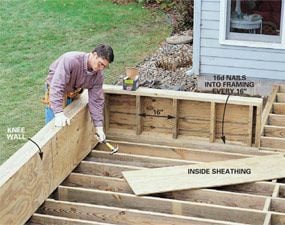
Photo 8: Fasten the knee wall
Tip the walls into place and plumb them, shimming under the bottom plate as needed. Nail the bottom plate to the deck framing every 16 in. with 16d nails. Nail the overhanging plywood into the deck framing with 8d nails. Then nail the inside plywood sheathing to the walls.
With the layout complete and the concrete set, the framing goes fast. Cut all your joists to length and slip each into the hangers (Photo 6). Label any bow (crown) with an arrow pointing up. When you install the joist, always set the crown up.
Check that the top sits flush with the beam and ledger. If you have to, slip a treated shim between the hanger and the joist to raise it, or knock a little off the bottom with a chisel to lower it. Blocking (Photo 6) stiffens a deck that has long joist spans. It’s now time for your framing inspection.
You’ll see the terrace effect take shape as you construct the knee walls (Photos 7 and 8). Using a circular saw, cut your 2×6 studs 18 in. long. Measure for the length of the plates directly off the deck frame, not by referring to your plan. Nail the studs every 16 in. between the plates with 16d galvanized nails. Then attach the plywood, using the factory-cut edge to square up the walls, and tip them up (Photos 7 and 8).
Step 5: Prep the walls with a solid mortar base
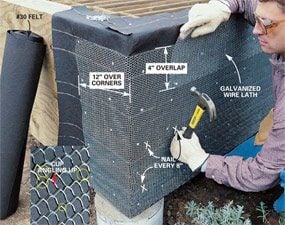
Photo 9: Staple felt
Staple No. 30 asphalt-impregnated felt to all the wall surfaces. Then install metal lath horizontally with the cup of the extrusion aiming upward. Nail it every 8 in. with 1-1/4 in. galvanized roofing nails, wrapping the corners a minimum of 12 in. and overlapping each sheet a minimum of 4 in.
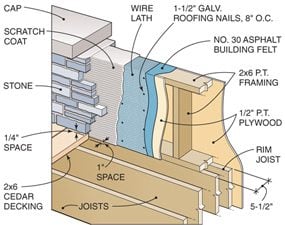
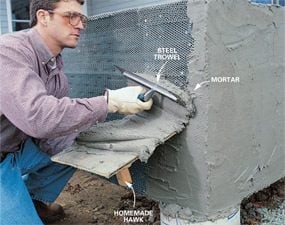
Photo 10: Spread mortar on lath
Mix the mortar according to the directions on the sack and scoop it onto a hawk. Hold the hawk against the wall, and slide the mortar onto the wall with a steel trowel. Firmly press the mortar into the lath, completely covering it by a good 1/8 in. Work fast. Have a helper mix mortar while you spread it.
First staple No. 30 asphalt felt to the plywood and wrap it over the top. It goes on a lot faster if two people work together, one unrolling as the other staples. Overlap any joints by at least 6 in.
Nail up galvanized mesh next (Photo 9). Be sure to wear heavy gloves to protect your hands—this stuff is sharp. Cut it with regular metal-cutting shears. Some types of wire mesh have little bumps on the back every 8 in. or so to space the mesh away from the wall (Photo 9). Put the bumps against the wall.
Mix up the mortar and apply it to the wall. Wear gloves and goggles to protect your skin from the caustic cement. Mix the mortar two or three bags at a time in a wheelbarrow with a short, flat-nosed shovel or a hoe. Add water slowly to the dry mix until it reaches the consistency of whipped cream. Then mix it aggressively for five minutes. Let it rest for a few minutes before you start applying it to the wall. Test the consistency by drawing the shovel back and forth in the mix. It should have a creamy texture yet still hold its shape when you spread it onto the wall (Photo 10). You’ll know immediately if the consistency is right. If the mortar is too wet, it’ll drip all over the place and fall off the trowel. If it’s too dry, it will be difficult to press into the mesh and it’ll peel off as you slide the trowel across it. Add mortar mix or water as needed.
Apply the mortar quickly. A helper is crucial to keep a fresh supply mixed and ready to go. Keep the wheelbarrow out of the direct sun to prevent the mortar from drying out.
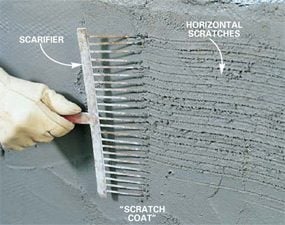
The next step is to “scratch” horizontal grooves into the mortar (Photo 11) after it firms up slightly. Use a special tool called a “scarifier” that’s available at stores that specialize in masonry tools, or simply a steel-tined garden rake. The important thing is to set horizontal grooves to provide a good bonding surface.
Cover the mortar scratch coat with plastic and let it harden and dry for two days before applying the stone.
Step 6: Apply the decking while the mortar cures
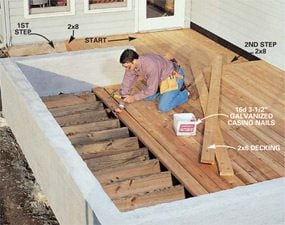
Photo 12: Nail the deck
Install the decking. Drive two 16d galvanized casing nails through the 2×6 decking into each joist. Set the nails slightly below the surface with a nail set. Start at the step of the lower deck, work toward the house, then align the boards of the upper deck to the lower and work away from the house. Straighten bowed boards by drawing them toward you with a chisel driven into the joist. Then nail, using a nail for a spacer between boards.
We selected 2×6 cedar decking for this project for its natural look, but you could also use one of the plastic/wood composites for extra durability. Start by attaching the riser trim to the lower step (Fig. D) then the 2×8 tread to the top on the lower platform. A 1-1/4-in. overhang on the tread creates a shadow line, making an attractive step. Then work in toward the house, spacing the 2×6 boards with the casing nails. Put the best-looking side face up. Start with a good, straight board and align the others with it. To straighten a bowed board, lay it with the arc against the installed one. Nail one end and work to the other, prying the board straight with a chisel as you go (Photo 12).
As you get within 3 ft. of a wall, measure the remaining distance to see if it’s equal on both ends. If not, stretch your spacing slightly between the boards to make the last board at the house (and at the stone wall) even. You’ll probably have to rip (cut the long way) the last board to width.
Apply the riser trim to the upper step and nail on the 2×8 tread (Photo 12). Then lay the first board against the house, ripping it to the width of the final board on the lower deck to make the decking line up. Butt the ends of the deck boards up tight to the treads, but leave the other ends about 1 in. from the knee walls so water and debris can fall through. The stone will cover this gap once installed. When you’re done decking, place cardboard over the surface to protect it from scratches and mortar stains while you’re working with the stone.
Step 7: Watch our pro set stone
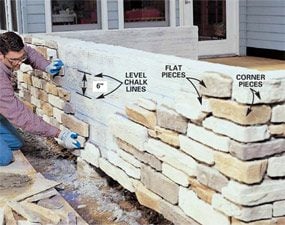
Photo 13: Snap reference lines
Snap level chalk lines on the walls every 6 in. as rough guidelines. Apply the stone, starting with the bottom corners and working your way up and out, staying in a stair-step shape. Spread a pile of stones nearby to provide a wide selection.
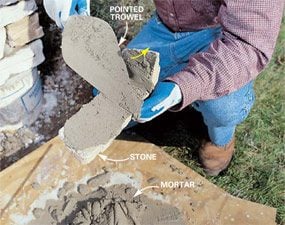
Photo 14: Back butter
Butter each stone by spreading mortar on the back. Press the mortar into the pores of the stone as you draw the trowel toward you, drawing off the excess.
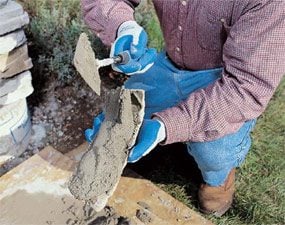
Photo 15: Spread mortar on the back
Drop a dollop of mortar onto the buttered stone and evenly spread a 1/2- to 3/4-in. layer, completely covering the back.
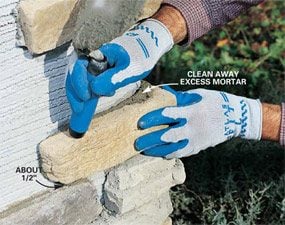
Photo 16: Set the stone
Press the stone into place, giving it a wiggle to seat it against the wall. Tap the stone with the handle of the trowel for slight adjustments. Leave about a 1/2-in. gap between stones. Using the point of the trowel, clean away excess mortar that oozes out into the joint.
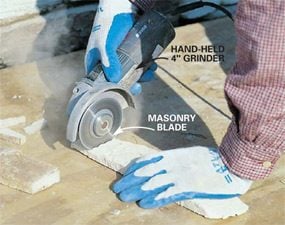
Photo 17: Cut stone to length
Cut the stone as needed with a hand-held grinder equipped with a diamond-tipped masonry or tile blade (or a circular saw with a diamond blade). Firmly hold the stone on plywood with your fingers well away from the blade.
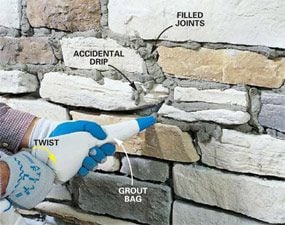
Photo 18: Fill the mortar joints
Squeeze mortar into all joints, filling them completely, using a grout bag. Start from the top and work your way down. Twist the bag slightly with one hand as you squeeze with the other hand to force the mortar out of the bag. Let the mortar set long enough to hold a thumbprint.
Applying the stone is the most creative and enjoyable part of the project. It’s half art and half technique. First snap level chalk lines 6 in. apart on the face of the walls, measuring up from the bottom of the wall (Photo 13). Use these lines as a guide, not an absolute reference, to keep the stones level as you work. Next spread a generous amount of stone out on scrap plywood to keep it clean and dry. Select stones from different boxes to get a feel for the various shapes, sizes and colors you’ll be working with. Start at the bottom of an outside corner first and apply the special corner stones. Work your way toward the top in a pyramid fashion (Photos 13 and 16). In the last 12 to 18 in., search for three or four stones that will end flush with the top, by dry-fitting them in place (without mortar). As you select a stone, always think about how the next one or two pieces will fit. Try to fit as many pieces as possible without cutting. It’s a bit of a puzzle. You can cut stone if you have to, but it’s dusty, it slows down the work, and the cut edge doesn’t look quite as natural as the cast edge.
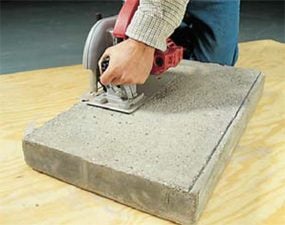
To cut the stone, use a hand-held grinder with a diamond blade (Photo 17). Hold the stone in place and mark it, allowing 1/2 in. on each side for the joint spacing. Then make your cut with the face of the stone up. Wear a dust mask and hearing protection while you cut.
Adhering the stone is a three-step process (Photos 14 – 16). First you “parge” the stone (press mortar into the back of the piece), then apply a second layer evenly across the back and finally, press the stone in place.
Be sure the scratch coat is dry before you apply the stone. The stone must also be dry, so protect it from moisture. Don’t even consider installing it on a wet or drizzly day.
TIP: Add about a quarter of a shovel of Portland cement to three bags of mortar mix to richen it up a little. This is our pro’s secret, for your eyes only!
Keep the mortar at a stiff whipping cream consistency. As you work, it will dry out, so add a little water now and then to keep it workable. Throw out leftover mortar after a half hour and mix a fresh batch.
Begin on the least conspicuous wall first to get the hang of it. Step back from the wall occasionally to be sure the colors blend well and the shapes and sizes are spread evenly throughout the wall. Resist the temptation to put the stone in rows all the same width. Break rows up fairly often with a larger piece. Stagger your vertical joints. Aim for about 1/2-in. joint spacing, but don’t get obsessed with individual pieces.
When you set the stones on the inside walls, keep them 1/4 in. off the deck surface to allow for airflow and to prevent rot.
With the stones set, finish the joints by grouting (Photo 18). Use a grout bag to fill the joints with mortar, like squeezing frosting from a pastry bag. If the bag you’re using has a metal tip inside, remove it. The tip tends to clog with mortar.
Mix the grouting mortar a bit more moist than you did for setting stone. Fill the bag using your trowel and give it a test squeeze. The mortar should be thick but flow rather than clog up. It takes some effort to force the mortar out of the bag. Your forearms will feel the strain after a while. Work quickly. If you drip mortar on the stone, let it dry before you brush it away. If you wipe it now, it’ll smear and stain the stone.
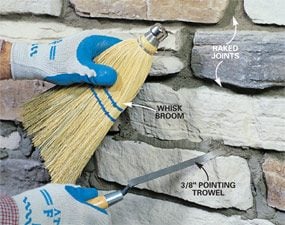
In 15 to 60 minutes, the mortar should stiffen to “thumbprint” hard (a thumb barely leaves a print when you press into it). Then rake away the excess with a pointing trowel (Photo 19). When raked, it should fall away as moist crumbs. After you rake a few square feet, lightly brush away any excess with a whisk broom. If the mortar smears, let it harden longer.
Step 8: Setting the caps
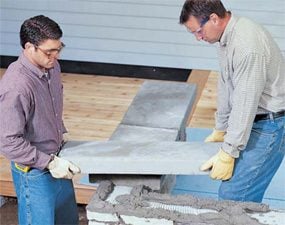
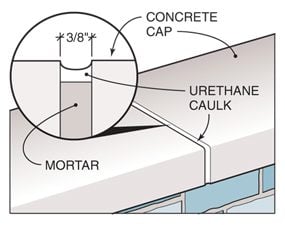
Lift the caps into place (Photo 20). These caps are heavy, so work carefully. Clean the work site to avoid tripping, and lift with your legs, not your back. Check for level, and then if necessary, wiggle on one end or the other as you press down to level the cap. Immediately check to make sure your overhang is even on all sides. The mortar grabs pretty fast, so work quickly. As you work, sight down the wall to make sure the caps are straight. Give each cap a 3/8-in. gap and later fill it with mortar to 3/8 in. from the top (Fig. H). After the mortar dries, fill the remaining gap with a gray urethane caulk to form a watertight seal.
All that’s left is to put a quality sealer on the decking to protect it. Bring on the furniture, then sit back and enjoy a well-deserved break!
Step 9: Make your own concrete caps
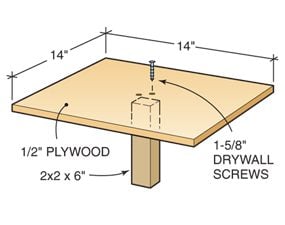
A: Concrete cap mold
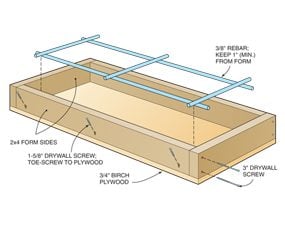
Cut the 2x4s to length and screw the ends together with 3-in. drywall screws. Toe-screw (screw at an angle) the sides to the 3/4-in. plywood base every 12 in. with 1-5/8-in. screws. Cut the 3/8-in. rebar to length with a circular saw and a metal-cutting blade.

B: Add concrete
Fill the forms one-third full with concrete, drop in the rebar, then finish filling the forms. Work the concrete into the corners and sides with the blade of the shovel as you go.
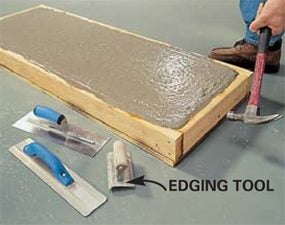
C: Level and compact the concrete
Level the excess concrete flush with the top of the form, then hit the sides of the form sharply with a hammer to eliminate air pockets. Quickly smooth it with two or three swipes of a magnesium trowel. Let the concrete set until any water that rises to the surface disappears and the concrete is “thumbprint” stiff. Then tool the edges with an edging tool to round them over. Finally, smooth the surface with a steel trowel.
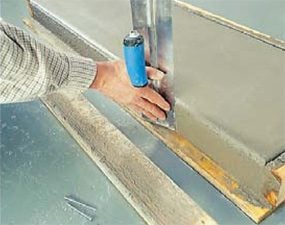
D: Remove the forms
Unscrew one side of the form when the concrete stiffens. This may take as little as 30 minutes or as long as three hours. If the concrete holds its shape (doesn’t sag), smooth the side with a steel trowel, filling in any voids left in the concrete. If the concrete slumps, put the form back in place and let it set longer. Otherwise, remove the 2×4 forms and smooth all sides. Let the concrete set for a week.
Some manufacturers make special capstones for topping off these walls, but for a smooth, more durable finish, we recommend making your own concrete caps. Here’s how.
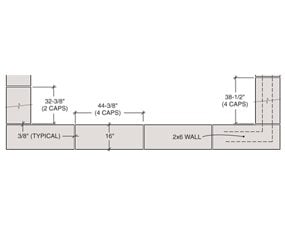
Cut and assemble the forms according to the sizes in Fig. J. When designing your own caps, limit lengths to about 3 ft. (150 lbs.!) Beyond that they get too heavy to carry safely. Screw together everything so you can remove the 2x4s easily.
Follow Steps A – E. The biggest mistake is to tool the concrete too soon, before the water that comes to the surface has time to reabsorb.
Here are a few more tips to help your concrete work go smoothly:
- Wear rubber gloves, goggles, long pants and a long-sleeve shirt to protect your skin.
- Wet the forms before pouring the concrete.
- Place the forms on a flat, level surface. Wet concrete will lie level when you settle the mix with a hammer (Photo C).
- Protect the fresh concrete from rain and direct sun.
- Pour the concrete in the morning. The lower temperatures will prevent the concrete from setting too fast and give you more finishing time.
- Let the caps set for at least a week to harden.
Additional Information
Required Tools for this Project
Have the necessary tools for this DIY project lined up before you start—you’ll save time and frustration.
- Adjustable wrench
- Angle grinder
- Caulk gun
- Chalk line
- Circular saw
- Cordless drill
- Framing square
- Hammer
- Jigsaw
- Knee pads
- Level
- Miter saw
- Posthole digger
- Safety glasses
- Socket/ratchet set
- Spade
- Stapler
- Tape measure
- Tin snips
- Trowel
