
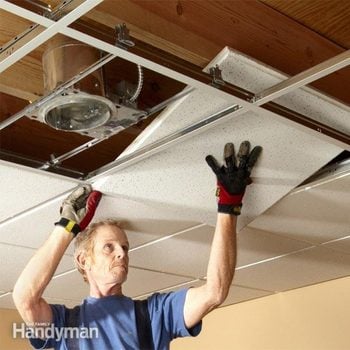
Drop Ceiling Installation Tips: How to Install Drop Ceiling Tiles
Updated: May 22, 2019A veteran drop ceiling installer shares his secrets for installing drop ceiling tiles yourself.
Drop Ceiling Tiles Installation Tip 1: Lay out the ceiling grid on paper
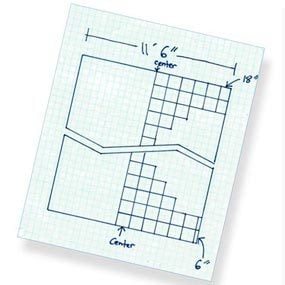
Even the pros use graph paper to lay out the ceiling grid for each room. It helps not only with your materials list but also with getting equal-size panels at each side of the room. Include items like light fixtures and heat registers. The room should be bisected at the center by either a main tee or a centered row of tiles. Wade’s tip on ordering materials: order by even numbers. If a room is 9 x 11 ft., order enough for a 10 x 12-ft. room.
Meet the Drop Ceiling Installation Expert
Wade Sides has been hanging suspended ceilings for more than 30 years. He started out working with his dad while still in high school. Wade has hung ceilings just about everywhere, from residential laundry rooms to casinos and mega-malls. With these tips, $75 worth of tools and a little elbow grease, you’ll save about 40 percent of the total cost of professional installation.
Drop Ceiling Tiles Installation Tip 2: Nail up the wall angle
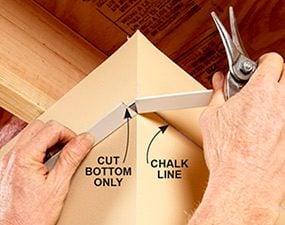
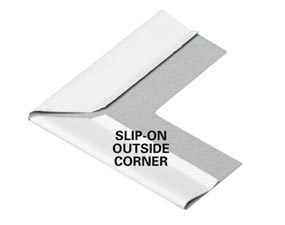
Pick a height so the ceiling tile will clear the lowest ceiling obstruction, like plumbing lines or ductwork. Snap a chalk line marking the top of the wall angle. Nail the wall angle at every stud with 1-1/4-in. drywall nails. Try to avoid nailing on or near the corner beads—it’s a sure way to cause nail pops and cracks. Instead, run the wall angle long, snip the bottom and then bend it around the corner. Finish it with a “slip-on” outside corner.
Drop Ceiling Tiles Installation Tip 3: Use fence staples to hold the angle tight
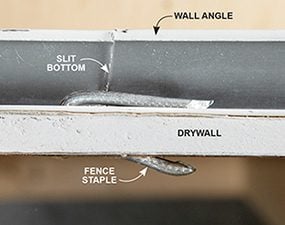
Wade uses fence staples to secure the wall angle between the studs, especially where there’s a gap between the wall and the angle. If there’s a severe bow in the wall, you may have to cut the lower part of the channel so it will flex and follow the contour.
Drop Ceiling Tiles Installation Tip 4: Run guide strings and drive in the hanging screws


Use strings as a guide to position the hanging screws (lag screws) and to keep the main tees straight while hanging. Offset the strings 1/2 in. so they line up with the sides of the tees rather than with the center. Wade wraps the end of the strings around a nail and uses a spring clamp to secure them to the wall angles. Sight along the string to position and drive in the hanging screws—they don’t have to be perfectly centered. These acoustical eye lag screws require a special driver, which can be purchased for about $4 at the home center where you get your other ceiling materials and tools.
Drop Ceiling Tiles Installation Tip 5: Line up the cross tee slots
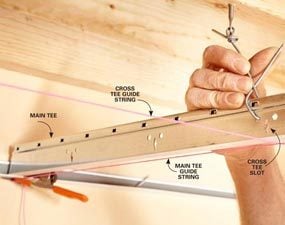
Once you’ve figured out the size of the border row, measure back from the cross tee slots, and cut your main tees to size. Don’t assume the wall is straight. Instead, run a string and use that as a guide to make sure all the cross tee slots line up.
Drop Ceiling Tiles Installation Tip 6: Pop-in rivets hold the grid square
Once you’ve hung a couple of main tees and locked in 8 to 12 ft. of cross tees, it’s time to square up the grid. Check the diagonal measurements of at least a couple of the openings. When everything is square, rivet the main tees and cross tees to the wall angle. “This is where most people get into trouble,” says Wade. If things are out of whack in the beginning, the problem will telegraph out across the room. Before you’re done, you may end up trimming full panels instead of just plopping them into place.
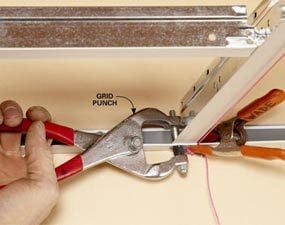
Drop Ceiling Tiles Installation Tip 7: Make rivet holes with a grid punch

Drilling your rivet holes works fine, but it’s slow-going. If you’ve got more than one suspended ceiling project in your future, a grid punch will save you a bunch of time. You can buy one through our affiliation with amazon.com for less than $30.
Drop Ceiling Tiles Installation Tip 8: Cut the flanges first
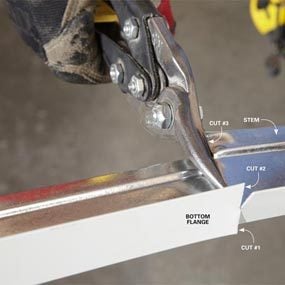
The cleanest way to cut the main tees to length is to cut the bottom flange first from both directions. Then cut the stem last. That’ll give you a clean, flat cut. Wade’s cutting tool of choice is a pair of high-quality, yellow-handled (straight-cut) aviator snips.
Drop Ceiling Tiles Installation Tip 9: Scribe each shadow line with a carpet knife
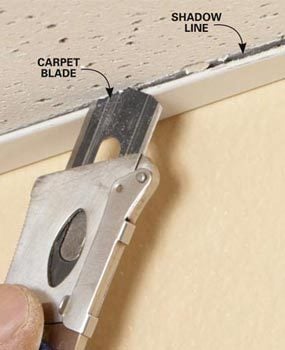
Scribe panel edges
Carve shadow lines along cut panel edges by scoring them in place. Learn how to cut ceiling tiles in our video tutorial.
Cut the border panels to length and then rest them in the track and score the shadow line with the knife. Then take the panel down to cut the shadow line.
Drop Ceiling Tiles Installation Tip 10: Use your finger as a depth gauge

Follow the scribe to cut halfway through the face of the panel first, and then finish it by cutting through the side. Use your finger as a depth gauge. Gloves will prevent the oil in your hands from making smudge marks on the panels—and, of course, protect your hands.
Drop Ceiling Tiles Installation Tip 11: Mark your holes with a drywall circle gauge


Scribe holes with a drywall circle gauge, and then make the cuts with a drywall saw. With just these two tools, you can cut a wide variety of hole sizes. Lay in ceiling tiles after making them the correct size.
Drop Ceiling Installation Tip 12: Repair panels with flat latex caulk
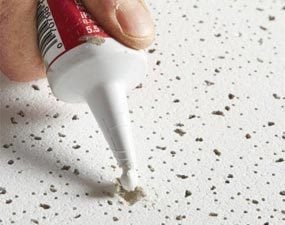
Wade insists that only rookies damage ceiling panels. But when a panel does get damaged at his job site, he uses a little white caulk (or “apprentice putty” as he calls it) to patch it up. Make sure you use a flat latex caulk—shiny silicone will stand out worse than the hole. If the damaged area is bigger than a pencil eraser, you may want to set that panel aside to be used as a partial in another location.
Required Tools for this Drop Ceiling Project
Have the necessary tools for this DIY dropped ceilings project lined up before you start—you’ll save time and frustration.
- Carpet knife
- Chalk line
- Clamps
- Drill bit set
- Drill/driver - cordless
- Drywall circle gauge
- Hammer
- Tape measure
- Tin snips
Required Materials for this Dropped Ceiling Project
Avoid last-minute shopping trips by having all your materials ready ahead of time. Here’s a list.
- Acrylic caulk
- Ceiling grid materials
