
Toenailing Basics
Updated: Oct. 31, 2022
Our staff expert walks you through the basics of this essential carpentry skill.

Introduction
The art of toenailing is easy to learn. With a little practice you can drive an angled nail perfectly every time.Tools Required
- Hammer
- Safety glasses
Toenailing—the key to success
It’s all in the angle
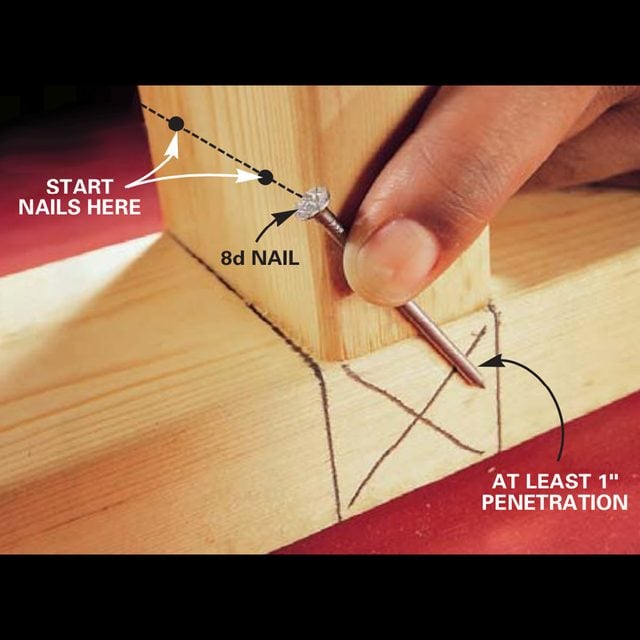
If you’re not sure where to start the nail, hold it alongside to visualize the path. Toenailing—driving a nail at an angle through the end of a board to anchor it—can be frustrating to learn. But it’s an essential carpentry skill, and once you master a few tricks for positioning and driving the nails and get some practice under your belt, it’ll be as easy as regular nailing. Toenailing not only makes a strong joint but also is a great way to coax stubborn boards into position.
Photos 1 – 3 walk you through the basic steps of toenailing. The key to success is starting the nail in the right spot and angling it a little steeper than 45 degrees. Visualize the path of the nail by holding it against the boards you’re joining (photo) to determine the right starting spot.
Project step-by-step (6)
Toenailing basics: Start the nail
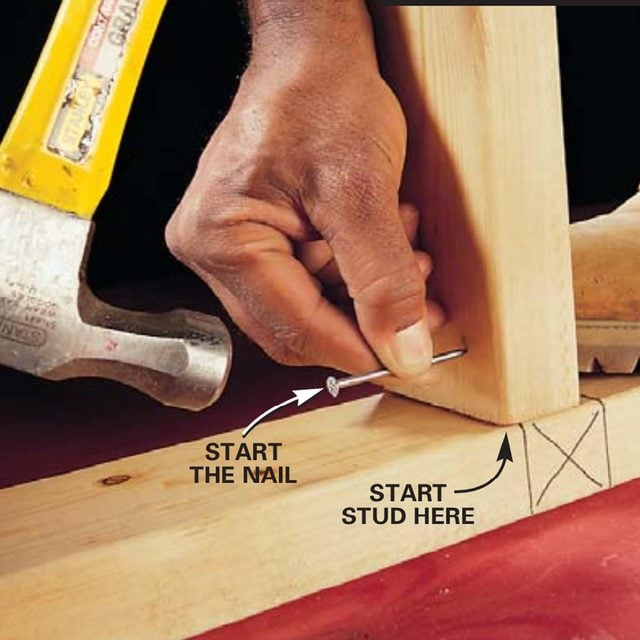
Position the board in front of the layout line and place your toe against the back. Start the nail by tapping it about 1/4 in. straight in, not at an angle.
Drive at an angle
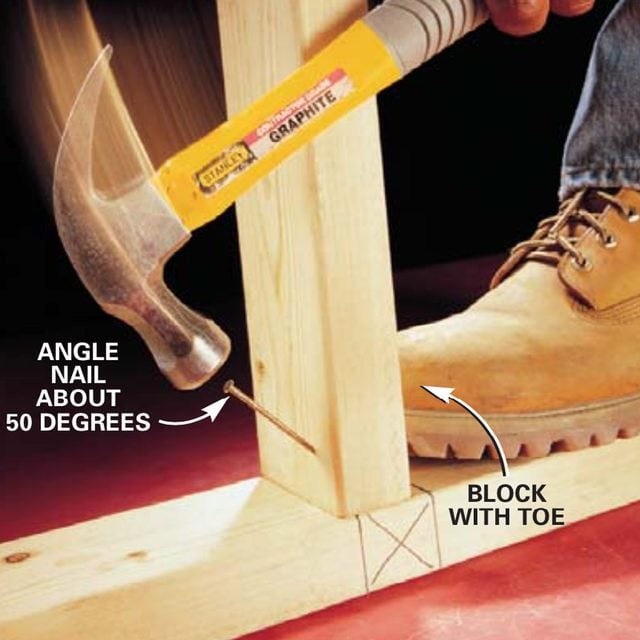
Pull the nail to about a 50-degree angle and set it with a couple of hammer taps. Then let go and drive it in. Brace your toe against the back of the board as you set the nail. It’s OK if the board moves slightly past the layout line.
Nail from the other side
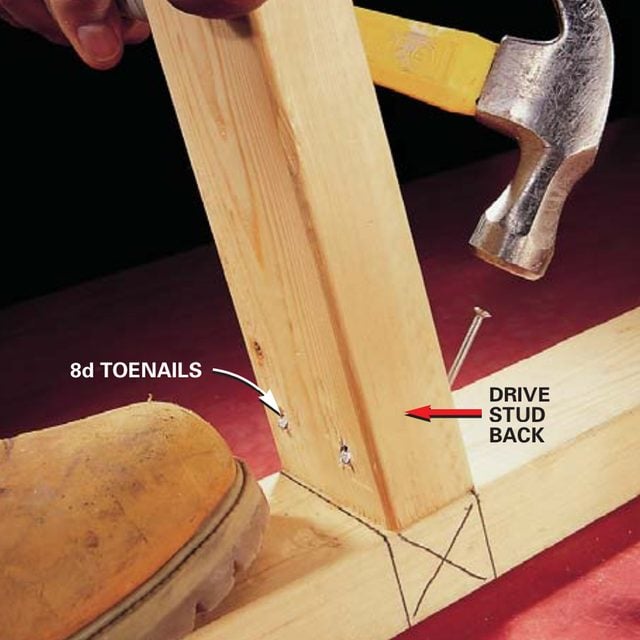
Drive toenails into the opposite side to complete the toenailing and at the same time drive the board back to the layout line.
Starting a nail at an angle can be tricky because it’ll tend to slide down the board and penetrate too low. It’s easier if you begin by tapping the nail point straight in (Photo 1). Then tip the nail at the correct angle and pound it in (Photo 2). As you pound, you’ll discover that toenailing pushes the board off position. Reduce this problem by pressing against the board with your toe to hold it in place while you nail (Photos 2 and 3). Also, position the board about 1/4 in. from your mark so the nail will drive it to the right spot.
Driving a toenail requires greater hammer control and precision than regular nailing. Hold the hammer at the end of the handle with a firm but relaxed grip. Swing from your elbow with a little wrist snap at the end of the stroke for extra oomph. Luckily, you don’t have to worry about leaving hammer marks when you’re rough framing walls and floors. As the nail gets close to fully driven, adjust your swing ever so slightly away from you so the face of the hammer will contact the nailhead off center. Catching the head of the nail with the edge of the hammer face allows you to drive the toenail completely.
Here are a few more toenailing tips:
- Drive the nails until the points barely protrude through the end of the first board before you position it, then position the board and drive the nails home.
- Drill pilot holes for the nails with a bit about the size of the nail shank. This works great for toenailing in tight spots.
- Cut a block (14-1/2 in. long for 16-in. on-center studs) to fit between studs when you’re toenailing walls. The block acts as a spacer and backer to support the stud while you toenail it.
Put toenailing to work: Start the nail in a bowed deck board
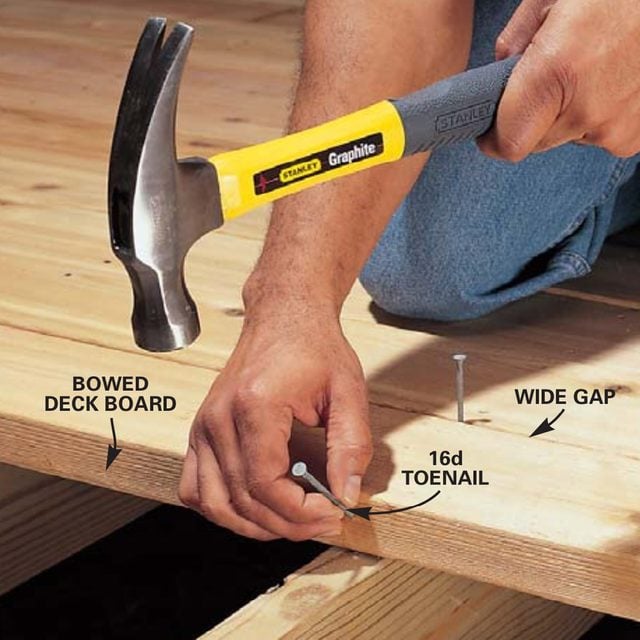
Toenail into the edge of a bowed board to move it closer to the adjoining deck board. Start the nail about one-third down from the top of the board and angle it about 45 degrees to catch the underlying joist.
Drive the nail and board straight
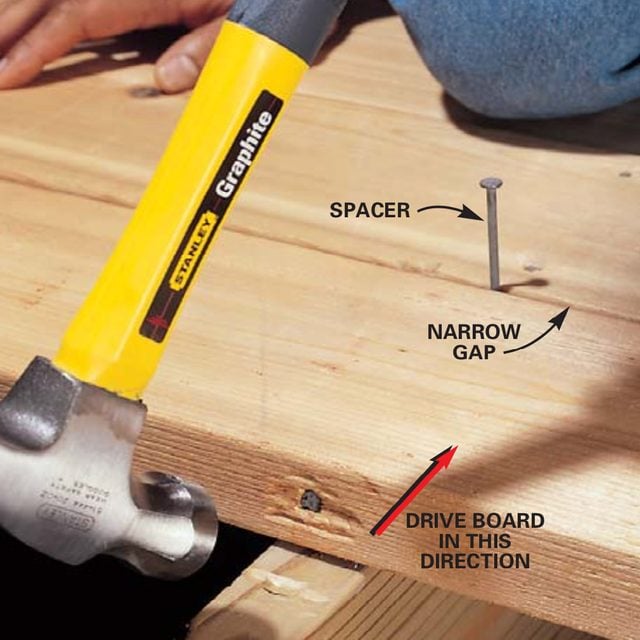
Pound the nail with heavy hammer blows to straighten the deck board and close the gap between the two boards. Use a shim or nail to maintain a consistent space between boards.
Straighten twisted joists
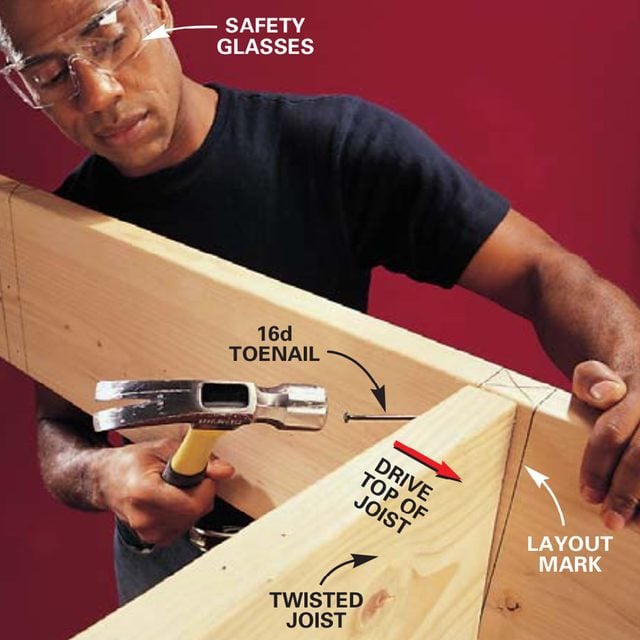
Move twisted framing members into alignment by toenailing in the direction you want the board to go. Continue pounding on the nail until the board is in the desired location. Add a second toenail to move the board farther if necessary.
Toenails have an amazing power to move lumber. This power is especially handy when you’re working with framing lumber or decking that’s not as straight as you’d like (Photos 4 – 6). Use big nails with big heads like 16d sinkers for these jobs. In fact, if one nail doesn’t do the job, drive another alongside to move the board even farther. One carpenter I know pounds in two 16d nails at once for extra holding power.
So remember, the next time your floor joists or studs stray from the line, coax them into place with toenails.