
No Cutting Corners: Tips for Tight Miters and Coped Joints
Updated: May 02, 2023Tips for tight miters and coped joints.

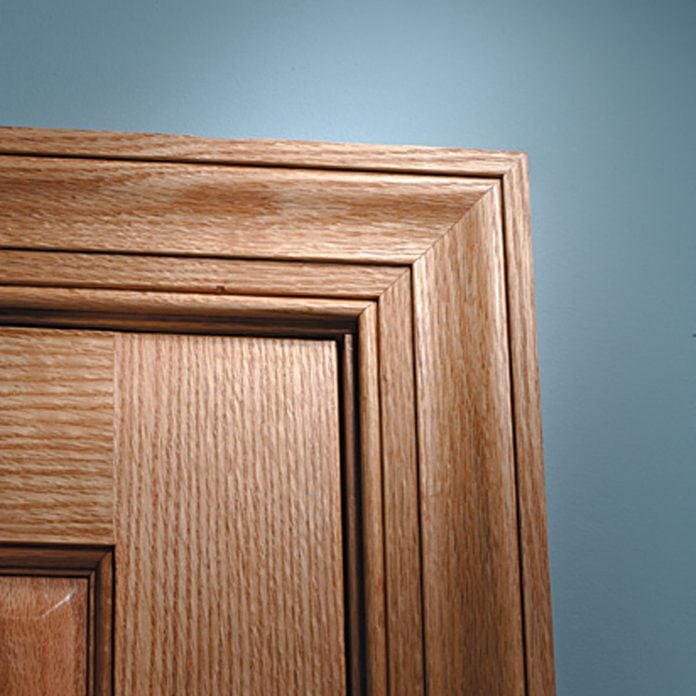
Shim and Shave Miters
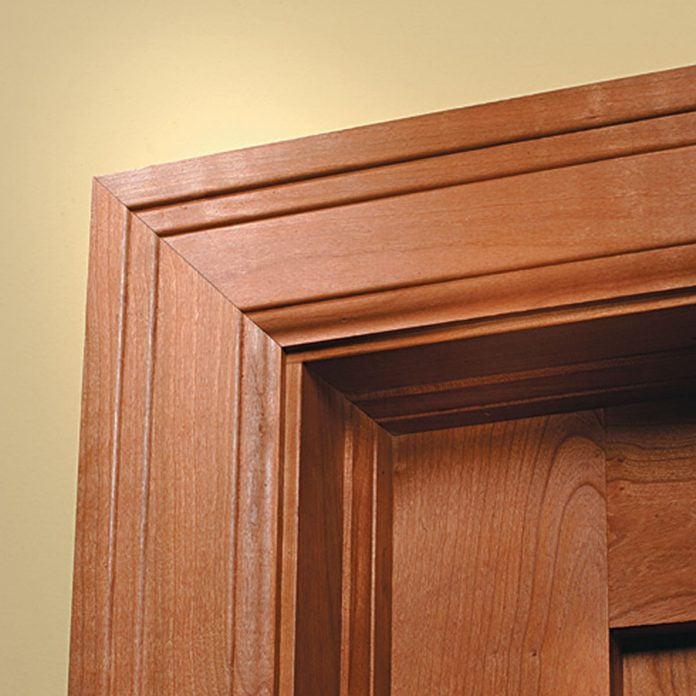
How many times have you set your miter saw exactly on 45 degrees and cut miters on a pair of moldings, only to discover they don’t fit? Well, don’t worry. There’s nothing wrong with your saw or your technique. Miters almost always have to be shaved to fit perfectly.
One method is to simply adjust the angle slightly on your miter saw and recut both moldings. The trouble is that making tiny adjustments to the cutting angle is difficult on many saws. A quicker and easier method is to place a shim against the miter saw fence to slightly change the angle. Move the shim away from the blade for smaller adjustments and closer for larger ones, or vary the thickness of the shim. Remember, both pieces need the exact same cut to fit precisely.
Plus, check out these Tips for Tight Miters and Miter Cuts.
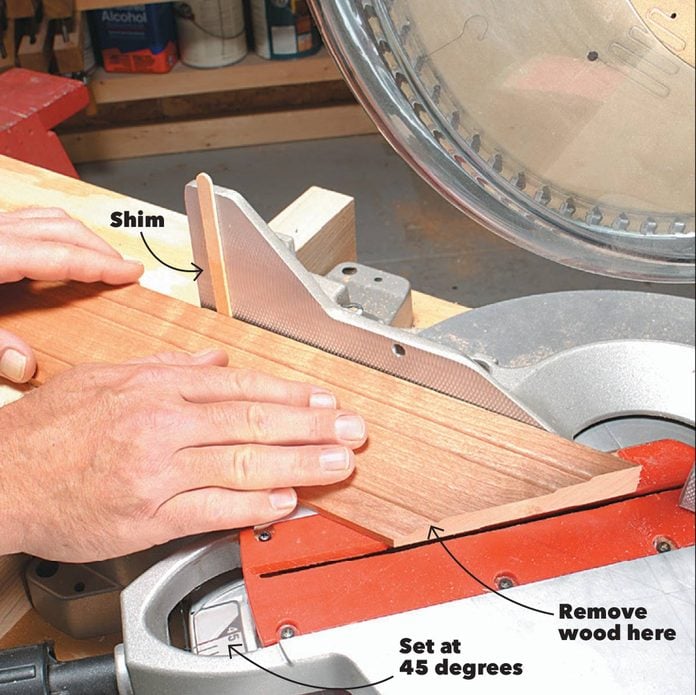
1. Micro-Adjust a Miter
Close a gap on the top of a miter by placing a skinny shim (1/16 in. or less) against the portion of the fence farthest from the blade. Slide the molding tight to the shim and against the fence near the blade. Hold it in this position while you make the cut. Caution: Keep your fingers at least 6 in. from the path of the blade.
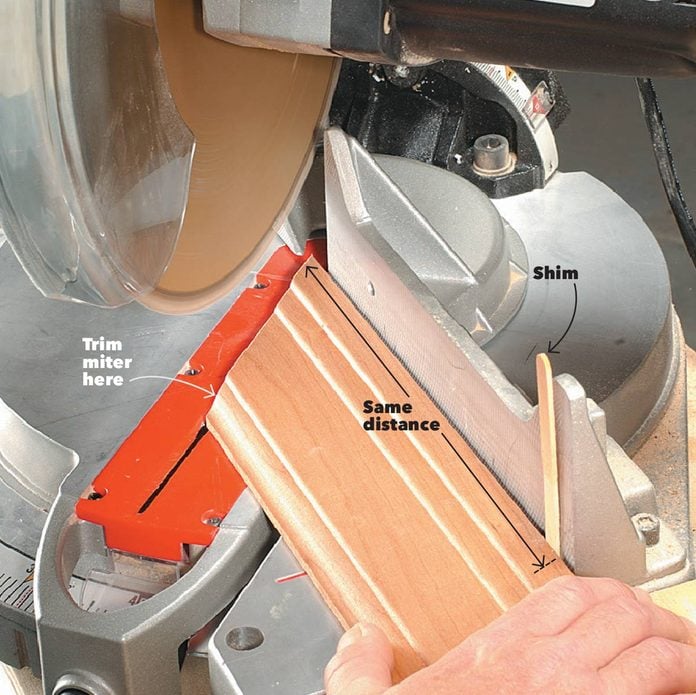
2. Treat Both Sides the Same
Trim the other half of the miter using the same technique. Use the same shim and place it the same distance from the blade. Drop the blade slowly through the wood to shave thin slices.
Tilt Trim on Inset Jams
Occasionally you’ll run into a door or window jamb that isn’t quite flush with the wall. On a protruding jamb, you can nail the trim to the jamb, slip a shim between the trim and the drywall, and then nail the trim to the wall. Caulk and paint will hide the gap. An inset jamb demands a different approach. First remove enough drywall so the trim can span the jamb and wall without rocking (Photo 2). This solves half the problem. But even now a regular 45-degree miter won’t fit because the molding has to tilt down to meet the jamb. Correct this problem by tilting the trim on the bed of the miter box to match the angle at which it rests against the wall. Then make standard 45-degree miter cuts. Photo 1 shows how to determine the correct thickness for the shim used in Photo 3 to tilt the molding.
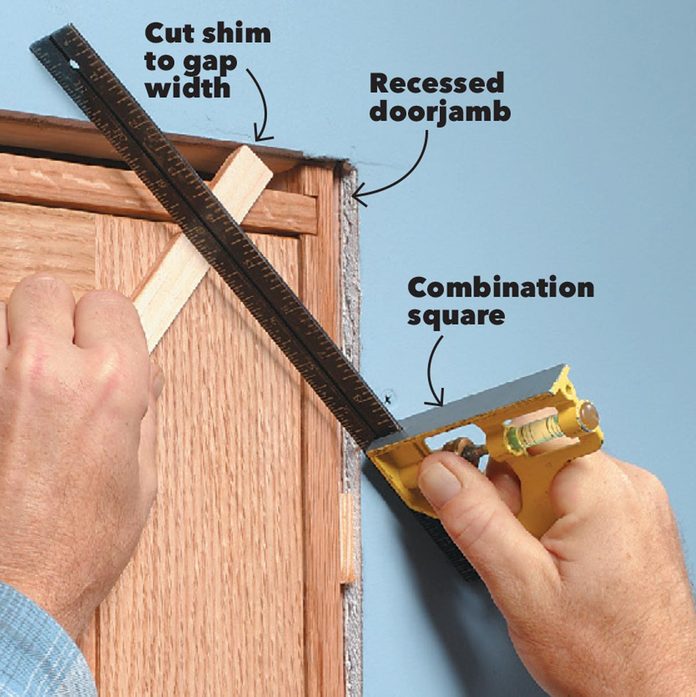
1. Custom-Cut a Shim
Cut a shim just thick enough to slip under a straightedge spanning the drywall corner. Use this shim to elevate the outside edge of your molding (Photo 3) before cutting it.
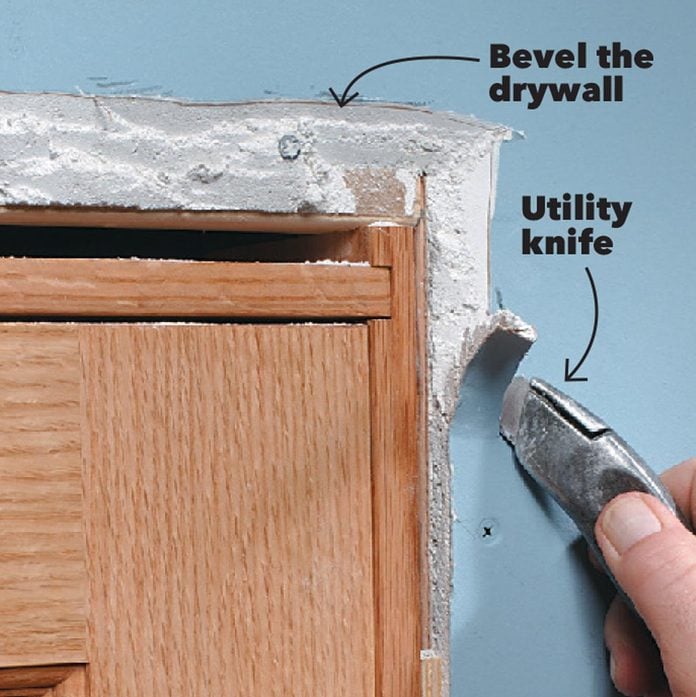
2. Slice the Drywall
Trim back the drywall with a sharp utility knife until the molding no longer rocks when it’s set in place against the jamb and drywall. Use a hammer to mash and flatten the drywall if necessary.

3. Tilt the Trim With a Shim
Raise the outside edge of the molding with the shim and cut the 45-degree miter. Repeat the process for the opposite miter. If other small adjustments to the angle are needed, follow the tip in Photo 1.
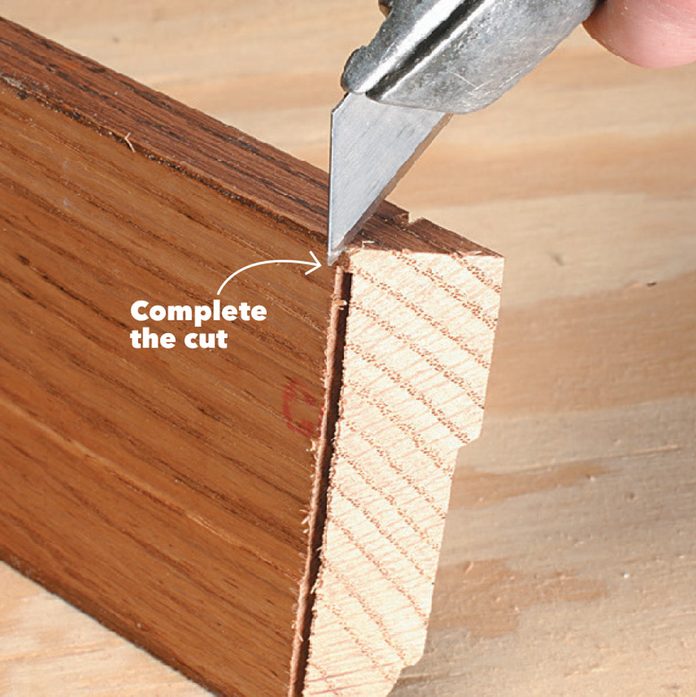
Cope Baseboard Faster

Coping is better than mitering at inside corners. But on tall baseboards, cutting the long, straight section of the cope with a coping saw is difficult, and the cut is usually wavy. Instead, start the cope as usual (Photo 1). Then tip the molding upside down in the miter saw and saw straight down to the profiled section. Finally, complete the cope by sawing out the profile (Photo 3).

1. Start With a Miter Cut
As with any coped joint, begin by cutting a 45-degree miter on the baseboard. The miter cut provides a profile to guide your cope cut.
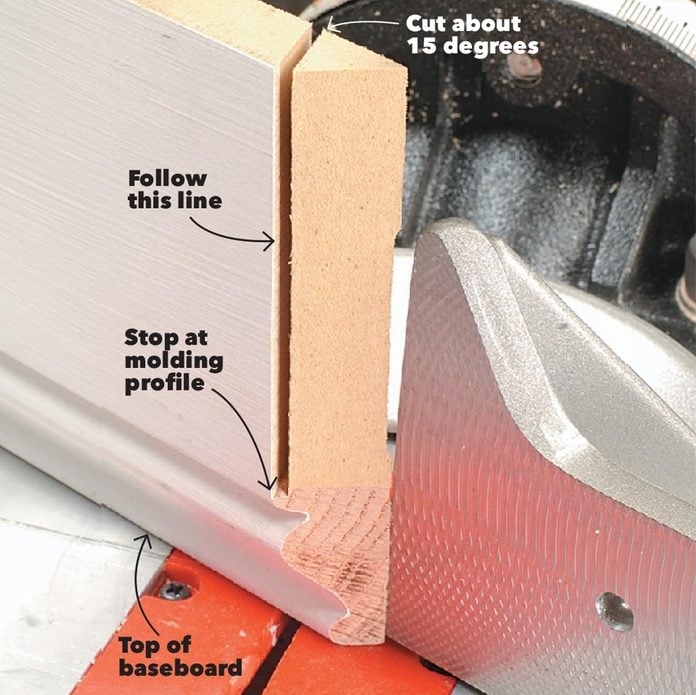
2. Make the Straight Cut
Turn the mitered baseboard upside down. Adjust the angle to about 15 degrees and saw down along the straight section of the beveled cut. Keep the blade slightly to the outside of the line. Let the blade stop before lifting it from the cut.

3. Cut the Curvers
Saw out the remaining profiled section with a coping saw. Tilt the saw to at least a 30-degree angle to create a back bevel for easier fitting.
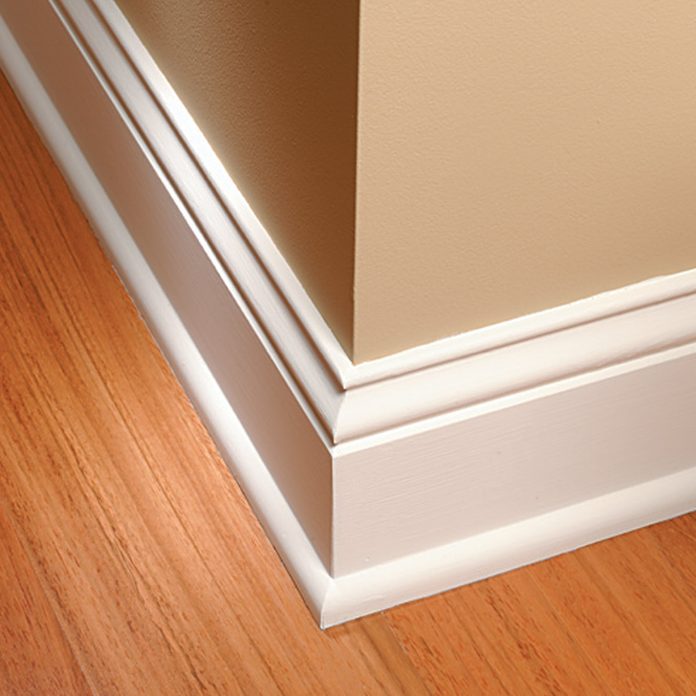
Close Gaps at Inside Corners
Uneven walls or floors that are out of level can cause even perfectly coped inside corners to look lousy. Check the fit of your cope before you nail in either base molding. That way you’ll still have the option to shim out the bottom of the square-cut (uncoped) piece to close a gap at the bottom of the cope (Photo 2). Photo 3 shows marking a cope that’s open at the top. You then file or plane to the line.
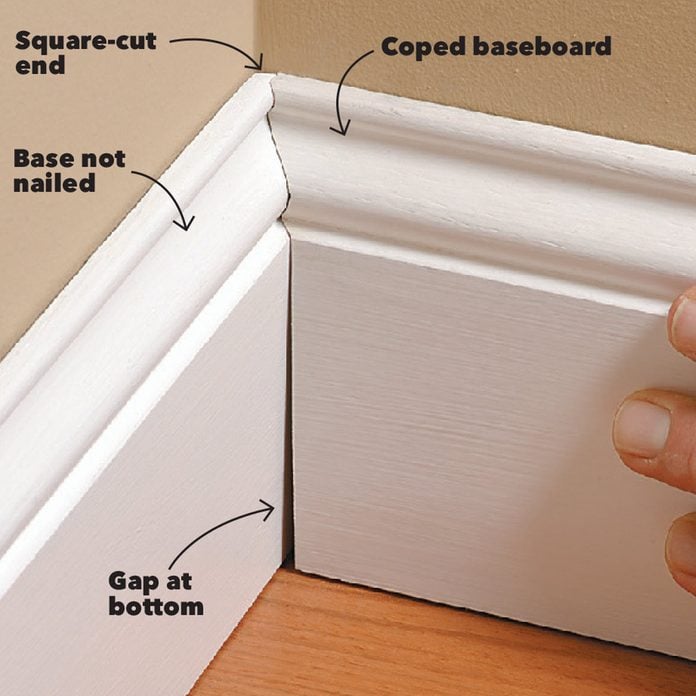
1. Check the Fit
Check the fit against the square-cut piece of base before nailing either of the two baseboards. The straight sections rarely fit perfectly.
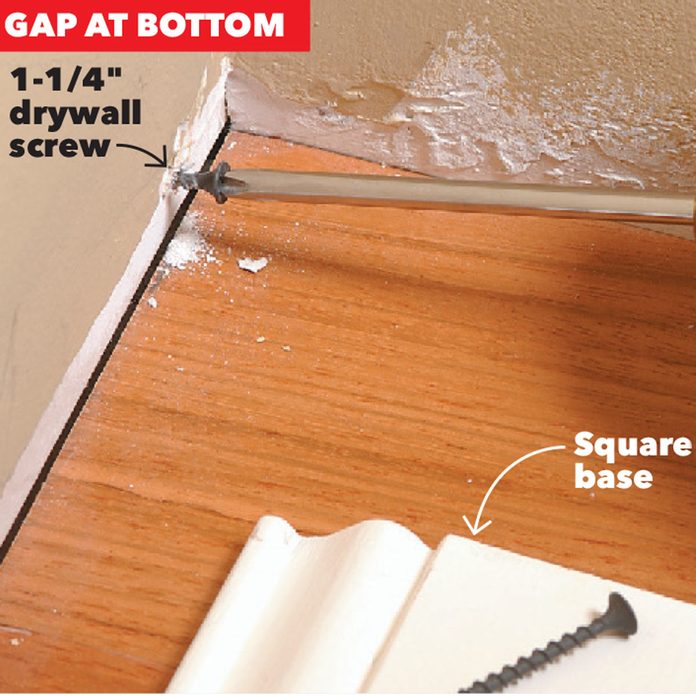
2. Add a Screw
Close a gap at the bottom by removing the square-cut base and driving a drywall screw into the wall about 1/2 in. from the floor. Test the cope and adjust the screw in or out until the cope fits tight.

3. Scribe and Trim
Close a gap at the top by scribing the gap with a small compass to mark the wood to be removed. Then file to the line.
Avoid Trim Collisions

Here’s one of the easiest ways to make your work look better: When sections of trim meet at joints or corners, match the wood tone and grain pattern. It only takes a few seconds, and you’ll avoid ugly mismatches like this.
Overcut Outside Corners
Getting outside corners to fit tight is trickier than it looks. The key is to make accurate marks with the baseboard in place rather than relying on measurements. And then cut the piece a little long so you still have the option to shave a little from the angle if it doesn’t fit. Since gaps on the back of the corner are barely noticeable, while gaps on the front are glaring, it’s a good idea to start by cutting slightly steeper 45-1/2-degree angles first. Then if there’s still a gap in the front, cut a slightly steeper angle on both pieces. You’ll need a compound miter saw or sliding compound miter saw to easily cut tight-fitting miters on wide baseboard.

1. Mark With a Knife
Mark outside corners with a sharp utility knife. It’s far more precise than a pencil mark. Repeat the marking process on the opposite baseboard. Cut 45-1/2-degree angles on both boards, leaving each an extra 1/8 in. long.

2. Cut the Fit
If the miter is open on the front, increase the cutting angle to about 46 degrees and recut both sides. Be careful to remove only a hair’s width from each board. Reduce the angle if the cut is open at the back. When the angle is correct, recut each board just to the outside of the marks before nailing them into place.
Make Dead Ends Look Good

When trim comes to a dead end—on window aprons or chair rail, for example— some trim carpenters just chop it off and nail it up. But there’s a better way: Add a mitered “return” for a finished look.
1. Leave the Cut Incomplete
Cut the angle for a small mitered return on your miter saw, but don’t completely cut it off from the trim stock. Instead, cut through the remaining sliver of wood with a utility knife.
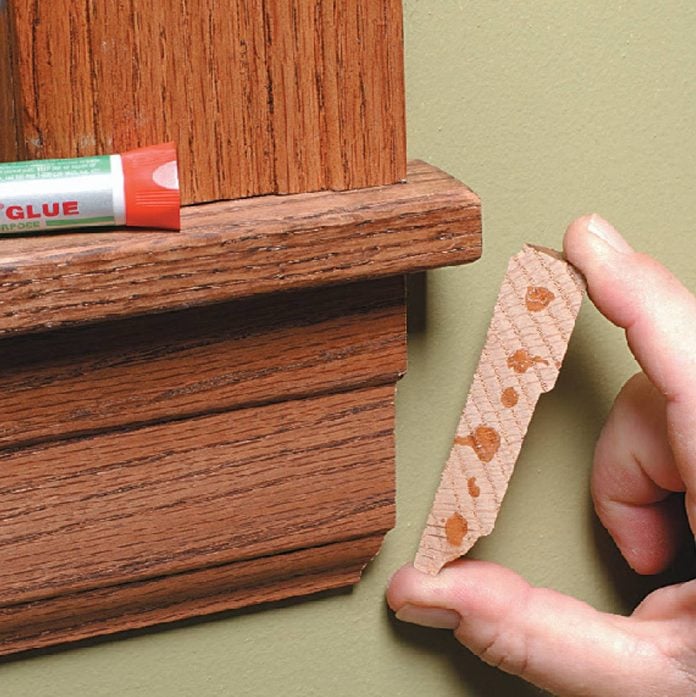
2. Glue in the Return
Choose a fast-acting cyanoacrylate glue formulated for wood (Krazy Glue is one brand).
Get a Pinner

Even if you only do occasional trim jobs, you need a 23-gauge micro pinner in addition to your 18-gauge brad nailer. The skinny pins fasten returns and other tiny pieces without splitting. In most areas, you don’t even have to fill the nail holes— paint or finish will hide them. (If the holes are at eye level, though, it’s good to putty them.) Many pin nailers cost less than $100—you can even find one at harborfreight.com for about $30. Cordless models are available as well (the Ryobi costs about $130). Grex makes a version (about $280) that shoots pins up to 2 in. long.
Tool hacks usually happen on the fly, when you’re in a situation that calls for a tool to be modified slightly or used in a way that’s different than its intended purpose. So check out these 20 cool tool hacks.
