
How To Install a Shower Pan

Updated: Apr. 04, 2024
A pre-fab shower base makes converting your old bathtub to a shower easy. Here's a procedure that can help you get the job done quickly.
Multiple Days
Intermediate
$101–250
Introduction
My first experience doing a tub-to-shower conversion was a great introduction to the project because it involved not just a reimagining of the bathroom design, but also a considerable amount of structural renovation. The plumbing had been leaking under the tub, and when we finally got that fixture out, we saw extensive rot that necessitated a complete demo and rebuild of the subfloor. The project taught me several things, including the need to make watertight plumbing connections that will last.
Not all such projects involve this much work. In most cases, as it was with the walk-in shower I installed in the house I shared with my wheelchair-bound wife, the subfloor is dry and structurally intact. That allows the main focus to be on doing the necessary plumbing work, building new walls and a shower base and tiling. I installed a pre-formed shower base in a subsequent renovation. Because pre-formed bases are virtually leakproof and are vastly easier to install than traditional solid mortar bases, it made the job that much less time-consuming.
Ripping out an existing tub or shower and replacing it with a pre-fab shower pan may involve heavy lifting, but it's basically a plumbing project. You should be familiar with basic pipe joining techniques to take it on. Mostly, this involves cutting and cementing plastic or PEX pipes and fittings. You can use copper if you're old-school and have confidence in your soldering skills, but if you use plastic, you won't have to worry if you make mistakes. The materials are inexpensive, and corrections can be made easily by cutting out sections and installing new fittings and pipes.
Completing this job — getting the old tub out, reworking the plumbing and installing the new base — will take two or three days at most. If you have to run a drain line through joists or studs, we recommend that you rent a 1/2-in. right-angle drill and a 2-in. hole saw (or bit). Otherwise, basic plumbing tools and hand tools are all you'll need. Be sure to apply for a plumbing permit and have an inspection done at the rough-in stage (when everything is still exposed) and after everything is complete (wall surfaces finished, final hardware installed).
When to call a pro
When structural repairs to the subfloor are needed, you're probably better off leaving that part of the job to a contractor. I'm speaking from experience.
Tools Required
- 4-in-1 screwdriver
- Adjustable wrench
- Assortment of driving bits
- Circular saw
- Drill
- Five gallon bucket
- Framing square
- Half-inch right-angled drill
- Hand saw
- Jigsaw
- Mortar mixing paddle
- Nut driver
- Pencil
- Pipe snapper (optional)
- Pry bar
- safety goggles
- Sledgehammer
- Slip-lock pliers
- Stapler
- Tape measure
- Trowel
- Tub drain wrench
- Two-inch hole saw
- Utility knife
Materials Required
- 1 1/2- in. PVC drain pipe
- 1 1/2-in. couplers
- 1 1/2-in. long-sweep elbow
- 1 1/2-in. P-trap
- 1 5/8-in. screws
- 1/2-in or 5/8-in. plywood or OSB
- 1/2-in. brass drop-ear elbow
- 1/2'-in. CPVC water pipe
- 2 X 4 lumber
- 2-in. screws
- 2-in. X 1 1/2-in. reducer
- Fender washers
- Plumbing thread tape
- Pre-mixed mortar
- PVC cement
- PVC primer
- Shower pan
- Silicone caulk
- Staples
- Tar paper
- Two 1/2-in. water shutoff valves
- Wood shims
Project step-by-step (13)
Order the shower pan well in advance
Take measurements and order the shower pan you need a couple of weeks before you plan to start the project. Even if you purchase one at a home improvement store, it probably won’t be a stock item and will have to be delivered.
You’ll simplify the project by ordering a base that is the same width as the existing bathtub. That way, you won’t have to replace any flooring or run into any code issues concerning clearance between bathroom fixtures.
- Pro-tip: While you’re at it, consider purchasing a new shower valve. Demolishing the walls exposes the plumbing and presents a golden opportunity to install it. If your bathtub didn’t have a shower, you’ll have to replace the valve anyway, but even if you already have a shower valve, it might not have scald-guard protection, and it won’t last as long as a new one. Once the walls are covered up, replacing the valve becomes a major project, so now’s your chance.

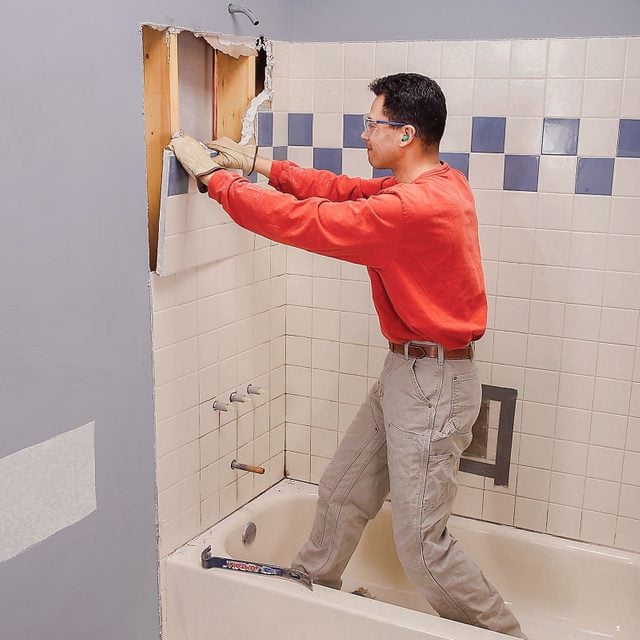
Demolish the walls
First, unscrew the shower head and the bathtub spout. If you want to reuse either of these, wrap the jaws of your wrench or pliers with a cloth to prevent damage. Then, remove the valve handle and the escutcheon cover. Most handles have a little plastic cap that pops off to expose a screw. Remove the screws and pull off the handle and the escutcheon.
Next, strip off the tub surround. Begin by cutting completely through the drywall around the perimeter with a utility knife. If you have cement board behind the tile, simply cut through the tape joint at the ceiling and strip the entire wall. Rip off the tile and drywall together in big chunks. If you have a fiberglass surround with a flange behind the drywall, cut 2 in. outside of the enclosure and pry the sections free one at a time with a pry bar.
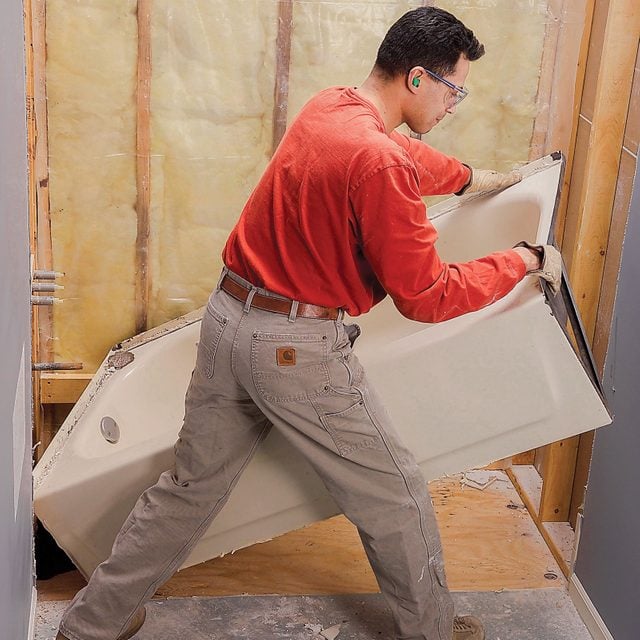
Remove the bathtub
- Remove the tub drain stopper if you haven’t done that already, then unscrew the tub drain from the P-trap assembly. The easiest way to do this is to use an inexpensive tub drain wrench that fits tightly into the drain and wedges against the sides so you can turn the drain with the wrench handle.
- Unscrew and remove the overflow plate from the front of the tub. If the plate has a lever, pull it up and out to remove the stopper linkage from inside the overflow tube. If there’s no lever, simply remove the plate.
- Continue by removing any screws or nails holding the tub flanges to the wall studs, using a pry bar or drill/driver as needed.
- Now that the tub is disconnected, you can muscle it out of the room. This is a job that almost always requires two people. If the tub is light enough to lift, simply tip it up and carry it away, but if it’s a heavier steel tub, you may want to slide it out. Wedge a couple of 2 x 4’s underneath it and use them as skids to protect the bathroom floor while you walk the tub away from the wall.
Pro tip: Cast iron tubs are extremely heavy, and the easiest way to remove one is to just bust it up with a sledgehammer and carry out the pieces. Lay an old blanket over the tub to catch flying shards, and wear safety glasses for this!
Cut an access slot for the new drain
Snug the new drain pan into position against the walls and draw the outline of the drain hole on the subfloor, using a pencil. Remove the drain pan and use a ruler to draw a square access slot centered on the drain hole and extending. The slot should extend about a foot in both directions, but it’s best if the edges running parallel to the joists bisect the joist edges on either side to make filling in the slot easier, so you might want to make it bigger.
Make marks on the subfloor just outside the cut-out to help you relocate the drain, then do the cutting by setting the depth of your circular saw blade about 1/8 in. longer than the subfloor thickness to avoid damage to the joists. Pry the cut-out free.
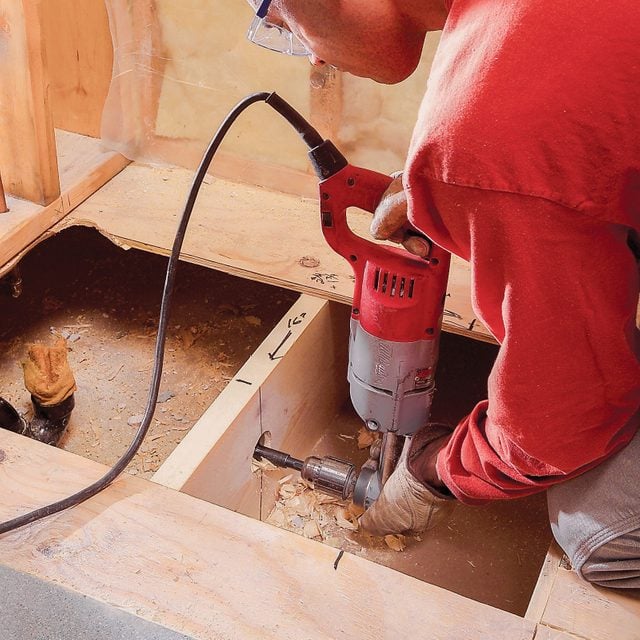
Make a path for the new drain line
The last time I installed a shower pan, the floor joists were running parallel to the drain, which made it easy to run the drain, because it involved very little cutting. If the joists are running in the other direction, you need to make holes in them, and this is where a right-angled drill and a 2-inch hole saw come in handy.
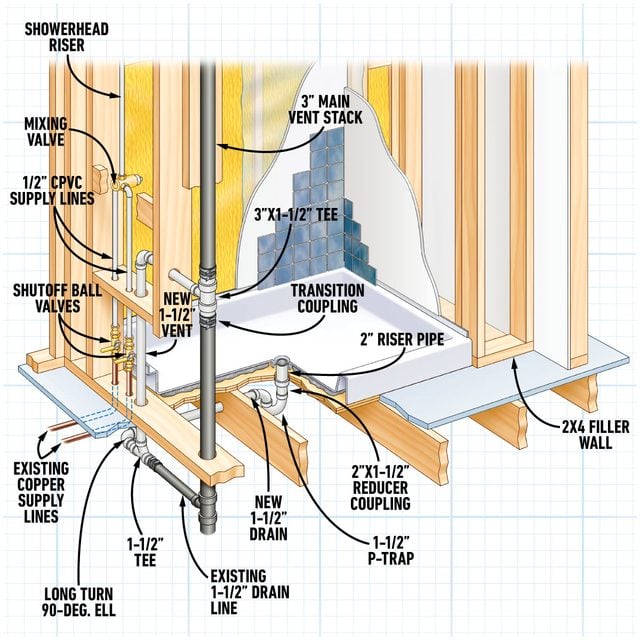
Drill 2-in. holes to leave some room to move the 1-1/2-in. pipe up or down to get the necessary slope, but don’t drill in the lower or upper 2 in. of any joist The horizontal line slopes 1/4 in. for every running foot toward the waste line (away from the drain), and the P-trap opening falls directly below the shower drain hole. Use the reference marks you drew on the subfloor to locate the drain position.
- Pro tip: Most shower drains are designed to receive 2-in. piping, while most existing tub drains are 1-1/2 in. When you have to change pipe sizes, the plumbing code calls for the transition to be made with a reducer directly below the shower, nowhere else.
Cut out the P-trap
Locate the existing P-trap, typically just under the floor at the front of the tub to line up with the overflow tube. For a shower, code requires the trap be directly under the drain, so you’ll have to move it. It’s usually plastic, and if so, go ahead and use a handsaw to cut it off about 2 inches away from the tee. Be careful to leave enough pipe stubbing out to glue on a new fitting. If it’s cast iron, rent a pipe snapper to make the cut.
Now you can lift out and remove all the old bathtub piping, including the overflow tube, P-trap and drain.
- Pro tip: The vent for the bathtub drain typically rises vertically from a tee installed at the trap outlet. Measure the distance from this tee to the new shower pan drain along the projected path of the pipe. If the distance is 42 inches or less (which it should be), the vent is code-compliant, and you can leave it as is.
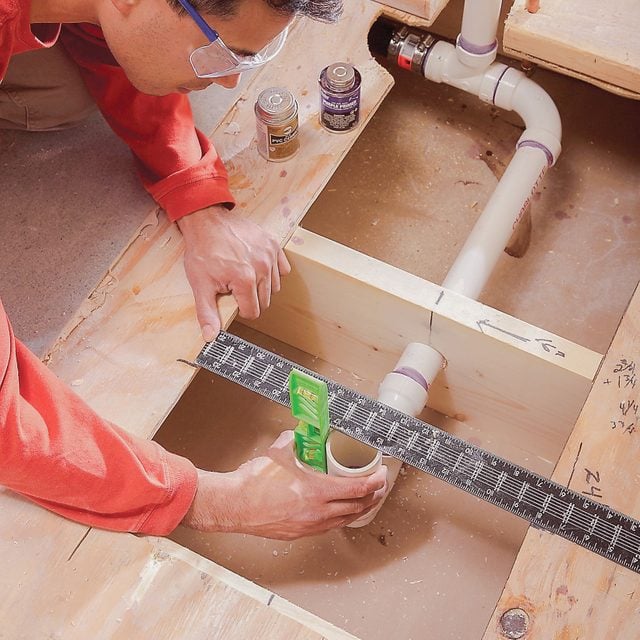
Run the new drain pipe
- Glue a 1 1/2-in. coupler onto the stub-out left when you removed the old P-trap or, if the drain is cast iron, clamp on a 1/2-in. rubber (Fernco) coupler so that you can transition to plastic pipe.
- Run 1 1/2-in. pipe to the drain location, using a long-sweep elbow to turn the corner from the tee to the shower drain, and being sure to maintain a 1/4-in.-per-foot slope away from the shower. Do a dry-fit (assemble without glue) to ensure everything fits before using cement.
- Assemble the P-trap at the end of the pipe so that the opening lines up with the reference marks on the subfloor.
- Insert a 1 1/2-in. nipple into the trap opening, then fit on a 1 1/2 x 2-in. reducer and add a length of 2-in. pipe long enough to rise a few inches above the floor.
- Disassemble everything and reassemble it with PVC pipe cement. Be sure to use PVC primer on pipe ends and fitting before you spread glue.
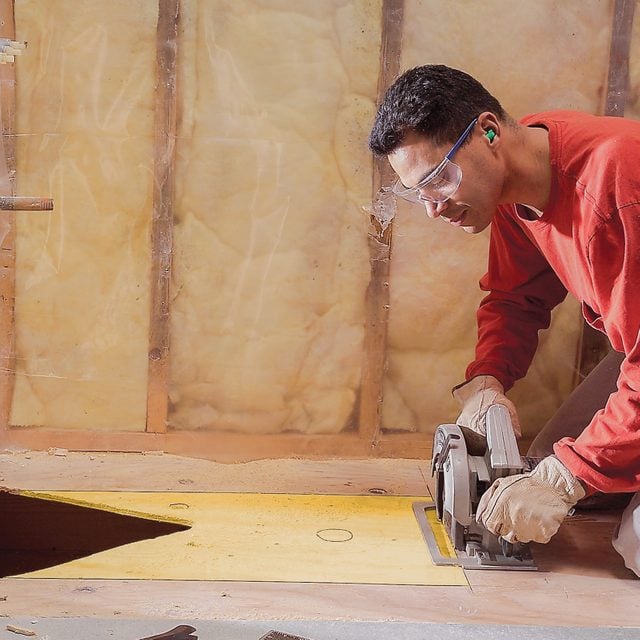
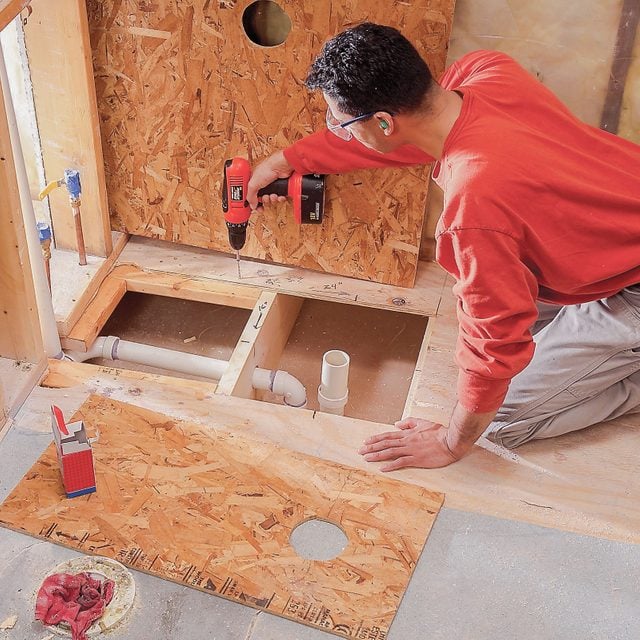
Close the floor
Add blocking to the framing to support the edges of a patch of new plywood or OSB with the same thickness as the subfloor. Mark the position of the drain pipe and cut a 3-in. hole with a jigsaw. Lay the patch in place with drain pipe extending through the hole and secure it to the joists and blocking with 1 5/8-in. screws.
Cut off the top of the drain pipe so that its opening is flush with the floor surface.
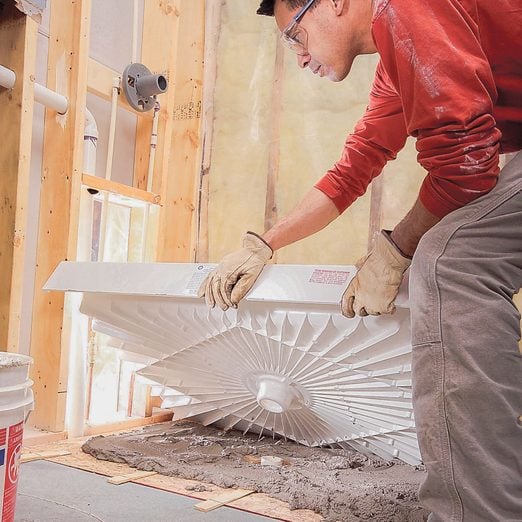
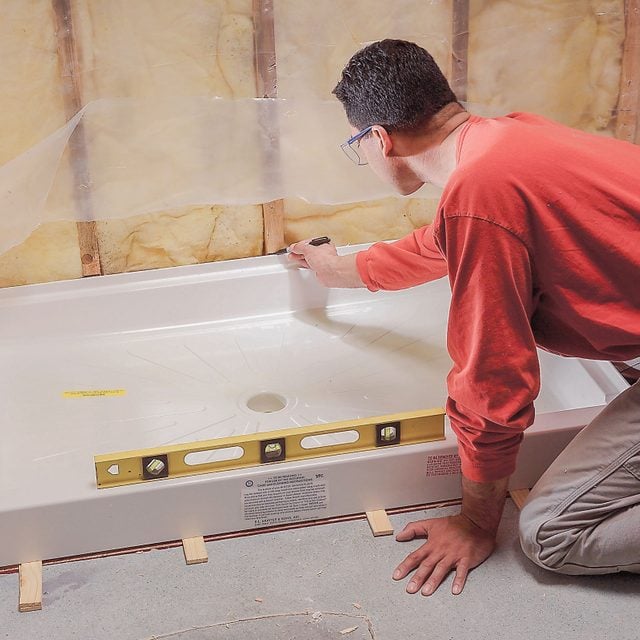
Level the base and mark the studs
Staple a sheet of tar paper on the subfloor to prevent the wood from sucking the moisture out of the mortar you’re going to pour. Set the base in place, pushing it tight against the studs on the back wall, and use a 4-foot level to check the level in both directions. Add wood shims wherever needed to bring all four edges of the pan level, then draw a mark along the top of the pan on each stud that it intersects.
Remove the pan carefully and glue the shims to the tar paper with silicone caulk to keep them in place while you pour the mortar bed.
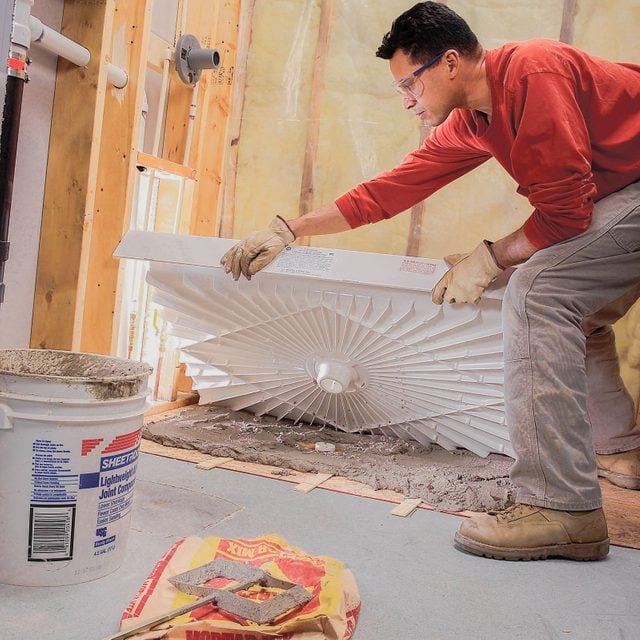
Set the pan in mortar
- Pour pre-mixed mortar into a five-gallon bucket and add water incrementally while you stir the mixture with a mixing paddle attached to your drill. When the mortar reaches a consistency of dry peanut butter, spread it with a trowel to a uniform 1-inch thickness over the entire subfloor.
- Lower the pan into the mortar while it’s still wet and push it down until all the edges line up with the marks you made on the studs. Stay off the pan until the mortar sets, which usually takes overnight.
- Secure the pan lips to the studs with the clips provided with the pan when the mortar is hard. If the pan didn’t come with clips, secure the lips with fender washers and 2-in. screws. Drive the screws just above the lips, not directly through them, to avoid cracking the plastic.
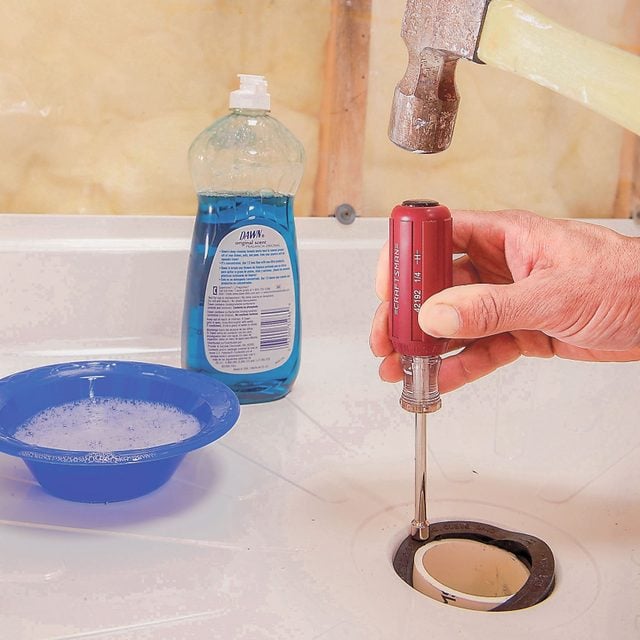
Complete the drain hookup
Consult the installation instructions that came with the shower pan for the drain hookup instructions. The drain I used came with a rubber gasket that I had to fit over the drain pipe and seat into the drain opening by pushing it down with a blunt object (I used a nut driver).
When the gasket is fully seated inside the opening, set the plastic drain strainer in place over the drain and push it down to secure it to the drain pipe. Don’t use glue; you’ll probably have to remove it at some point to clear the drain.
- Pro tip: Drain assemblies that screw to the drain opening typically have to be glued to the P-trap. You need access under the shower to do this, and since you don’t, it’s best to stick with the type of drain described above.
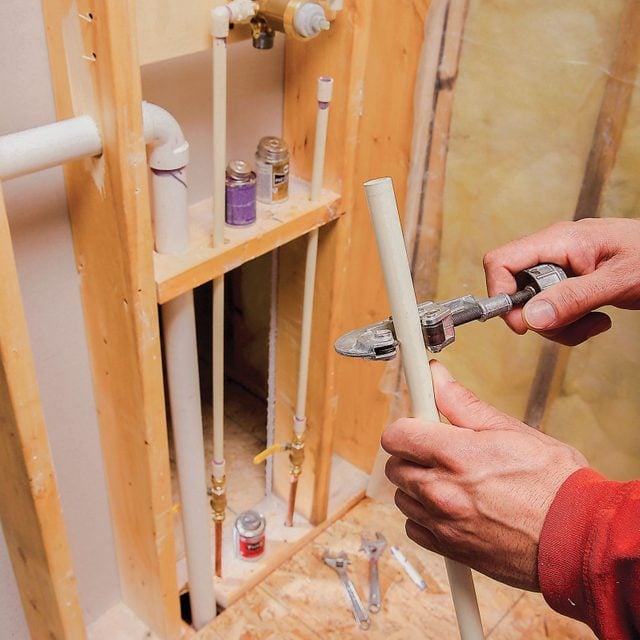
Mount the shower valve
Turn off the water to the bathroom and cut the supply pipes to the existing valve. This is a good time to install shut-off valves on the hot and cold supply lines where you can reach them through an access panel. Once the valves are installed, you can shut them off and turn the water to the bathroom back on.
Unscrew the old bathtub valve and remove it complete with all pipes attached to it. Choose a location for the new valve that’s easy to reach, screw 2 x 4 blocking to the framing at that location to support it and screw the valve to the block.
Run new supply pipes from the shutoff valves to the valve. If you choose to run CPVC or PEX pipes, and the shutoff valves are brass, install an appropriate adapter on each valve. Depending on your shower valve, you may also need adapters to connect it to plastic pipes.
Finish off by running a vertical pipe from the valve to the location of the shower head. This pipe should be copper, and it should terminate with a 1/2-inch metal threaded elbow anchored to the studs. When the walls are finished, you’ll screw the shower arm into this fitting.
FAQs
What are the benefits of installing a shower pan?
Besides being far easier to install than a traditional mortar bed, a pre-fab shower pan gives you plenty of design options for the shower walls.
Do you need mortar to set a shower pan?
It depends on the pan. Some manufacturers specifically recommend a mortar bed while others don’t. It’s a good idea even if it’s not required because the mortar supports the pan and prevents the plastic from flexing and cracking.
Does a shower pan have to be perfectly level?
Yes. This is absolutely crucial. The built-in slope that directs water into the drain only works if the pan is level. If it isn’t, water will collect and cause slipping and mold problems.
Originally Published: December 03, 2018