
How to Repair a Bathroom Fan
Updated: Feb. 15, 2024Replace a dead motor and improve air flow
- Time
- Complexity
- Cost
- A full day
- Intermediate
- $51–100
Replace a dead motor
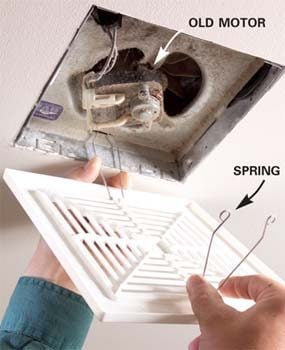
Photo 1: Remove the grille
Pull the grille down and pinch the springs to release them from the housing. Then vacuum out the dust so you can find the model number.
If your bathroom fans are dead, here’s some good news: You don’t have to tear out the entire unit. Even if you fan is decades old, chances are you can get a replacement motor. Although a new motor costs about the same as a new fan, a bathroom vent fan motor replacement saves time and trouble. You don’t have to cut into the ceiling, crawl around your attic or get up on your roof. It usually takes less than an hour.
Your first step is to get the fan’s model number. Remove the fan grille (Photo 1) and vacuum away the dust to find the number on a label or stamped on the fan’s housing. But don’t order a new motor until you remove the old one. You might need other parts too.
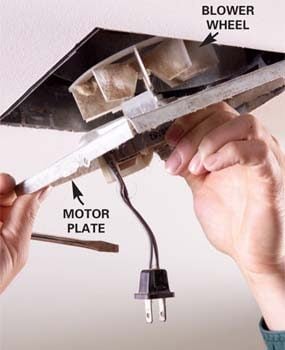
Bath fans vary in design, but motor replacement requires the same basic steps, no matter which brand or model you have. Turn off the power to the fan at the main breaker panel. Then unplug the fan and remove the motor plate (Photo 2). Some motor plates release by pressing or prying on the side of the fan housing. Others are secured with a screw or two.
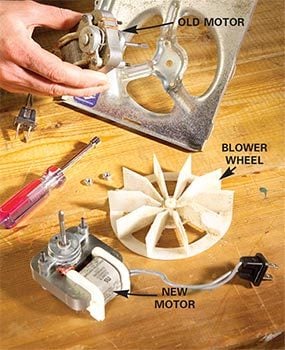
Before you can remove the motor from the plate, you have to get the blower off the motor’s shaft. This is often the toughest part of the whole project. An older metal blower might be fastened with a screw. Plastic blowers usually aren’t fastened at all, but simply slide off the shaft. Either way, removal may require some hard prying and pulling. If you wreck the blower while removing it, don’t worry. You can order a replacement at little cost. To install the new motor, simply reverse the removal process.
Run duct outside to prevent roof rot
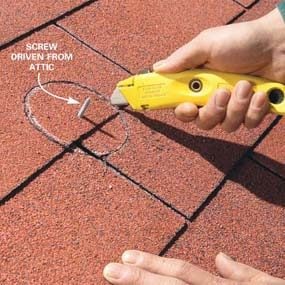
Photo 1: Locate and cut the vent hole
Slice out a 4-1/4 in. circle of shingles centered on the marker screw. Then drill a starter hole for your jigsaw blade and cut out the roof sheathing.

Photo 2: Trim back shingles
Notch out the upper layer of shingles to fit around the vent’s hood. Remove any nails that will stop the vent’s flange from slipping under the shingles.
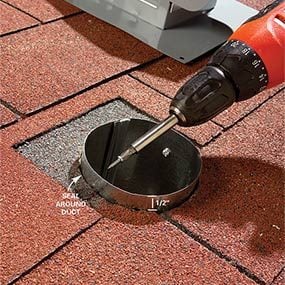
Photo 3: Install rigid duct
Fasten a 6-in. length of duct to the roof sheathing with three screws. Seal around the duct with roof cement.
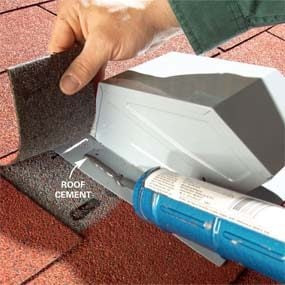
Photo 4: Set the vent hood
Slide the hood under the shingles. Cement the shingles to the vent’s flange. Fasten the lower edge of the flange with 1-1/4-in. roofing nails.
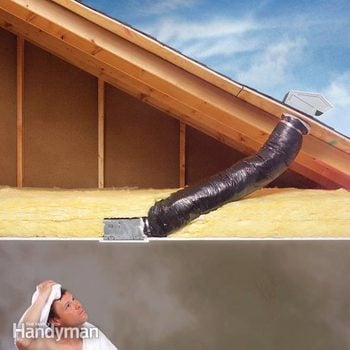
When there’s an attic above the bathroom, some installers take a shortcut: Instead of running the duct through the roof, they end the duct inside the attic. The result is that the fan fills the attic with moist air. That moisture feeds wood rot. In winter, frost forms in the attic and as the frost melts, water can damage the ceilings below.
If you don’t have a cap on your roof like the one shown in Photo 2, chances are your bath fan vents into the attic. Running a new duct up through the roof isn’t a complex job, but you will have to work in the attic and on the roof. Since you’re doing all that work anyway, consider replacing the fan.
An attic can get dangerously hot in summer, so work on a cool day. Wear a dust mask and eye protection. Bring a trouble light and a large scrap of plywood to use as a work platform. Here’s how to do the job with only two trips to the attic: On your first trip, measure the exhaust port diameter and pick a spot near the fan where you want the duct to exit the roof. Drive a screw up through the roof so you can find the location from outside. Then head for a home center. Here’s what you’ll need:
- A roof vent cap.
- Aluminum duct the same size as the flexible duct. You only need about 6 in., so buy the shortest section available and cut it with a metal snips.
- Two 6-in. hose clamps.
- One tube of roofing cement.
- 1-1/4-in. roofing nails and 1/2-in. sheet metal screws.
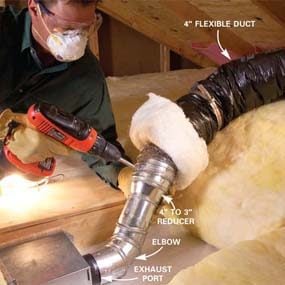
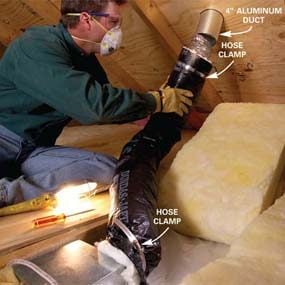
- Flexible, insulated duct. Insulation prevents condensation from forming on or inside the duct. Home centers often carry only 4-in. insulated duct. If your fan has a 3-in. port, you can still use 4-in. duct by attaching a 3-in. elbow and a 3 x 4-in. reducer with 1/2-in. sheet metal screws as shown in Photo 5.
Install the roof vent cap as shown in Photos 1 – 4. Photos 5 and 6 show how to finish the job in the attic.
CAUTION!
Your roof may not look intimidating from the ground, but it will seem a lot higher and steeper when you climb on it. So don’t take on this project unless you feel safe and secure up there. Wear soft-soled shoes for good traction, make sure the roof is dry and stay clear of power lines. For increased safety, buy roof jacks at a home center. These metal brackets support a plank that keeps you and your tools on the roof. For the ultimate in safety gear, rent a roof harness. The harness connects to a rope that’s anchored to the roof.
Required Tools for this Project
Have the necessary tools for this DIY project lined up before you start—you’ll save time and frustration.
- 4-in-1 screwdriver
- Adjustable wrench
- Caulk gun
- Drill bit set
- Drill/driver - cordless
- Pry bar
- Utility knife
Required Materials for this Project
Avoid last-minute shopping trips by having all your materials ready ahead of time. Here’s a list.
- 4-in. flexible insulated duct
- 6-in. hose clamps (2)
- Aluminum duct
- Roof cement (tube)
- Roof vent cap
- Roofing nails
- Sheet metal screws
