How to Tune Up A Lawn Mower in a Few Easy Steps

Updated: Apr. 04, 2024
Tuning up your lawn mower before the first blade of grass pops up helps keep it running smoothly and effectively all season.
1 hour
Beginner
Around $75
Introduction
The first engine I took apart and rebuilt was a 2-cycle Briggs and Stratton from a lawn mower I found in the trash. That was over 60 years ago, and I've been rebuilding internal combustion engines (ICE) ever since. Every ICE engine—especially if it's a small engine— needs regular maintenance to keep performing at its very best. That includes your lawn mower.
"Nothing will ruin your day quicker than pulling the starter cord on your lawn mower until it feels like your arm is going numb, and not having the lawn mower start," says David Bodzioch, an ASE and Pennsylvania Department of Education certified Recreational Power Equipment Technology and Automotive Technology instructor.
When to Tune Up a Lawn Mower
Late winter is the best time to tune up a lawn mower. Don't wait until your grass is six inches tall before rolling out your lawn mower, hoping it starts. Bodzioch said, replacement parts are plentiful, it's the perfect DIY job, and if you need to take it to a repair shop, it's usually their slow season.
Safety
Ensure your lawn mower is cool and unplug the spark wire or cable from the spark plug. Wear safety glasses and heavy work gloves when working near or around the mower cutting blade. If the fuel tank has gasoline in it, have a fire extinguisher nearby.
PRO TIP: Before you begin, empty the gas tank, or seal the gas tank by removing the gas cap and covering the opening with a plastic bag. Screw the cap back on over the plastic bag. This will help prevent gas spilling when it comes time to tilt the mower to change the oil.
Tools Required
- 1 1/2-inch putty knife
- Arc joint pliers or oil filter wrench (optional)
- Combination wrench set
- Hose clamp pliers (optional)
- Multi-bit screwdriver
- Spark plug gauge
- Spark plug socket and ratchet
- Stiff bristle plastic scrubbing brush
Materials Required
- Air filter
- Anti-seize compound (optional)
- but recommended)
- Dawn detergent (or optional degreasing cleaner)
- Disposable gloves
- Drain pan
- Fuel additive (optional)
- Funnel (optional
- Garden hose
- Heavy work gloves
- Kitty litter or saw dust (optional)
- Lint free or microfiber towels
- Motor oil
- Oil and fuel filter (depending on your make and model)
- Old cardboard box opened to lay flat
- Paper or disposable towels
- Rust inhibitor
- Safety glasses
- Scrubbing bucket
- Spark plug
- Spray bottle
- Two scrap 2x4s
Project step-by-step (6)
Clean the Mower
If you put your lawn mower away last season without scrubbing the underside of the deck, Bodzioch says “you’ll want to remove any caked-on gunk or built-up dirt [before tuning up your lawn mower]”.
Pro Tip: Bodzioch recommends tilting the mower “up” on its back wheels when cleaning the deck: “Tilting it on its side usually leads to loading the carb or muffler up with oil.”
- Fill the spray bottle with warm water, add a couple of tablespoons of Dawn detergent, and give it a shake.
- Tilt the mower and support with the 2x4s or place something heavy across the handle to hold the mower up.
- Wrap the blade with the towels (or cut a flotation “noodle” lengthwise) to cover the blade.
- Spray the underside of the deck with the garden hose to help loosen any heavy build-up.
- Carefully use the 1 1/2-inch putty knife to clean away any stuck-on grass or leaves from the underside of the deck.
- Spray the underside of the deck with the Dawn solution and scrub with the stiff bristle brush to thoroughly clean the deck bottom.
- Rinse with clean water and let dry. When dry, spray the deck with the rust Inhibitor to prevent grass from sticking to the deck and prevent rust and corrosion.
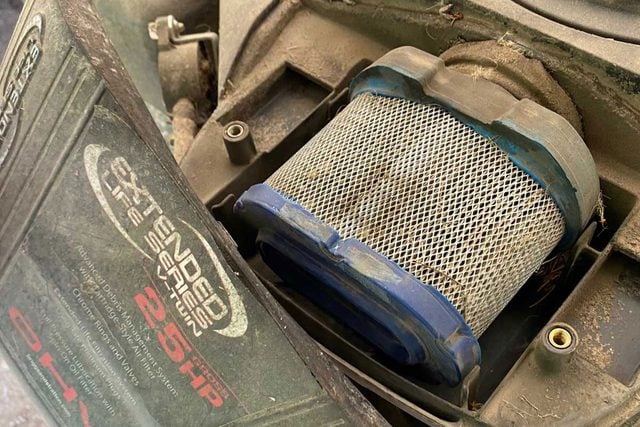
Change the Lawn Mower’s Air Filter
A clean air filter helps maintain the proper fuel/air ratio, allowing the mower to burn less gas. Lots of dirt, grass clippings and debris get into the air filter over the spring and summer, which is good because that’s its job! However, as it builds up, it will eventually become dirty enough to throw off the air and fuel ratio, causing your mower to smoke, sputter or even prevent it from starting.
- Locate the air filter cover.
- Loosen the cover screw and remove the cover.
- Remove the old air filter.
- Cover the air inlet with a clean rag.
- Spray the Dawn solution, or a degreasing cleaner, onto a clean rag and wipe away any dust, dirt or debris from the air filter housing. Let dry.
- Remove the rag from the inlet and install the new filter.
- Some air filters have a pre-cleaner foam filter/cartridge that catches larger debris. Wash the foam filter in the sink with warm water and a few drops of Dawn detergent. Let it fully dry before reinstalling back onto the air filter.
- NOTE: after a year or two most foam cartridges deteriorate and should be replaced.
- Reinstall the air filter cover and tighten the retaining screw.
Replace the Spark Plug
The spark plug is what ignites the fuel and air mixture inside the combustion chamber making the engine run. It’s usually easy to locate on a walk-behind mower, but you’ll probably have to lift the engine cover to access it on a riding mower.
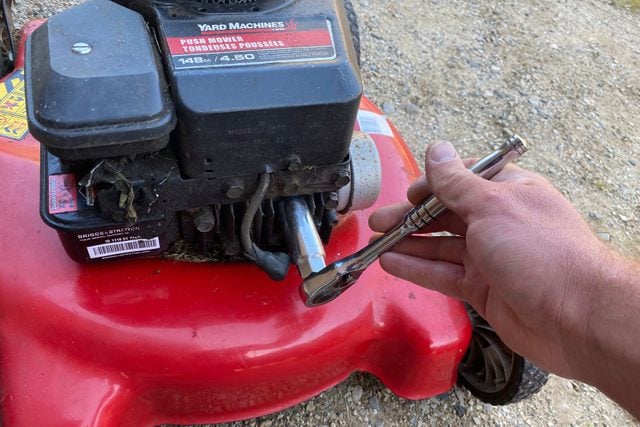
- For safety reasons, if you already haven’t, disconnect the spark plug wire or cable from the spark plug and secure off to the side.
- If the plug’s rusted in place, spray the base of the spark plug with penetrating lubricant and let it soak in for 10 minutes before trying to loosen the plug again.
- Using the correct size spark plug socket, turn the plug counterclockwise (remember, righty-tighty and lefty-loosey) to loosen it.
- Like ICE engines, lawn mower spark plugs may have short or long threaded sections.
- You can clean the old plug, but if it’s covered in black sooty stuff, for less than $10, install a new one.
- Make sure you replace the spark plug with one recommended by the manufacturer.
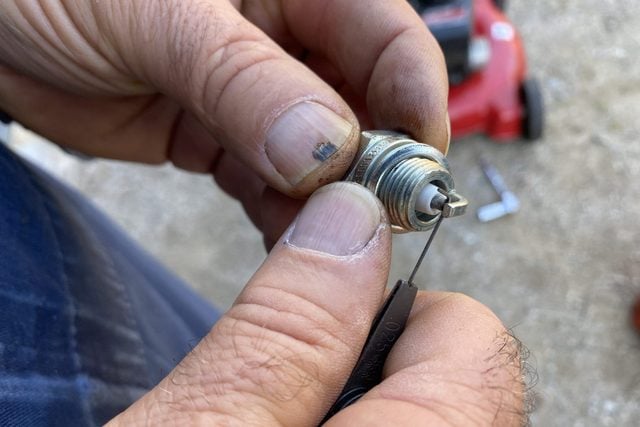
- Use the spark plug gauge to check the air gap (the space between the center electrode and the side electrode—the piece overhanging the center electrode) and check the side electrode is centered directly over the center electrode.
- Consult your owner’s manual for the air gap specification for your mower’s make and model.
- Bodzioch, suggests dabbing a small amount of anti-seize compound on the spark plugs threads to “make it easier to remove next time.”
- Thread the new spark plug into the hole with your fingers.
- Tighten the spark plug using the socket and ratchet until it stops spinning, then give it another quarter turn. Overtightening can easily break the spark plug’s porcelain insulator or make it nearly impossible to remove at a later time.
- DO NOT reconnect the spark plug wire/cable just yet.
Change the Oil (and Oil Filter)
Changing oil is a critical step. Again, just like the ICE engine in your car, over time, contaminants and moisture get into the old oil. Once oil becomes saturated with contaminants from combustion by-products and heat, additives begin to break down. As oil additives break down the acidity level of oil increases, causing oil to lose its ability to protect the engine from damage. Check your owner’s manual to see if your mower has a removable oil drain plug or a replaceable oil filter.
With a Removable Oil Drain Plug:
- Tilt the mower on its back wheels, place the cardboard underneath, and support with the 2x4s or place a heavy weight across the handle.
- Locate the drain plug.
- Use a lint-free cloth to clean the area around the oil dipstick.
- Remove the dipstick.
- Place the drain pan on top of the flattened cardboard, then under the drain plug.
- Clear dirt or debris away from the drain plug.
- Remove the plug by turning it counterclockwise using a wrench or socket and ratchet and let all the oil drain out.
- Using a clean, lint-free cloth, remove any grit from the drain plug threads. Check and replace the drain plug gasket or O-ring if cut or damaged.
- Reinstall the drain plug by hand once all the oil has drained out.
- Tighten the drain plug until it stops, then tighten another half-turn with a wrench or socket/ratchet. Just like the spark plug, do not overtighten the drain plug.
- If your mower has an oil filter, now’s the time to replace it. An oil filter traps byproducts of combustion (dirt, dust, debris and sludge) that motor oil holds in suspension to help reduce wear and tear to help keep the engine running smoothly for many years.
- Check the owner’s manual to ensure you purchase the right oil filter for your make and model mower.
- Almost exactly like replacing the oil filter in your car, unscrew the oil filter using an oil filter wrench or arc-joint pliers.
- Check the old oil filter’s gasket is not stuck to the mower.
- Thoroughly clean the gasket contact surface with a degreaser to make sure it’s perfectly clean.
- Use your finger to spread a thin coat of new oil on the gasket before installing the new filter.
- Tighten the filter by hand only. Once the filter contacts the engine or mounting adapter, tighten another quarter to half turn. Do not overtighten.
- Puncture the top of the old filter and drain any remaining oil into the drain pan.
- Remove the drain pan and cardboard.
- Lower the mower.
- Using a funnel will prevent spills that will be hard to clean up (and the reason for the kitty litter).
- Refill the engine with the manufacturer’s recommended oil type and weight. Add a small amount of oil at a time, then keep checking the dipstick to ensure that the oil is at the proper level. Do not overfill the crankcase.
Pro Tip: If your mower is bulky or difficult to tilt consider investing in a fluid change syringe or an inexpensive fluid transfer pump, especially If you have lots of other internal combustion engine equipment (snow blower, motorcycle, generator, pressure washer, etc.)
Without a Drain Plug:
- Use a lint-free cloth to clean the area around the oil dipstick.
- Remove the dipstick.
- Place the drain pan on top of the flattened cardboard, then under the oil fill tube.
- Tilt the mower over on its side. The old oil will drain out of the fill tube.
- Keep tilting the mower until all the old oil drains out.
- Once all the old oil has been drained, remove the cardboard, lower the mower, and follow the last two steps above.
PRO TIP: Properly dispose of waste oil to prevent contaminating groundwater. Most counties and municipalities, as well as most big-box auto-parts stores, offer hazardous-waste collection sites where you can bring your used oil for recycling.

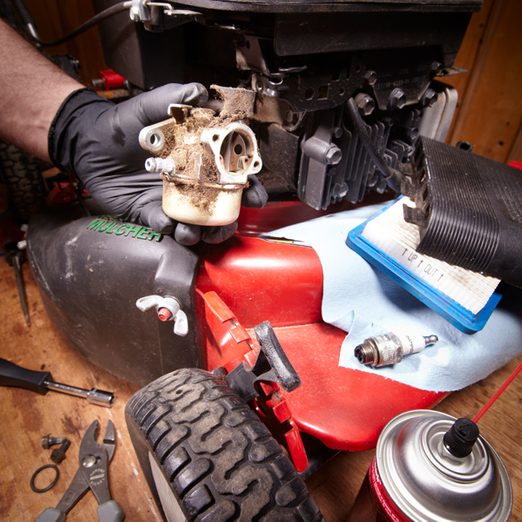
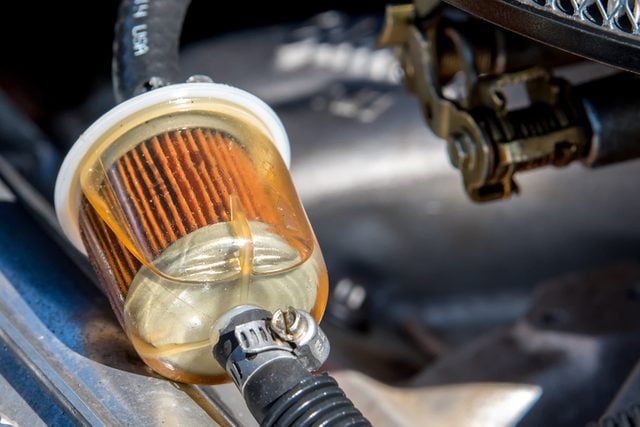
Fuel Filters
Again, check your mower’s owner’s manual to determine if your mower has a fuel filter. Lawn mower fuel filters come as canister (similar to an oil filter) or in-line, pleated paper designs. A clogged fuel filter can stop your mower dead in its tracks. Fuel filters have a simple, but important job, keeping dirt, rust, scale and other impurities from entering and damaging the engine. Safety first! No smoking or open flames and have a fire extinguisher handy. Turn the fuel cut-off valve to the “off” position and use a different drain pan to catch any gasoline that spills.
- For a canister fuel filter, follow the same steps as replacing the oil filter.
- For an in-line filter, use hose clamp pliers or a multi-bit screwdriver to loosen either spring or worm gear clamps located on each side of the filter.
- Slide the clamps off the filter’s rubber or plastic fuel lines.
- Twist the filter to “break” the seal between the filter and fuel lines.
- Remove the old filter—note “inlet” and “outlet” port orientation, usually marked with an arrow.
- Inserting the new filter into the fuel lines, ensure the new filter “outlet” port is pointed in the correct direction—toward the carburetor.
- Reposition the clamps and retighten.
Finishing Up
Wipe any spilled oil or other fluids off the mower. Clean your work area, tools and dispose of old parts. Properly dry out and store oily rags and waste oil containers until bringing to a facility that collects used oil.
- Check the oil level again.
- Fill the tank with fresh gasoline. I always add the recommended amount of fuel stabilizer (usually one ounce) when filling the tank to prevent corrosion.
- Open the fuel shut-off valve if closed. If you replace the fuel filter, you will need to pull the starter cord a few times to prime the carburetor.
- Reconnect the spark plug wire/cable.
- Start the mower, let it run for a few minutes. Check for oil and fuel leaks.
- Shut the mower off and check the oil level again.
How much does a lawn mower tune-up cost?
Depending on your make and model, it can cost $15 (or less) to simply change the oil and install a new spark plug yourself. If your mower needs an air, oil and or fuel filter, it may add another $30 to $50 to the cost. Most of the chemicals you may need (degreaser, rust inhibitor, penetrating lubricant or fuel additive) are most likely in your garage.
Is it cheaper to repair your lawn mower or buy a new one?
Again, depends. If you invested in an expensive mower with all the bells and whistles, and it’s less than five years old, it makes sense to invest in DIY repairs, such as replacing a defective carburetor, a frayed starter cord or a broken control cable. If you bought a $100 mower, it’s 15 years old, and it needs major engine repairs or the deck is rotted out, then it’s time for a new one.
Pro Tip: I always add the recommended amount of fuel stabilizer to my five-gallon gas can to help keep the gas fresh as long as possible. In addition to annually tuning up my snow blower, generator, and pressure washer, because they can sit idle for a year or longer, I start them every six months to keep them in tip-top shape for when I go to use them.
DIY vs. Professional Lawn Mower Tune Up
Performing the five simple DIY lawn mower tuning steps listed here can save you $200 to $300 in labor over taking it to a small engine repair shop. Although each lawn mower can be different, the steps are usually similar.
Before you start, check the owner’s manual for the manufacturer’s recommended motor oil, filters, and spark plug. The manual should also tell you where the parts are located and how to replace them. It should also include notes on certain specifications such as the spark plug air gap and how much oil the engine holds. If the engine is running poorly or belching black smoke after the tune-up, it may be time to visit the pros.
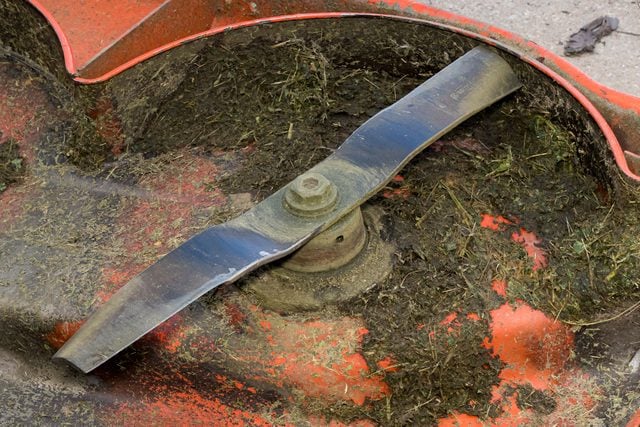
Sharpening Your Lawn Mower Blade
Sharpening a lawn mower blade twice each season helps maintain a green, healthy lawn, reducing mowing time, decreasing engine strain and lowering fuel consumption. An easy DIY task, follow these steps to learn how to sharpen your lawn mower blade while performing a tune-up.
About the Expert
David Bodzioch has been an ASE Master Technician for 23 years, is EETC (Equipment and Engine Training Council) certified and for the past 19 years has taught Recreational Power Equipment at North Montco Technical Career Center.
Happy mowing!