
How to Properly Sharpen Lawn Mower Blades

Updated: Apr. 11, 2024
Sharpening a lawnmower blades sounds like a tougher job than it is. In most cases, you can do it in less than 20 minutes with simple hand tools.

An hour or less
Beginner
Less than $20
Introduction
One of the things I enjoyed most about the landscape company I co-founded with my wife in the late '80s was the opportunity to revisit my childhood. From my pre-teens up until I left for college, I was the neighborhood lawn mowing guy, and that meant I was using our Toro rotary mower to cut three or four lawns a week. It was definitely a chore, but I found it agreeable because it got me outside amidst the smell of freshly cut grass.
Back then, it didn't occur to me to sharpen the blade — that was a job for my older brother. But mowing lawns professionally many years later prompted me to develop the maintenance and blade sharpening skills I didn't have when I was younger. Dull blades tear grass rather than cut it cleanly, and an uneven lawn full of shredded grass can become moldy or scorched by the sun. Results like that would have earned our company two-star reviews on Yelp (if such a thing had existed back then).
Blade-sharpening became a monthly maintenance routine for me, which is more often than a homeowner usually has to do it. Both rotary and reel mower blades need regular sharpening, and the process is similar for both.
Since rotary mowers are more common, that's the type described in this procedure. Just as a reminder: A rotary mower has a blade that hangs from the top of a housing and spins in a horizontal plane, while a reel spins vertically around the wheel axle. Riding mowers can have either type, but since removing a rotary blade from a tractor isn't as easy as it is for a walk-behind mower, riding mowers aren't covered here either.
Tools Required
- Bench vise
- File
- Rags
- Socket/ratchet set
- Spark plug wrench
- Steel pipe
- Wire brush
Materials Required
- 2 x 4 block
- Gloves
- Paint
- Safety goggles
- WD-40 lubricant
Project step-by-step (7)
Disable the lawnmower
Locate the spark plug and pull off the spark plug wire to prevent the mower from accidentally starting while you’re working. Tape the wire to the housing to keep it out of the way.
- Pro tip: Use a spark plug wrench to remove the spark plug. If the piston happens to be at the top of the compression stroke, a little bump to the blade might force the piston over the “hump” and into the power stroke. If that happens, the blade will lurch around and could break your hand! Removing the plug prevents that by relieving compression.
Tip the mower and mark the blade
Tip the mower so the carburetor and air filter side is up. This prevents gas and oil from dripping into the air filter, resulting in hard starting and clouds of smoke when you get the mower running again.
Spray or dab a little paint on the blade to mark the side that faces out. That way you’ll know which way to reinstall it. It’s a common mistake to put the blade back upside down, and if you do that, it won’t cut properly and you’ll drive yourself nuts trying to figure out why.
- Pro tip: If the gas cap has air holes, some gas will likely leak onto the floor, so do this procedure outside and keep a rag handy to wipe up spills. Avoid using matches, lighters or any other sources of open flames.
Remove the blade
Wedge a 2 x 4 block between the end of the blade and the housing to prevent the blade from rotating counterclockwise (don’t use your foot for this!). Spray a little WD-40 on the nut (or bolt) holding the blade to the engine shaft to loosen it, wait a minute, then use a long-handled wrench to turn it counterclockwise. The nut is tight, so it may take a lot of force to turn it. It helps to extend the wrench handle with a length of steel pipe for extra leverage.
Once the fastener is loose, unscrew it, remove the blade and set the mower back in the upright position.
- Note: The blade on some older models rotates counterclockwise, and they take a reverse-thread nut or bolt that you have to turn clockwise to remove. This isn’t true for most modern mowers, which almost all have clockwise-rotating blades.
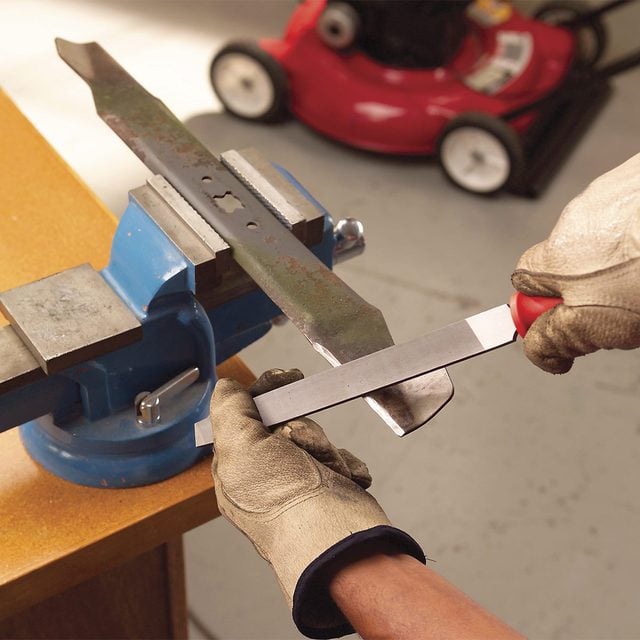
Sharpen the blade with a file
Clamp the blade in a bench vise and clean off rust and debris with a wire brush (don’t erase the paint marks you made earlier). Put on gloves and safety goggles and use a bastard mill file (a flat file about 10 inches long and a half to one inch wide) to hone the bevels on both ends of the blade.
Hold the file at the exact angle of the bevel and stroke up and down repeatedly while moving from one end of the bevel to the other. To maximize the life of the blade, you’re aiming for “butter-knife” sharp, not razor-sharp. It shouldn’t take more than 30 to 50 strokes to achieve this.
Pro tips
- The file cuts in one direction only: on the push stroke. You’ll feel resistance when the file grips the metal. If you don’t feel the file “biting,” try pushing down a little harder, and if you still don’t feel resistance, change the file, because the one you’re using is probably dull.
- To save time, I sometimes use a rotary tool with a grinding wheel attachment on curved mulching blades that are difficult to file. This tool is safer and easier to control than an angle grinder, which some pros use, but you still have to use light pressure to avoid overheating the soft steel and ruining the blade. On the whole, however, a file is the safest tool to use on straight blades.
Balance the blade
Hang the blade from a nail to check the balance. If one side dips, file a bit more off that side until the blade hangs horizontally. This step is important because an unbalanced blade causes vibrations that can make mowing more of a chore than it already is and actually damage the lawnmower.
Reinstall the blade
Tip the lawnmower back over, fit the blade back onto the shaft and screw on the nut or bolt to hold it. Wedge the 2 x 4 back between the blade and housing (on the opposite side of the blade this time) and tighten the fastener down with the wrench.
Be sure to tighten firmly. Under-tightening is a common mistake. It can throw off the engine timing and even make the mower hard to start.
Set the mower upright, replace the spark plug and spark plug wire and give the mower a test start.
FAQs
How often do you need to sharpen a lawn mower blade?
This depends on the size of your lawn and how often you mow. If your lawn is less than an acre in size, and you mow once a week, sharpening twice a year — once at the beginning of the season and once halfway through — is usually enough. If you have a large lawn or mow multiple lawns, you might need to sharpen every two to four weeks.
How can you tell if your lawn mower blade is dull?
Mowing with a dull blade tears grass rather than cutting it, and it sometimes pulls grass out in clumps. Grass with torn blades is more susceptible to disease and may have brown or white tips. Moreover, the lawn looks uneven after being cut with a dull blade.
Should you pay to have your lawn mower blade sharpened?
If you have the right tools, you can sharpen a lawnmower blade in less than 20 minutes with little risk of making a mistake. However, if the blade is pock-marked and chipped after mowing through rocky soil, it may need more than a simple sharpening, and that’s usually a job for a pro.
How much does it cost to sharpen a lawn mower blade?
If you remove the blade and take it to a shop for sharpening, the average cost is about $30.
Originally Published: September 14, 2020