
How to Change Rear Brake Pads

Updated: May 26, 2023
Maintaining disc brakes is a perfect opportunity for DIYers to get their hands dirty and save a few hundred dollars.
Introduction
Learning how to change rear brake pads on your disc brakes isn't hard. Let's get started!Project step-by-step (11)
Remove the Rear Wheel
Start the process by placing wheel chocks in front of the front wheels. (Don’t set the emergency brake; engaging it makes it harder to remove the calipers.)
Set the jack in place and lift just enough to put some pressure on the jack. Use a lug or impact wrench to loosen the lug nuts on the wheel. Lift the vehicle until the wheel comes off the ground, then spin the lug nuts off the lugs and remove the wheel.
Remove Bolts from Caliper Pins
Use a box-end wrench to loosen the bolts holding the caliper in place. Remove the bolts and use mechanics wire or a short bungee cord to hang the caliper up and away from the work area to avoid putting tension on the brake line.
Remove Bolts from Caliper Brackets
Use a box-end wrench to loosen the two bolts holding the caliper bracket in place. You may need a longer-handled wrench to get more torque on reluctant bolts. If you don’t have one handy, slip a length of pipe over the box-end wrench handle to fashion an extension. Remove the bolts and lift the caliper free of the rotor.
Lubricate Caliper Guide Pins
As long as you have removed the caliper, take the time to lubricate the two caliper guide pins. Wipe each off with a clean rag, then brush with silicone paste lubricant. Replace them in their sockets and twist to distribute the lubricant.
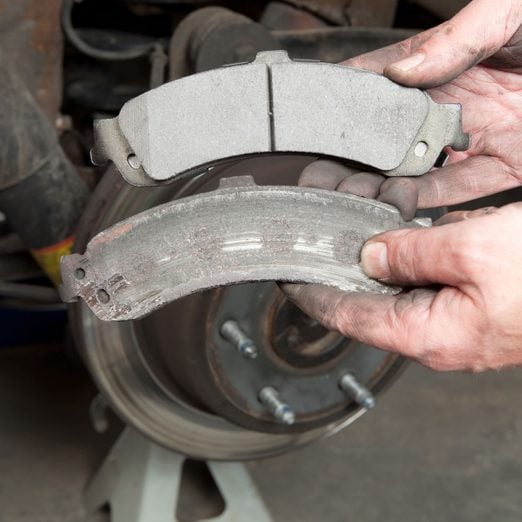
Remove the Brake Pads
Slide the brake pads out of the caliper bracket. Pull the old stainless steel retainer clips free from the grooves that hold them in place, paying attention to their orientation (snap a quick picture if you think you might forget), and then clean the dust off the bracket using a wire brush.
Reattach Caliper Bracket
Slide the pads to the outsides of the bracket, leaving as much room as possible to get them over the rotor. Set the bracket into position and twist the two anchor bolts with your fingers until snug. Tighten each firmly with a long-handled box-end wrench. Be careful not to over-torque and strip the threads.
Seat the New Brake Pads
Snap the new retainer clips into place, positioning them the same way as the old ones. Some pads come with a packet of brake grease, otherwise break open a new pouch of brake grease and apply a thin coat to the inside of each clip holding the brake pad ears.
Find the new brake pad with the metal flange attached to its back. This flange is the squealer that signals heavy pad wear and should be mounted on the inside pad. Slide this pad into the clip-lined grooves in the caliper bracket with the friction material facing the rotor. Fit the matching outer pad into the other side of the bracket, again with the friction material facing the rotor.
Reattach Caliper
Retract the piston. If the piston face is hollow, any tool large enough to compress the piston will suffice, taking care not to break through the thin metal that comprises the back face of the piston. You can protect the piston by laying one of the old pads across the piston as you push it back. Many newer models require a special tool called a brake caliper wind-back tool. Identify these pistons by looking for a solid surface (not hollow) on the piston face that has two or three recesses for the winding pins to grip and turn.
If you get the brakes pulled apart and don’t have the tool, you can still complete the job with a needle-nose vise-grip wrench or pliers. Grip the piston face with the tip of the wrench and turn it clockwise to retract the piston.
Reposition the caliper, fitting it over the new brake pads. Insert the anchor bolts through the caliper and into the slider pins. Finger-tighten until snug, then tighten each firmly with a box-end wrench.
Remount Wheel
Seat the wheel on the lugs and thread the nuts onto the lugs using your fingers. Rather than working around the hub in a circle, work in a star pattern, jumping across the hub. Once all the lugs are threaded, snug them by hand before tightening firmly with a lug or impact wrench, again working in that same star pattern. Make a point of rechecking the lugs after driving your vehicle for a few days.
Pump the Brake Pedal
After installing the wheels, make sure to pump the brake pedal to reengage the caliper piston to the brake pads. Failure to do so will result in no brakes when the pedal is pushed the first time.
A Note on Safety
There is no way to determine whether brake pads contain asbestos just by looking at them, and many aftermarket suppliers still use the material. When changing brake pads, never use compressed air to clean any of the parts. Instead, use a spry-type brake cleaner; this will trap the dust and prevent it from becoming airborne. Always wear a dust mask when working on brakes.
Originally Published: March 25, 2020