
How to Roll on Bedliner Paint in a Pickup Truck
Updated: Dec. 21, 2023Save hundreds of dollars with a roll on bedliner
- Time
- Complexity
- Cost
- Multiple Days
- Beginner
- $101–250
Roll On Pickup Truck Bedliner Overview
Whether you have a factory-perfect pickup bed you’re anxious to protect or a scratched and dented pickup truck bed you’re dying to hide, you have several options for bed liners. Molded drop-in types are sized for your truck and cost $250 to $500. Other options are a professionally installed spray-on liner, which costs $500 to $1000, or a do-it-yourself roll on bedliner for $100 – $200 (including tape and cleaners), which is what we’ll focus on here.
All liners have their obvious pros and cons. Molded bedliners are good at absorbing shocks and hauling gravel or sand but can be slippery. They can also get punctured, which can lead to bed corrosion if water and debris become trapped underneath. On the other hand, spray or roll/brush-on bed liners are a heavy-duty polyurethane mixture that hardens and thoroughly coats the inside of your truck bed. Brush-on and roll on bedliners are skid resistant, but on the downside, they can’t be removed and aren’t as thick as drop-ins, so they’re subject to denting.
The three critical steps for a solid, long-lasting coating are preparation, preparation, preparation. No shortcuts allowed, or you’ll end up with a worthless chipping or peeling surface.
Choosing a roll on bedliner product
Herculiner, Dupli-Color and Rust-Oleum are the most popular retail brands. You can find them at most auto parts stores. However, you can also find many other brands online. Just search for “roll on bedliner.”
The products come in three types: water-based, solvent-based single-stage and solvent-based two-part formulas. Truck bedliner cost will range from $80 to $100 per gallon for water-based and single-stage products, to $150 per gallon for two-stage formulas. One gallon is enough to apply two coats to most truck beds. The preparation work is the same for all three formulas.
All DIY bed liner products contain a gritty material for skid resistance. However, some of the higher-priced versions also include rubberized bits for added impact resistance.
You’ll have to brush the product into corners and seams. You may choose to brush it onto the bed itself. But we recommend buying the manufacturer’s optional application kit and applying the product with its special roller. If you opt to brush it on, at least back-roll it to achieve a more uniform texture.
If cost is your most important consideration, buy the water-based or single-stage product. However, if you want a bed liner that’s closest in durability to a professionally sprayed-on product, spend the extra dough and buy a two-part bed liner.
Roll on Bedliner Preparation
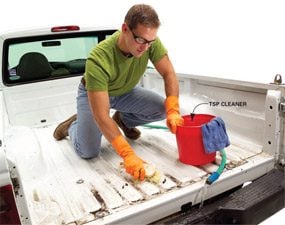
Step 1: Wash
Remove the tailgate and set it on sawhorses. Sweep or vacuum dirt and debris from the bed and tailgate. Make sure any drain holes are clear. Scrub both the bed and the tailgate with a strong solution of TSP (trisodium phosphate or a TSP substitute) and water to remove oil, petroleum or wax-based residue. You may also need to use chemical removers and a scraper. (Follow the directions that come with the kit you select.) Rinse with plenty of clear water and wipe with a clean rag. Allow to dry thoroughly.
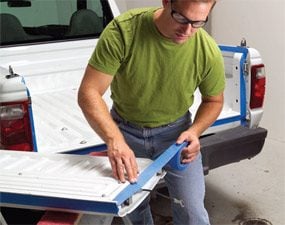
Step 2: Mask
Using painter’s tape, carefully mask off all areas that aren’t going to be covered, especially at the back of the bed near the tailgate. Press the tape down firmly to form a good protective seal. Neatly cover the drain holes with tape or foam rubber weatherstripping to seal them.
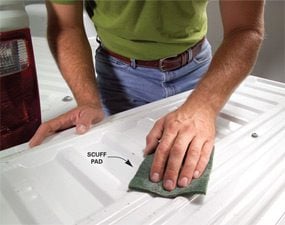
Step 3: Scuff
Thoroughly scuff all painted surfaces, including any surface rust, to ensure a good bond. Take your time and leave no glossy areas. Sand deep rust or corrosion to the bare metal with 150-grit sandpaper. Blow out or wipe down the bed to remove all sanding dust. Apply a coat of rust converter/primer/sealer over bare metal areas (Mar-Hyde is one brand, available through our affiliation with Amazon.com) and let dry. Don’t use lacquer-based primer.
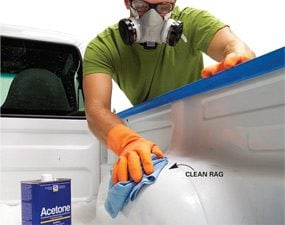
Step 4: Wipe
Wipe the bed area with acetone (should only need to purchase 1 qt. of acetone for this project). Wear chemical- resistant gloves and a respirator. Start at the front of the bed using the spray bottle. Let the acetone sit for a few seconds and wipe it off with clean shop towels, never using the same side of the towel twice. Wipe the entire surface of the bed where the material is to be applied. Let dry about 10 minutes. (Never use lacquer or alcohol-based solvents.)
Roll on Bedliner Paint Application
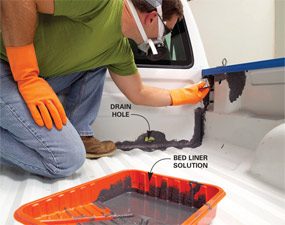
Step 5: Brush
Remove the bedliner paint lid and thoroughly mix the material using a paint mixer and power drill (make sure the temperature is between 32 and 95 degrees F). The material can be thinned up to 10 percent with xylene if it’s too thick to brush or roll. Occasionally stir the mixture while applying. Begin with the seams and corners, dabbing rather than stroking the material into them.
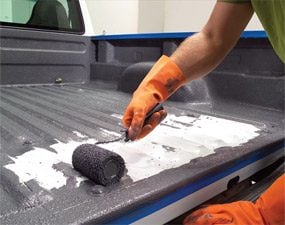
Step 6: Roll
Once the seams and corners are covered, use the supplied textured roller cover and handle to gently apply the material to the front and side panels first, then roll the material onto the tailgate and the floor of the trunk bed. Apply a second coat of material along the taped edges before the first coat dries so the tape won’t tear when you remove it. Touch up any missed areas with a small brush. When you’re finished, discard the roller cover and wrap the brush in a plastic bag to keep it from drying out. Use xylene to remove any excess material while it’s still wet. Once the first coat has set up (usually in six hours) or isn’t tacky to the touch, apply the second.
Let the rags and application materials air dry, then throw them into the trash. Recycle any leftover materials or solvents as you would oil paint.
Required Tools for this Truck Bed Coating Project
Have the necessary tools for this DIY project lined up before you start—you’ll save time and frustration.
- 4-in-1 screwdriver
- Adjustable wrench
- Bucket
- Cordless drill
- Paint roller
- Paint scraper
- Safety glasses
- Stiff brush
Required Materials for this DIY Bedliner Paint Project
Avoid last-minute shopping trips by having all your materials ready ahead of time for this bedliner paint project. Here’s a list.
- 1 qt. xylene
- 150-grit sandpaper
- Acetone
- Bed liner kit.
- Box of TSP
- Household sprayer
- Paint mixer for power drill
- Roll of 2-in. blue masking tape
- Roll of lint-free blue paper shop towels
- Rubber-coated (PVC) gloves
- Two additional Scotch-Brite pads
- Two disposable paint roller pans
