
How to Install an Attic Lift
Updated: Apr. 10, 2024
Send heavy loads to the attic—with the press of a button

A full day
Beginner
More than $1000
Introduction
Having attic space above your garage just about doubles your storage options. But carrying stuff up the ladder is a hassle and can be dangerous. An attic lift makes the chore safe and effortless. You can even store things like a lawn mower or snow blower that you wouldn’t think of hauling up a ladder. A lift is easy to install if your garage has the right bones, and it uses power you likely already have. We’ll tell you what you need to know before you buy and walk you through the installation.Tools Required
- Circular saw
- Drill/driver
- Framing square
- Level
- Reciprocating saw
- Tape measure
- wrench or socket set
Materials Required
- Attic lift

ASSESS THE CEILING STRUCTURE:
Standard trusses or framing may not handle the weight of a loaded lift or all the items you want to store. Attic or storage trusses, on the other hand, are designed to support extra weight. If your garage attic has a floor (plywood or OSB) and enough space for you to stand up, chances are you have trusses suitable for an attic lift. If you’re not certain whether your attic can bear the load, it’s best to consult a structural engineer.
SHOP ONLINE:
Attic lifts aren’t sold in any brick-and-mortar stores we’re aware of, but several brands are available online: VersaLift, Auxx-Lift and Aladdin storage lifts were the options we found. Prices ranged from $900 to $3,500. We chose a top-of-the-line VersaLift model, which cost $2,600.
Learn more and purchase this lift at versaliftsystems.com.
SPACE REQUIREMENTS:
There are several models of the VersaLift; we used the 24-in. model with wireless remote, which needs an opening of 22-1/2 in. between joists, 46-1/2 in. along them and 4 ft. of vertical clearance. You also need to know the distance from the garage floor to the attic floor because the models come with different lengths of cable.
HEED THE WARNINGS:
Read and follow the safety precautions for using the lift. The instructions also caution against turning on the lift before you connect the cables to the platform. Doing so will cause a big headache and add many extra steps.
POWERING THE LIFT:
Check to see whether there’s already an outlet close enough for the power cord to reach. If there isn’t one, the best way to add one is by connecting the new outlet to an existing attic light. This way the VersaLift has power only when the garage light is on, and it can be turned off without a special trip to the attic. For help with that project, search for “wire an outlet” at familyhandyman.com.
Project step-by-step (10)
Cut the Opening From Above

Start in the attic by snapping lines on the floor along the inside of the joist space you’re using for the lift. Snap two more lines to make a rectangle 46-1/2 in. long and 22-1/2 in. wide. Make sure you have at least 4 ft. of vertical clearance above the marks, then cut the opening into the floor with a reciprocating saw.
Install Headers Between Trusses
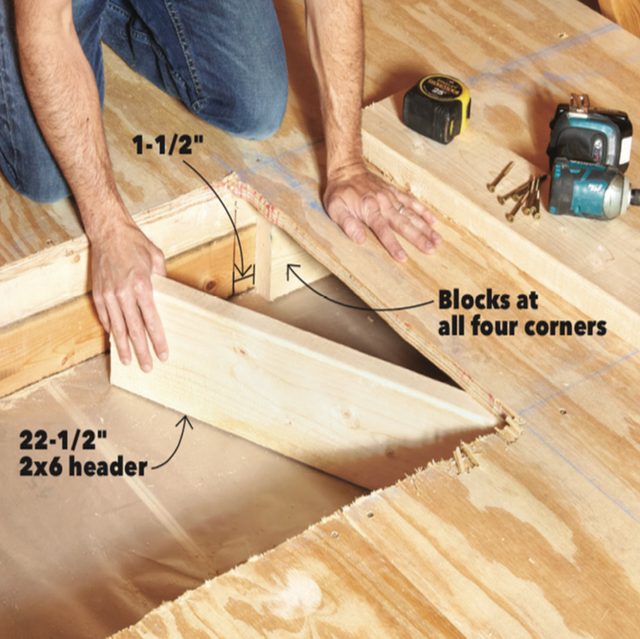
Install blocks 1-1/2 in. beyond the opening at each corner. Then cut headers and screw them to the blocks. Double-check the opening to be sure it’s sized correctly and square.
Cut the Drywall

Slice around the rough opening to open the hole to the garage. Hang a plumb bob from each corner of the opening and mark the garage floor. This will help later on when you attach the platform to the lift.
Cover the Corners
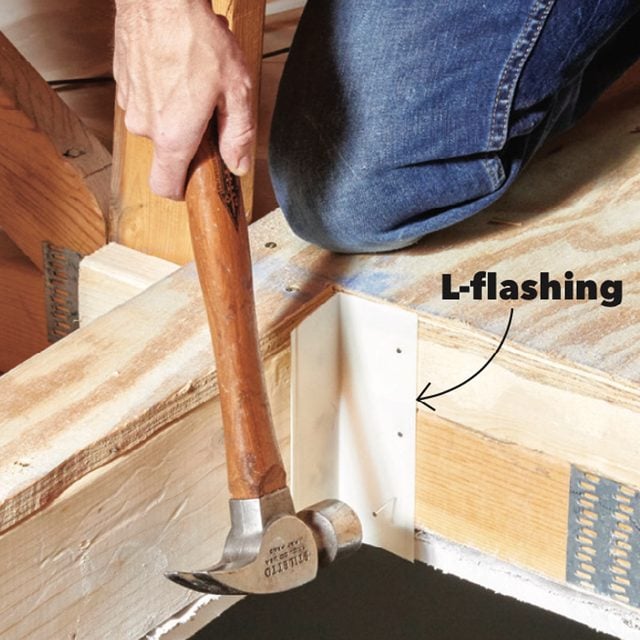
For the platform to move through the opening smoothly, nothing can protrude into the opening, including nail heads, splinters and screws. If there are any protruding edges, trim them off with a flush-cut bit in your router. Cover the corners from the top of the floor to the bottom of the ceiling with the L-flashing provided with the lift.
Next, read: 10 Important Things You Need to Do When Finishing Your Attic
Level the Lift
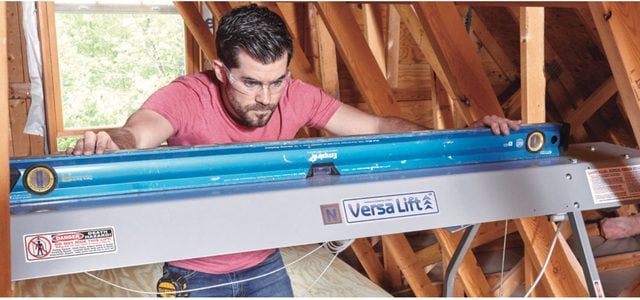
Position the lift over the opening and start the lag screws that fasten it to the floor. But leave the lag screws loose so you can adjust the mounting rails later (see Photo 9). Level the lift housing by sliding shims under the legs (see Photo 6).
Lock the Legs in Place
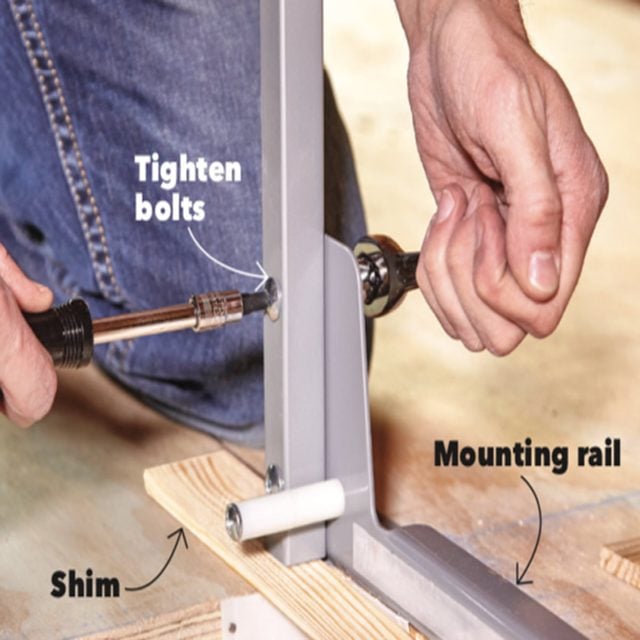
At this point, the bolts that hold the legs to the mounting rails are loose. The bolt holes are slotted, so with the legs shimmed and the unit level, push the mounting rails to the decking and tighten the bolts that hold the legs to the mounting rails.
Assemble the Platform
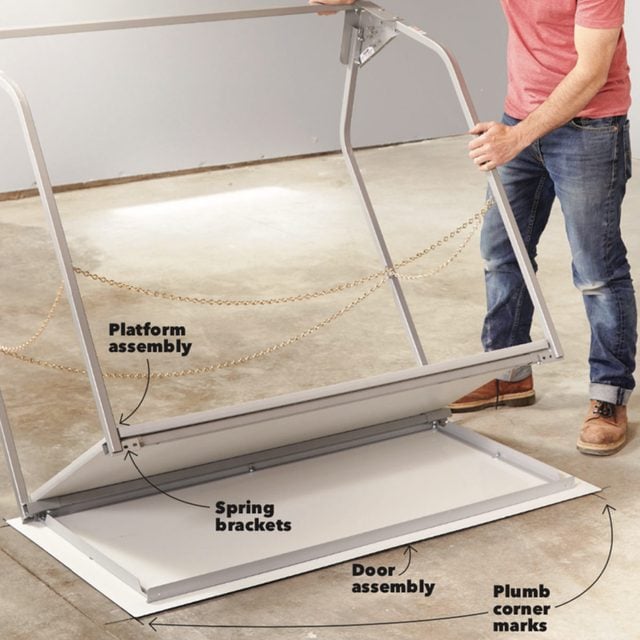
Build the lift platform and door, then set the platform assembly on the door. Screw the spring brackets to the door braces. Then set the unit inside the corner marks on the floor.
Connect the Cables to the Platform
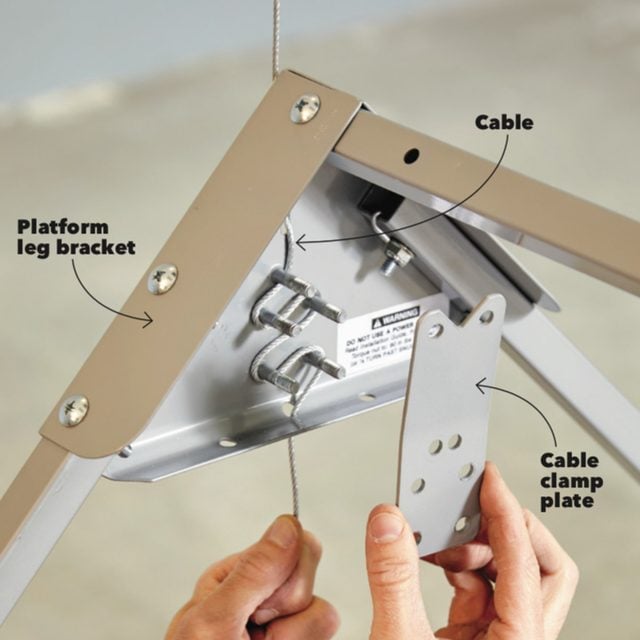
Drop the cables from the lift housing into the opening and thread each cable through the slot in the platform leg brackets. Pull the cable tight and wind it back and forth through the studs on the inside of the bracket and then back through the hole on the bottom of the bracket. Then attach the cable clamp plate and aluminum spacers to the brackets with locknuts. These should be tightened to the specified torque of 5 ft.-lbs. or snug plus a half turn. Loop the excess cable up and hold it in place with zip ties.
Center the Lift

Adjust the mounting rails to line up center marks on the platform and outside the opening lengthwise. Place a small shim between the mounting rails and the platform legs to maintain spacing before tightening the lag screws that hold the mounting rails to the attic floor. Repeat this at each corner.
Adjusting the Housing
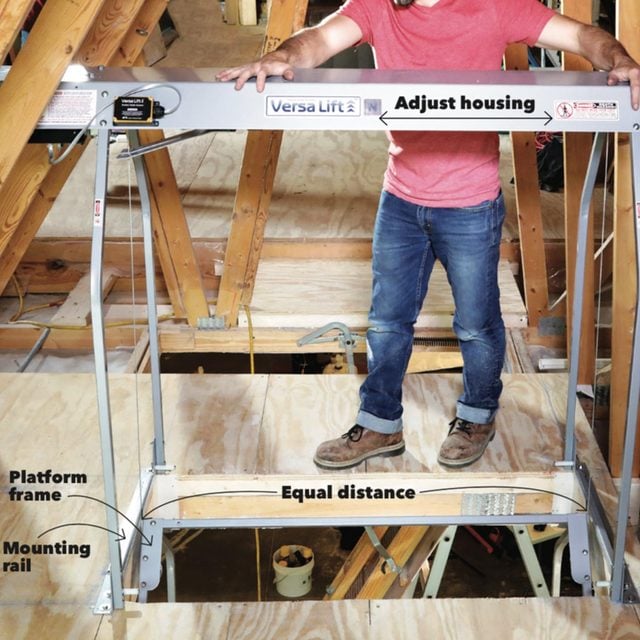
Lower the top of the platform frame even with the mounting rails to check that the platform hangs centered between the mounting rails. If the spacing between the brackets and the mounting rails isn’t equal, push the lift housing to make the spacing the same on both sides.
Every product is independently selected by our editors. If you buy something through our links, we may earn an affiliate commission.