
How To Prevent Ice Dams on Your Roof
Updated: Feb. 01, 2024
Take action before the first snow to keep your roof in good condition.
While spring storms are notorious for damaging roofs, winter can be hard on the top layer of your house too. Ice damns are one of the main concerns you have to watch out for when the temperatures drop and the snow starts flying. Fortunately, you can take steps to prevent ice dams and extend the life of your roof.
On This Page
What Is an Ice Dam?
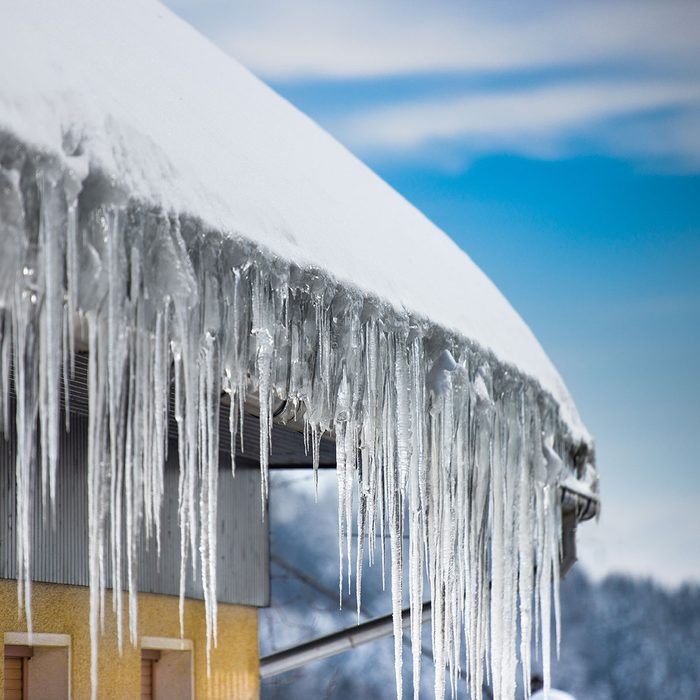
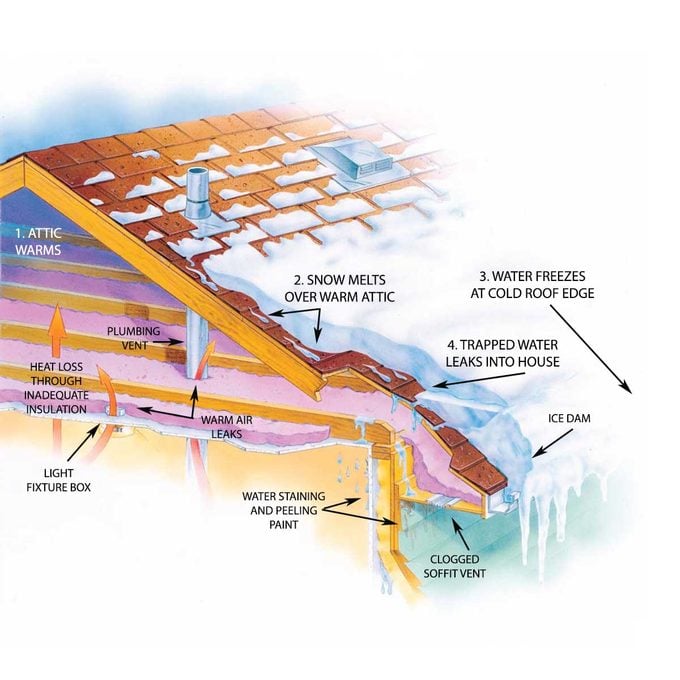
Ice dams and icicles form when the snow melts, runs down your roof and refreezes near the edge. This only occurs when part of your roof warms to above 32 degrees F, warm enough to melt the snow, while the roof edge remains below freezing. This scenario is often the result of a warm attic.
In most homes, heat escapes through ceilings into the attic and warms the wood and shingles directly above it. Although the outdoor temperature is below freezing, the snow melts over the warmed section of roof. When the meltwater runs down the roof, it hits the cold edge not warmed by the attic. There it freezes, creating a rim of ice. This rim can grow, trap more water behind it, and bingo — you have a full-fledged ice dam.
With nowhere else to go, the trapped water works its way back up under the shingles. Eventually, it causes leaks in your roof as the water drips through into the soffits, walls, and ceilings. You might first notice rust spots on drywall fasteners, the result of ice dams. You might also see peeling paint, sagging sheetrock, or stains around windows and doors. It can even lead to mold or rot.
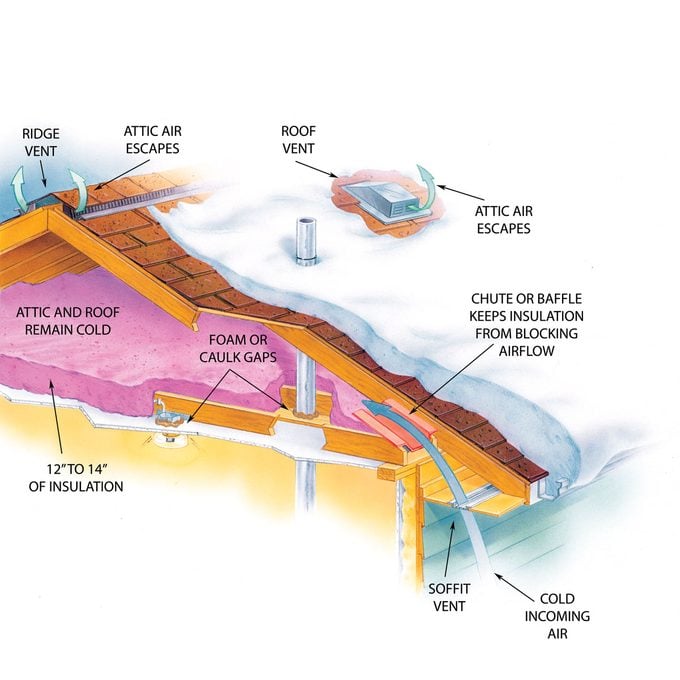
The key to preventing ice dams is simply to keep your attic and roof cold. After a snowfall, a cold roof will have a thick blanket of snow. A warmer roof, however, will soon have clear spots where the snow has melted off, and may well have icicles hanging from the eaves. To keep your roof cold, follow these three steps:
Close up Attic Bypasses
In the average home, about one-third of the heat loss is through the ceiling into the attic. And most of that loss comes from air leaks caused by unblocked walls, gaps in drywall, and cracks around light fixtures, plumbing pipes, chimneys, access hatches and other ceiling penetrations (shown above).
Air leaks can be tough to stop. You have to climb into your attic, pull or rake back insulation, and plug the leaks using foam, caulk and other methods. Low roof angles make some air leaks difficult to reach. This work is definitely a cool weather project; your attic will be unbearably hot otherwise. Always wear a dust mask, a long-sleeved shirt and long pants to help prevent skin irritations caused by insulation.
Bonus: By stopping air leakage to mitigate ice dams, you’ll save energy and reduce your heating and air conditioning bills.
Measure Your Attic Insulation Level
While you’re in the attic, check the depth of your attic insulation. Upgrade attic insulation to an R-value of about R-40. Building codes require about 12-in. to 14-in. of fiberglass or cellulose. Add more if you have less than eight inches and have had ice dam problems in the past.
Blown-in cellulose and fiberglass are usually better than hand-placed batts, because they fill more tightly around rafters, joists and other obstructions, leaving fewer gaps. It’s usually worth hiring a professional for this job; you probably won’t save much by doing it yourself. However, if you can’t find a good price, you can rent a blowing machine from a rental yard or home center. Often, the use of the machine is free with the purchase of insulation.
Add Roof and Soffit Vents
Attic ventilation draws in cold outdoor air and flushes out warmer attic air, cooling the attic and the roof in the process. The minimum ventilation area (size of the openings) should be about one sq. ft. of vent per 300 sq. ft. of ceiling area (attic floor area), when half the vent area is low on the roof and half is high.
Actually figuring all this out is a bit complex; you have to examine your existing vents to find the area of each, which is stamped on them. As a rule of thumb, put an 8-in. x 16-in. vent in the underside of the overhang (soffit) in every other rafter space . (If you’re planning to rebuild the soffit, install a continuous 2-1/2-in.-wide “strip” vent, because it will look better.) And install a continuous ridge vent along the peak.
If the ridge on your roof is much shorter than the roof edge — on pyramid-shaped roofs, for example — add the common square-shaped roof vents near the peak. Add enough so their ventilating area is about equal to the area of soffit vents. This might deliver a whole lot more ventilation than the minimum requirement, but don’t worry. You’re unlikely to have too much ventilation.
In addition:
- Some roof types are difficult to vent, especially roofs with angled ceilings and no attic, roofs with skylights, flat roof dormers and low-slope roofs. You may have to rely on the secondary strategies we list in the next section.
- Insulation, especially the blown-in type, can block the airflow. Take a long 1×2 up into the attic with you and poke it through the spaces between rafters over the exterior walls to make sure they’re open. Baffles usually prevent this problem. If you don’t have them, add them before installing additional insulation. A shot of air from a compressor hose from the outside will open plugged soffit vents.
- Assessing the venting is tricky on homes that have had aluminum retrofitted over old soffits. If you have persistent ice damming in one area, you might have to remove several aluminum sections to check the venting.
Reminder: Climbing onto your roof can be dangerous. Follow safety procedures.
Caution: Whenever you make your home more airtight, check your combustion appliances (gas, oil or propane-fired water heaters, furnaces, etc.) for backdrafting. Appliances that don’t draft properly can dump waste gases, including potentially deadly carbon monoxide, into your home.
Ice Dam Prevention Products
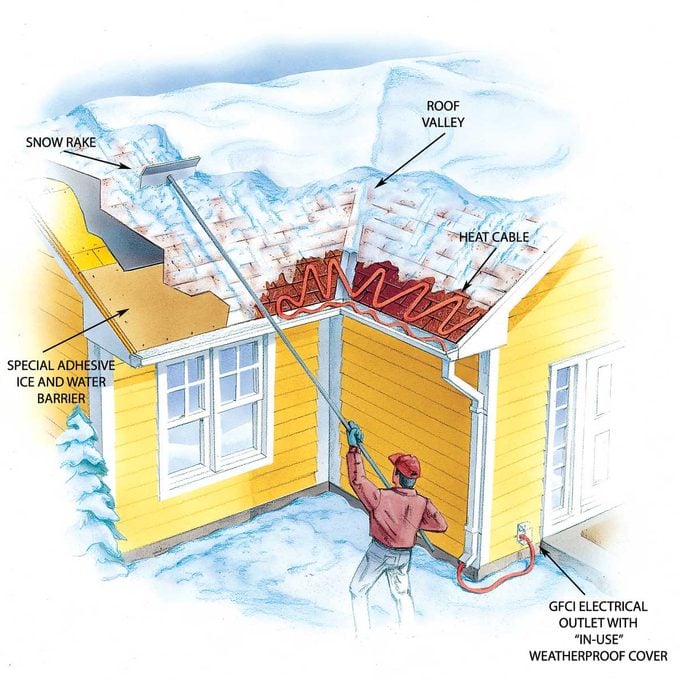
A cold roof isn’t always a perfect solution. During winters with heavy snowfall, you may get ice dams anyway. Or ice dams may consistently form at the foot of roof valleys (the junction where two roofs meet at a right angle) because they fill with windblown snow. And some sections of the roof may be impossible to keep cold. That’s when you have to call on secondary strategies and ice dam prevention products to prevent ice dam damage.
- Run a special ice dam prevention product, adhesive ice-and-water barrier, from three to six feet up the roof from the edge the next time you reroof. Ice and water barrier is a type of self-sealing underlayment that adheres to the roof decking and waterproofs it. You shingle over the top of it. It’s required by the building code in most regions now. Adding the ice-and-water barrier is an expensive proposition if you have to tear up an otherwise sound roof, but it’s cheap insurance when you have to reroof anyway. Ask your local building inspector how far you should run it up the roof in your region.
- Rake the snow off your roof after a heavy snowfall. A snow rake, an aluminum scraper mounted at a right angle on a telescoping aluminum pole, is the simplest solution for occasional heavy snows. If you pull the snow down, it can’t melt and form an ice dam. It’s an effective, if tedious, solution, but only for single-story homes. You can’t reach the second-floor roof. (Never use a snow rake when standing on a ladder!) And you have to take care not to break the shingles, which are brittle in cold weather. Most home centers and hardware stores in ice dam country carry or can order snow rakes. Get one before the snow comes; demand goes up after the first heavy snowfall of the season.
- Install heat cables when all else fails. Heat cables are high-resistance wires that you mount on the roof edge in a zigzag pattern and plug into an outdoor GFCI receptacle. They’re ideal in spots where ice dams regularly occur and can’t be stopped any other way. One problem: You have to route the meltwater away. Otherwise, it will refreeze in the gutters and along the roof edge. You’ll have to run the heat cable inside a downspout so the downspout doesn’t clog with ice.
What To Do if You Already Have an Ice Dam
Ice dams themselves aren’t necessarily a problem. It’s the leaks that do the bulk of the damage. If you can’t detect signs of ice dam leakage, either in the soffits on the outside or in the attic or ceilings, you may not have to do anything. Then during warmer weather, apply the prevention strategies we listed earlier.
If you have leakage from an ice dam and can’t rake the snow off the roof, the best way to get rid of the ice dam is to hire a roofing company to steam it off. A steamer is like a pressure washer, except that the water is hot to help with ice dam removal. It melts the ice away without damaging the roofing. Chipping the ice off with a hatchet or an ice pick can break or puncture the shingles.