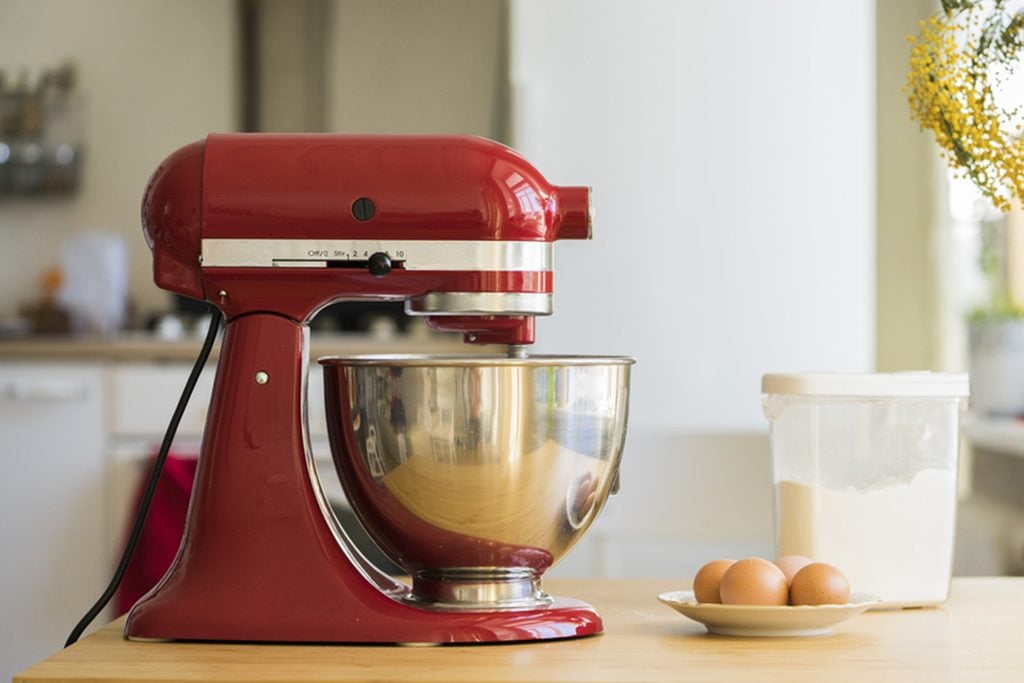
Have you noticed your mixer just isn’t quite mixing like it used to? Whether you’re whipping up a batch of Grandma’s famous divinity, or serving a decadent layer cake—you need your stand mixer operating at peak performance. (Here’s the model our Test Kitchen likes best.)
But don’t spend the big bucks on a replacement just yet. Here’s a KitchenAid-approved mixer fix that’s super easy. In fact, all you need is a flat-head screwdriver.
Does my mixer need to be adjusted?
First, determine if your mixer’s problem is the adjustment level. Look out for these telltale signs:
- After mixing, ingredients are left on the bottom of the bowl
- The tilt head is not locking in place
- The white flat beater is chipped on the bottom
- There are scrape marks in the bottom of the bowl
If you’ve noticed any of the issues listed above, your mixer needs to be adjusted higher or lower.
See the KitchenAid mistakes everyone is making.
Do the dime test
If your mixer bowl is metal, try this trick. (Note: Do not attempt with a glass or ceramic bowl.)
Place a dime in the bowl and attach a flat beater. Turn to “stir” or low speed, then observe how the dime moves around the bowl. If the dime does not move, your beater is too high. If the dime moves around continuously, that means your beater is too low. If the dime is traveling slowly around the bowl, moving about a half inch with each pass of the beater, the bowl height is correct.
Adjust the height of the beater with this quick fix
Now that you know that your beater height needs to be adjusted, all you need to do is turn one little silver screw. But first, unplug the stand mixer, just to be safe!
Where is the screw?
On a tilt head mixer you will find the screw where the head meets the stand when tilted back. If you have a bowl lift mixer, the screw is located on the inside of the stand.
How to adjust the screw
Using a flat-head screwdriver, turn the screw counterclockwise to raise the bowl and clockwise to lower the bowl. Just a slight turn is all you’ll need. Don’t turn the screw more than 90 degrees in either direction. After turning the screw, you may want to use the dime test again to text your clearance level, then repeat the screw adjustment as needed.
You’re all set! It’s time to treat yourself to a new KitchenAid attachment.
Foods You Never Thought to Make in a KitchenAid
MeatballsMaking meatballs can be tough on your wrists—especially when whipping up a big batch. Save your energy by letting a stand mixer do some of the work. Simply toss the breadcrumbs, eggs, seasonings and any other add-ins from your favorite recipe into the mixing bowl. Use the paddle attachment on a low speed to combine the ingredients. Then, add the meat until mixture is lightly but thoroughly incorporated.
In the market for a new stand mixer? This is our favorite KitchenAid model.
Shredded chickenWhether you're shredding chicken for a crowd or a single sandwich, let your stand mixer do all of the work. No forks required. Simply toss cooked, boneless chicken into the mixing bowl, secure the paddle attachment and turn the mixer on a low speed. Voila! In just a few seconds you'll have effortless pulled chicken.
Check out the
10 best KitchenAid attachments you can buy.
GuacamoleGuac lovers, listen up. The days of mixing your favorite chip dip by hand are over. Make guacamole in a stand mixer by placing halved avocados, lime juice and your favorite seasonings in the mixing bowl. Use the paddle attachment on a medium speed to combine. Then, stir in diced tomatoes, onions, jalapeños and any other add-ins you'd like.
Pizza dough
No bread machine? No problem. You can still make easy homemade doughs—no kneading required. Just attach a dough hook to your mixer and let it work its magic. Your dough is done when it's smooth and elastic.
Mashed potatoesMashed potatoes are a holiday favorite, but they can take a toll on your time (and energy!) when mashing by hand. Lighten up your workload by making oh-so-creamy potatoes in your stand mixer. The paddle attachment makes quick work of boiled potatoes, butter, milk and any add-ins you desire. Just mix the spuds on a low or medium speed until you reach the desired consistency.
Stuffed shells fillingStuffed shells are a comfort food classic, but they can be tedious to assemble. Make the task easier by preparing the filling in your stand mixer. Blend the cheese, seasonings, egg and any other add-ins on a medium speed with the paddle attachment. Once combined, scoop the mixture straight from the bowl into the cooked shells.
DipsNo appetizer spread is complete without a good dip, but it takes time to chop and combine all of those ingredients. Use your stand mixer to speed up the process. When making spinach and artichoke dip, for example, mix together the cream cheese, mozzarella, seasonings and other base ingredients until smooth. Then, throw in the spinach, artichokes and other veggies. In just minutes you've made a creamy-yet-chunky dip that's ready to pop in the oven.
MacaronsMacarons don't have to be intimidating. The secret is to get your egg whites perfectly whipped—and a stand mixer can help you do just that. Let the egg whites reach room temperature, then beat with the whisk attachment until stiff peaks form.
Ever wonder the difference between macaroons and macarons? Here it is.
Scrambled eggsWe know that scrambled eggs are super easy to make by hand. But when whipping up a big batch for company you'll appreciate your stand mixer's power. Simply crack the eggs into the mixing bowl, secure the whisk attachment, and add your desired amount of milk and seasonings. Blend for a minute or so until the eggs are fluffy and light.
Pulled porkTake the mess out of pulled pork by shredding the meat in your stand mixer. Use the paddle attachment and a low speed to tear apart warm meat. Just be sure to cut the roast into medium-sized pieces before attempting to shred it—placing a whole roast in the bowl will overwhelm your machine.
Mom’s Meat LoafMom made the best meat loaf, and now I do too. When I first met my husband, he wasn't a meat loaf guy, but this recipe won him over. —Michelle Beran, Claflin, Kansas
Cheesecake fillingCheesecake filling can be a real pain to mix by hand—especially if the ingredients are cold. Minimize the muscle by mixing up your filling in a stand mixer. Just blend all of the ingredients until super smooth and pour into your prepared crust.
ButterAdd extra flavor to your butter with herbs and spices. Just place softened butter in the mixer, add your seasonings, and let the mixer evenly incorporate. If you're feeling extra ambitious, make the butter from scratch by placing heavy cream in the stand mixer. Whip it on high speed until butter starts to form. Drain away any excess liquid, and that's it! You have fresh, homemade butter.
KolachkesIt's tough to combine stiff ingredients—like ice cream and butter—by hand. Use your stand mixer to create these sweet Polish treats. Trust us, your arm will thank you.
Lasagna fillingLasagna is a labor of love, but that doesn't mean it has to take hours to make. Speed up the process by preparing at least one of the fillings in your stand mixer. Create the cheese layer by blending together ricotta, eggs, mozzarella and more with a paddle attachment on medium speed.
MashmallowsHomemade marshmallows are SO much better than the store-bought kind. And with the help of your stand mixer, they're not too challenging to make. Once you've brought all the ingredients to a boil, pour the liquid into your stand mixer and beat on high until the mixture is thick and has doubled in volume.
Up Next: 9 KitchenAid Major Appliances We'd Be Happy to Have in Our Homes