
Table Saw Jigs: Table Saw Sled Plans
Updated: Jun. 09, 2023Get dead-on square cuts and 45-degree miter cuts every time!
- Time
- Complexity
- Cost
- A full day
- Beginner
- $51–100
Overview
If you own a table saw, you know it works great for ripping long pieces. But did you know that you can crosscut wide pieces with the same ease and accuracy? Or make perfect 90- and 45-degree miter cuts on narrower boards? All it takes is a table saw sled. A table saw sled rides in the miter gauge slots and has a fence that’s mounted exactly 90 or 45 degrees to the blade, enabling accurate square or 45-degree cuts. We’ll show you how to build a sled for each application, using a 42-in. square sheet of 1/2- or 3/4-in. plywood, particle board or MDF. We’ll tackle the crosscut sled first.
CAUTION!
You must remove the blade guard on your table saw to use the sled. To prevent accidents:
- Adjust the blade so that no more than 1/4 in. is exposed above the board you’re sawing.
- Keep your hands well away from the path of the blade.
- After completing a cut, turn off the saw and let the blade come to a complete stop before moving the sled.
Table saw sled for 90-degree crosscuts
Step 1: Gather materials and cut the pieces
We used top-quality nine-ply birch for our crosscut sled, but any flat plywood with smooth faces will work. The tricky parts of the construction are cutting runners that slide smoothly in the tracks, and getting the fence perfectly square to the blade. We’ll show you how to accomplish both as you construct the sled.
Start by cutting strips of plywood for the stiffener, front fence and blade cover (Figure A). Cut them 1/4 in. wider and 1/2 in. longer than the finished size to allow for trimming. Then spread wood glue on the mating faces and clamp them together. Clamp them onto a perfectly flat surface like the top of your table saw. Try to keep the layers lined up as you clamp them. After about 20 minutes, scrape off the partially hardened glue. Then run the pieces through the table saw, removing about 1/4 in. Using Figure A as a guide, mark the shapes onto the pieces and saw them out with a jigsaw. Smooth the curves with a belt sander.
Figure A: Crosscut Table Saw Sled Pieces
For part names and dimensions, see the Cutting List in “Additional Information” below. Figure A, the Cutting List and a complete Materials List are available in pdf format in “Additional Information” below.
Figure B: Crosscut Table Saw Sled
Figure B is available in pdf format in “Additional Information” below.
Step 2: Cut and assemble the runners and base
Photo 1: Fit the runner stock
Slide a hardwood board in the miter gauge slot on your table saw to check the fit. If it’s too tight, sand and plane it until it slides easily with no slop. Work on this while you’re waiting for the glue to set up on the fence blank (about a half hour).
Photo 2: Position the runners
Rest the runners on pennies to elevate the top edge above the surface of the saw. Apply a thin bead of wood glue down the center of the top of the runners.
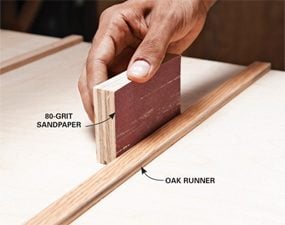
The next step is to cut the runners from strips of hardwood. If you have standard 3/4-in.-wide miter gauge slots, sand or plane a 1×3 hardwood board until it slides easily in the slots (Photo 1). (For narrower slots, you’ll have to plane or cut the 1×3 to reduce its thickness.) Then rip strips from the 1×3 that are about 1/16 in. thinner than the depth of the slot. Photos 2 and 3 show how to attach the strips to the sled base. Let the glue set for about 20 minutes. Then remove the assembly from the table saw and scrape off excess glue from the edges of the runners and bottom of the base. You’ll also have to clean out any glue that has gotten into the slots on the table saw. Slide the sled back and forth in the slots. If the sled doesn’t slide easily, inspect the runners for darkened areas where the metal has rubbed on the wood. Use spray adhesive to attach a piece of 80-grit sandpaper to a square-edged block of wood and sand the darkened areas to remove a little wood (Photo 4). Repeat this process until the sled slides freely.
Step 3: Add the stiffener and square the fence
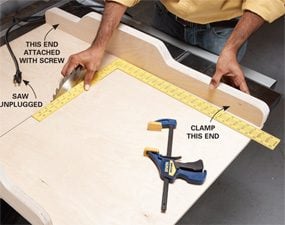
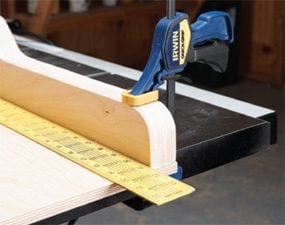
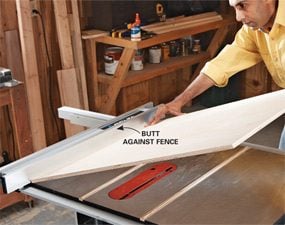
Glue and screw the stiffener to the front edge of the base, being careful to keep screws away from the path of the table saw blade. Then set the table saw blade to about 3/4 in. high and slide the base into the blade. Stop cutting when you get within 3 in. of the back of the base. Turn off the saw and let it come to a stop before removing the sled. Align the fence with the back edge of the base and drive a screw into the right end. Photo 5 shows how to square the fence to the saw blade and clamp it in place. Screw the blade cover to the back of the fence, being careful to keep the screws well away from the path of the blade.
Step 4: Test the fence for square
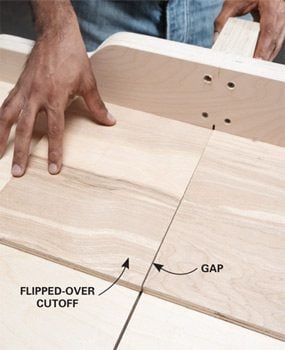
With the clamp firmly in place, set a 12-in. or wider scrap of plywood on the sled and cut it in two. Test the accuracy of the sled by flipping one side of the cut scrap over and pushing the freshly cut edge against the other half (Photo 6). If the two pieces fit perfectly with no gap, the sled is cutting squarely and you can drive three additional screws into the fence to hold it in place. Otherwise, tap the clamped end of the fence with a hammer to nudge the fence a bit. Then make another test cut. Repeat this process until the cut is perfect. Then add the screws.
Step 5: Add stop blocks
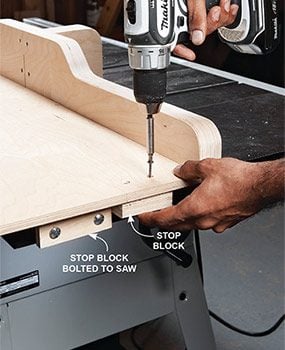
Complete the sled by adding the stop blocks. With the blade half covered by the fence and blade cover, screw a block to the bottom of the sled. Use carriage bolts to attach another stop block to the table saw bed (Photo 7).
Table saw sled for 45-degree miter cuts
Magic miter sled
Anybody can cut a 45-degree miter by using a miter saw. But how about cutting eight precise 45-degree miters to create a perfect picture frame? If you’ve ever tried it, you know that task can be ticklish, frustrating and difficult.
One way to accomplish this seemingly impossible feat is to build a miter sled for your table saw. You can build this simple sled using nothing more than a half sheet of 1/2- or 3/4-in. plywood, particleboard or MDF, a few squirts of wood glue and a couple of full paint cans for glue-up weights. After you throw it together, you’ll be cutting perfectly matched miters for frames, furniture or trim in no time, without muss or fuss.
How it works
Here’s the beauty of the system. We show you how to position the fence so it’s very close to perfect. But if it’s a little off, the table saw jig is self-correcting. That’s because you cut one miter on one side of the jig and its matching miter on the other side. So if your jig cuts at 46 degrees on the first side, it’ll cut at 44 degrees on the other.
Even though one of the miters will be a little longer than the other, it’s easy to sand off the excess so the difference will be imperceptible. But try to build the table saw jig as accurately as you can. This self-correcting business only goes so far!
Picture-perfect picture frames
I credit myself with being a fairly accomplished woodworker. But picture frames always drove me nuts! I found that they required more fuss and more precision than any other miter work I ever had to do. I tried miter saws and table saws, even using expensive aftermarket miter gauges. Nothing seemed to work without my messing with shims, recuts, etc. Then I built the miter sled shown below. The frame I’m holding here took me all of 15 minutes to cut and assemble, and it’s the first time I’ve built a frame without recutting a single miter.
Figure C: Miter Cut Table Saw Sled
Figure C is available in pdf format in ‘Additional Information’ below.
Step 1: Build the base
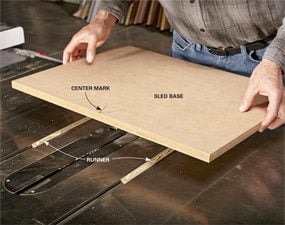
Photo 1: Mount the base on the runners
Mark the center of the base. Add a thin line of glue to the runners and rest the base on the strips, aligning the center mark with the saw blade. Keep the runners and the miter base flush with the back of the saw table.
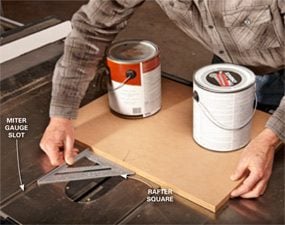
Photo 2: Square the base
Rest two paint cans on the table and use a rafter square and the miter gauge slots to square the miter table to the table saw. Let the glue set up for 20 minutes or so. Then give the sled a test slide. If it binds at all, flip it over, clean off any glue squeeze-out and use a sanding block to knock down the edges of the runners.

Our sled base is nothing more than a slab of MDF cut into a 24 x 18-in. rectangle as shown above. The only tricky part is cutting the runners to a width such that they don’t wiggle or bind in the slots, and to a thickness so they project about 1/8 in. above the table (Photo 1). Rip them so they glide smoothly in the slots without binding or slop. Spend time on them. They’re one of the main ingredients of an accurate sled.
Step 2: Add the fence
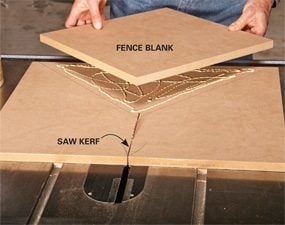
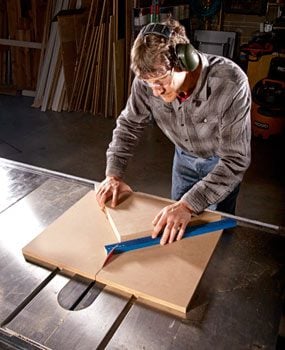
Photo 4: Glue on the first fence layer
Apply some glue to the fence blank and sled base. Line up the tip of the blank with the saw kerf and the two other corners with the back edges of the table. Clamp it in place with a paint can for 15 minutes.
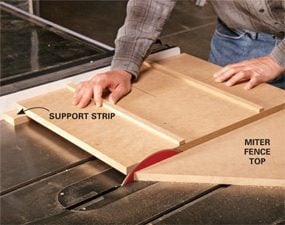
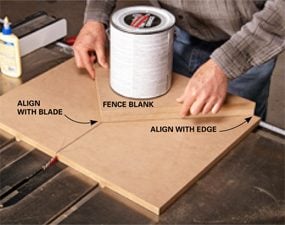
Our fence is just a 16 x 16-in. square of MDF. Since the factory corner is 90 degrees, mounting it diagonally gives you accurate 45-degree angles for cutting the miters. After the square is glued on top (Photo 4), cut it in half (Photo 5) and stack the waste on top (Photo 6) so the edge of the fence becomes 1-1/2 in. thick and more suitable for cutting thicker material.
Identical cuts every time!
If you’re cutting miters for windows or other house trim, you can get close enough just by careful measuring and cutting. But if you’re building a picture frame or any other frame that calls for maximum precision, attach an auxiliary fence to the right or left side of the triangle fence. Screws or hot glue works well. The fence should be long enough so there’s room for a stop block behind the longest piece you’re cutting.
For the first piece, cut the first miter. Mark the length and cut the miter at the other end, from the opposite side of the sled. When you’re satisfied with the length, use the piece as a guide to place a stop block on the auxiliary fence. Now when you cut the matching, opposite side of the frame, the lengths will be identical.
Project PDF Files
Click the links below to download the construction drawings, materials list and cutting list for this project.
Cutting and Materials Lists and Construction drawings
Additional Information
- Figure A: Crosscut Table Saw Sled Pieces
- Figure B: Crosscut Table Saw Sled
- Cutting List
- Materials List
- Figure C: Miter Cut Table Saw Sled
Required Tools for this Project
Have the necessary tools for this DIY project lined up before you start—you’ll save time and frustration.
- Adjustable wrench
- Belt sander
- Clamps
- Countersink drill bit
- Drill bit set
- Drill/driver - cordless
- Framing square
- Hammer
- Jigsaw
- Table saw
- Tape measure
- Utility knife
- Wood chisel
Required Materials for this Project
Avoid last-minute shopping trips by having all your materials ready ahead of time. Here’s a list.
- Sandpaper
- See Materials List in "Additional Information"
- Spray adhesive
- Wood glue
