
How to Repair Plaster
Updated: Dec. 04, 2017Quick fixes for cracked plaster

Repair sagging, cracking plaster walls and avoid the mess of demolition. With plaster washers and wide fiberglass mesh, old plaster walls can be made smooth and solid again.
Saving loose plaster
Reattaching loose plaster
Pull loose plaster tight to the lath with plaster washers. If the screw cracks the plaster as it goes in, predrill through the plaster. Finish by skim coating the washers.
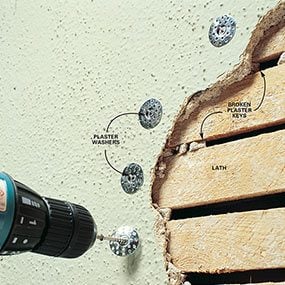
Plaster sags from ceilings or bulges from walls when the plaster keys embedded around the wood lath break loose. To repair it, you’ve got two choices. You can break out all the loose stuff and replaster the area—not a do-it-yourself project. Or, you can stabilize the sagging plaster by using plaster washers to pull it back up against the lath. Plaster washers don’t always work, but they’re cheap so it’s worth a shot.
First, locate the joists or studs and mark their location in the loose area. Push up the loose plaster and place 2-in. screws and the perforated plaster washers into the joists or studs about every 6 or 8 in. The convex washer will flatten as the screw tightens. If the plaster has a rough surface, you may need to first scrape the surface to get the washer to lie flat. Next, secure the loosened field to the lath between joists with more washers. Finally, skim-coat over the washers with drywall joint compound. It may take several coats and extra effort to create a smooth finish or mimic the existing texture.
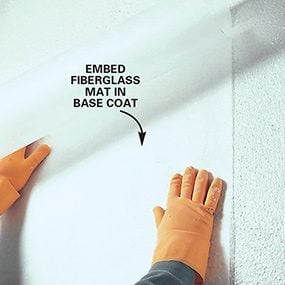
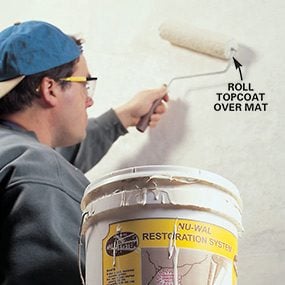
If you have solidly attached plaster with cracks spider-webbing through your walls and ceilings, you can stabilize and coat the entire surface with another product—wide sheets of fiberglass mat. Self-stick mats are available at home centers. Simply stick them to the wall or ceiling and then skim coat with two or three coats of joint compound. Another system, called Nu-Wal, uses a slightly different method. First, you roll on a latex-like base coat. Then embed the fiberglass mesh, and roll over it again. This method essentially gives your plaster walls a new flexible skin so non-structural cracks won’t reappear. Plus, it acts like a vapor barrier, keeping moisture from migrating into the wall, and it’s approved for lead paint encapsulation on interior walls.
Need to Remove Plaster and Lathe?
Required Tools for this Project
Have the necessary tools for this DIY project lined up before you start—you’ll save time and frustration.
- Cordless drill
- Mud pan
- Paint roller
- Roller sleeve
- Taping knife
- Utility knife
Required Materials for this Project
Avoid last-minute shopping trips by having all your materials ready ahead of time. Here’s a list.
- Fiberglass mat
- Joint compound
- Nu-Wal plaster repair system
