
How to Use a Block Plane
Updated: May 21, 2019Tips for using and sharpening the versatile block plane.
Adjust the blade for fine shavings

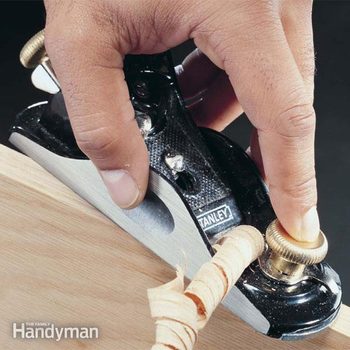
Photo 1: Make adjustments to the blade
Adjust the blade by backing off the height adjusting screw until the blade drops completely below the sole of the plane. Then gradually raise the blade as you eyeball across the sole until the blade barely comes into sight. Adjust the blade side to side until its cutting edge is parallel to the sole of the plane. Test the cut on a scrap of wood and raise the blade a little at a time as necessary to achieve the desired cut.
Always keep a sharp blade in the plane. A sharp blade will cut fine shavings. To allow for the fact that the blade gets shorter as it’s repeatedly resharpened, most plane blades can be positioned in any number of slots.
Pick the one that places the bevel of the blade close to the opening in the sole of the plane. Then reinstall the cap and snug it down onto the blade. Don’t over-tighten it or you won’t be able to lower and raise the blade. Photo 1 shows how to adjust the blade height and angle. Expose more blade to remove more material and less to take finer shavings.
Video: Flattening Rough-Sawn Lumber
Expand your woodworking skills and get access to a wide range of domestic and imported wood for your furniture projects by learning to flatten and plane rough-sawn lumber.
Angle the plane for easier cutting
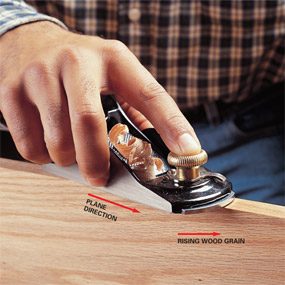
Photo 2: Plane with the grain
Hold the plane at a slight angle to the wood and plane with the grain of the wood as shown whenever possible. Planing against the grain will cause the blade to catch and tear or splinter the wood.
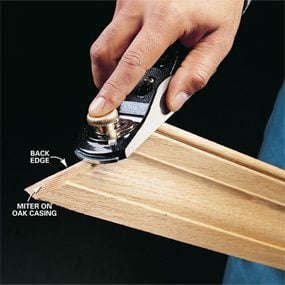
Photo 3: Tighten miter joints
Tighten miters by trimming excess with a sharp block plane. Work from the short side to the long side of the miter to avoid planing against the grain. Angle the plane slightly to the backside of the miter to help the face of the miter fit tighter.
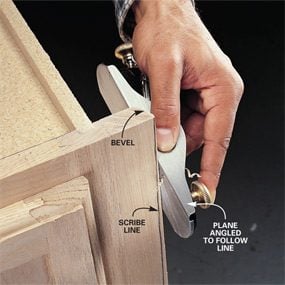
Photo 4: Increase the plane angle for wavy lines.
Cut curved scribe lines by skewing the plane at an extreme angle to the board. You can cut gradual curves this way.
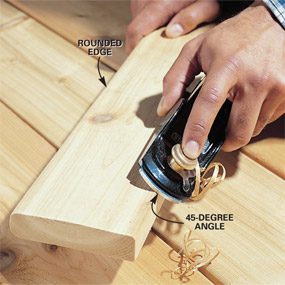
Photo 5: Make multiple passes for rounded edges
Ease edges and round off corners by setting the plane for a very light cut and making the first pass at a 45-degree angle to the face of the board. Then make passes on either side of this at 22-1/2 degrees. Continue planing in this manner until you achieve the desired radius. Use sandpaper to smooth out the curve.
Photos 2 – 5 show some of the ways you can use a block plane to accomplish everyday carpentry tasks. Nestle the plane in your palm. Start each stroke with more force bearing down on the front of the plane through your index finger, and end each stroke with more force on the back of the plane through your palm. Hold the plane at an angle to the wood so the blade slices off thin, even shavings (Photo 2).
Be aware of the grain direction and work with it whenever possible. To plane wavy lines or difficult-to-plane grain, increase the angle of the plane to 45 degrees or more (Photo 4).
Paint and other finishes rapidly dull plane blades. Use a carbide scraper to remove paint or finish before planing.
Keep your plane in a dry area and retract the blade when you’re not using it. Resharpen the blade often to maintain the edge and you’ll always be ready to trim a door, loosen a drawer, or unstick a window at a moment’s notice.
Buying Block Planes
Block planes range in price from about $12 for a basic plane to $150 or more for a collector-quality plane. In the middle of this range is my favorite, the Stanley low-angle block plane (about $45). Less-expensive planes have fewer adjusting mechanisms (you’ll have to wiggle the blade by hand to position it), less accurate machining and lower-quality steel in the blade. But despite these shortcomings, they’ll still do the job when fitted with a sharp blade.
More-expensive planes usually have a means of adjusting the size of the opening (mouth) in the bottom (sole) of the plane to accommodate fine or thick shavings. It’s a nice feature but not a necessity.
The bottom line: Buy a plane that feels good in your hand and fits your budget. Then keep the blade sharp.
Video: Make Your Own Woodworking Sanding Blocks
Steps to a keen edge
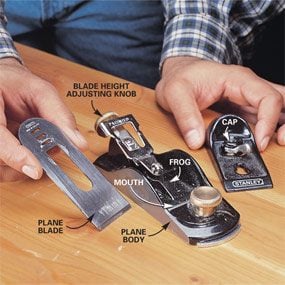
Photo 6: Install the blade so the bevel faces up
Remove the cap by sliding the lever, or in some cases loosening the screw that holds it in place, and lifting it off to expose the blade. Then lift out the blade. Properly installed, the bevel on the blade faces up (away from the sole).
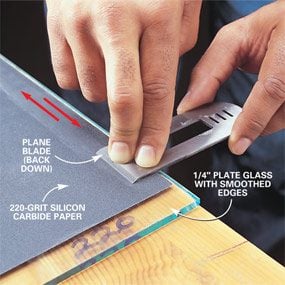
Photo 7: Flatten the back of the blade
Press the first 1 in. of the back of the plane blade perfectly flat to the grinding surface and slide it back and forth to flatten it. Start with 220-grit paper. Inspect the back every five or six strokes and continue until the sheen is even. Then polish the back of the blade by sliding it back and forth on progressively finer grits up to 600-grit.
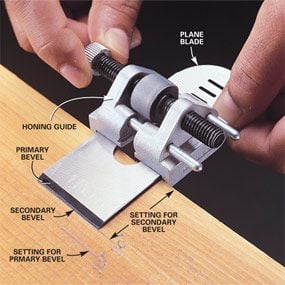
Photo 8: Place the blade in a honing guide during sharpening.
Set the blade in the honing guide at the distance recommended by the manufacturer. Leave the blade in the guide at this setting until you’re completely finished sharpening.
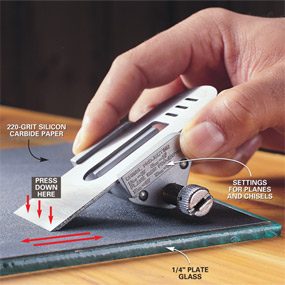
Photo 9: Grind and polish the back of the blade
Slide the blade back and forth across the grinding surface until you raise a burr on the back of the blade (you can feel the burr with your fingernail). Then polish the back of the blade on 600-grit paper to remove the burr (as in Photo 7, except leave the blade in the honing guide). Continue this process of grinding and polishing the back using progressively finer grits up to 600-grit.

Photos 6 – 9 show sharpening basics. Here are the key steps to getting a plane blade sharp:
- Flatten the back of the blade and remove scratches and milling marks by grinding it, beginning with 220-grit sandpaper and working to 600-grit (Photo 7). You’ll know the back is flat when the sheen is even.
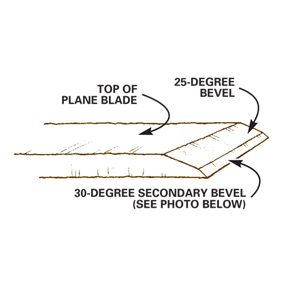
- Set the honing guide for 25 degrees and grind the primary bevel (Fig. A). You only need to progress to the 220-grit paper.
- Then set the blade in the guide to grind a secondary bevel of 30 degrees (Fig. A). Progress through at least 600-grit. Don’t move to the next grit until you’ve removed all of the grinding marks from the previous grit.
- Grind until you raise a little burr on the back of the blade (Fig. B). Then flip the blade over, backside down on the sandpaper, and sand off the burr with 600-grit paper. Repeat this process as you progress from coarse- to fine-grit sandpaper. Make sure you hold the back of the blade exactly flat on the sandpaper when you grind off the burr. If you tilt it, you’ll “roll” the edge and have to go back to a coarser grit to reestablish the cutting edge.
- Complete sharpening with the final removal of the burr to create a razor edge.
Glass, Sandpaper and a Guide Make for Razor-Sharp Blades
For 25 years, I’ve been struggling with my trusty old oilstone to achieve the elusive razor-sharp edge. Now I’ve abandoned that method in favor of one that’s better and faster. Here’s what you need. Buy two 12-in. square pieces of 1/4-in. glass at the hardware store and ask to have the edges ground smooth for safety. Then buy an assortment of sandpaper. For really dull blades that need major grinding, buy 80- and 120-grit aluminum oxide sandpaper.
For fine sharpening, buy 220-, 320- and 600-grit silicon carbide (black) waterproof paper. Buy a couple of sheets of each grit. To get set up for sharpening, spray a light coating of spray adhesive (available at hardware stores and home centers) on the backside of a full sheet of sandpaper, let it dry a few seconds and stick it to the glass.
Next, buy a honing guide to hold the blade at a constant angle as you roll it back and forth over progressively finer grits of paper. There’s no skill or guesswork required. Simply mount the plane blade in the guide according to the instructions (Photo 8).
Required Tools for this Project
Have the necessary tools for this DIY project lined up before you start—you’ll save time and frustration.
- Block plane
Required Materials for this Project
Avoid last-minute shopping trips by having all your materials ready ahead of time. Here’s a list.
- 120-grit aluminum oxide sandpaper
- 220-grit silicon carbide sandpaper
- 320-grit silicon carbide sandpaper
- 600-grit silicon carbide sandpaper
- 80-grit aluminum oxide sandpaper
- Glass
