
A Full Guide to DIY Roof Installation

Updated: Apr. 17, 2024
If you live in your house long enough, you'll eventually have to replace the roof. Here's how to do it yourself and keep your family dry and cozy.
Several days to a week
Intermediate
Varies
Introduction
Re-roofing with asphalt shingles is a straightforward enough job, but it isn't one without potential hazards, and you can take that from someone who has fallen off a roof. Luckily, my injuries were minor — mostly bruises — but it could have been worse. As a result, I run through a checklist of conditions before I'll consider doing roofing work:
- The pitch has to be low enough to walk on safely. Professional roofers consider any pitch lower than 8/12 walkable (8" of vertical rise per foot of horizontal distance), but my cutoff is 6/12. Anything above that I consider a job for pros with the right safety equipment.
- A hoist is available to lift shingles onto the roof. Just thinking about carrying multiple bundles, each weighing from 50 to 80 pounds, up a ladder and dragging them into position makes my back ache. Not to mention that manually bringing shingles onto the roof presents another opportunity for a fall.
- The weather is dry and not too windy or hot (ideal temperatures are between 50 and 80 degrees). A wet roof is a slippery roof, the hot sun is hazardous — to you and the roofing material — and working in windy conditions is just asking for an accident. Needless to say, roofing when it's cold enough for ice is also out of the question.
- The terrain around the foundation is stable and flat enough to support a ladder and isn't covered with shrubs and other vegetation that prevent easy access.
When all these conditions are met, replacing the roof on your house is a viable DIY project, and you can save a bundle by hiring friends or local workers to help you instead of a roofing company. Be advised that you'll probably need a building permit before starting. You'll also need to conform to local regulations, which vary by region and climactic zone.
Safety Precautions
Besides the conditions I've already mentioned, there are a number of other important safety considerations for DIY roofers:
- Be wary of high roofs. The roof I fell off was a little more than 10 feet above the ground, and if it had been much higher, I could have been more seriously injured. If your roof is high enough to give you vertigo, consider hiring pros for the job, so you can live to enjoy your new roof.
- Purchase safety equipment. A fall protection kit including a harness, rope and hook only costs about $100.
- Wear rubber-soled shoes at all times, and get some knee pads. Your knees will thank you.
- Provide hard hats for workers on the ground to protect them from falling debris. Always look and call out before throwing anything off the roof.
- Position ropes and extension cords so they're not underfoot.
- Make sure your ladder can support your weight plus the weight of a bundle of shingles in case you have to carry one up.
- Extend the ladder at least three feet above the roofline and tie it to the eave, so it won't move. Never step on any rung that extends above the roof.
- Set up scaffolding to install the drip edge and first few courses of shingles.
The Basic Procedure
This article provides a complete step-by-step procedure for installing new roofing. Here are the basics in a nutshell:
- Tear off the old roofing. Rent a dumpster to make life easier and avoid having to make several trips to the dump in a truck.
- Replace damaged or rotted decking.
- Install any new vents you might need. If your attic doesn't have enough ventilation, this is a good time to install new roof vents, and if you've always wanted a skylight, now's your chance.
- Lay underlayment. Codes in regions with extreme weather call for self-adhesive waterproof underlayment, also known as an "ice barrier." Otherwise, a single layer of 15-lb. felt underlayment (tar paper) is usually sufficient unless local codes call for 30-lb., which is heavier and more water-resistant.
- Install flashing in valleys and around dormers.
- Nail in the shingles.
- Apply roofing sealant where needed.
Now that you know what's involved, let's get into the details.
Tools Required
- broom
- Caulk gun
- Chalk line
- Circular saw
- Drill/driver
- Extension ladder
- Hammer
- Pry bar
- Roofing nailer with compressor and air hose (optional but recommended)
- Roofing tear-off shovel
- Stapler
- Tape measure
- Tin snips
- Utility knife with straight and hook blades
- Work gloves
Materials Required
- 1 1/2" screws or nails
- 1-1/4" roofing nails
- 15- or 30-lb. roofing felt paper
- Asphalt shingles
- Clear sealant
- Drip edge flashing
- Large tarps
- Roof sealant
- Self-stick underlayment (ice barrier)
- Staples
- Step and dormer flashing
- Valley flashing
- Vents and/or skylights (optional)
Project step-by-step (14)
Tear off the old shingles
Start the project by tearing off the old roofing, shingles and underlayment. If you have movable items near your house and are worried they might get damaged, relocate them. Invest in a few large tarps to protect your plants and landscaping and catch the thousands of nails that will rain off the roof. Removing old self-stick ice-and-water underlayment can be downright impossible, so it’s OK if you have to leave it in place. Whenever possible, I park a dumpster close to the house to toss in the old shingles right from the roof, simplifying the clean-up.
The most efficient tear-off procedure is to pry off the ridge cap shingles with a pry bar and then transition to a roofing tear-off shovel for the rest. Starting at the ridge, work the shovel underneath the shingles and underlayment, prying them up and pushing them down toward the eave. It’s important to remove all the old nails or pound them flat because protruding nails will tear holes in the new shingles.
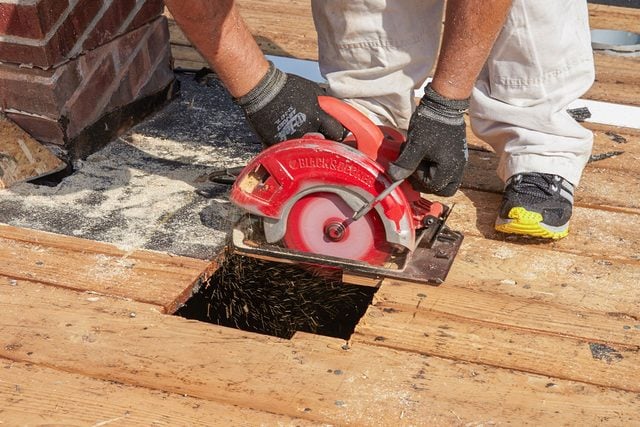
Repair the decking and cut new vent openings
Replace any decking that shows signs of water damage or rot. If all the decking is in good shape, you can skip this step, but on an old roof, chances are there will be damaged areas. Set the blade depth of a circular saw to slightly more than the thickness of the decking to avoid cutting into a joist and cut a rectangle around each damaged section (make the rectangle large enough to intersect a joist on either end). Remove that section and replace it with CDX plywood or OSB of the same thickness (usually 1/2 inch). Secure it to the joists with 1 1/2″ screws or nails.
If you plan on installing new vents or skylights, this is the best time to cut the openings for them.
When you’re done, sweep the roof decking clean with a broom.
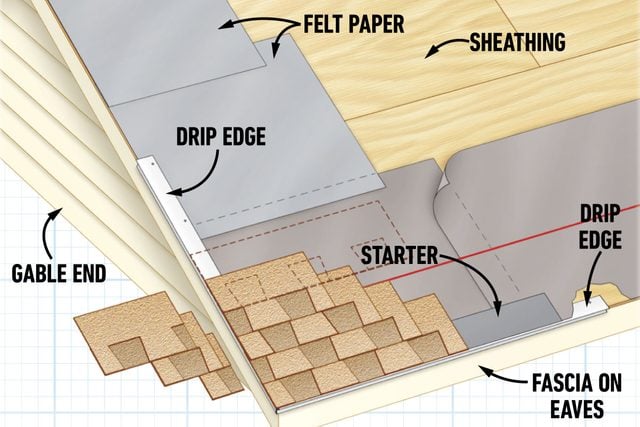
Install drip edge on the eaves
Fasten the drip edge that covers the fascia on the eaves. The whole length of the fascia is probably not perfectly straight, so don’t snap a line; just hold the drip edge snugly against the fascia and fasten it through the top into the decking with roofing nails. Nail it every couple of feet with 1-1/4-in. roofing nails, and cut it to length as needed with tin snips.
Metal drip edge isn’t usually required (check with a local building official). Still, I always install it because it gives roof edges a nice finished look, prevents shingles from curling over the edge, and keeps water from rotting the edges of the decking and the fascia.
- Pro tip: Wait until you finish installing the underlayment before you install the drip edge on the gable ends of the roof. Start at the bottom side of the gable and overlap the sections of drip edge a few inches as you work your way up the roof.
Stick on the ice barrier (if required)
Install self-stick underlayment in regions where codes require it. Often called “ice-and-water” underlayment, it prevents water that seeps under the shingles from damaging the decking because it sticks to the roof decking to seal out water. It also seals around nails and keeps water from leaking through nail holes.
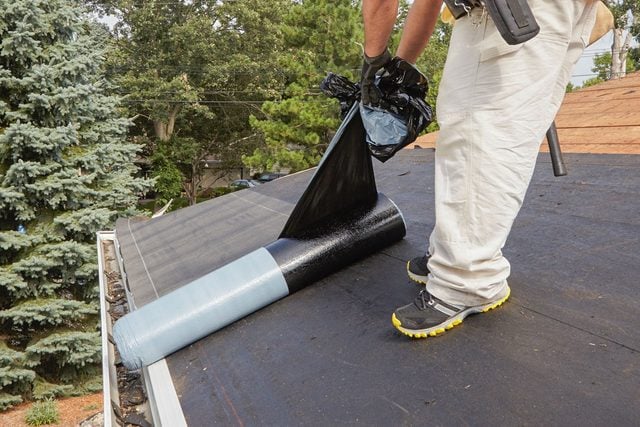
Rolls of self-stick underlayment have a plastic backing to prevent the material from sticking to itself. The backing is separated down the middle. Line up the lower edge of the roll with the outside of the drip edge. Peel back part of the uppermost backing on the roll, and nail the top corner of the underlayment to the decking. Start pulling the roll across the decking using the backing, ensuring the material is as flat and as straight as possible as you pull. Cut sheets to length as needed with a utility knife.
Continue up the roof, ensuring each upper course overlaps the one below it by at least two inches. It’s important to ensure all your underlayment lies flat before you fasten it to the decking. Ripples and lumps can telegraph through the shingles and may be noticeable from the ground.
On warm days, self-stick underlayment will stick to clean decking without fasteners. Fasten it to the roof with staples or nails on colder days, but only fasten the top part of the underlayment until you go back and peel off the bottom half of the plastic backing. The higher the temperature outside, the stickier the adhesive on the rolls gets and the trickier it is to work with, so keep that in mind when you plan your project.
- Pro tip: Many severe climate areas have specific requirements for installing self-stick underlayment, so always consult your local building official. Also, remember to slide the underlayment underneath any existing vent or chimney flashing.
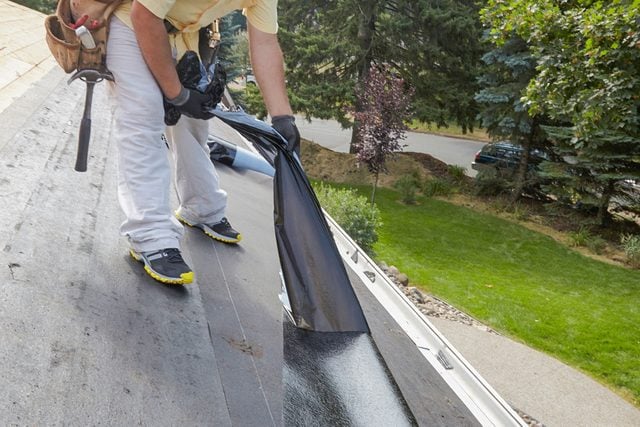
Lay roofing felt paper
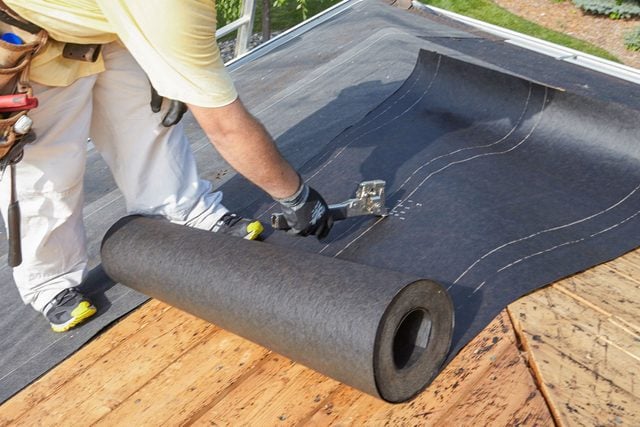
Cover the roof with roofing felt paper. If you installed an ice barrier, the felt paper goes on top of that; otherwise, it goes directly on the decking. I usually use lightweight 15-lb. paper unless local codes call for 30-lb. paper, or I plan to leave the paper exposed for more than a few days. Heavier paper wrinkles less and is less likely to tear when someone walks on it.
Start each course by driving several staples grouped close together, then unroll the felt and straighten out the row before you add more staples. Space staples approximately 12 inches apart. Work your way from the eave to the peak, laying the courses horizontally with the upper courses overlapping the lower ones by at least two inches. When you need two pieces of paper in the same row, overlap their seams by at least six inches. Use a utility knife for cutting.
When you reach the top of the roof, run your last row long and drape the paper over the peak (top ridge) onto the other side. When you reach the top on the other side of the roof, run that paper up and over as well. That way, you’ll end up with a watertight ridge. Your local building official may want to inspect your roof at this point, but sometimes, you can get by by snapping a few photos. Ask about the inspection schedule when you pick up your permit.
- Pro tip: Don’t scrimp on staples. Paper with too few staples will tear out under your feet and could cause a fall. Don’t walk on paper that hasn’t been stapled down.
Install valley flashing
Complex roofs with more than one peak have valleys between the sloped sections that are especially vulnerable to leaking, so they need the protection of metal valley flashing. I leave the valleys uncovered when installing felt paper, so I can do them separately when I install the flashing. Here’s a method I have learned:
- Install self-stick underlayment. This process is easier with two people. Cut the underlayment to size (or in sections for long valleys), and peel off the entire plastic backer. With a person on each end, fold the underlayment in on itself, sticky side out. Then, lay it into the valley and unfold it. Try to push it down into the crease of the valley as tightly as possible. If you leave a gap underneath, the underlayment could tear when you install the metal valley flashing. Run the underlayment past the drip edge at the eaves and trim off the extra with a utility knife. Once it’s smooth, nail it down on the outside edges.
- Install felt paper over the self-stick underlayment. When trimming the felt paper, be careful not to cut into the underlayment.
- Install the flashing. Lay the flashing in place. Bend the top edge over the roof peak and trim the bottom edge flush with the drip edge, using tin snips. Nail the flashing down along its outside edge (you don’t want any nails on the exposed part of the flashing, or they’ll leak). Space nails by 12 inches.
- Lay vertical shingles along the edges. Snap chalk lines on either side of the flashing 1-1/2 to 3 inches from the center. Arrange shingles vertically along these lines and drive nails to hold them at the edge of the flashing or just outside it. These vertical shingles provide a clean line inside the flashing and eliminate the need for trimming when you lay the rest of the shingles. The adhesive on the underside of the shingles will adhere to the metal to make a good seal.
Install vents
Now is the time to install any vents for which you have cut openings. These usually come with their own flashing. Apply a bead of roof sealant along the underside of the flashing, set the vent or skylight in position over the opening and secure it by driving nails through the flashing. Put a dab of roof sealant on each nail head to prevent leaking.
- Pro tip: Don’t drive any nails through the flashing on the downward side of the slope — you still need to slide shingles underneath it.
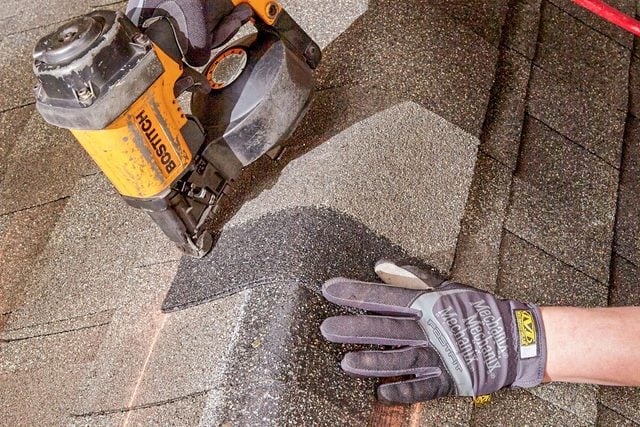
Begin with starter shingles
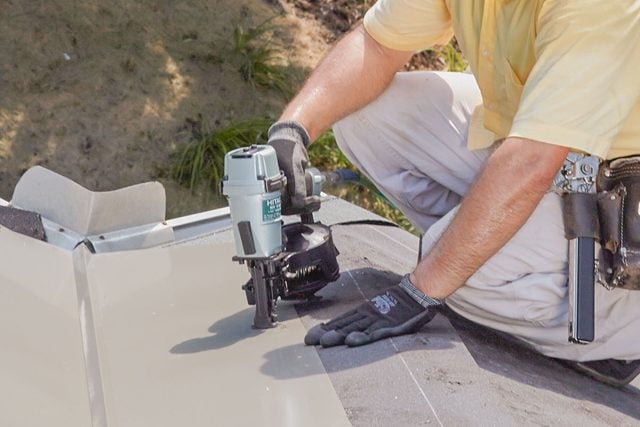
Run a row of starter shingles with the leading edge a 1/2 inch beyond the drip edge. A starter shingle is half the width of a regular one, and it has an adhesive strip to hold down the shingles you place over it. Its purpose is to prevent water from leaking through the seams of the two shingles you place over it.
Position starter shingles so the adhesive strip is toward the bottom and facing up, and secure it with five nails placed two to three inches up from the bottom of the eave.
Some pro roofers install starter shingles on the gable ends as well. It’s not usually required, but it provides a cleaner look. Hang gable-end starter shingles 1/2 inch past the drip edge, and make sure you overlap the starter shingle on the eave by 2 to 3 inches.
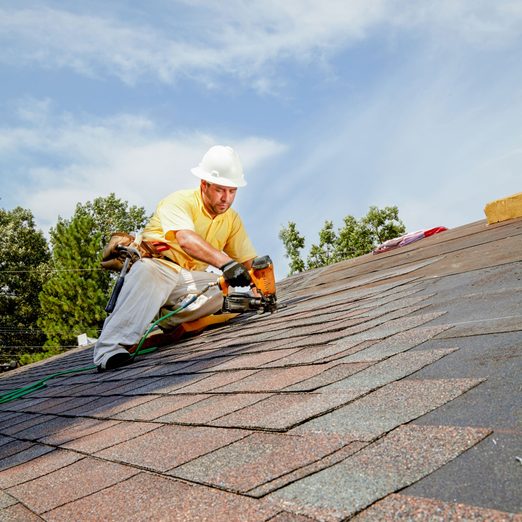
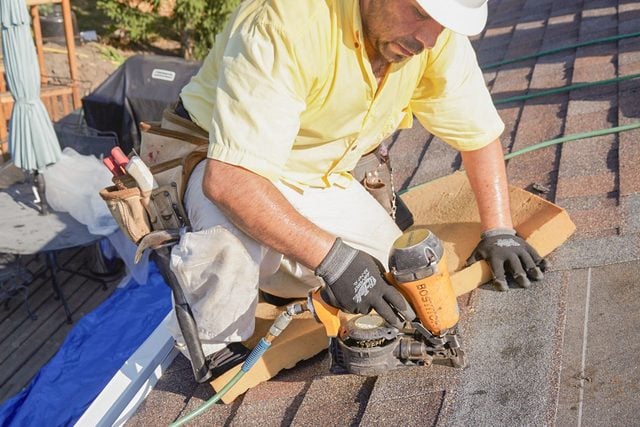
Continue with the rest of the shingles
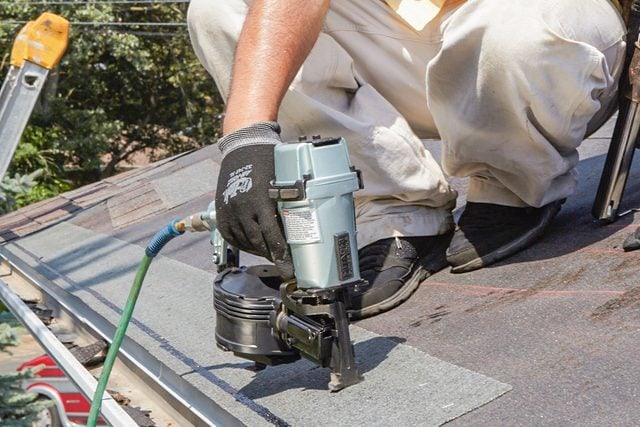
Start laying shingles along the eave and work your way toward the peak. Follow the manufacturer’s nailing instructions. This is crucial because improper nailing is the leading cause of roof failures in storms. Each shingle generally requires five evenly spaced nails driven above the adhesive strip far enough to be covered by one inch of the shingle above it. I always use 1-1/4-in. zinc-coated roofing nails.
Line up the bottom of the first row of shingles with the starter row’s bottom edge, ensuring the seams are staggered. With that row complete, you’ll need to figure out the reveal (the portion of the shingle that isn’t covered by the one above it). Standard reveals vary between 5 and 6-1/2 inches. Whatever the reveal is supposed to be, snap a horizontal line that distance from the top of the first row of shingles to guide you in installing the next row. The line helps keep the next row straight and is more accurate than lining up the bottoms of the shingles.
Slightly wavy rows won’t be noticeable from the ground, so only snap lines every several rows to straighten things out. Follow the stagger pattern recommended by the manufacturer of your shingles, and use partial shingles to start subsequent rows. Once you get within 8 ft. of the ridge, measure down to your shingles at each end of the row. If one side is closer to the peak than the other, snap lines for all the remaining rows, making the reveal on one side progressively larger until you make up the difference. Don’t adjust any row by more than 3/16 inch.
- Pro tip: For nice, straight lines, run shingles over the edge of the roof, then snap a chalk line and trim them off with a hook blade in your utility knife. If the overhang is more than a foot, cut some off and use the remainder elsewhere.
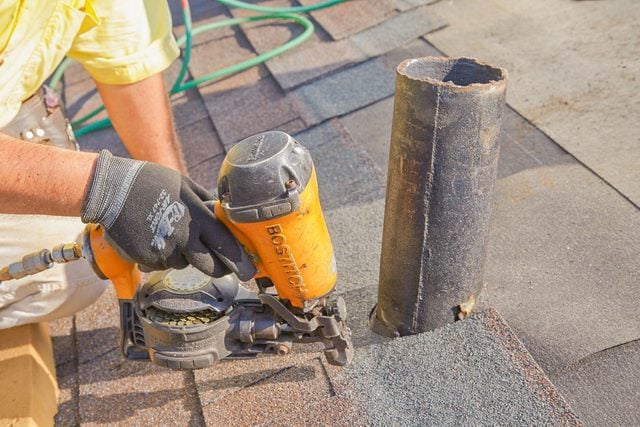
Shingle around existing vents
Install a layer of underlayment around vent pipes and caulk with roof sealant before shingling.
When you reach the vent, slide the lower shingles underneath the flashing and drive nails through the flashing and into the decking. Seal each nail head.
Install the upper rows on top of the flashing, cutting the shingles as needed to fit around the vent. When you nail the upper shingles, get as close as possible to the flashing, but avoid driving directly through it.
Cap the ridge
Use the same technique as you did with the felt paper when you reach the ridge: Wrap the first side over the top, and then wrap the second side over the first. Cut the shingles to size with a utility knife fitted with hook blades. Run the shingles long over hip ridges and rakes and in the valleys. When you’re all done installing the shingles, snap lines and trim the shingles to the line with a hook blade.
Once all your shingles are installed, you’ll need to cover (cap) the ridge (and hip ridges if you have a hip roof), and you use ridge cap shingles for this. Install them so the prevailing wind blows over them and not into them. You might need longer nails to drive through the several layers of shingles on the ridge.
Hip roof: If you have a hip roof, the top ridge cap shingles will overlap the hip ridge cap, so start with the hips. Snap a couple of guidelines just a little inside the perimeter of the ridge so the lines get covered up when you’re done. Nail each shingle on both sides about 1 inch above the overlap seam.
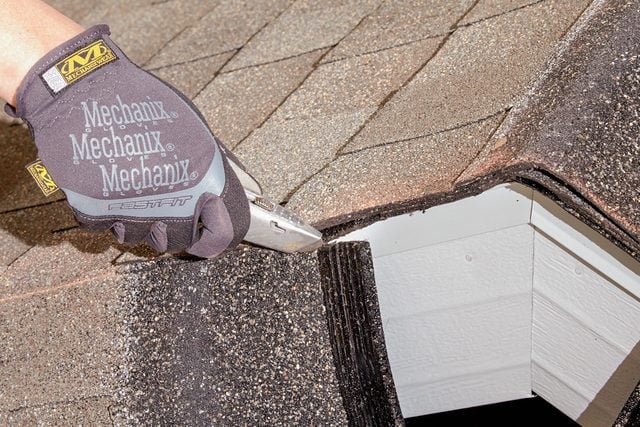
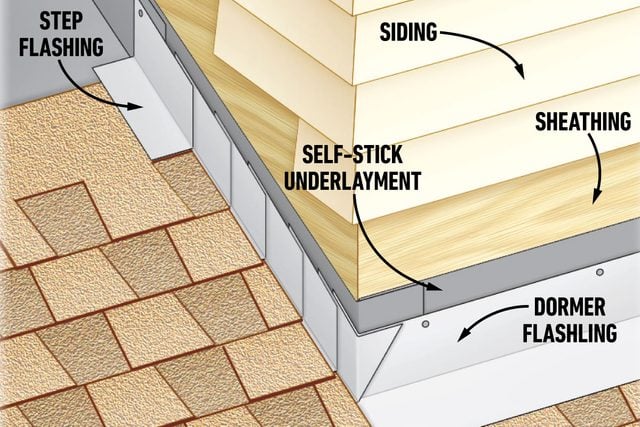
Install step and dormer flashing
Start by running self-stick underlayment at least 6 inches up onto the walls. This provides an additional barrier if water does get past the flashing. Cover the front wall first, and then work your way up the side wall. Overlap the sidewall underlayment around the corner onto the front wall about one inch or so.
Install the shingles right up to the front wall. Cut a couple of inches off the vertical portion of the dormer flashing, and run the horizontal portion past the side wall that same distance. Nail the dormer flashing to both the wall and the shingles.
Make a 1 to 2-inch cut with tin snips at the bend in the first step flashing. Run a bead of sealant on the corner edge of the dormer flashing, and then run that step flashing past the dormer flashing the same distance you made your cut. With your hammer, bend the step flashing around the corner onto the dormer flashing.
Install your next row of shingles over that first step flashing, then cover that row with a step flashing, and so on. Nail the step flashing to the wall toward the top of the flashing at the end closer to the peak, so the next step flashing in line will cover the nail. Don’t nail them down through the shingles.
For information about flashing around chimneys, see Installing Chimney Flashing.
- Pro tip: It’s possible to reuse existing step flashing and dormer flashing, but the best way to get a watertight seal is to tear off the siding in those areas and install new flashing.
Seal it up
Before you put your ladder away, sweep all the debris off the roof. Then, seal all the exposed nails on your vents and stack flashing. If you used stack flashing that has a rubber boot, seal the area where any rubber meets the pipe. Avoid silicone (it won’t hold up) and asphalt-based sealants (they tend to dry out when exposed to direct sunlight). I prefer Lexel. It’s clear like silicone, sticky as model glue and lasts for years.
- Pro tip: The areas you sealed require maintenance. Inspect them every few years.
FAQ
Should a DIYer attempt to roof a house?
Installing roofing is straightforward enough, but it can be tricky, and if you make mistakes, you’ll be living with roof leaks until you or the pro you should have hired in the first place corrects it. The best roofs for DIYers are simple ones that aren’t too steep and have a minimum number of valleys and no dormers.
When is the best time of year to roof a house?
This depends on where you live. The ideal weather for roofing is dry and not too hot or cold. In most parts of the country, that would be early to late spring and early to mid-fall. In temperate climates, you might be able to work throughout the summer without getting fried.
Originally Published: July 24, 2021