
How to Frame a Gabled Dormer
Updated: Feb. 22, 2023A gabled roof looks great from the outside and adds space and light inside.
- Time
- Complexity
- Cost
- Multiple Days
- Advanced
- $501-1000
Step 1: Is framing a gable dormer for me?
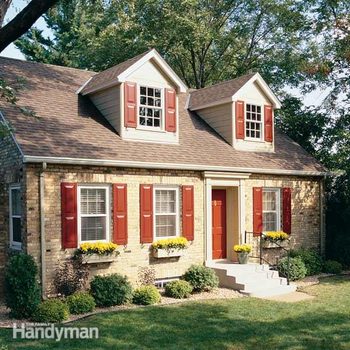
Gable dormer framing
Adding a gabled dormer roof creates additional space and lets the sunlight shine in.
Building a roof dormer is an ambitious and challenging project. You should have a few remodeling projects under your belt before tackling a task this big and complex. If you’re a little unsure of your rough-framing or roofing skills, hire a carpenter to help with this phase of the roof dormer project. The gable dormers we built are 6 ft. wide, about 9 ft. from the floor to the peak, and set back from the front wall of the house about 2 ft. Each dormer adds about 30 sq. ft. of headroom.
Projects this large and complex are expensive, especially when you add in elements like windows. Plan on a big time commitment as well. Set aside at least a four-day chunk of time for the basic framing, because once the roof’s open, you’ve got to keep at it until the dormer is weathertight. Then you can relax a little as you finish the exterior siding and trim. Plan on spending seven or eight more weekends finishing the interior and completing the exterior painting.
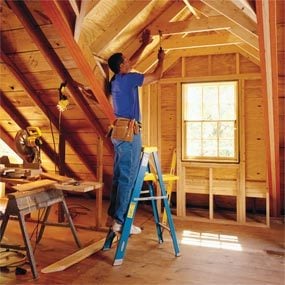
Building a dormer requires a tool belt loaded with all the basic carpentry tools, plus a few extras—a circular saw, reciprocating saw, framing square and 2- and 4-ft. levels. You’ll also need good equipment for working up high, an extension ladder, roofing brackets and scaffolding (see “Roof Safety”). We also recommend you rent or buy a personal fall arrest system (PFAS; Photos 1 and 12), consisting of a full-body harness, lanyard, rope, roof anchor and all the hardware and instructions.
Step 2: Work out dormer details on paper
Like any other major remodeling project, your dormer project will progress more smoothly if you work out the details on paper or a full-size layout on your garage floor (Figure B), before beginning construction. Dormers are complex and not every house is suitable. To make sure the dormers work, we recommend hiring an architect who specializes in residential construction or remodeling. The architect will help you consider issues such as roof slope, interior headroom, exterior appearance, structural strength, roof condition and cost. If the dormer is feasible, the architect will draw up plans that include all the dimensions and special structural details. Use the plans to obtain a building permit from your local building inspections department.
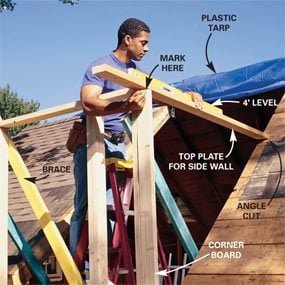
After the plans have been approved by the building department, take them to a full-service lumberyard. A salesperson will put together a materials list and cost estimate and help you order windows and special items. Before you cut the hole in the old roof, have all of your materials delivered and rent a trash container or trailer for the debris. Buy a mesh reinforced plastic tarp large enough to cover the entire dormer area (Photo 5). Stretch one edge of the tarp so it laps over the roof ridge and secure it with 2x4s screwed into the roof sheathing. Roll the tarp back and it will be ready to pull over the roof dormer at night or in the event of a surprise rainstorm.
Step 3: Lay out the dormer on the attic floor before opening the roof
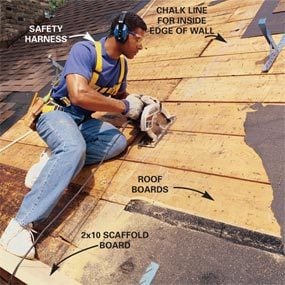
Photo 1: Remove shingles and sheathing board
Remove the shingles from the area of the new dormer. Snap chalk lines for the inside edge of the dormer side walls, set your saw to cut through the roof sheathing and saw from bottom to top on both sides. Leave the overhang sheathing uncut. Pry off the old sheathing boards.
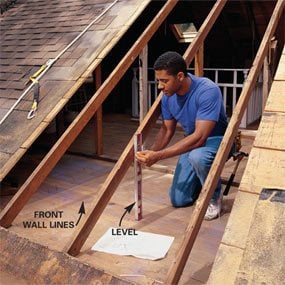
Photo 2: Make sure everything is plumb
Using dimensions from your plan, draw lines on the floor to indicate the location of the front dormer wall. Plumb up from the outside face of the wall line and mark the rafters. Deduct an additional 1-1/2 in. to allow space for the new header (Photo 4) and cut off the rafters with a circular saw.

Photo 3: Install the new rafters
Cut the new triple rafters to the same length and angles as the old and slide them under the roof sheathing. Nail through the ridge board into the ends with three 16d common nails. Nail them together with pairs of 16d nails every 16 in. Toenail the bottoms to the plate with two 16d nails, then add metal strap.
Before you can cut the hole for the roof dormer, you must know exactly where the side walls will be built. Mark the dormer wall layout on the attic floor and make sure the dormer walls are square with the exterior wall of the house. Use a plumb bob to transfer the inside edge of the walls to the underside of the roof. Drive nails up through the roof at the corners. Return to the roof, remove shingles in the area and snap chalk lines between the protruding nail points. Saw along the lines to open the roof (Photo 1).
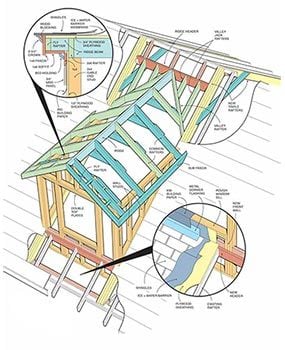
The side walls will rest on the new rafters and the front wall will rest on the attic floor. Using the lines on the floor that indicate the front wall of the dormer, mark the old rafters for cutting (Photo 2). Then reinforce the opening in the roof by adding rafters along each side and the opposite side of the roof if necessary (Figure A and Photo 3).
Our plans called for adding matching sets of triple rafters to the side of the roof opposite the dormers. Check your plans for special construction details like this. Pay close attention to fastening requirements. We anchored the bottom of the tripled 5-1/2 in. laminated veneer lumber (LVL) rafters to the building with the special metal straps specified by the architect. Make sure the new rafters line up with the edge of the roof sheathing (Figure A).
Roof safety
Working on roofs is dangerous. To minimize your risk:
- Rent or buy a personal fall arrest system (PFAS; Photos 1 and 12). Purchase for $250 or rent for about $35 a day. (Rentals can be difficult to find.)
- Use metal roofing brackets and 2×10 planks to provide solid footing (Photo 12). Follow the installation guidelines included with the brackets (found at any large home center).
- Sawdust and debris make the roof slippery, so sweep it off often. Wear flexible, soft-soled shoes to increase traction.
- Never work on a wet roof.
Step 4: Plumb and square the front wall
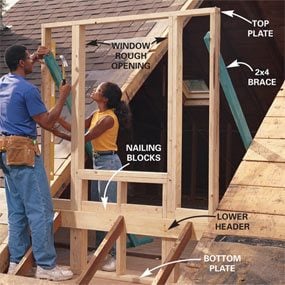
Photo 4: Put up the front wall
Install the lower header with joist hangers (Figure A) and assemble the front wall on the attic floor. Stand the front wall and align it with the marks on the floor. Shim under the bottom plate to level it if necessary, then nail it into the floor joists with 16d nails. Plumb the corners with a level and brace them with 2x4s.
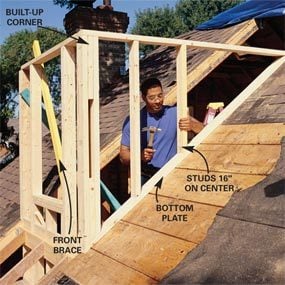
After seemingly endless planning and preparation, you’ll finally see real progress when the walls go up. Install a 2×6 header across the opening to support the cut-off rafters, then fit the front wall between the new rafters (Photo 4). Take a little extra care to make sure the top of the wall is level and brace it perfectly vertical (plumb) and square. Complete the wall framing by building the side walls as shown in Photos 5 and 6. Take care not to bow the top plate when angle-nailing studs.
Make a Simple Rafter Jig
If the slope of your dormer roof is the same as your old roof, hold a scrap of plywood against the old roof boards and draw a level line on it. Make a rafter cutting jig by measuring 12 in. along the “level” line and using a square to draw a perpendicular line up to the “roof” edge of the board. Cut along these two lines and screw a scrap of 2×2 along the “roof” edge of the plywood.
Stretch a string across the top of the rafters, aligned with the inside of the side wall, and make a mark where this line intersects the top of the side rafters. Now measure from this point up to the intersection of the ridge board and header to find the length of the valley rafters. Cut them according to Figure C.
Nail up both valley rafters. Use a straightedge to make sure they’re aligned with the tops of the common rafters. Then measure, cut and nail the valley jack rafters every 24 in. on center. Cut valley jack rafters to the same angle as the common rafters, but bevel the bottom cut 45 degrees.
Step 5: Cut and install the rafters
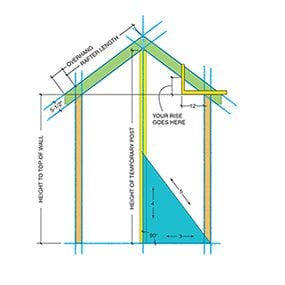
Figure B: Rafter design
Eliminate guesswork—make a full-size drawing of the gable wall on the floor of your garage or attic. Begin with a baseline and snap a center line perpendicular to it. Use the 3-4-5 triangle method to make the 90-degree angle. Then add the 2×4 side walls and the roof slope using a square. Snap lines for the rafters, then draw in the ridge and soffit detail. Cut a common rafter for a pattern and lay it on the drawing to check for fit. Measure and cut the temporary post that supports the ridge.
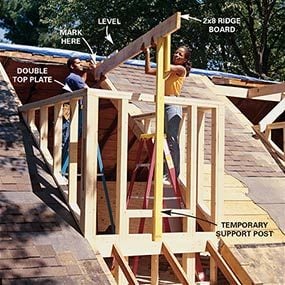
Photo 7: Place the ridge board
Cut a 2×4 to temporarily support the new 2×8 ridge at its correct height (see Figure B). Hold the ridge board level and mark the side rafters at the top of the ridge board. Cut a 2×8 header to fit across the opening and attach it to the new rafters at that height with metal joist hangers.
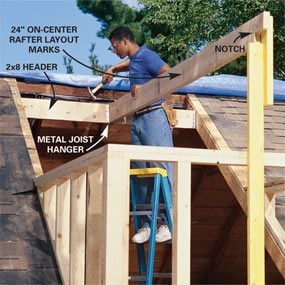
Photo 8: Attach the ridge board to the header
Cut the ridge board to length and notch it according to your soffit details. Then nail it to the center of the header, using a metal joist hanger for extra strength. Cut and install the common rafters spaced 24 in. on center (Figures B and C,).
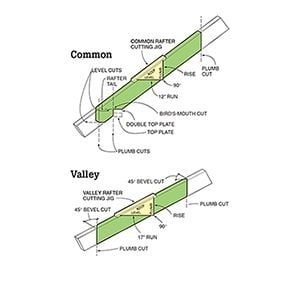
Figure C: Rafter cuts
Construct a simple jig for marking the common rafters. For the two valley rafters, use the same dimension for the “plumb” side but extend the “level” side to 17 in. (17 in. works for every roof slope). The top plumb cut on valley rafters has a 45-degree bevel on each side. The bottom plumb cut has a single 45-degree bevel.
You don’t have to understand all the technicalities of rafter cutting to build the dormer roof. Make the full-scale drawing to the dimensions and roof slope in your plan (Figure B) and use it to measure the exact height of the ridge (temporary post) and the lengths and angles on the common rafters. If the slope of your dormer roof is the same as that of the old roof, you can use the roof jig technique shown to measure the slope and transfer it to the new rafters.
Measure the length of the valley rafters (Photo 9) and cut them using Figure C as an angle guide. Don’t worry if you miscut a few boards. You can use them later for the shorter valley jack rafters (Photo 10).
Attach the rafters to the ridge by nailing through the ridge into the rafter with three 16d nails. Then toenail the opposing rafter to the ridge with six 8d common nails, three on each side. Use three 8d toenails to attach the rafter to the wall plate. Ask your building inspector whether you need additional seismic and high wind anchors.
Step 6: Finish the roof and exterior
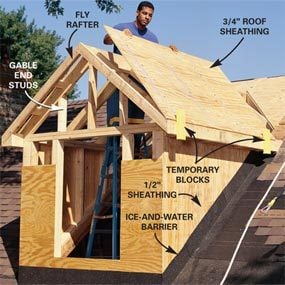
Photo 11: Sheathe the walls and roof dormer
Add the subfascia and 2×4 overhangs (Figure A). Sheathe the walls and roof with plywood. Drive 8d nails every 6 in. along the edges of the sheathing and every 8 in. along all other studs. Complete the soffit and overhang details according to the plan (Figure A).
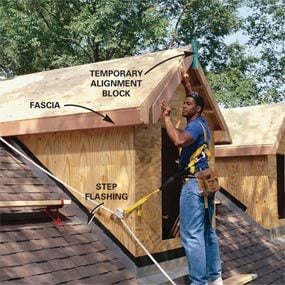
Photo 12: Install roof trim
Fit the roof trim and nail it on (Figure A). Complete the underside of the overhang and soffits and add a roof edge molding to match your house. Install step flashing and reroof along the dormer edges.
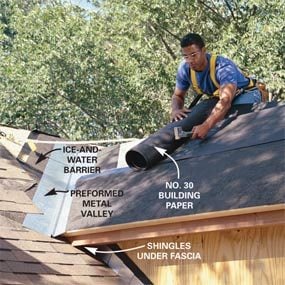
Photo 13: Shingle the roof
Cover the valley and roof edges with a 36-in. wide strip of ice-and-water barrier. Then install a preformed galvanized metal valley (or use other methods approved by your building inspector). Shingle the roof from the bottom up according to the instructions on the shingle packaging.
Fill in the gable end studs after the rafters are complete (Photo 11). Then install the roof sheathing. It’s a great feeling to have the structure closed in and ready to finish, but now’s not the time to rush the job. Careful attention to leakproof flashings and roofing details (Figure A and Photos 12 – 14) at this point in the job will save you unbelievable headaches later on. Think like water. Start at the bottom and work up with felt, shingles and flashings. Always overlap the lower piece.
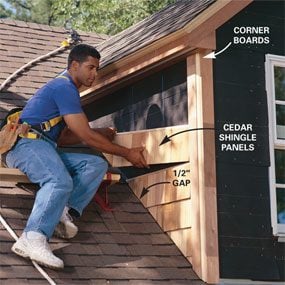
Finish the exterior of your dormer with materials that match or complement those on your house.
Step 7: Finish the interior

Once the dormer is weathertight and you can sleep without worrying about the pitter-patter of rain, move inside. Add rafter ties to strengthen the roof and to provide space for insulation and ventilation (Photo 15). When the framing has been OK’d by the building inspector, you can proceed with the electrical rough-in, insulation, drywall and woodwork.
Finally, keep in mind that even with the best planning, you’ll occasionally hit a roadblock. Take a break. You’ll figure something out, and probably end up with a few good stories to tell your grandchildren about your dormer-building adventure.
Additional Information
Required Tools for this roof dormer Project
Have the necessary tools for this DIY dormer roof project lined up before you start—you’ll save time and frustration.
- 2-ft. and 4-ft. levels
- Circular saw
- Drill/driver - cordless
- Extension ladder
- Framing square
- Hammer
- Reciprocating saw
- Safety glasses
- Stapler
- Tape measure
- Tool belt
