Fix a Running Toilet and Toilet Flapper
Updated: Dec. 18, 2023
Repair a leaking toilet flapper seat

Introduction
If you've tried a new flapper to fix your running toilet and it still runs don't give up hope. Here's a fix that's sure to work.Materials Required
- Flush valve repair kit
Few household annoyances are quite as maddening as the sound of a constantly running toilet. If you hear your toilet refilling too often, or if you hear the steady hiss of running water, the flapper may be leaking. The flapper (aka “flush valve seal”) is the plug that falls against the drain hole (flush valve drain seat) on the bottom of the tank and holds water in until the next time you flush. When flappers or flush valve seats wear out, water trickles out, causing the water valve to open to refill the tank. Here are a few tips for fixing a leaking toilet.
Project step-by-step (2)
Step 1
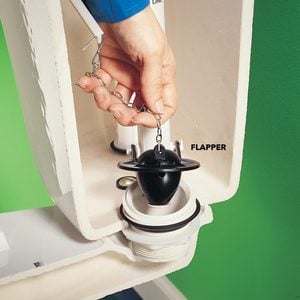
Replace the Flapper
- Remove the old flapper and take it with you to the hardware store or home center to find a matching replacement.
- Note: Occasionally a new flapper doesn’t solve the problem. If you’ve tried replacing the toilet flapper but the toilet still runs, the flush valve seat is probably rough or pitted. You can replace the entire flush toilet flapper valve, but it’s a big job.
Step 2
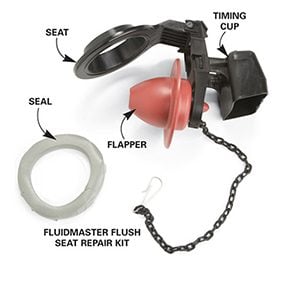
Flapper Kit with a Flush Seat Repair
- If replacing the flapper alone didn’t work, look for a flapper kit that contains a flush seat repair.
- Note: We show a Fluidmaster 555C kit ($7), but others are available. The kit contains a flapper and matching seat that you adhere to the damaged seat with the adhesive provided, as shown.
- Start by closing the toilet flapper valve on the water line to the toilet by turning it clockwise.
- Flush the toilet and hold the flapper open to allow the water to drain from the tank.
- Use a sponge to mop out the water that remains.
- Follow the included instructions to install the new toilet flapper valve seat and flapper.
- Pro tip: The Fluidmaster flapper we show includes a plastic cup that allows you to adjust the length of time the flapper stays open. It’s for toilets that use 3.5 gallons or less for a flush. If your toilet uses more than this, remove the timing cup.
- Install the new flapper.
- Adjust the length of the chain so it’s just slightly slack when the flapper is down.
- Turn on the water and test the flush.
- Note: You may have to fiddle with the length of the chain to get the flapper working correctly.
- When you’re done, cut off the excess chain to keep it from getting stuck under the flapper.