
Soldering Tips
Updated: Jun. 21, 2017Don't let leaky pipes dampen your day

Don't let copper pipes keep you from doing your own plumbing. You can get leak-proof joints on the first try, every time with these tips.
Soldering a copper pipe joint.
I learned how to solder in high school shop class. It was surprisingly simple—so simple that my textbook covered the whole process in just five steps:
- Thoroughly clean the end of the pipe with sandcloth.
- Thoroughly clean the inside of the fitting with a wire fitting brush.
- Apply flux liberally to both the pipe and the fitting, and assemble the joint.
- Heat the fitting (not the pipe) with a propane torch for about 30 seconds.
- Touch soldering wire to the joint.
Following these basic steps, I successfully soldered a few joints and congratulated myself on becoming a skilled plumber. But when I tackled my first real-world plumbing project, I found that the basics weren’t always enough. After a few screw-ups and a lot of advice, I picked up some tricks for successful soldering. Here’s a collection of my favorites.
Take valves apart before soldering
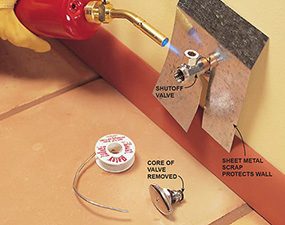
To keep the heat from damaging the rubber or plastic parts inside, disassemble valves before soldering. Most valves—like the shutoff ell shown here—can be easily disassembled and reassembled in a few seconds. Ball valves are a stubborn exception. Luckily, ball valves are not easily damaged by heat. Just be sure to open the valve and concentrate the heat at the fitting ends of the valve body.
Keep solder off the threads
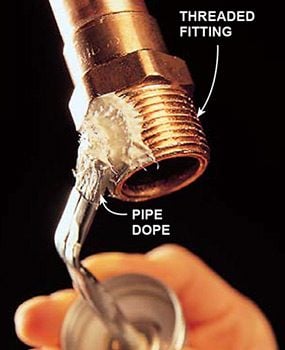
Just a tiny dab of solder on the threads of a fitting can make a fitting nearly impossible to tighten. It’s best to solder a threaded fitting to a pipe before you connect the other end of the pipe. That way, you can stand the pipe upright so excess solder will run away from the threads. When soldering a threaded fitting to a pipe that’s already in place, protect the threads with a heavy coat of pipe dope (also called “thread sealant” or “pipe joint compound”). The heat from your torch will dry out the dope, making it useless as a sealant. Wipe it away and apply new dope.
Stop water with bread
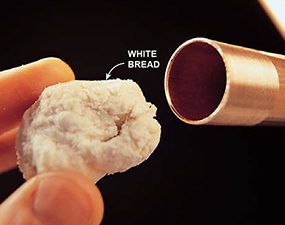
If there’s a little water dribbling through a joint, you can’t get the fitting hot enough to melt solder. To stop a trickle, roll white bread into a ball and stuff it deep into the pipe. The bread will hold back the water just long enough for you to solder the joint (work fast!) and then quickly dissolve when you turn the water back on.
CAUTION!
Use white bread only. Whole-wheat contains gritty grains that can get stuck in valves.
Let soldered joints cool
Hot solder is fragile. Even gentle movements like vibrations from nearby hammer blows can ruin a soldered joint that’s still hot. Let it cool for a few minutes before putting any stress on it.
Don’t burn the flux
If the flux begins to smoke or blacken as you heat the joint, it means one of two things: You’ve overheated the joint by holding the torch on it too long or—more likely—you’re holding the torch too close, trying to heat the joint too quickly. Pull back and take your time. If the flux burns, the solder will ball up and roll off the pipe instead of sticking as it should.
MAPP Gas vs. Propane
A propane torch is the traditional weapon of choice for weekend plumbers. It works fine for most jobs and it’s cheap: You can get a 14-oz. disposable bottle of propane and a torch for about $20.
The big advantage of MAPP gas (methyl acetylene-propadiene) is that it burns more than twice as hot as propane. That means the joint gets hot enough to melt solder twice as fast; you’ll save 15 to 30 seconds per joint. MAPP gas also enables you to solder large pipe (anything more than 1 in. in diameter is difficult with propane). But you pay for the extra heat: A bottle of MAPP gas costs about twice as much as propane and requires a special torch, which will cost twenty bucks or more.
Assemble and solder all ends of a fitting at once
Don’t, for example, insert pipe into one end of an elbow and solder it, then insert and solder the second pipe. If you do, you’re likely to ruin the first joint.
Protect nearby joints from heat
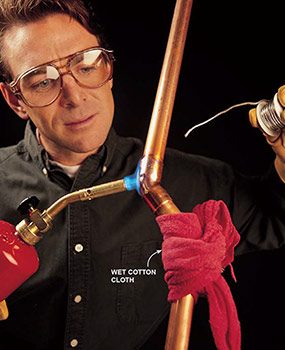
If you’re soldering 3 in. or less from another soldered joint, wrap it with a wet rag so it doesn’t get hot enough to soften the solder. The rag should be cotton, not a synthetic material that might burst into flames.
If a joint leaks, resolder
First turn off the water and open a faucet that’s lower than the leaky joint to allow the pipe to drain. Then smear the joint with solder, heat it and add more solder. This usually works. If it doesn’t, you have to take the joint apart and start over.
Required Tools for this Project
Have the necessary tools for this DIY project lined up before you start—you’ll save time and frustration.
- Soldering torch
Required Materials for this Project
Avoid last-minute shopping trips by having all your materials ready ahead of time. Here’s a list.
- Emory cloth
- Flux
- MAPP gas
- Propane
- Solder
