
How to Solder Copper Pipe Joints
Updated: Feb. 14, 2024Learn to solder copper pipe like a pro.
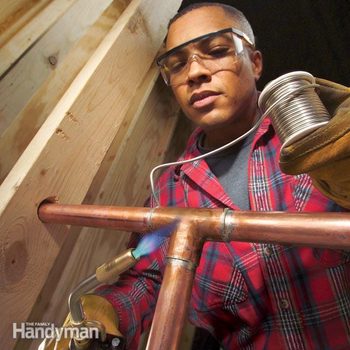
With a little practice, anyone can solder copper water pipe. Learn how to cut, clean and flux pipe and fittings, how much solder to use, and how to check for a leak. We'll show you how to solder like a pro so you can tackle your next DIY plumbing job.
- Time
- Complexity
- Cost
- A full day
- Beginner
- $51–100
Buy a self-lighting torch
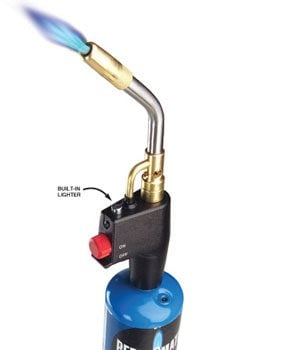
After years of using a regular, inexpensive torch, I finally splurged on a fancy model with a built-in lighter. They cost more, but boy, what a difference. Just pull the trigger to light the flame. No more fumbling with a striker or match. And it’s safer, too. I used to leave the torch burning just to avoid relighting it. Now I turn it off when I set it down to avoid accidentally igniting my blue jeans.
In addition to the self-lighting feature, look for one that burns MAPP gas. MAPP gas produces a hotter flame, which is better for soldering larger diameter pipes (1-in. and larger) and brass valves. Once you’re comfortable with how much heat to apply for a good solder joint, you can switch to MAPP gas to speed up all of your soldering jobs.
Use a good-quality tubing cutter
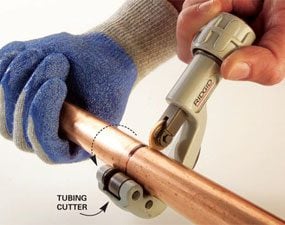
Use a good-quality tubing cutter rather than a hacksaw. You’ll be assured clean cuts with square ends that fit neatly into the pipe fittings. The cutting process leaves a small burr inside the pipe. To avoid creating undesirable turbulence inside the pipe, remove the burr with the flip-out burr remover on the back of the cutter.
Use a steel brush for complete cleaning of pipes and fittings
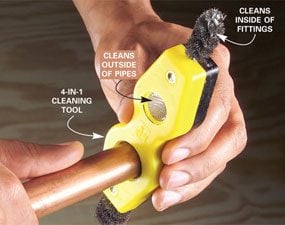
Oils, oxidation and other impurities on the outside of pipes and inside of fittings prevent solder from sticking. To clean them, you can use just about anything that’s abrasive, including sandpaper and emery cloth. But for the quickest, cleanest results, buy a 4-in-1 cleaning tool like the one shown. Use it to clean the outside of pipes and the inside of fittings for 1/2-in. and 3/4-in. copper.
Apply tinning flux rather than regular flux
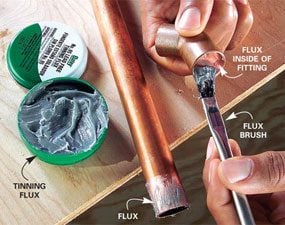
After a thorough cleaning, coat the pipe and fitting with flux before heating the joint. This helps solder flow into the joint. You may find two or three kinds of flux on the shelf. We recommend tinning flux. It contains a bit of powdered metal alloy that is similar to solder. The alloy melts and coats the inside of the joint and helps ensure a solder joint that’s completely filled and leakproof.
Assemble the pipes, then solder the joints all at once
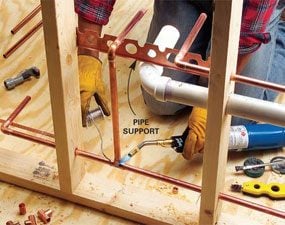
We don’t recommend trying to assemble the entire plumbing run before starting to solder, but cutting, sanding and fluxing a grouping of pipes is a good practice. It allows you to accurately cut and fit the pipes before soldering. With this done, it’s an easy matter to solder the joints one after the other. Since the pipes are held firmly in position, you don’t have to worry about accidentally disturbing a joint before it’s cooled.
Heat the joint just enough to melt the solder
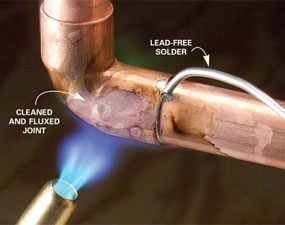
If you don’t heat the joint enough, the solder won’t flow into it. If you heat the joint too long, you’ll burn the flux (it’ll smoke and turn black) and make it difficult to get the solder to flow into the joint. Applying just the right amount of heat comes with practice, but it’s not hard to learn. Here’s how. Light the torch and, if possible, adjust the torch until the blue part of the flame is about 1 to 2 in. long (this depends somewhat on the type of torch and tip you use). Then position the tip of the blue part of the flame on the fitting and heat the joint about five seconds or until the flux starts to bubble and sizzle.
Test the joint by touching the solder to the seam on the side opposite the flame. When the copper is hot enough, the solder will melt like butter. Move the flame away from the joint and feed about 1/2 in. to 3/4 in. of solder into the joint. The solder will flow into all areas of a properly cleaned and fluxed joint. Then to make sure the joint is completely filled, run the tip of the solder quickly around the seam. It’s easier to reach around the backside of the joint if you bend a hook on the end of the solder before you start. If the solder beads up and rolls off rather than flowing into the joint, you’ve probably burned the flux or the copper isn’t clean enough. You’ll have to take the joint apart to clean and reflux it before trying again.
Make sure the joint is filled
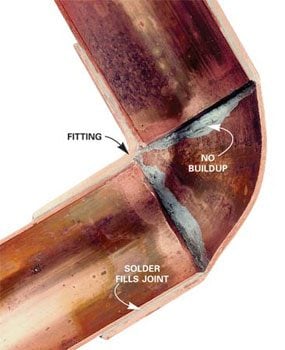
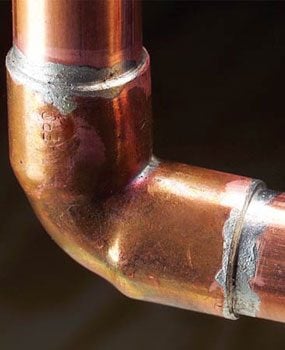
With practice, you’ll know by feel when you’ve successfully soldered a joint. The solder will flow easily and completely around and into the fitting. But when you’re just starting out, it’s a good idea to inspect the joints for voids.
A good solder joint should have an even band of solder showing all the way around. If you see an area that looks as if it needs more solder, brush a little flux onto the joint. If the joint is still warm, the flux will melt and flow into the void. Then reheat the joint and resolder.
Don’t Burn Down the House!
I’m always a little nervous when working so close to wood with a flaming torch, especially when the water is turned off. That’s why I make a point of filling a bucket with water first. I also keep a fire extinguisher handy and protect flammable materials with a flame protector.
Required Tools for this Project
Have the necessary tools for this DIY project lined up before you start—you’ll save time and frustration.
- Soldering torch
- Tube cutter
Required Materials for this Project
Avoid last-minute shopping trips by having all your materials ready ahead of time. Here’s a list.
- Lead-free solder
- Tinning flux
