
How To Solder Copper Pipe
Updated: Feb. 13, 2024
Have some plumbing to do, but not sure which skills you'll need? Learning how to solder, as outlined below, is the first step.
Varies
Intermediate
about $100
Introduction
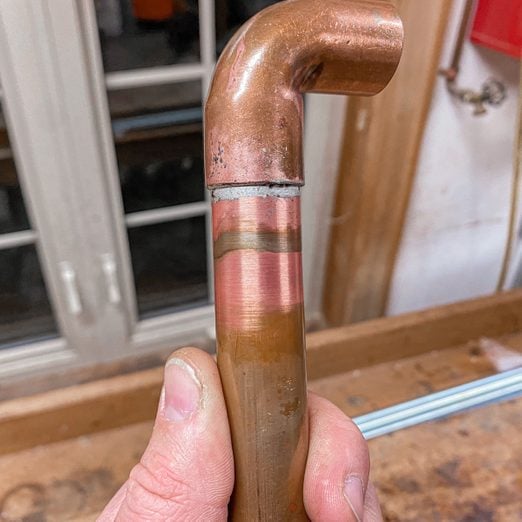
Soldering is the process of joining two or more interlocking pieces of pipe by melting a blend of metals called solder and using it as a sort of glue to join the pieces together. My dad has been soldering for himself and others for nearly 50 years, and he taught me how to solder copper pipe as a teenager.
When I worked at a film studio in my late 20s, the props department needed a device that would shoot streams of water at an actor mid-scene. That meant getting properly sized pieces of copper pipe and fittings and soldering them together. Trouble was, no one in the props department knew how to solder. Though I was a sound guy and there was a strict rule about not interfering with other departments, I stepped in and saved the day with a careful bit of soldering.
Later, I used those same skills to solder copper pipe in my home's water system, although I did most of the work with PEX.
If you're a DIYer with plumbing work to do, learning how to solder copper pipe is extremely useful. Keep reading and learn the whole process.
When to call a pro
Call in a professional if you're new to soldering and face a critical job, like joining water pipes in your home. Any mistakes here could turn into a huge headache. Watch and learn this time around. Then if you feel up to it, DIY your next soldering job. It's also unwise to attempt any soldering without all the equipment and materials listed below.
Tools Required
- Emery cloth - 120 grit
- Fire extinguisher
- Fitting brush
- Flame protector cloth or steel plate
- Gloves
- Pipe reaming tool
- Propane torch
- Striker (if your torch doesn't have an automatic igniter)
- Tube cutter (large enough to cut up to 1" tubing)
Materials Required
- Copper pipe and fitting you'll be soldering
- Lead-free solder
- Paste flux
Project step-by-step (7)
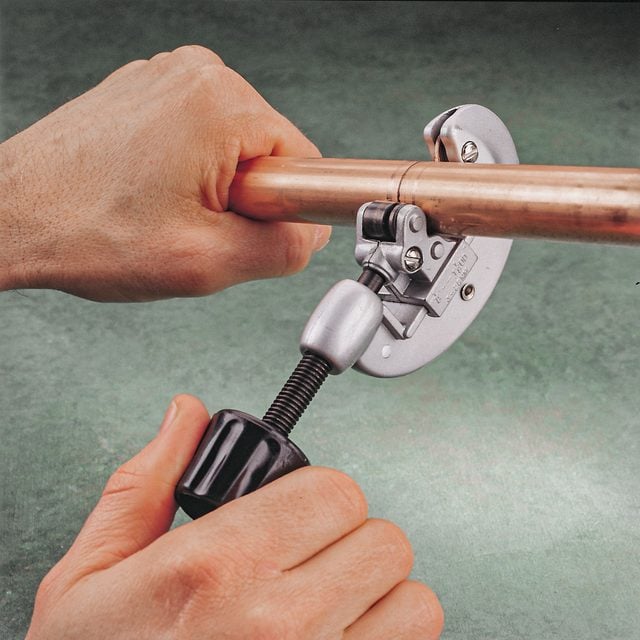
Cut the copper pipe
- Grip the copper pipe firmly in one hand and tuck one end under your knee to keep it from slipping while you tighten and rotate the cutter.
- Clamp the pipe between the cutting wheel and the guide wheel and rotate the cutter, scoring the pipe all the way around.
- Tighten the cutter knob a quarter turn and rotate the cutter again, scoring the pipe deeper. Don’t tighten it too fast; you’ll dent the pipe and have to start over.
- Continue tightening and rotating the cutter until the pipe snaps off, about eight turns in all.
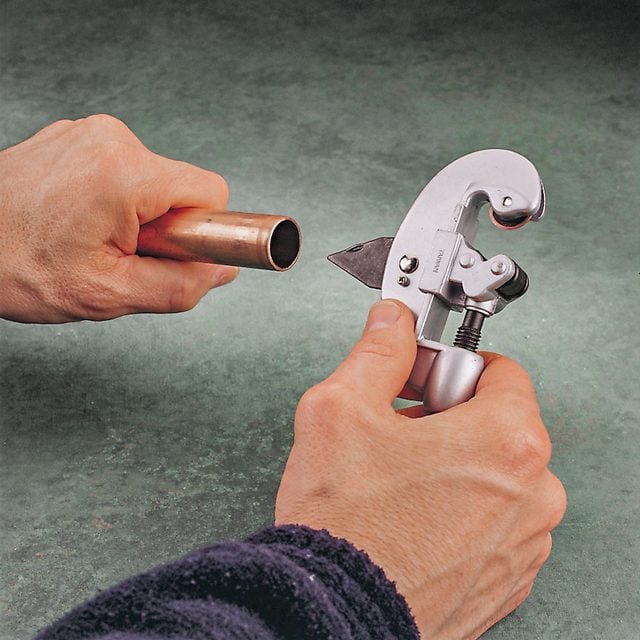
Remove burrs from the pipe
- Use a reaming tool to remove the sharp burrs you’ll probably find on the outside and inside of the cut ends of the pipe.
- Cutting copper usually creates these sharp-edged burrs, and they need to be removed for your soldering to work properly.
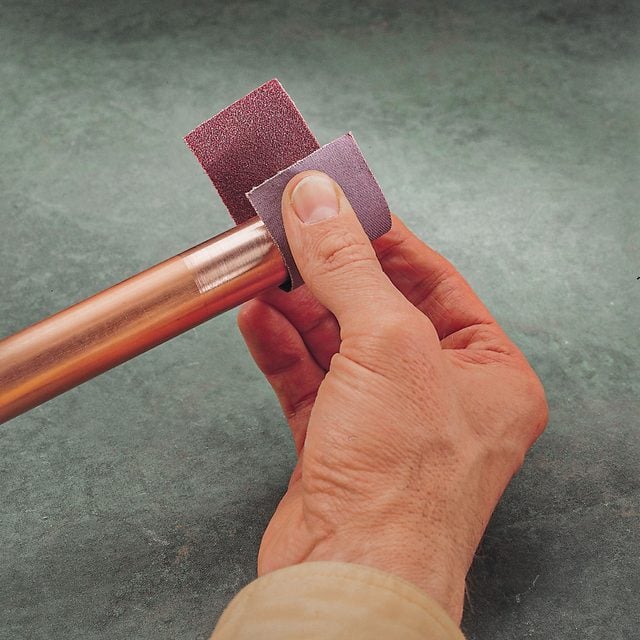
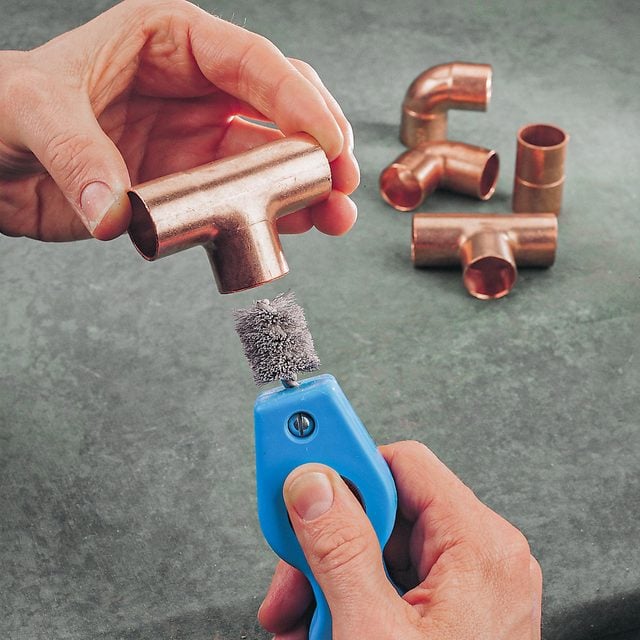
Clean the pipe and fitting
- Clean dirt and corrosion off the outside of the pipe end with a 120-grit emery cloth. The copper should shine when you’re done.
- Clean the mating areas of the pipe and fittings, even if they look shiny and new. Thorough cleaning is the key to success when soldering. It ensures a secure, leak-proof joint.
- Clean the inside of the copper pipe fittings with a special wire brush that’s sized to fit the pipe diameter. You can also wrap emery cloth around your finger to reach the inside, but don’t touch the cleaned surface with bare hands.
Flux the joint
- With your fitting brush, spread an even layer of flux over the surfaces to be joined (the pipe ends and the insides of the fittings).
- Push the joint together until the copper tube seats at full depth.
- Wipe off excess flux with a disposable shop rag.
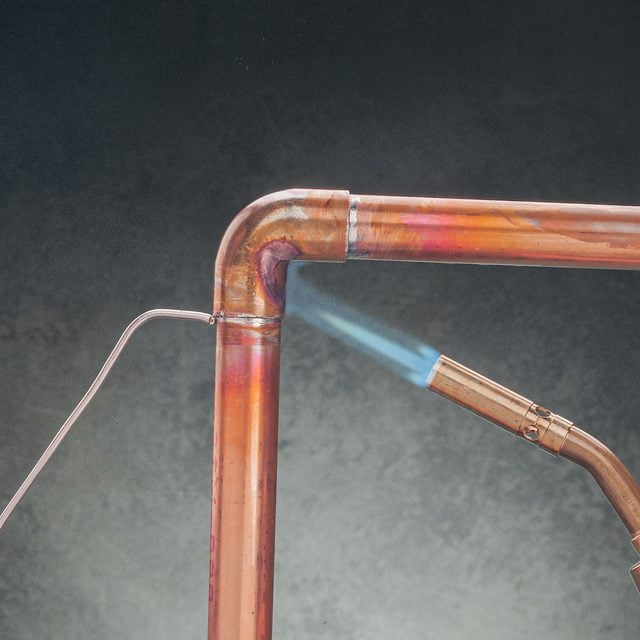
Heat the joint and flow the solder
- Fire up your torch and adjust the flame so the blue cone in the center is about 1-1/4-in. long. The longer the cone, the hotter the flame.
- Hold the flame so the tip (the hottest point) just touches the fitting. It’s not necessary to heat the copper tube directly, because the fitting quickly conducts the heat to the tube inside the joint.
- Heat the joint with your propane torch, moving the cone of the flame back and forth for even heating.
- Hold the solder opposite the flame, the coolest point, to make sure all parts of the joint are hot enough. Solder won’t fill spots cooler than its melting point.
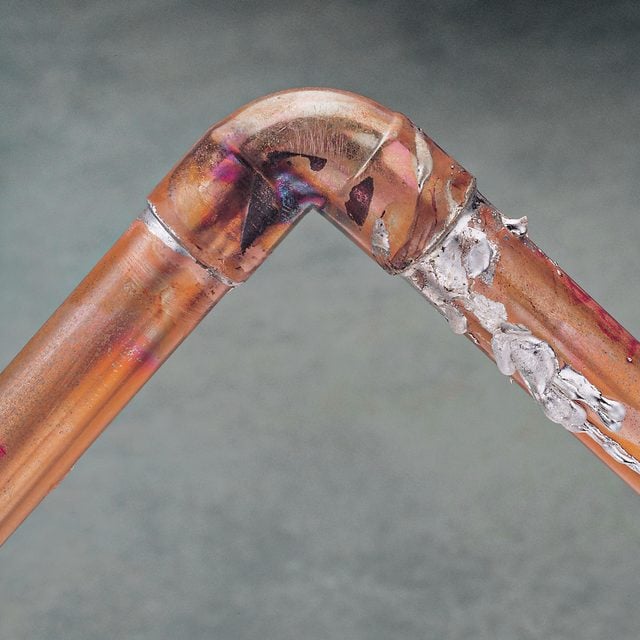
- Continue this until the solder melts and flows into the joint. The joint should appear full on all sides.
- Give the joint 30 to 45 seconds to cool and harden before putting pressure on it. Be careful; it will still be too hot to touch.
Use special techniques for tough spots
- Be patient when soldering brass valves. The fitting may require five to six times as much heat to raise the joint to the solder melting point.
- Leave brass valves at least partially open when soldering them.
- Heat the joints of tubing from several sides to raise the temperature more evenly if you’re working with pipe larger than 3/4-inch.
- When working with these large pipes, add solder from several points and examine the joint to make sure the solder fills the joint on all sides.
Follow these safety tips
- Hang a flame protector cloth or a steel plate over wood and other flammable materials when soldering nearby.
- Keep a fire extinguisher or bucket of water handy in case you start a fire.
- Shut off your torch when you set it down. The propane tank is tippy. Eventually a lit torch will fall over and burn something.
- Drain water lines and dry the tubing in the area being soldered if there’s any chance the pipe isn’t empty.
- Ensure no pressure builds up in the pipe you’re working with by opening a faucet at the end of the line.