
How to Replace a Kitchen Sink Basket Strainer
Updated: Jul. 11, 2023
Replace a sink strainer—it’s easy!
A full day
Beginner
$51–100
Introduction
Quick and easy fix for a leaky kitchen sink basket strainer. Replace the basket strainer yourself in just an hour and save the cost of a visit from the plumber.Tools Required
- 4-in-1 screwdriver
- Adjustable wrench (2)
- Hammer
- Locking pliers
- Rotary tool
- Slip joint pliers
Materials Required
- Plumber's putty
Project step-by-step (6)
Replace a leaky kitchen sink drain strainer
Test for the kitchen sink drain leak
Fill up the sink with water and touch a facial tissue between the bottom of the kitchen sink drain and the sink. If the tissue picks up any water, you’ve got a leaky basket strainer and it’s time to learn how to remove a sink drain.
Loosen the coupling nut
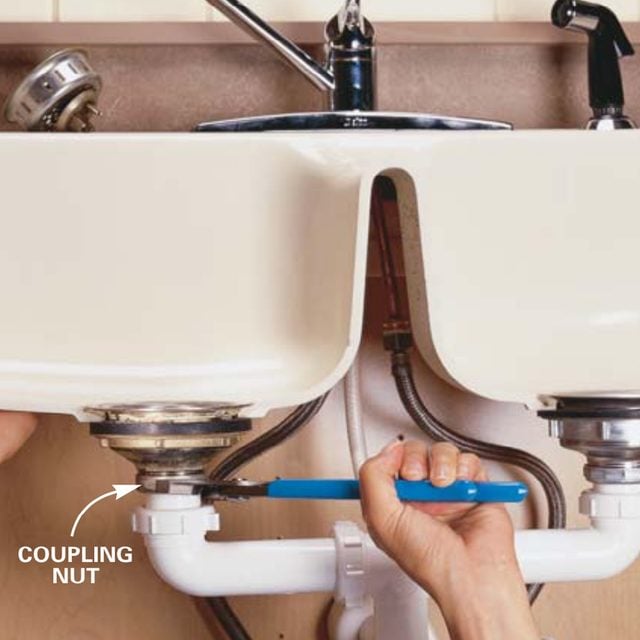
Loosen the coupling nut at the base of the kitchen sink strainer basket with a slip-joint pliers and slide the nut completely off the threads. If the basket spins, hold it tight as in this photo.
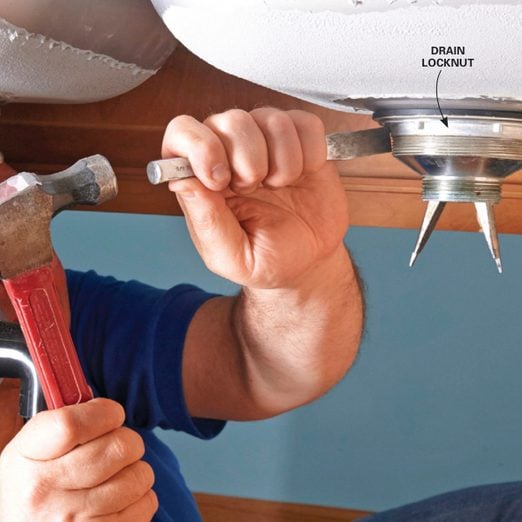
Unscrew the locknut
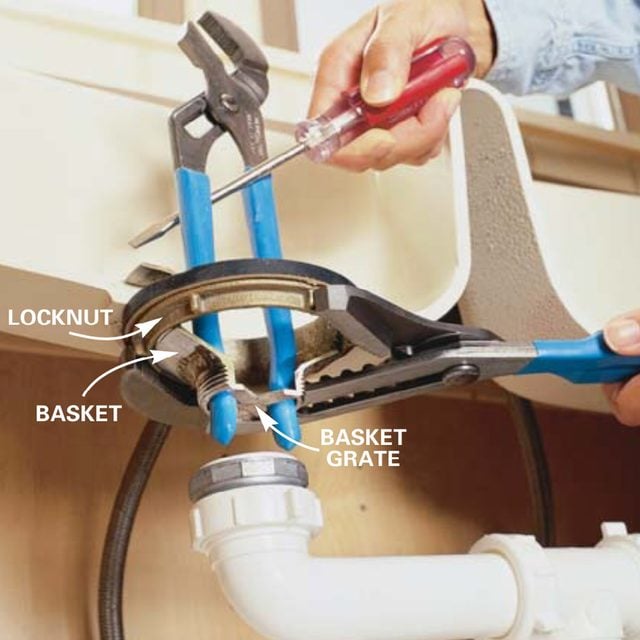
Use 16-in. slip-joint pliers or spud wrench to unscrew the kitchen sink strainer locknut. If the entire basket spins, insert the handles of a pliers into the strainer grate from above and stick a screwdriver between the handles to hold it still. Reach over the front of the sink, or have an assistant hold the screwdriver from above. If you can move the drainpipe out of the way, you can insert the pliers handles up into the strainer grate from the bottom to get a better handle on it yourself.
Apply putty and reset the basket
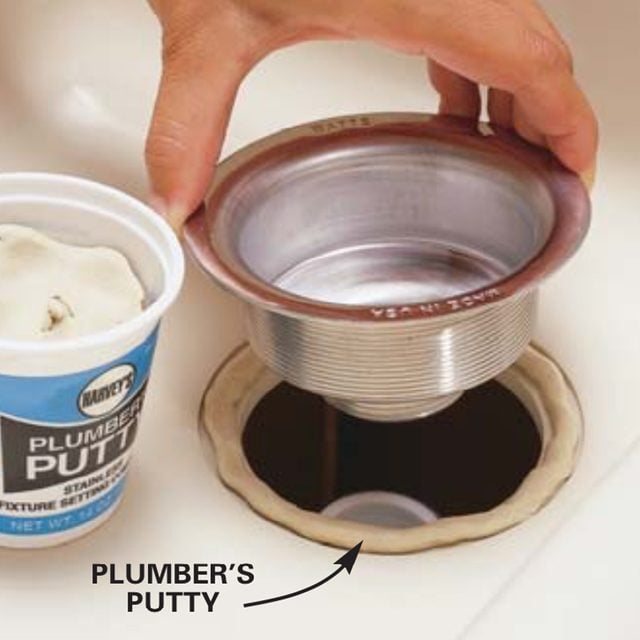
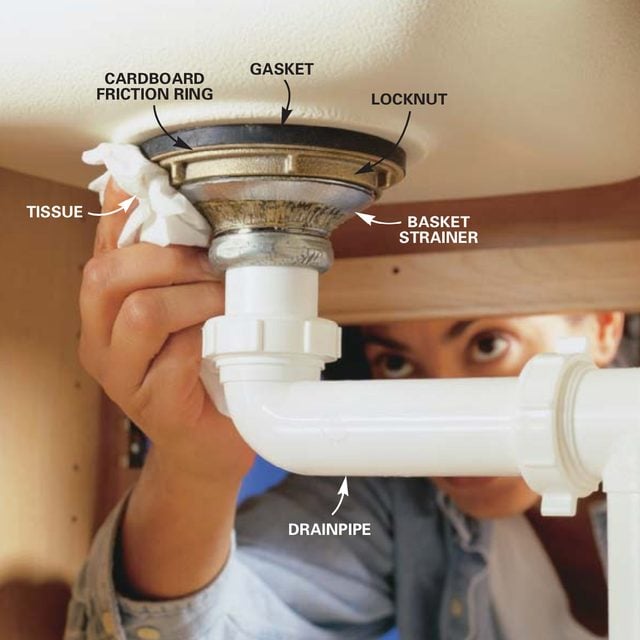
Roll plumber’s putty between your hands into a rope the size of a pencil and wrap it around the lip of the kitchen sink drain opening. Press the kitchen sink strainer firmly down into the putty, add the rubber gasket, friction ring and locknut under the sink, and retighten the locknut.
If you discover a puddle of water in the cabinet under your sink, it may be caused by a leaky basket strainer. Old plumbing fittings can be tricky to loosen, but we’ll show you how to tear them apart and put them back together without any strain. You can pick up all the necessary supplies at a hardware store or home center.
To be sure the leak is coming from the basket strainer instead of a pipe joint, test the basket for leaks as shown in Photo 1. Once you confirm that the basket strainer is leaking, begin the removal process (Photo 2). Photo 3 shows how to remove the strainer locknut, which holds the basket tight to the sink. If the locknut is rusted in place, spray it with penetrating oil. If you don’t have large enough pliers to get a good grip, loosen the locknut by tapping the locknut with a hammer and an old chisel. (If the locknut won’t move, see the next step, below.) Completely remove the locknut, friction ring and gasket, and lift the old basket out of the sink.
Scrape off the old putty with a plastic putty knife so you don’t scratch the sink. Seal the new basket in the sink with plumber’s putty as shown in Photo 4. Plumber’s putty cannot be used on certain new sinks, but these will be labeled to that effect. If you can’t use plumber’s putty, use a non-water-based silicone. Excess putty will squeeze out between the new basket strainer and the sink when you tighten the locknut in place. Wipe it off with a rag or paper towel. Make sure to insert the cardboard friction ring between the rubber gasket and the locknut so the locknut spins freely, without catching on the gasket.
Drastic measures for stuck nuts
Cut the locknut
If all else fails, chuck a metal cutoff wheel into a rotary tool and cut the locknut. Cut until you reach the cardboard ring above the nut. Don’t cut into the sink. If the nut still doesn’t spin, fit your chisel into the cut area and smack it with a hammer to crack it open. Wear eye protection.
Buying Tips

You have to spend at least $50 to get a high-quality kitchen sink basket strainer assembly with a durable finish and a reliable stopper mechanism. The best strainers have either a spin-lock or a twist-and-drop style stopper. The spin-lock stopper doesn’t have any parts that can wear, but screwing it in and out can be annoying. The twist-and-drop style is much easier to use but requires occasional O-ring replacement.
Avoid push-in style strainers that have a nonreplaceable neoprene stopper or a plastic knob. The plastic parts break and can lose their sealing ability if exposed to boiling water.