Trim Paint Tips for Smooth and Flawless Results
Updated: Dec. 05, 2023
Our best tips for painting trim perfectly. You'll learn how to trim paint like an expert!

Introduction
These trim painting tips will pay off for smooth and perfect results. Check out how to use these tips to your advantage.Project step-by-step (20)
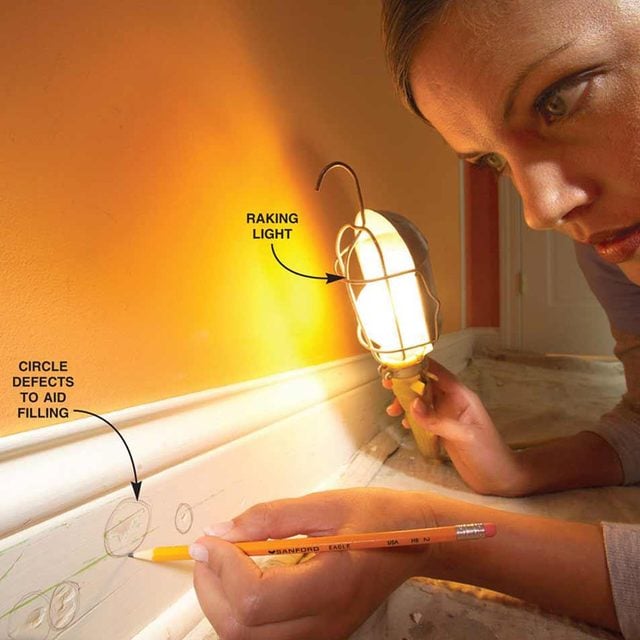
Shine a Light Across the Woodwork and Circle Flaws
Position a hand-held bulb (at least 60 watts) so it shines across (rakes) the wood surface to detect loose paint, rough edges and other blemishes in the surface to determine what needs to be filled. Take a pencil and lightly circle spots that need work. Add these pencils to your shop to make measuring simpler.
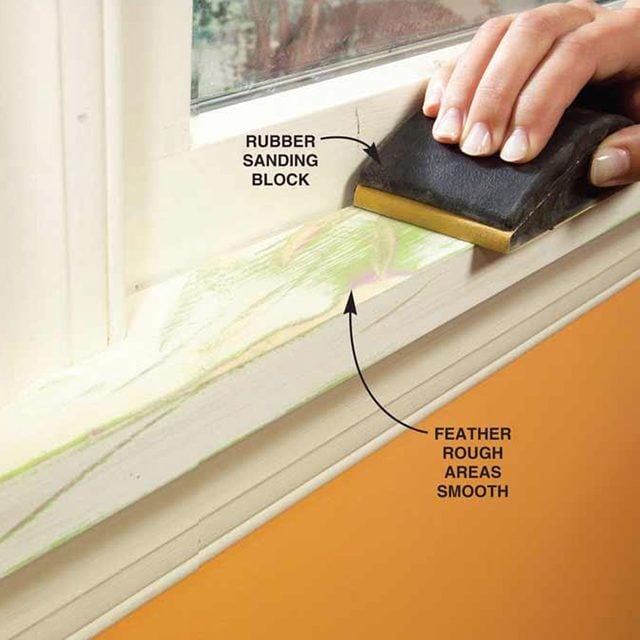
Buy a Sanding Block
The right tool improves the sanding job:
- A folded sheet and finger pressure work great for most areas.
- A rubber sanding block is comfortable to grip, works well with feathering and lets you apply more even pressure in stubborn areas like windowsills.
- A sanding sponge or pad conforms readily to curves and crevices.
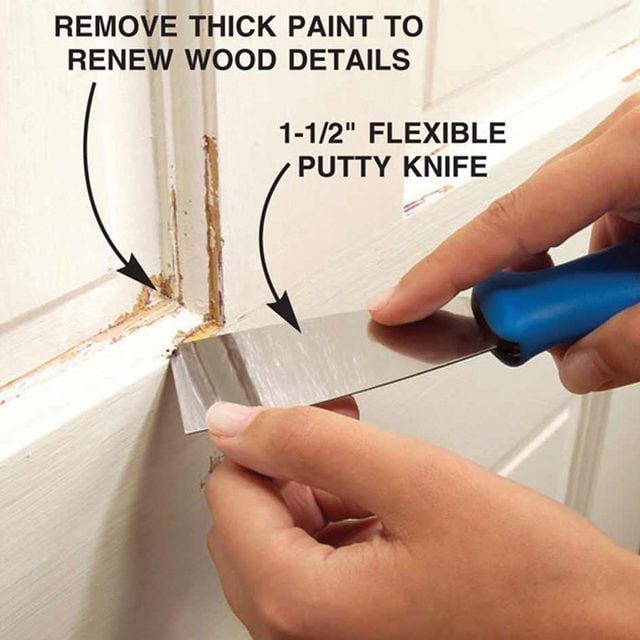
Clean Out Tight Areas and Fine Details With a 1-1/2-in. Flexible Putty Knife
For small, tight areas, scrape with a 1-1/2-in. flexible putty knife. Use a pushing motion to go under the paint, working from an area of loose paint to an area where paint is firmly adhered.
This action bevels the remaining paint layers to make a smooth transition between damaged and undamaged areas, and it renews the details in the wood.
Dust and Vacuum Thoroughly
When the first sanding and scraping step is complete, dust off all areas with an old paint brush and vacuum woodwork with a brush attachment.

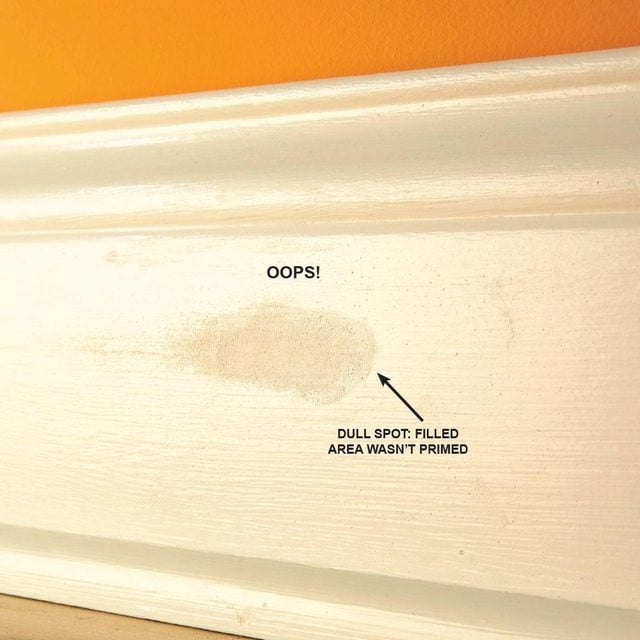
Feather Out Filled Areas With 320-Grit Sandpaper
Use 320-grit sandpaper over all filled areas to flatten and feather them out. Dust off the sanded areas with an old paint brush, and vacuum with a brush attachment. Finish by wiping down the wood with a damp cloth if using water-based paint or a tack cloth if using oil-based paint. Spot-prime filled areas, especially if you’re using gloss or semigloss paint, or else the paint will be dull in filled areas.
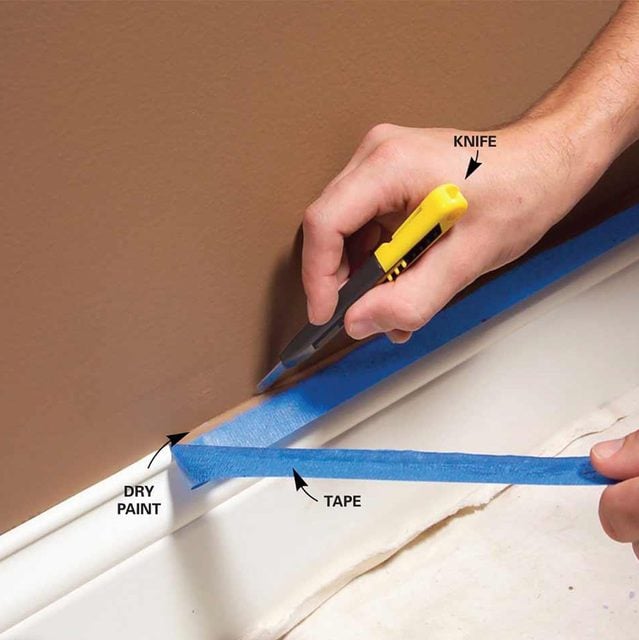
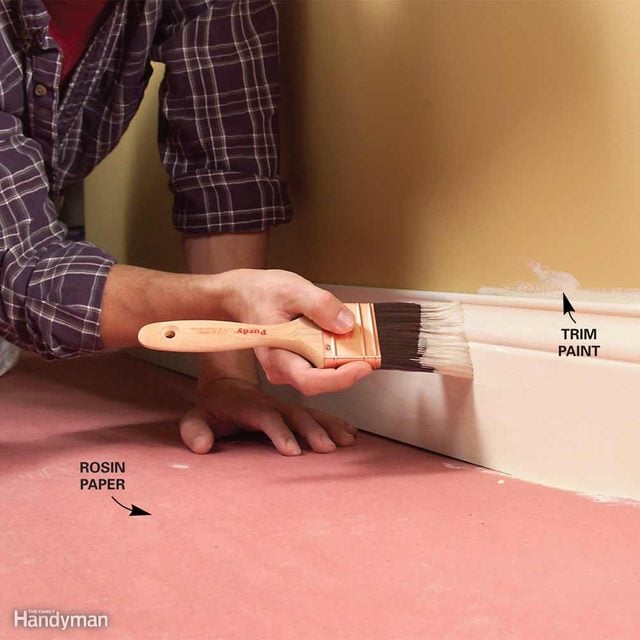
Let Paint Dry, Then Cut the Tape Loose for a Perfect Edge
Once paint is dry, you can’t just pull the tape off the trim. Paint forms a film between the wall and the tape, and removing the tape tears pieces of dried paint off the wall. So before pulling off the tape, cut it loose.
Wait for the paint to completely dry at least 24 hours, then use a sharp utility knife or box cutter knife to slice through the film. Start in an inconspicuous area to make sure the paint is hard enough to slice cleanly. If you cut the paint while it’s still gummy, you’ll make a mess. As you cut the paint, pull up the tape at a 45-degree angle. Get more secrets of professional painters, like the Bucket Edge.
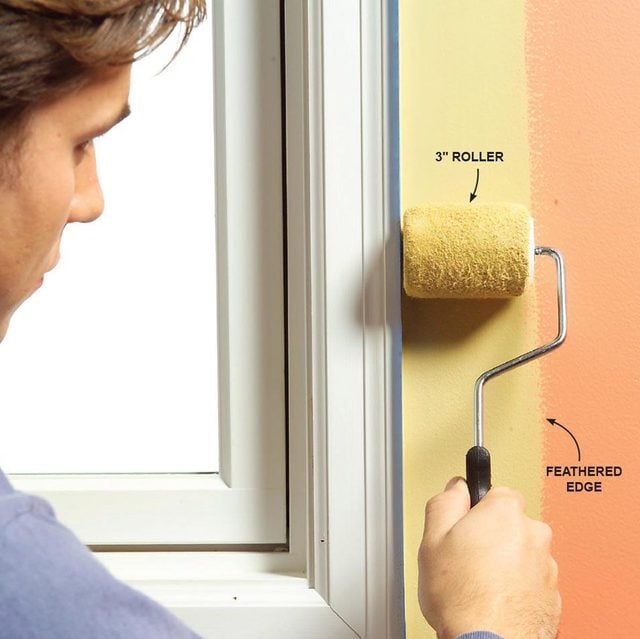
Roll Paint Along the Edges for Consistent Texture
When it comes to wall painting, corners and areas next to trim that are painted only with a brush have a noticeably different texture than the surrounding paint. To ensure the finished texture will be consistent in these areas, brush on the door and trim paint, then immediately roll it out before the paint dries.
Use a 3-in. roller with a nap that’s the same thickness that was used for the rest of the wall painting. Roll as close as you can without bumping the opposite wall or slopping paint onto the trim. Finish brushing on the paint and rolling it out in one area before moving on to the next section. Next, check out these 29 painting tool hacks to make your painting projects a breeze.
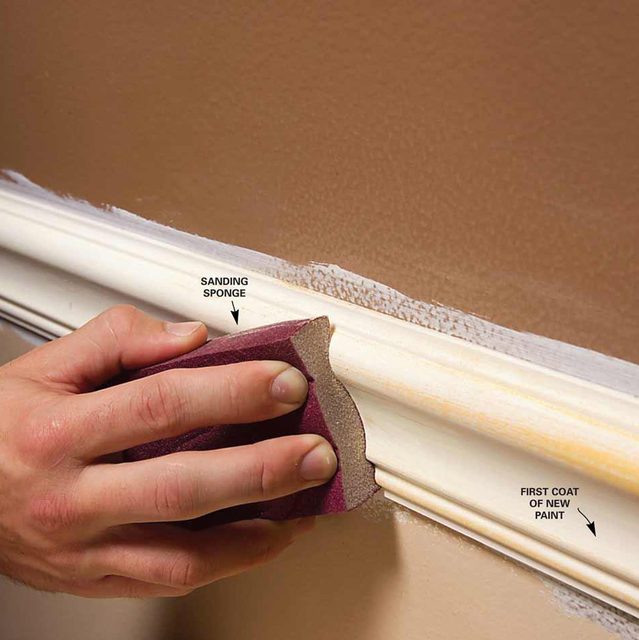
Sand Trim Between Coats for an Ultra-Smooth Finish
One coat of paint usually won’t hide the underlying color and sheen on trim. And if you don’t sand the surface smooth between coats, the finish may have a grainy texture.
For a smooth finish, sand the trim before applying each coat of paint. Sand the trim with a fine-grit sanding sponge. Sponges get into crevices where sandpaper can’t go and apply even pressure. Then apply the first coat of paint, let it dry at least 24 hours, lightly sand it again for a completely smooth surface, and apply the second coat.
After each sanding, vacuum the trim, then wipe it down with a tack cloth to remove the dust. Plus: If you spill paint, here’s how to remove paint from clothes.
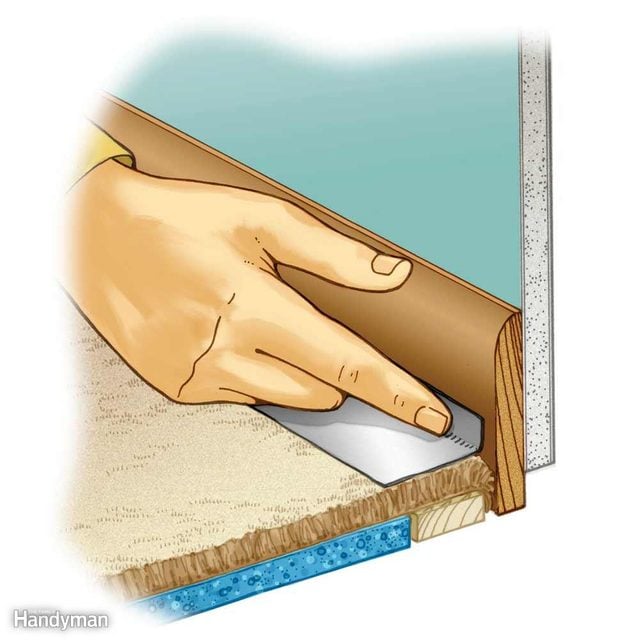
How to Paint Trim with Carpet
Using a metal paint shield often smears the paint. Here’s a solution that always works.
- Place strips of 2-in. wide masking tape on the carpet along the baseboard, with one edge of the tape extended up about 1/2 in. onto the baseboard.
- Then tuck this extended edge down between the baseboard and the carpeting with a putty knife.
- Paint the trim in the entire room, and when it’s dry, just pull up the tape. While you’re at it, learn whether to paint trim walls or ceilings first.
Paint the Trim First, Then the Ceilings and Walls
Finally, the answer we’ve all been waiting for! Pros usually follow a certain order when painting a room. They paint the trim first, then the ceiling, then the walls. That’s because it’s easier (and faster) to tape off the trim than to tape off the walls. And you certainly don’t want to tape them both off!
When painting the trim, you don’t have to be neat. Just concentrate on getting a smooth finish on the wood. Don’t worry if the door and trim paint gets slopped onto the walls. You’ll cover it later when painting walls. Once the trim is completely painted and dry (at least 24 hours), tape it off (using an ‘easy release’ painter’s tape), then paint the ceiling, then continue on to wall painting.
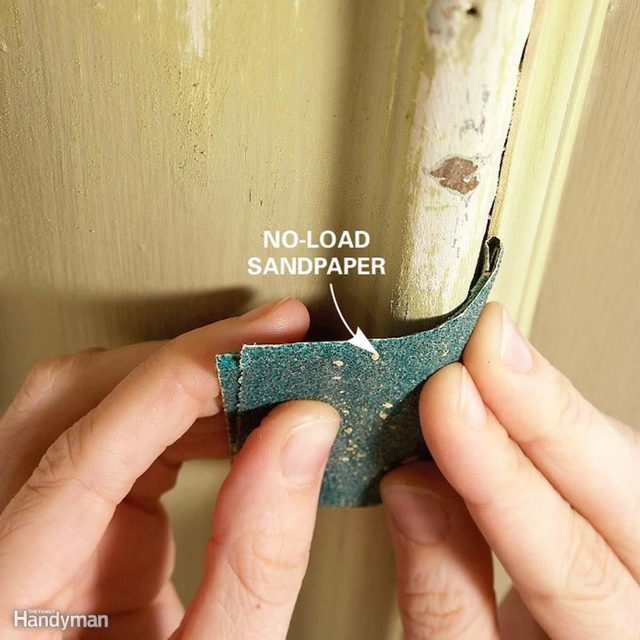
Careful Sanding is the Key to a Perfect Job
If your woodwork is smooth, just give it a once-over with 120-grit sandpaper. But if your trim is in rough shape like ours, start with 80-grit sandpaper. Switch to 100-grit for smoothing and blending in the areas with layered paint. Finally, go over all the wood with 120-grit. Buy sandpaper labeled “no-load.” No-load sandpaper won’t clog as easily and is better for sanding painted surfaces.
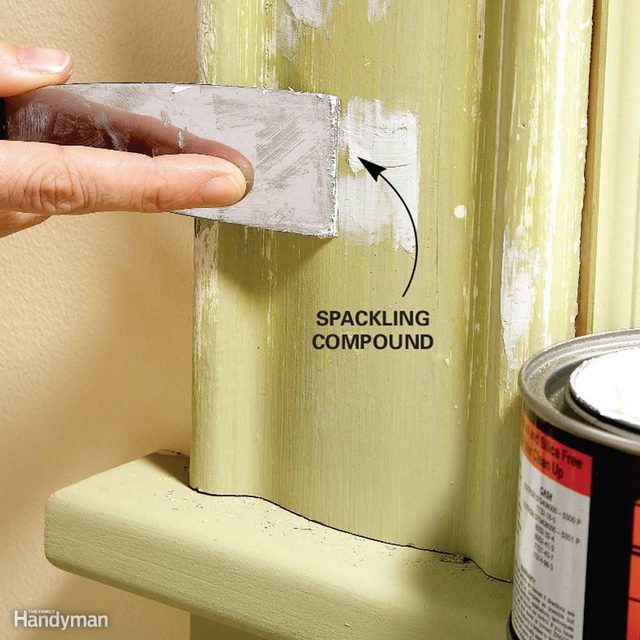
Fix Holes and Dents
To repair large dents or gouges on edges that are vulnerable to abuse, use hardening-type two-part wood filler (Minwax High Performance Wood Filler is one brand).
Fill smaller dents and holes with spackling compound. Since spackling compound shrinks as it dries, you’ll have to apply a second (and possibly a third) coat after the previous coat dries. Shine a strong light across the woodwork to highlight depressions and ensure that you don’t miss any spots as you’re applying the filler. Let the filler dry and sand it smooth.
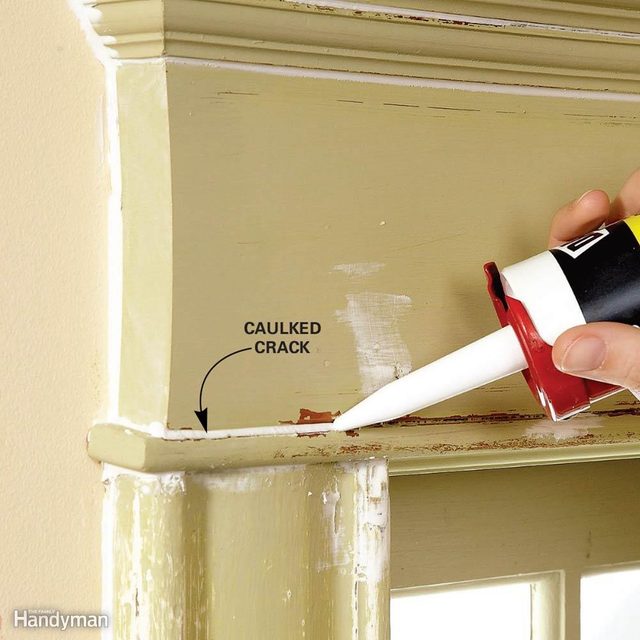
Caulk for a Seamless Look
Here’s a step that many beginners don’t know about but pros swear by. Caulk every crack or gap, no matter how small. Use latex caulk or a paintable latex/silicone blend.
The key is to cut the caulk tube tip very carefully to create a tiny, 1/16-in.-diameter hole. Fill all the small cracks first. Then, if you have wider cracks to fill, recut the caulk tube tip to make a larger hole. Move the caulk gun swiftly along the cracks to avoid an excess buildup of caulk. If necessary, smooth the caulk with your fingertip.
Keep a damp rag in your pocket to clean caulk from your finger and to keep the tip of the caulk tube clean. If caulk piles up in the corners, remove the excess with a flexible putty knife.
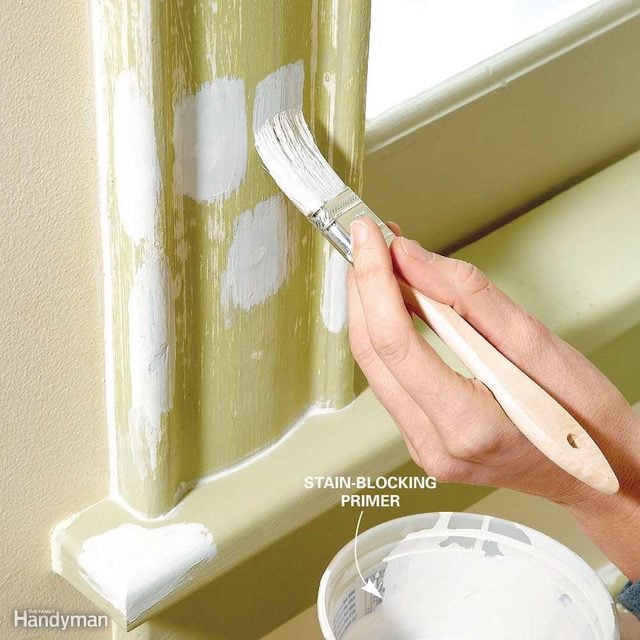
Spot-Prime to Avoid Blotches
Brush a stain-sealing primer (B-I-N is one brand of shellac-based primer) over the areas that you’ve patched or filled, and over areas where you’ve sanded down to bare wood. If you have a lot of patches and bare spots, it’ll be faster and easier to just prime the entire surface. Also seal discolored areas or marks left by crayons, pens or markers to prevent them from bleeding through the finish coat of paint.
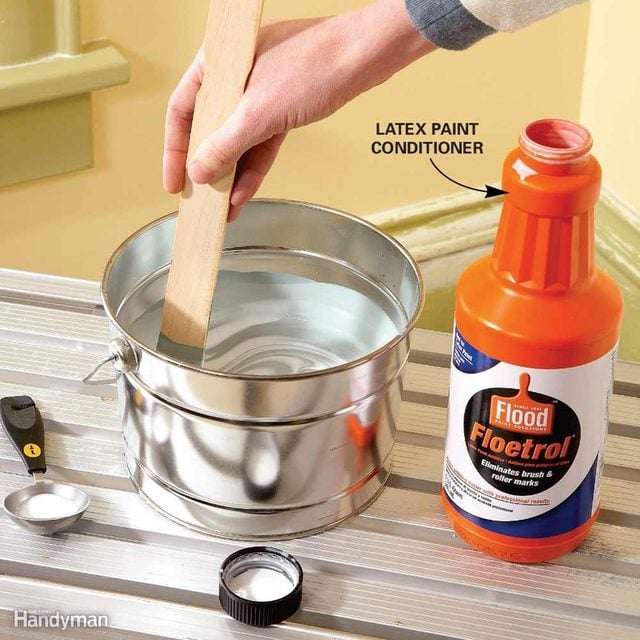
Add an Extender to Latex Paint
Most pros prefer to use oil-based paint on trim for two reasons: Oil-based paint doesn’t dry as fast as water-based paint, leaving more time to brush. And oil-based paint levels out better than most water-based paints, leaving a smoother surface with few visible brush marks. But because water-based paint is more environmentally friendly, less stinky and easier to clean up, it’s a better choice for DIYers.
You can make water-based paint perform more like oil paint by adding latex paint conditioner. Floetrol is one brand. Conditioners make the paint flow better and slow down the drying time, allowing you more time to spread the paint without leaving brush marks. Check with the manufacturer of the paint you’re using to see if it recommends a particular brand of conditioner.
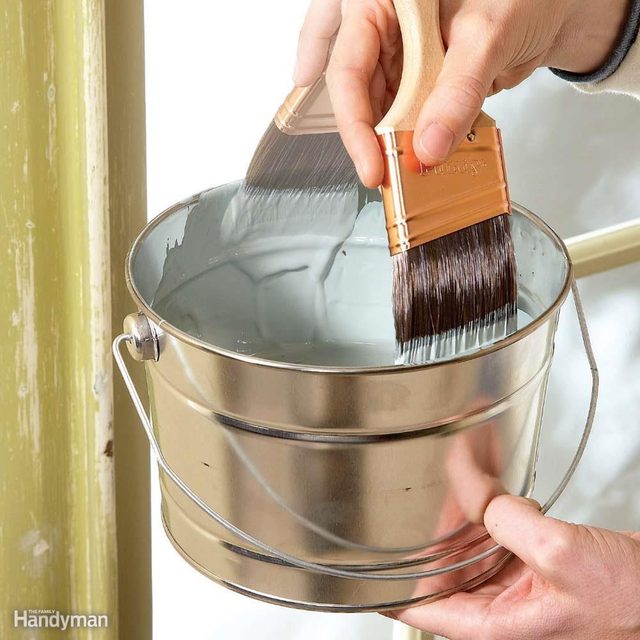
Slap, Don’t Wipe
Slap the brush gently against each side of the bucket to remove the excess paint. This method of brush loading is best for laying on paint because it keeps the bristles fully loaded with paint. To use the brush for cutting-in, follow up by wiping each side of the brush gently on the rim to remove a little more paint.
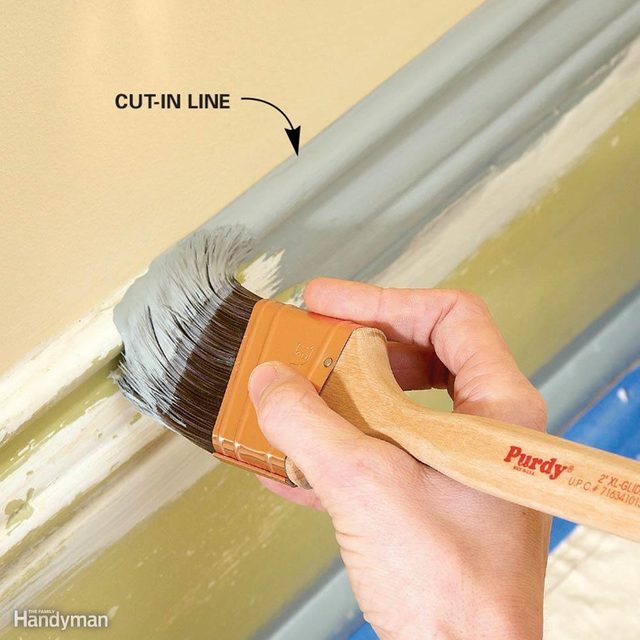
Cut in Edges Before You Fill the Center
Cutting-in is a skill that takes practice to master, but it’s worth the effort.
To cut in, first load the brush. Then wipe most of the excess paint off by gently scraping the bristles on the edge of the can. Start by pulling the brush along the edge, but keep the bristles about 1/4 in. away from the wall or ceiling to deposit some paint on the wood. Now return with another brushstroke, this time a little closer. Sneaking up to the line like this is easier than trying to get it perfect on the first try. At the end of the stroke, arc the brush away from the cut-in line. Cut in a few feet and then fill the middle.
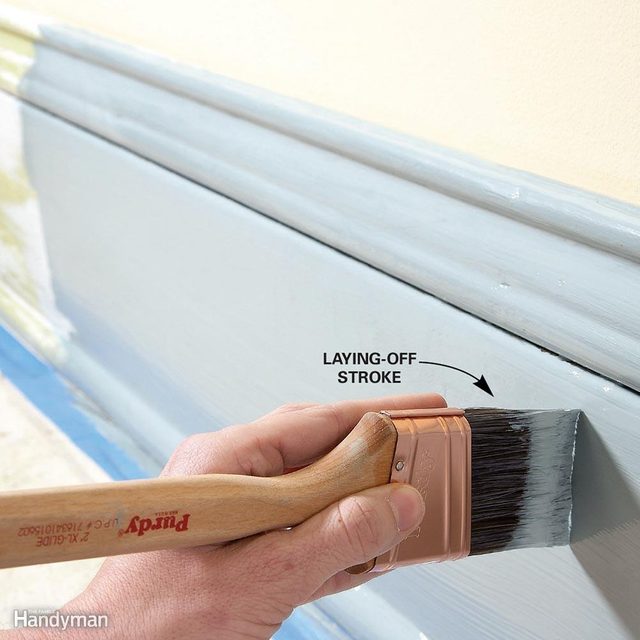
Lay On, Lay Off
The biggest mistake beginners make is to work the paint too long after it’s applied. Remember, the paint starts to dry as soon as you put it on, and you have to smooth it out before this happens or you’ll end up with brushstrokes or worse.
So here’s the tip. Load your brush. Then quickly unload on the surface with a few back-and-forth brushstrokes. This is called “laying on” the paint. Repeat this until you’ve covered a few feet of trim with paint. Don’t worry about how it looks yet.
Now, without reloading the brush, drag the tips of the bristles over the wet paint in one long stroke to “lay off” the paint. Start in the unpainted area and drag into the previously painted trim. Sweep your brush up off the surface at the end of each stroke. Areas wider than your brush will require several parallel laying-off strokes to finish.
When you’re done laying off a section, move on and repeat the process, always working quickly to avoid brushing over partially dried paint. Try to complete shorter pieces of trim with a continuous laying-off brushstroke.
Don’t Start a Brushstroke on Already-Smoothed Paint
Setting the paintbrush on an area that’s already been smoothed out with laying-off strokes will leave an unsightly mark. Try to start laying-off strokes at the end of a trim piece or board, or in an unpainted area. Brush toward the finished area. Then sweep the brush up and off, like an airplane taking off from a runway, to avoid leaving a mark.
Avoid Brushing Across an Edge
Brushing across an edge wipes paint from the bristles and creates a heavy buildup of paint that will run or drip. Avoid this by brushing toward edges whenever possible. If you must start a brushstroke at an edge, align the bristles carefully as if you’re cutting-in, instead of wiping them against the edge. If you accidentally get a buildup of paint that could cause a run, spread it out right away with a dry paintbrush or wipe it off with a damp rag or your finger.