
How to Get a Smooth Polyurethane Finish
Updated: Jul. 23, 2023
Expert tips for applying a flawless clear finish.
A half day
Beginner
$20-50
Introduction
These tips and techniques for applying oil-based polyurethane produce virtually flawless results. They include using a roller, using wipe-on poly and above all controlling dust.Tools Required
- Orbital sander
- Paint roller
Materials Required
- 6-mil plastic sheeting
- Mineral spirits
- Polyurethane
- Sandpaper
- Synthetic sanding pads
- Wipe-on polyurethane
Getting Started
Even though I’ve built dozens of cabinets and furniture pieces, I don’t consider myself a high-end finisher. But I’ve developed my own little collection of tips, systems and techniques for applying oil-based polyurethane. It gives me great results, quickly and painlessly. This is a skip-the-brush system. It’s all about rolling poly on the big areas, using wipe on poly on the small ones, and above all, controlling dust. I’ll show you the tips I used while I was finishing my latest project, a flat-screen TV stand.
Project step-by-step (8)
Step 1
Sand Out Pencil Marks
- Begin by drawing light, squiggly pencil lines on the surface at each grit stage. When the pencil lines disappear, you’re ready to move on to the next grit.
- Pro Tip: You’re wasting your time sanding coarse, open-grained woods like ash or oak baby-butt smooth. I generally start at 80 grit and end with 100 or 120 grit. Sanding through all the grits to 220 grit won’t improve the finish one bit. But with closed-grained woods like maple or birch, don’t skip any grit steps, and go all the way to 220 grit.

Step 2
Maintain a Clean Work Area
- A clean work area is key. The more dust free the project and the surrounding surfaces, the less work you’ll have and the more flawless your finish will be.
- Pro Tip: Before the finishing starts, I vacuum the project, the workbench and the floor.
- Under the piece to be finished, I spread out 6-mil poly to protect the floor from drips and spills and make cleanup easy. I’ll reuse these sheets several times, then toss them.
- Pro Tip: Don’t finish on the same day you sand; the dust stays in the air for hours. Start finishing with clean clothes and hair.

Step 3
Wipe the Project With Mineral Spirits
- Wipe down the project with a tack cloth, or a lint-free cloth saturated with solvent.
- Note: I like to use an old, clean cotton T-shirt for this and the wipe-on step shown later. This step removes nearly all traces of dust. It only takes a few minutes for the solvent to evaporate so you can get started on finishing.
- Pro Tip: Don’t use water; it’ll raise the grain and you’ll have to sand again.
- Note: I like to use an old, clean cotton T-shirt for this and the wipe-on step shown later. This step removes nearly all traces of dust. It only takes a few minutes for the solvent to evaporate so you can get started on finishing.

Step 4
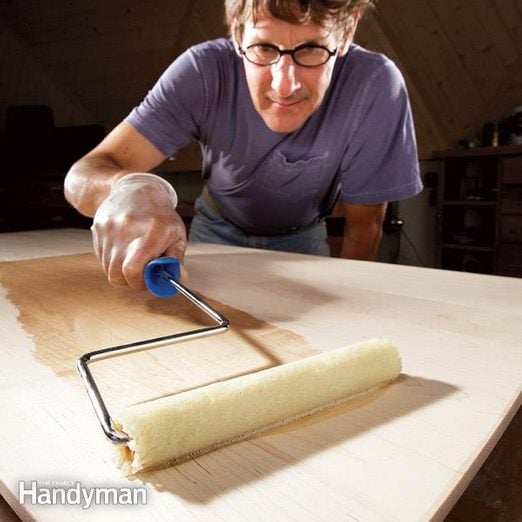
Use a Roller on Large, Flat Surfaces
- A 6-in. rollers lets you apply the poly fast and evenly. No brushstrokes, puddles or thin spots.
- Note: I prefer to use 6-in. microfiber rollers dampened with mineral spirits. There’s always a bit of leftover lint, but only on the first coat. A Teflon baking tray makes a great rolling pan.
- Don’t freak out when you see the finish right after you lay it down. It’ll look like it’s full of flaws. Just roll it out and use the raking light to make sure the surface is completely covered.
- Pro Tip: Don’t keep working the finish. Let it be, and it will flatten out. I keep a can of spray poly handy in case of bubbles. A light mist knocks them out.
- After each coat, re-dip the roller in mineral spirits and put it into a zippered plastic bag for the next coat and leave the wet tray to dry. In a couple of hours, the dried poly just peels right out of the pan. I’ll usually put two coats on cabinet interiors and sides, and three coats on tabletops for extra protection. Here are a few tips for finishing a table top.

Step 5
Finish Both Sides at Once
- With a solid wood top like this one, finish both the top and the bottom surfaces, even if the bottom won’t show.
- Warning: Skip this step and the top can twist, cup or warp.
- To save drying time, coat the bottom and then immediately flip it over to finish the top.
- Note: I just don’t care if there are a few fingerprints. Right after the top is rolled out, I roll the edges and then go around them with a dry foam brush to eliminate any drips or thick spots. I skip the final coat on the underside. Being short a single coat on the underside isn’t a big deal.

Step 6
Use Wipe-On Poly for Small or Tight Areas
- After the roll-on coats are dry, I use Minwax wipe on poly (use the same sheen you chose for the roll-on poly) for the face frames, legs, doors or any other narrow, small or intricate areas.
- I do this after the large areas are dry so I don’t smudge adjacent areas. I like it because only two things get dirty: a glove and a cotton rag, both of which I toss after each coat.
- Note: I can put on two to four coats of wipe on poly in one day depending on the temperature and humidity. There are no drips, sags or runs — ever. And because Minwax wipe on poly dries so fast, there’s rarely a dust problem.
- Pro Tip: The downside to Minwax wipe on poly? Because the coats are so thin, you need lots of them. I’ll put on as many as eight coats of Minwax wipe on poly when two rolled coats would do the trick.
- Note: I can put on two to four coats of wipe on poly in one day depending on the temperature and humidity. There are no drips, sags or runs — ever. And because Minwax wipe on poly dries so fast, there’s rarely a dust problem.

Step 7
Lightly Sand With Pads and Paper
- I lightly sand between coats with extra-fine synthetic sanding pads. The goal is to roughen the surface a bit and rub out dust motes, hairs and drips.
- Pro Tip: If there are stubborn nibs that stand up to the pads, grab 280-grit and be more aggressive. Then just wipe off the dust with mineral spirits and apply another coat.

Step 8
Let the Final Coat Dry in a Dust-Free Area
- For the final coat, I vacuum the work area again and let the dust settle overnight.
- Pro Tip: In the winter, I warm the room and then turn off the overhead furnace a couple of hours before finishing to settle any dust.
- After the finish is on, I immediately roll small workpieces into my shop bathroom, which is nearly dust free. If it’s cool in the bathroom, I use an electric space heater to speed up the drying. If it’s a big project, I make a drying booth out of 6-mil poly sheeting first, which nearly eliminates dust specks.
