
How to Build a Retaining Wall
Updated: Dec. 11, 2023
The simplest, cheapest, back-friendliest retaining wall in history.
A full day
Beginner
Varies
Introduction
Instead of using stone or timbers, make an attractive, long-lasting retaining wall from pressure-treated 2x4s, plywood and trim boards. Construction is fast and simple, and the materials are much lighter to work with.Tools Required
- Air compressor
- Air hose
- Bobcat
- Chalk line
- Circular saw
- Cordless drill
- Hammer
- Hearing protection
- Jigsaw
- Level
- Miter saw
- Safety glasses
- Spade
- Stapler
- Utility knife
Materials Required
- (For a 32-ft. wall)
- 1 50' roll of 4" drain tile
- 1 Roll of ice-and-water barrier
- 16d galvanized framing nails
- 2 – 2 x 6 x 16' treated (footing plates)
- 2 – 2 x 8 x 16' treated (top cap)
- 2-in. deck screws
- 20 – 1 x 6 x 8' treated (trim boards)
- 20 – 2 x 4 x 8' treated (studs and struts)
- 3-in. deck screws
- 8 – 1 x 4 x 8' (braces)
- 8 – 2 x 4 x 16' treated (sleeper and wall plates)
- 8 – 4 x 8 x 1/2" treated plywood (sheathing)
- 8d galvanized framing nails
- Drain tile
- Exterior stain
- Gravel
- Ice and water barrier
- Topsoil
Overview
Find a buddy
You’ll need to find a guy like my friend Brad to help. He doesn’t need tons of carpentry savvy, just the willingness to work for doughnuts, pizza and beer.
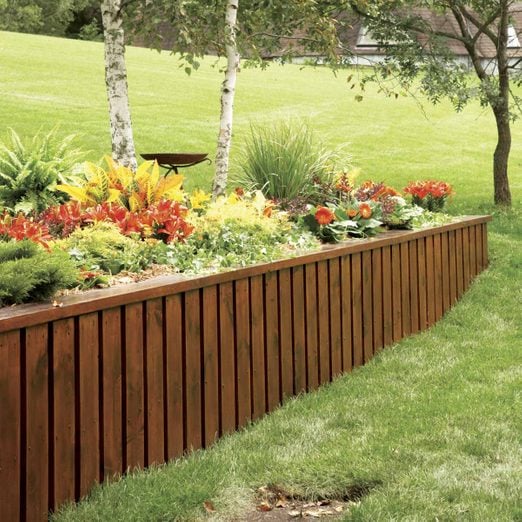
I needed a retaining wall. But I didn’t want to abuse my back by schlepping around landscape blocks. Plus, I didn’t want to bust the bank buying good-looking blocks. So after accessing my internal carpentry database, I came up with a solution: a wood foundation built as a retaining wall. I’ve built dozens of wood foundations (yes, made from treated wood for real basements under new homes), so this was a no-brainer—super easy, attractive and cheap.
This 32-in.-high, 32-ft.-long wall was built in one fairly laid-back day by me, Brad and another friend of mine named Bob Cat (meet him in Photo 7). The materials cost $500, plus another $500 for Bob and his operator, who supplied gravel and some extra topsoil for fill.
Having Bob involved meant there was very little shovel work. And Brad appreciated having Bob there almost as much as I did.
The skeleton of the wall is a treated wood, 2×4 stud wall clad on both sides with 1/2-in. treated plywood. It’s held in place with 2×4 “dead men” assemblies buried in the backfill. The dead men are 2×4 struts bolted to the wall studs and anchored to a perpendicular 2×4 sleeper (see Figure A). The weight of the soil on the dead men anchors the wall against the backfill pressure. It’s important to locate the bottom of the wall below grade a few inches so the earth in front of the wall will anchor the base in place.
Get the right stuff
Ordinary treated wood will last a good long time depending on soil conditions, although wet sites with clay will shorten the wall’s life somewhat. I used ordinary treated wood from the home center, and I figure the wall will last at least 20 years. To build a wall that’ll last forever, use foundation-grade treated wood, the material used for basements. It’s usually Southern yellow pine, a very strong softwood that accepts treatment better than most, and contains a higher concentration of preservatives. You may find it at lumberyards where contractors shop. Or you can special-order it from any home center or lumberyard, although you’ll pay a premium.
Choose nails rated for treated wood: 16d for the framing and 8d for the sheathing. Use 3-in. construction screws for standoffs and dead men connections—again, ones that are rated for treated wood. You’ll also need a box each of 2- and 3-in. deck screws for the trim boards.
Figure A: Wall Anatomy

No matter how large your wall is, it should have these basic elements.
Prepping the site
I had a gentle slope to retain, not a huge hill. This 32-in.-high wall is designed to hold back a gentle slope and is good for walls up to 40 in. For walls 40 to 48 in, place the studs on 12-in. centers and keep the rest of the wall the same. Don’t build the wall more than 48 in. high—a taller wall requires special engineering.
Do the digging with a shovel if you wish. The trick is to dig halfway into the hill and throw the soil on top of the hill. That way you’ll have enough fill left for behind the wall. The downside is that if you hand-dig, you’ll also need to dig channels for the 2×4 struts and sleepers (see Photo 5).
It’s much easier to hire a skid steer (Bob) and his operator to dig into the hill and then cut down a foot or so behind the wall to create a shelf for resting the dead men. Expect to pay a few hundred dollars for skid steer services. The operator can also scoop out the 12-in.-wide by 10-in.-deep trench for the gravel footing, and deliver and dump a 6-in. layer of gravel into the footing. Then you’ll only need to do a bit of raking to level off the trench. A yard of gravel will take care of 50 linear feet of wall. If you have extra gravel, use it for backfill against the back of the wall for drainage. Have Bob and his operator return to fill against the back side of the wall and do some final grading.
Project step-by-step (7)
Get the footings ready
Level the gravel base
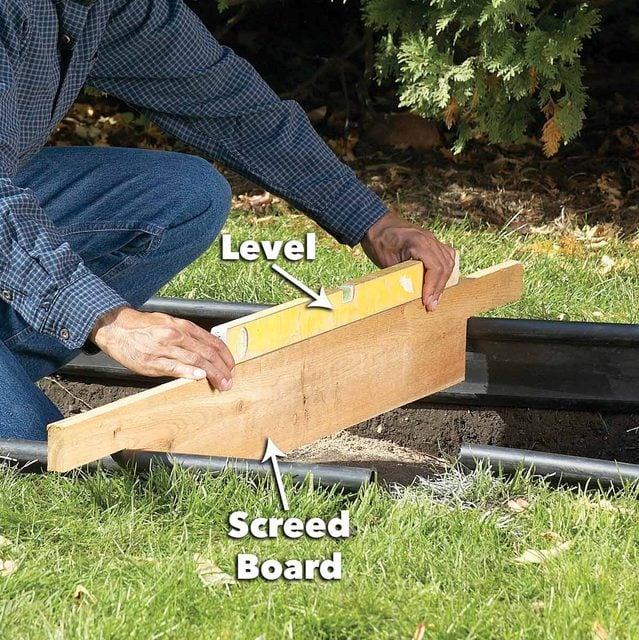
Lay the 2×6 footing plates on edge and use a 4-ft. level to level the gravel. Pack the gravel with the footing plate to drive it down until it’s flat and level.
Fill the trench with gravel. Any type will do, but pea gravel is the easiest to work with. Roughly rake it level, then tip one of the footing plates on edge and rest a level on top to grade the footing (Photo 1). Use the plate as a screed, as if you’re leveling in concrete, and you’ll get it really close, really fast. Try to get it within 1/4 in. or so of level. Offset any footing plate joints at least 2 ft. to either side of wall joints. To drive down the plate until it’s level, stand on it as you pound it into the gravel with another board, occasionally checking it with a level. If you can’t drive the board down to achieve level, scoop out shallow trenches on either side of the footing plate with your hand. Then there will be a place for gravel to flow as you drive down the plate.
Frame and set the walls
Frame and set the walls
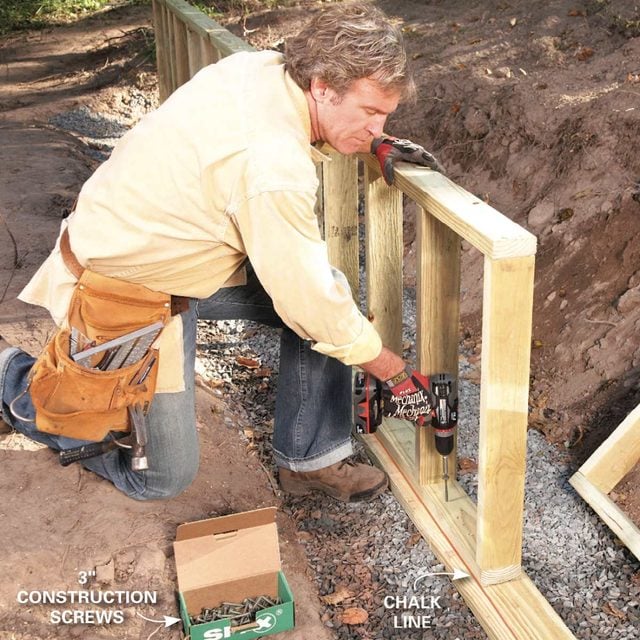
Frame the walls and stand them on top of the footing plates. Snap a chalk line on the footing plate 1 in. from the edge and then screw the bottom plates to the footing plate even with the line. Frame the walls in your driveway or on the garage floor. The walls are very light, so you can carry them a long way if you need to. Build them in sections, whatever length you like, and screw the end studs together at the site. Leave off the sheathing for now. Snap a chalk line 1 in. in from the outside of the footing plate to align the walls (Photo 2). Place them, screw the joining studs together with four 3-in. construction screws and screw the wall plates to the footing plates in every other stud space with 3-in. construction screws.
Plumb, straighten and brace the walls from the front side and then add the tie plate. Make sure to seam the tie plate joints at least 4 ft. away from the wall joints.
Sheathe and waterproof the walls
Brace and sheathe the wall
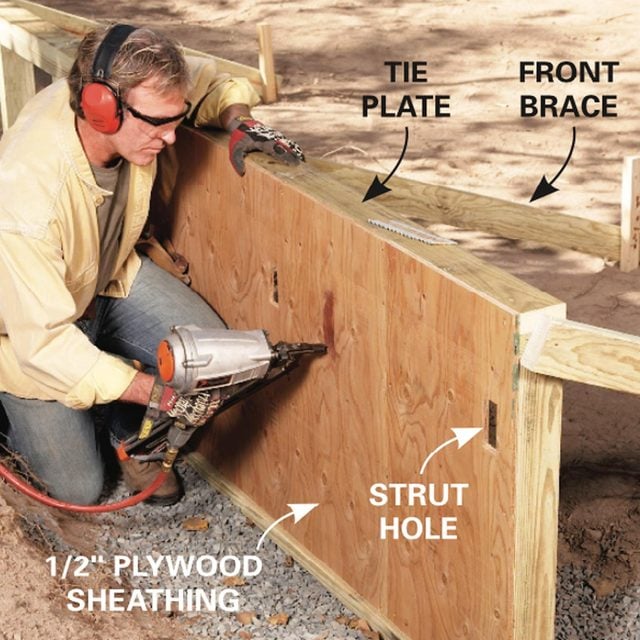
Plumb and brace the wall, then screw down the tie plate. Dry-fit the plywood to the back of the framing and mark the strut holes and cut out the holes. Then nail the plywood to the studs.
Waterproof the walls
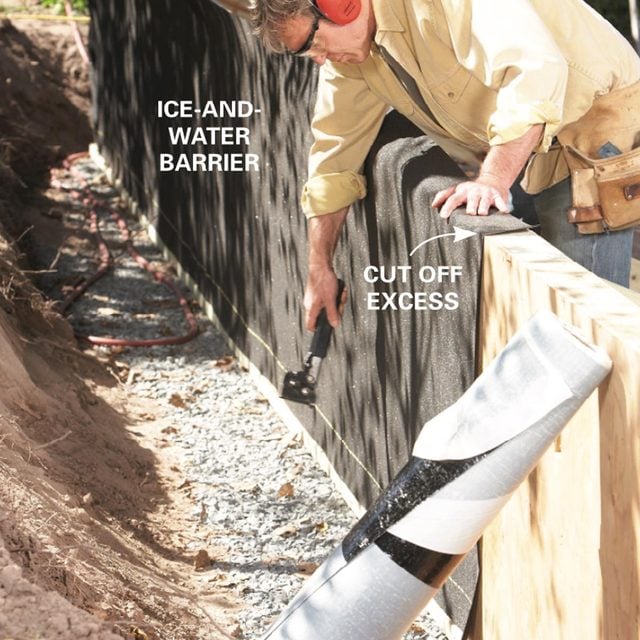
Clad the back of the wall with ice-and-water barrier and cut out the strut holes with a utility knife. Set the plywood panels in place one at a time. Draw and cut 1-5/8-in. x 3-5/8-in. openings spaced 6 in. down from the underside of the top plate and directly next to every other stud. Nail each panel into place with 8d nails spaced every 8 in. before moving on to the next one. Cover the outside with ice-and-water barrier (Photo 4). The adhesive won’t hold the barrier in place, so staple it as needed. Cut off the excess at the top and cut out the strut openings with a utility knife.
Add the struts and sleepers
Assemble the dead men
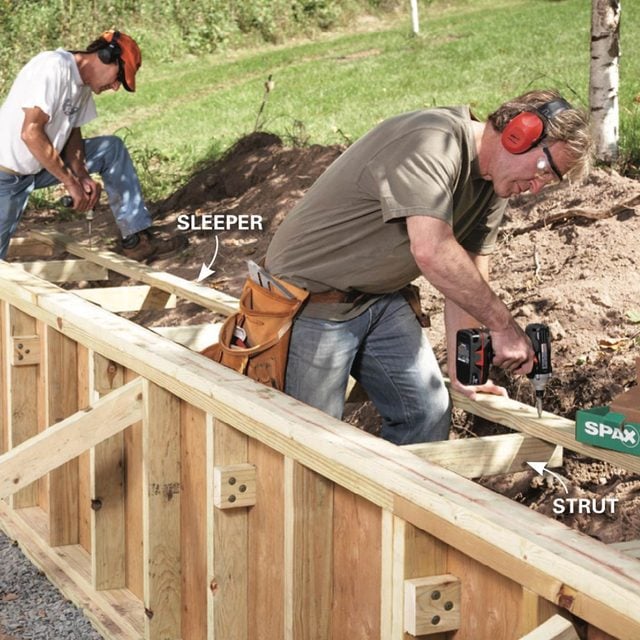
Poke the struts through the holes and screw them to each stud. Roughly prop up the struts and secure a continuous 2×4 sleeper to the end of each one with two 3-in. screws. Slip the struts through each hole. Prop them up so they’re close to level, either by piling up dirt or supporting them on chunks of scrap wood. Screw each one to a stud with three 3-in. construction screws. (Predrill the holes to prevent splitting since it’s so near the end.) Screw the sleeper to the other end of each strut with two more screws.
Skin and finish the front
Add the trim
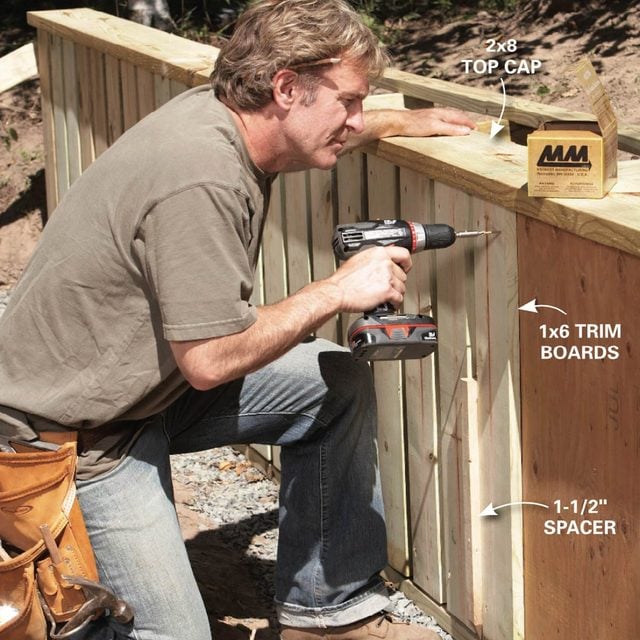
Nail vertically oriented plywood to the top and bottom plates and to the front of the wall. Make sure to seam plywood over studs. Screw a 2×8 top cap to the top plate, hanging it over the front of the wall 1-1/2 in. Fasten vertical 1x6s to the sheathing with 1-1/2-in. spaces between boards. Before you can finish the front of the wall and backfill behind it, you’ll have to remove the front braces. So prop up the dead men to keep the wall near plumb while you finish the front. Cut the plywood and nail it on, orienting it vertically to the front so the exposed grain will match the 1×6 boards applied over them. Add the 2×8 cap, keeping a 1-1/2-in. overhang at the front. Screw it to the tie plate with 3-in. deck screws. Screw the 1×6 treated boards to the sheathing with 2-in. deck screws. We spaced our boards every 1-1/2 in. using a scrap 2×4 as a spacer. Don’t trust the spacer for more than a few boards at a time. Occasionally check a board with a level and make any necessary adjustments.
Backfill and finish
Time to backfill
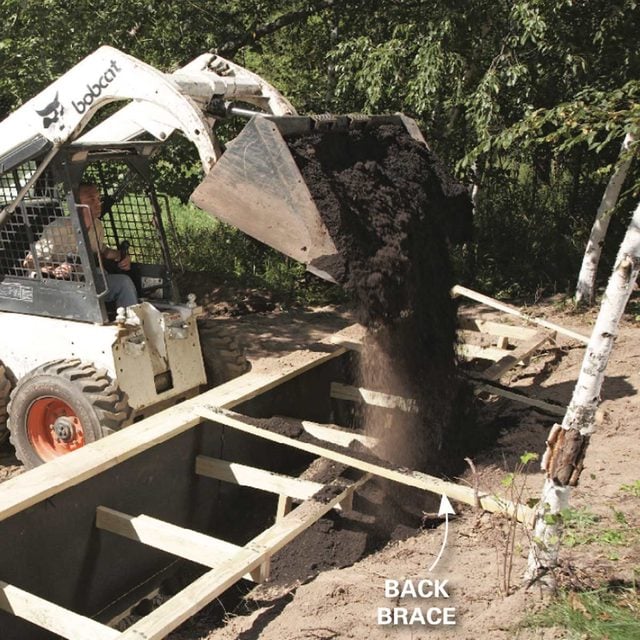
Plumb and brace the wall from the back. Backfill, starting at the sleeper, to anchor the wall into place as you continue filling the space behind the wall. Plumb and brace the wall from the back by nailing braces to the top cap and staking them on the hill. Prop up every other strut and the sleepers with scraps of wood or the fill falling on the struts and sleepers will force the wall out of plumb. Backfill first against the front of the wall over the footing to lock the wall base into place, then fill behind it. Then fill over the sleeper, working your way toward the wall itself. The object is to lock in the sleeper before the fill pushes against the wall. Once the backfill is in place, it’s a good idea to run a sprinkler over the fill for several hours to make it settle before you remove the braces.
If you like the look of your wall, you’re good to go—no finish required. The treated wood will weather from green to gray in a year or two. We applied two coats of exterior butternut color stain to ours.