
How to Build a Garden Pond Deck
Updated: Jun. 13, 2023Plans for a rectangular reflecting pond with ground-level boardwalk.
- Time
- Complexity
- Cost
- Multiple Days
- Beginner
- $501-1000
Build this deck and pond
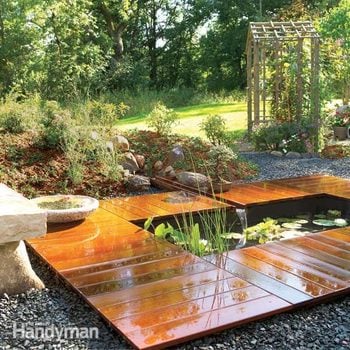
Are you in need of a little serenity? A reflecting pond is just the place to rest your gaze after a trying day. The one we chose for this issue is unique, not only in appearance, but also in building technique.
Most ponds are free-form, informal shapes that have either soft or hard plastic liners dug into the ground. But for ours, we used simple wood walls to frame it and form the base for the surrounding deck. A single-piece rubber liner keeps the water in. And the garden berm that surrounds one end is practical as well as a nice landscaping feature. We simply mounded the soil dug from the pond hole so we wouldn’t have to haul it away.
This pond isn’t exactly a weekend project. In fact, even if you’re in great shape, you should expect to spend the better part of a long day just digging the hole and laying in the gravel footings. The good news is that the construction is simple and doesn’t require a bunch of expensive tools. The only power tools you’ll need are a circular saw, a screw gun and possibly a plate joiner (or biscuit joiner; Photo 16) for the boardwalk. The techniques we show are simple to master.
How Much Will It Cost?
You can spend as much as $3,000 if you build the “Full Monty” version we show, featuring a state-of-the-art filtration system, expensive exotic decking and concealed fasteners. In fact, we spent about $1,200 just on the hardwood decking (called Ipe; more on this later), including a 14-ft. long boardwalk that connects the pond to a nearby patio. We spent $1,450 more on the pond filtration kit. Keep in mind that garden ponds are notoriously difficult to keep clean; we wanted an almost no-maintenance system.
But you can do this project for less than $1,000 by using standard decking materials and skipping the filtration system altogether.
Planning the project
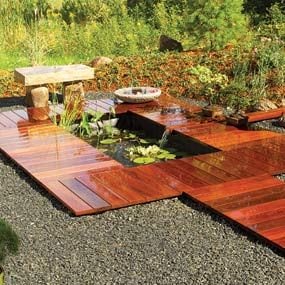
The first step in planning your pond is to determine its size, depth and location. Size: Our 4 x 8-ft. pond is surrounded by a 30-in.wide boardwalk so it encompasses an area about 8 x 12 ft.
Your pond can be virtually any size or shape you’d like. The basic how-to steps on footings, wall framing and boardwalk will work for almost any layout you choose. Just make sure you select a pond liner and liner pad that’ll fit. Determine the liner and pad size by adding the height of both walls to the bottom dimensions plus 2 ft. for both the length and the width. Be aware that fitting the liner and building the boardwalk will be more complicated if you choose an exotic pond shape like a “T.”
Pond depth: A 3-ft. depth allows deeper water plants like water lilies to thrive and protects pond fish from predators.
Whatever depth you choose, make sure the tops of the pond walls stand above the surrounding grade at least 5 in. and at most 10 in. so the boardwalk footing design will work with your pond. It’s smart to dig the hole, then pour in the gravel base and measure to grade to determine the final stud height.
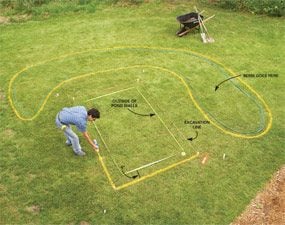
Location: For this pond design, you should have an area in your yard that has less than 8 in. of grade change over the footprint of the pond and boardwalk. To help pick a location, lay out a garden hose that outlines the boardwalk. You’ll be surprised at just how large an area it encompasses, especially when you include room for the berm.
Overhanging trees will retard water plant growth and drop lots of leaves in the water, so it’s best to avoid them if possible. Once you’re satisfied with the location, use our technique of laying out the pond hole and berm position. Then use stakes and strings and “upside down” marking paint to prepare for excavation (Photo 1).
Winterizing: If you live in a freezing climate, you’ll have to drain the pond halfway and remove the pump. Fish and some plants won’t make it through the winter. You may have to bring them inside.
CAUTION!
Ponds are drowning hazards for children. This design is especially hazardous because the overhanging boardwalk makes climbing out difficult. If children have access to your yard, build a fence with a lockable gate around the pond.
Digging the hole
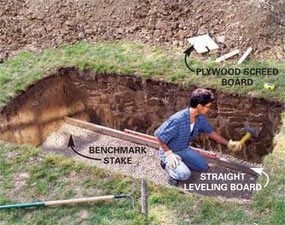
Photo 2: Level the hole
Dig a hole about 4 in. deeper than your desired pond depth, then fill the bottom with 4 in. of gravel. Drive 2×2 stakes in the middle of the wall positions at each corner and drive them down slightly below the top of the gravel. Choose one of the stakes as your benchmark and level across to the tops of the other with a 4-ft. level and straight 2×4, driving them down until they’re all even.
After marking the pond and berm with spray paint, throw the excavated dirt into the berm perimeter. You’ll be able to sculpture the berm’s final shape and size as you excavate. We suggest digging the hole only 1 ft. larger than the pond walls to minimize digging and the amount of gravel fill needed against the pond walls (Photo 10). But in loose soils, the hole walls may begin caving in and you may have to dig a larger hole.
Don’t let the hole sit for days on end before you set up the pond walls because the sides will eventually collapse, especially if it rains.
Choose the highest grade point to determine digging depth and dig down 32 in. from that point. That way the 36-in. high pond lip will still be several inches above grade after you add the gravel footing. Use any type of clean gravel or sand for the 4-in. deep pond footing and base.
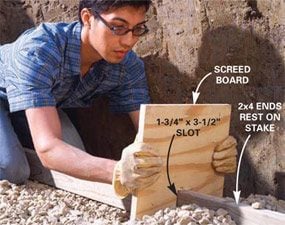
The finer the gravel, the easier it is to level. Just roughly level the gravel with a steel rake, then follow the simple method we show using stakes and a screed board to level the gravel footings directly under the walls (Photos 2 and 3). If your soil is sand, only dig a 38-in. deep hole, skip the gravel and use the sand for the footings, liner base and backfill.
Treated wood walls
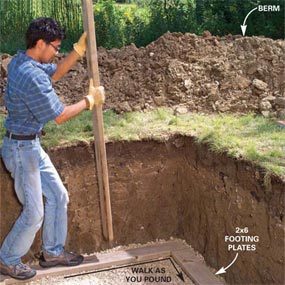
Photo 4: Install the footing plates
Cut the treated 2×6 footing plates to length, then lay them on the gravel and toenail the ends together with 16d nails. Stand on the footing plates and settle them into the gravel by pounding on them with another 2×6. Settle the entire perimeter by walking along it as you pound.
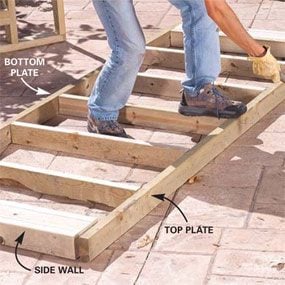
Photo 5: Build the walls
Cut the 2×4 studs and plates to length (follow Figure A for dimensions). Assemble the pond walls as shown by nailing the studs to the plates with two galvanized 16d nails at each end.
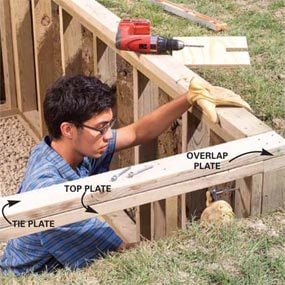
Photo 6: Tie the walls together with top plates
Center the walls on the footing plates and tack the corner studs together with a 16d galvanized box nail. Square the walls by measuring opposite corners diagonally and shifting the walls until the measurements match, then nail the tie plates to the top plates with two 16d nails spaced every 12 in. and four more nails in the ends as shown. Predrill three evenly spaced 3/16-in. holes and bolt the corners together with 1/4 x 3-in. lag screws.
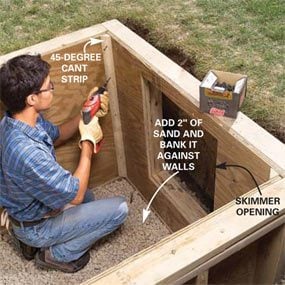
Photo 7: Add the plywood sides
Cut the 3/4-in. treated plywood to size and fasten it to the wall studs with 2-in. deck screws spaced every 6 in. Then rip and cut to length 45-degree 2×2 “cant” strips and screw them to the inside corners with 3-in. deck screws. Finally, spread a level 2-in. layer of sand on the floor of the pond, banking the edges up the walls a couple of inches.
We recommend ground contact (.40 retention) treated wood for the wall, footings and deck framing. If foundation-grade lumber (.60 retention) is available at the lumberyard, choose it for all the below-grade materials and the pond structure will last virtually forever. Use double hot-dipped galvanized nails for fastening the framing but screw the plywood to the inside with deck screws. Nails could work their way out and puncture the liner.
Note that each layer of pond wall plates overlaps the one below it (Figure A, in Additional Information, below). That’s to spread the load over a larger area, help tie everything together and even out slight inconsistencies in heights.
Installing the liner and the liner pad
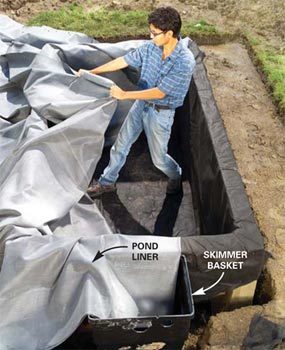
Photo 8: Center the skimmer in the opening
Adjust the skimmer until it’s centered over the opening and even with the top edge of the pond wall. Use gravel to elevate or level the skimmer basket as necessary. Hold it in place with a few shovelfuls of gravel around the bottom. Center the pond liner over the pond and tuck it into the inside bottom edges of the pond walls. Fold over the corners as neatly as possible.
The liner pad protects the rubber liner from being punctured by sharp stones and rough framing surfaces. Before you install the liner pad, carefully inspect the walls and take care of protruding fastener heads, splinters or sharp stones that could work their way through and puncture the waterproof pond liner.
It’s easiest to install the liner pad by cutting a separate piece slightly larger than the bottom and then cutting separate pieces for the sides. They hang over the pond lip and drape over the walls (stapled to the outside), overlapping the bottom liner. You can cut up the liner pad as much as you need to as long as you overlap the pieces. Keep pleats and folds to a minimum and the pond liner will fit better.
We spread out the pond liner on the grass and roughly cut it to size with a utility knife before dragging it over the pond and pushing it into position. It’s easy to catch it on sharp objects and puncture it, so be careful. Slip out of your shoes and work in your socks when standing on top of the liner and fitting it against the walls. The key to a good-looking job is neat corner pleats, so spend some time on careful folds. After filling the pond with water, tack the liner around the outside with roofing nails and cut off the excess.
Customizing the skimmer and biofilter
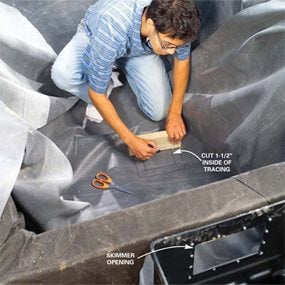
Photo 9: Cut out the skimmer opening
Press the liner against the skimmer and trace the opening onto the liner with a felt-tip marker (leave plenty of slack at the bottom to allow for settling when you add the water). Draw an opening 1-1/2 in. smaller than the tracing on all four sides, using a 2×4 spacer block. That allows the flange to overlap the rubber for a good seal. Then cut out the opening with a scissors.
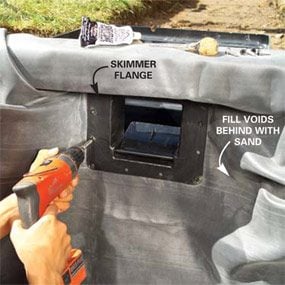
The skimmer and biofilter (see “Buy a Biofilter, or Drain and Scrub.”) need customizing to work in your particular pond. First of all, you’ll have to measure the width of the skimmer inlet, including the skimmer flange (Photo 9). Custom-size the wall opening to fit your skimmer opening.
We recommend making it about 4 in. wider than the skimmer flange to accommodate folding the liner through the wall and screwing it to the skimmer basket. The opening height isn’t too important, since the basket sits outside the wall. After the liner is clamped to the skimmer, fill the space between the wall opening and the liner with sand to support the liner against the pressure of the water (Figure A, in Additional Information, below).
The pumps that come with the kits are generally powerful enough to drive a sizable waterfall over the lip on the biofilter. To throttle down the water flow to the trickle needed for the sluice, buy a separate PVC valve to fit in the hose leading from the skimmer to the biofilter (Photo 11). But simply replacing the kit pump with a smaller one may make more sense because it’ll cost less to run.
Buy a pump that lifts water 6 ft. (it’ll say on the back of the pump box) and a smaller hose that fits the pump outlet and is long enough to reach from the skimmer to the biofilter. Drill holes above the water lines of both the skimmer and the biofilter baskets for threading the hose through and connecting the new pump. The water line in the biofilter must run all the way to the bottom of the biofilter so the water can flow up through the filtration system. Keep the larger pump for draining the pond when necessary.
Our biofilter came with a separate lip that functions as a spillway or built-in waterfall. We discarded the lip and cut a replacement spillway out of decking and then cut a slot to receive the sluice (Figure B, in Additional Information, below, and Photo 20). The replacement spillway is then caulked and screwed into the biofilter spillway opening and the sluice is sealed in the slot with silicone caulk.
Under the boardwalk
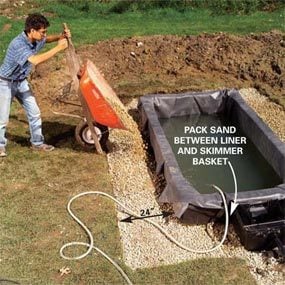
Photo 10: Backfill the wall with gravel
Fill the pond with the garden hose, backfilling the pond walls with gravel at the same rate as the water fills the pond. Stop filling when the water flows into and fills the skimmer basket.

Photo 11: Level the biofilter basket
Dig the hole for the biofilter basket. Center it in the middle of the pond wall. Add or remove gravel to adjust the basket to make the top level in both directions. Do the same to make the bottom of the spillway opening level with the top of the pond walls. Then dig the trench for the water line.
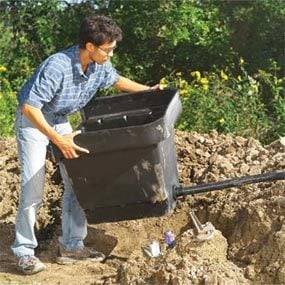
Photo 12: Attach the water line and reinstall the biofilter basket
Pull the biofilter basket out of the hole and attach the water line following the manufacturer’s directions. Then lower the basket back into the hole and check the placement and exact height again before backfilling around the basket.

Photo 13: Attach the ledgers
Cut 2×4 pond deck ledgers to fit as shown, then space them 1-1/2 in. above the pond walls using a 2×4 block as a guide. Tack them to the tie plate with a few 3-in. deck screws. Then bolt them to the tie plates with 1/4 x 3-in. lag screws spaced every 18 in. Bore 1-in. dia. countersink holes in the ledgers at the ends of the pond so the lag screwheads are just below the face of the 2x4s. Screw a 2×2 block to the top of the wall in front of the skimmer basket for the access panel support.
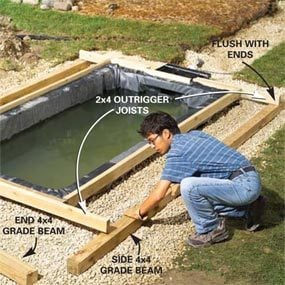
Photo 14: Attach the beams
Bolt outrigger joists to the pond ledgers, projecting the ends 16-1/2 in. past the pond ledgers. Cut two 4x4s 33 in. longer than the side pond ledger boards, then center them on the pond and slide them under the ledger ends. Cut the end 4x4s to fit between the side 4x4s and nestle them into the gravel until they’re flush with the tops of the side 4x4s.
Dig the shallow 24-in. wide boardwalk footings before the pond is filled with water and backfilled with gravel. That way you can pour gravel against the pond walls and fill the footings at the same time (Photo 10). But if you have crumbly soil, it’s best to dig the footings after the pond is backfilled to keep soil from caving in against the walls.
The footing depth should be about 10 in. below the pond rim everywhere. If the terrain is slightly sloped, the 4-in. deep gravel footing will slope as well. Don’t worry about the slight slope; just try to rake out obvious humps for a consistent surface.
After you place and roughly grade the 4-in. deep gravel, it’s just a matter of nestling the 4×4 “grade beams” into the gravel the correct distance away from the wall (Photo 14). They don’t have to be perfectly level, just fully supported by the gravel. You’ll be able to make the fine adjustments when you attach the 2×6 grade beam ledgers to the 4×4 grade beams.
Tip:
Dig the skimmer and biofilter basket holes deeper than needed and fine-tune the bottom heights by adding gravel. It’s easier to level than soil.
Ipe decking and invisible fasteners

Photo 15: Install the beam ledgers
Cut the beam ledgers to length and fasten them to the 4×4 grade beams. Keep the top edges even with the pond ledgers (they will be level). Bolt them to the grade beams. Note: If your site is sloped, a 2×6 may not reach high enough. You may have to use 2x8s or even 2x10s on some of the low sides. We had to use 2x8s along one side and one end wall.
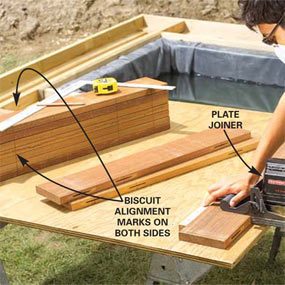
Photo 16: Cut biscuit slots in the decking
Lay a 32-in. deck board in place (Photo 18). It should extend about 4 in. over the pond edge. Mark the board at the centers of the pond ledger, grade beams ledger and about 3 in. from the pond end. Use the board as a pattern to mark biscuit placement points on both edges of other deck boards. Cut No. 20 biscuit slots on the adjoining edges.
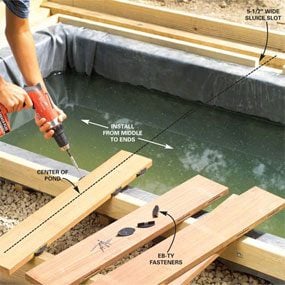
Photo 17: Install the decking
Center the first board on the long side and fasten it. Center and cut a 5-1/2 in. wide notch on the biofilter-side pond ledgers and grade beam ledgers even with the pond lip. Starting on the side opposite the biofilter, center and fasten the middle deck board. Install the deck boards in both directions until they’re about 4 to 5 in. from the ends of the pond. On the biofilter side, start the decking on both sides of the slot.
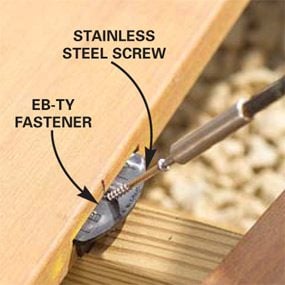
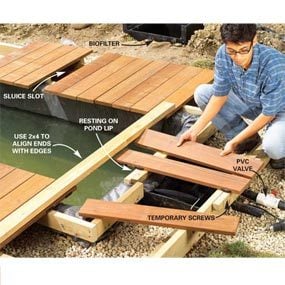
Photo 18: Build the access panel
Cut two 23-in. long 2x2s for the access panel deck. Temporarily screw one to the grade beam ledger directly above the skimmer with 3-in. deck screws and lay one on the pond lip as shown. Center and fasten the four access panel deck boards to the 2x2s. Temporarily remove the outrigger joist (Figure B) if necessary to install blocking near the deck splice, then replace it before completing the decking.
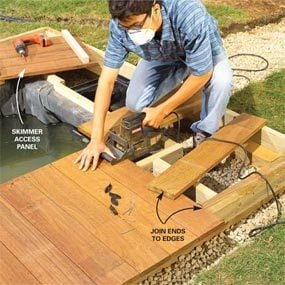
Photo 19: Finish install the decking boards
Install the rest of the decking boards on both sides of the access panel. Join the ends of decking to the edges of decking running the opposite direction with EB-TY biscuits to keep everything aligned and flat. Snap lines along the edges of the deck and trim the perimeter with a circular saw for straight edges.
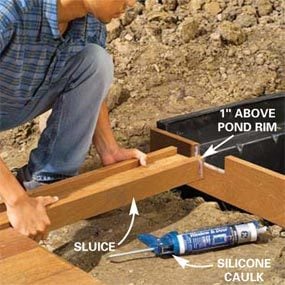
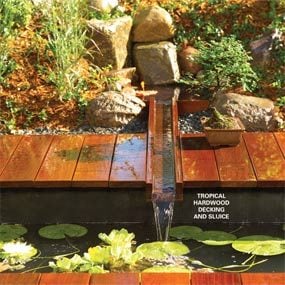
Photo 20: Build the sluice
Rip a 5-ft. long deck board for the two sides (see Figure B), then caulk and screw it to the sides of another 5-ft. long deck board to form the sluice. Cut a length of decking to fit the width of the biofilter spillway. Clamp it in place and use a level to mark the sluice slot. The bottom of the slot should be 1 in. higher than the pond rim. Remove the board, cut the slot, then caulk and screw the board to the biofilter. Attach the sluice to the opening with silicone.
Our boardwalk is made of a tropical hardwood named Ipe. At twice the price of 5/4 x 6 standard decking cedar or about the same price as clear cedar, it’s not for everyone. Because the wood we chose is so clear and beautiful, we decided to use an invisible fastening system called EB-TY so unsightly screw- or nailheads wouldn’t mar the appearance. If you don’t want to use this system, stainless steel trim head screws would be another good option. The EB-TY system is a variation of standard plate joinery with plastic biscuits substituted for wooden ones.
You’ll need a plate joiner to cut the slots into the decking edges for the biscuits. Then you slip the plastic biscuits into the slots and screw them into the joists with the stainless steel screws included with the kit. Biscuits are also added to the deck boards overhanging the pond but are not secured to any joists. They further support the overhang and keep the decking aligned. Deck boards that aren’t biscuited to neighboring boards need to be face screwed.
Buy a Biofilter, or Drain and Scrub
You have a decision to make about how much time you want to spend caring for your pond. We purchased a pond kit that included the liner pad, liner, pump, hose, skimmer and biofilter for about $1,400. You can also purchase all the parts separately over the Internet or at larger garden centers. The biofilter contains bacteria that cleanse the water of the nutrients that feed pond-choking algae. The system is reasonably easy to install and keeps your pond clean and balanced.
The kit makes the pond virtually maintenance free. Here’s how the system works: Water flows from the pond into the skimmer where mesh catches larger debris. At the bottom of the skimmer, a pump sends the water to the biofilter, where it rises through the filter. Now clean, the water flows out the basket to run down the sluice and back into the pond.
For a cheap alternative to the biofilter system, drain the pond a few times during the summer with a sump pump and scrub the algae from the bottom and sides. Refill the pond with fresh water.
Fish waste will accelerate algae growth, so you’ll reduce the work by banning fish from your pond. You’ll still have to buy the liner pad, the liner and a small pump if you want to put in a sluice. The pump can rest on the bottom of the pond with a water line leading under the boardwalk to the top of the sluice. Take care to choose a pump that can lift water at least 6 ft.
Additional Information
Required Tools for this Project
Have the necessary tools for this DIY project lined up before you start—you’ll save time and frustration.
- Biscuit joiner
- Caulk gun
- Chalk line
- Circular saw
- Cordless drill
- Drill bit set
- Hammer
- Hearing protection
- Level
- Miter saw
- Safety glasses
- Screw gun
- Spade
- Speed square
- Tool belt
- Utility knife
- Wheelbarrow
Required Materials for this Project
Avoid last-minute shopping trips by having all your materials ready ahead of time. Here’s a list.
- 1/4 x 3" lag screws with washers (40)
- 16d galvanized box nails
- 2 x 2 stakes
- 2-in. deck screws
- 2x4 10' (1)
- 2x4 10' (6)
- 2x4 8' (15)
- 2x4 8' (2)
- 2x6 10' (1 )
- 2x6 8' (2)
- 3-in. deck screws
- 3/4" gravel (2.5 yds.)
- 3/4" plywood 4x8 (3)
- Access panel framing (treated) 2x2 8' (1)
- Biofilter
- Decking 5/4 x 6 8' (23)
- EB-TY deck fasteners (200)
- End grade beam ledgers (treated) 2x6 10' (2)
- End grade beams (treated) 4x4 8' (2)
- End pond ledgers (treated) 2x4 10' (1)
- Garden hose
- Landscaping paint
- No. 20 biscuit slots
- Outrigger joists (treated) 2x4 10' (2)
- Pond liner
- Sand (5 yds.)
- Side grade beam ledgers (treated) 2x6 12' (2)
- Side grade beams (treated) 4x4 12' (2)
- Side pond ledgers (treated) 2x4 10' (2)
