
Installing Kitchen Backsplash and New Vent Hood
Updated: Jan. 30, 2023Get a bright, refreshing look in one weekend—with no major mess or disruption
- Time
- Complexity
- Cost
- Multiple Days
- Beginner
- $501-1000
Step 1: Project Overview
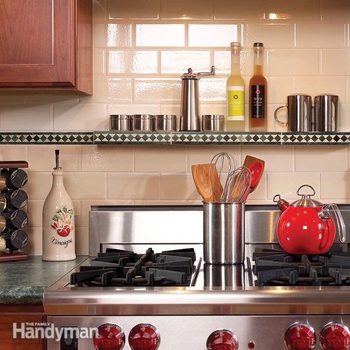
You don’t have to do a complete remodel of your kitchen to add new life to it. The two projects in this article—a tile backsplash and a new range hood—can quickly and dramatically transform a dull kitchen. In most cases, you can complete the tile job in a weekend, but ours took about three days because of the added shelf above the range. And here’s a home improvement project that doesn’t take a lot of skill—you just need patience and attention to detail.
The chimney-style hood we installed creates a stylish “chef” look in a kitchen. New, pro-level gas ranges require more ventilation, so if you’re in the market for one, this is your opportunity to upgrade your range hood too. We don’t get into hood installation details in this story, but whatever hood you choose will come with step-by-step instructions.
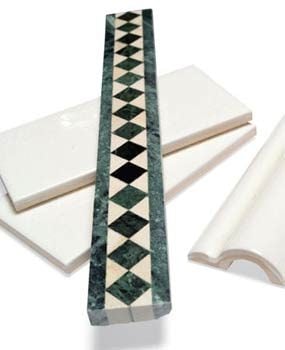
We chose a classic 3 x 6-in. New York subway-style tile with patterned stone trim pieces that matched our countertop color. The shelf above the range is perfect for setting seasoning containers on while you’re cooking. This design feature should only be used for a range that has a panel backsplash or heat deflector built into it.
To have as much space as possible for our tile design, we chose new countertops that didn’t have the typical built-in backsplash. But you could also tile above such backsplashes with equally great results.
The only special tools you’ll need are a notched trowel, a margin trowel for mixing, a tile saw to cut tile around electrical boxes and at corners, and a level to draw layout lines.
Step 2: Remove the old vent and cabinet
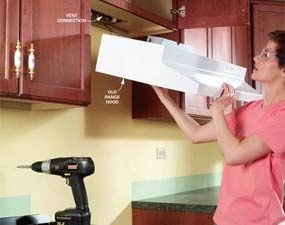
Photo 1: Remove the range hood
Shut off the power to the range hood, disconnect the electrical and vent connections, and remove the mounting screws for the old hood. Slide it out carefully to prevent damaging the side cabinets.
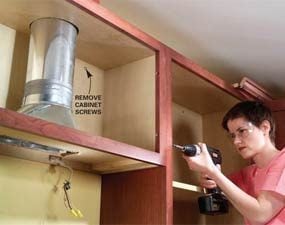

Follow the photo sequence to see how to remove the old vent and cabinet.
Step 3: Prep the walls to maximize tile adhesion
Wash the walls of the backsplash with a non-sudsing cleaner like Soilax or TSP and thoroughly rinse with clear water to remove any residue. In most cases, after washing you can sand the wall with 100-grit sandpaper to slightly roughen the surface of the paint. If you live in a house built before 1978, the paint may contain lead. Instead of sanding, use a paint deglosser to remove the shine and improve adhesion. Paint deglossers are available at paint stores.
Before you tile, protect the surface of the countertops, because the thin-set mortar and the backside of the tiles are abrasive. We bought ordinary kraft paper (Photo 4) and taped it to the countertops. Keep the tape about 3/16 in. away from the wall so you’ll be able to remove it easily at the end of the job.
Step 4: Plan your tile layout
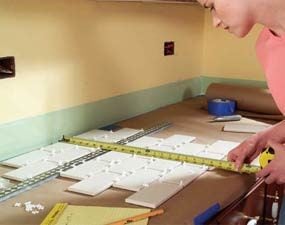
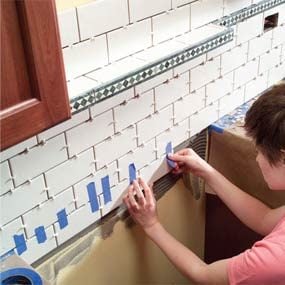
Photo 4: Decide on a layout
Lay out a section of the countertop design with the tile spacers. Take accurate measurements of sections of the tile to determine the best starting and ending points. You may have to shift your design from side to side or up and down a bit to avoid unsightly small pieces at the ends.

The tile you choose and the dimensions of your backsplash area will dictate your layout. Here are a few suggestions to get your layout to work:
- Sketch your backsplash design on graph paper and figure the amount of tile you need. Buy an extra 10 percent to make up for cutoffs and any goofs you might make while cutting.
- Once you get your tile, lay out a section of it complete with spacers (Photo 4) to see the amount of coverage you’ll get with your tile.
- Measure the backsplash area again from side to side and bottom to top to make sure your pattern will work. You want to avoid having pieces smaller than an inch at the top and the ends. Small pieces are difficult to cut and make the project look amateurish.
- You may want to shift the pattern to avoid complicated cuts around electrical outlets and other obstructions.
- Remember to allow space for a caulk joint at inside corners; this can affect the size of pieces as well. Once you have your layout, transfer guidelines onto the wall with your level and square. The lines will act as a general guide, so don’t plot every tile.
Step 5: Mix the mortar to a toothpaste consistency
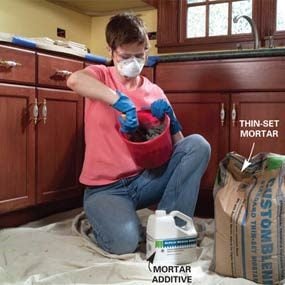
We chose thin-set mortar rather than a mastic adhesive because thin-set is heat resistant and forms an excellent bond. It’s very easy to mix: Just add water and an acrylic-bonding agent in equal amounts to the powder until you get a smooth mix the consistency of toothpaste. The bonding agent improves the durability and flexibility of the mortar. Get it from your tile supplier. When the mixture is free of lumps, let it stand for about 10 minutes to allow the chemical reaction to take place. Spread the mortar onto the wall with your notched trowel. We chose a 1/4-in. notched trowel for our tile. Ask your tile supplier what will work best for the tile you chose. In addition to a full-size trowel, I like to use a smaller version for backsplashes because it’s easier for me to handle in tight spaces.
Step 6: Push your tile into the mortar
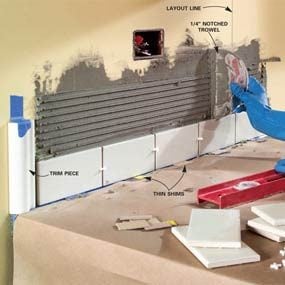
Photo 7: Spread the mortar
Draw a level line on the wall for your first course and use thinner spacers (about 1/16 in.) near the countertop. Check the tops of the first row with a level to be sure they’re even. Trowel the thin-set mortar onto the wall as you go—don’t get far ahead of yourself or it will dry out.
Following your layout lines, start pushing your tile into the mortar one piece at a time as shown in Photo 7. Don’t spread too much mortar onto the wall and get ahead of yourself. The mortar will start to dry and reduce the adhesion. Generally it’s best to spread the adhesive for only about 10 pieces of tile until you get the hang of it and can increase your speed. If the mortar skins over and dries, scrape it off and apply fresh mortar.
If you’re setting bisque tile, give each tile a quick dunk in a pail of water before setting it into the mortar. Bisque tile (usually a terra cotta color on the backside) is highly porous and will pull too much water out of the mortar, causing it to dry too quickly and form a weak bond. If you’re using porcelain or stone tile, just press it into the mortar without dunking.
To keep the caulk joint small (about 1/16 in.), use thin tile shims at the countertop seam with the first course. I used pieces of thin cardboard cut from the back of a tablet, but thin shims are available from your tile supplier. Be fussy with the first row of tile. Check the tops with your level to make sure the tiles are perfectly aligned.
Insert the tile spacers as you go (Photo 8) to keep the tiles from sagging into each other, and don’t worry about small globs of mortar oozing between the tiles. You can always go back a few hours later and knock them loose with a putty knife or chisel. Continue spreading mortar, cutting the end pieces and adding courses.
Step 7: Use a wet saw to cut tile around electrical boxes

Photo 9: Rough cut electrical boxes
Trapped cutouts, like this electrical box contained within a single tile, require multiple cuts every 1/2 in. across the tile.

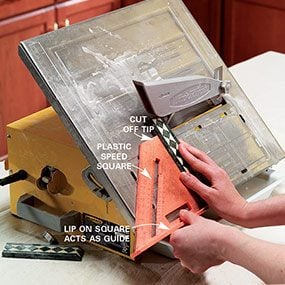
Shut the power off to your backsplash receptacles and unscrew and pull out the devices so they won’t get in your way as you measure and cut around them. There’s no real trick here other than measuring and marking the tile so it’s even with the edges of the box. First mark the cutout on your tile with a fine-tip permanent marker so the lines won’t wash away on the wet saw (Photo 9). When cutting pieces to fit into the corners, ease the sharp edges of the cuts with a tile stone (available at your tile supplier).
Note: In most cases, your tile and mortar will protrude past the electrical boxes 1/4 in. or more, so you’ll need to add box extenders to each receptacle and switch box once the tiling and grouting are complete. Both metal and plastic box extenders are available at home centers. I prefer the plastic type because it’s easier to trim to fit.
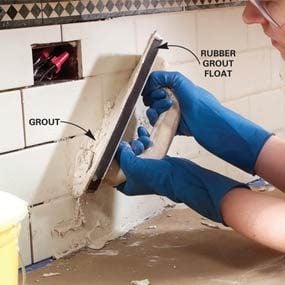
Step 8: Push the grout into the spaces
Once the mortar has set overnight, remove the spacers and go back with a putty or utility knife and clean the clumps of oozing mortar from the tile and spaces between. Also clean out the excess mortar under the first course of tile at the countertops to leave space for caulk. Once the backsplash is cleaned off, thoroughly vacuum the entire shelf and countertop before grouting. If you fail to get all the excess mortar scraped away, the grout will be discolored at those spots.
Mixing grout is similar to mixing thin-set mortar. Follow the manufacturer’s instructions. Some types of grout need an acrylic additive; others don’t. Mix just what you can apply in about 20 minutes so it doesn’t dry out. Usually about a quart of grout (mixed) works best. Acrylic additives shouldn’t be used with some natural-stone tile to avoid staining the stone, so check with your tile supplier.
Push the grout into the spaces between the tiles with a grout float. Hold the float at a 45-degree angle to the tile and push firmly across the tile surfaces. For stubborn, hard-to-get- at spots in corners, you may need to push it in with your fingers. Use the float to wipe away any excess grout and then scrape it back into your bucket. Divide the project into manageable chunks. You don’t need to grout the whole project at one time.
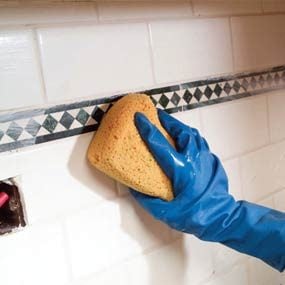
After about 15 minutes or so, you should start sponging the tile surface to remove the grout. I like to use two 5-gallon buckets of water and wring out the sponge in one of the buckets and have a relatively clean water rinse in the other bucket. Be sure to wring out the sponge well so you won’t add a lot of water to the grout as it sets. Too much water will weaken the grout mixture. Wipe the surface at least three times and check for haze once it dries. With shiny glazed tiles, you can always go back and wipe the haze off with a clean cotton cloth once the grout is set, but stone or porous tile must be wiped clean before the grout sets.
Note: If you choose stone or tile with a dull finish, you may need to seal it before grouting. This keeps the grout from being absorbed into the tile and forming a stubborn haze.
Tip: Never pour excess mortar or grout down your drain. You’ll have a huge plumbing bill and a lot of headaches if it hardens down there. Just throw the excess mortar into the trash and clean the bucket with a stiff brush. For your rinse buckets, let the grout or mortar settle to the bottom, pour off the water at the top and scoop the thick waste at the bottom into the trash.
Step 9: Caulk the seam between the tile and the countertop
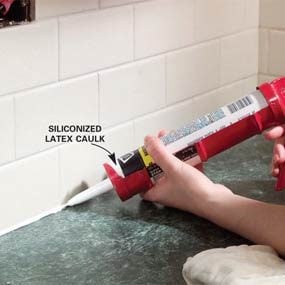
Once the grout has set for a couple of hours, remove the protective paper and tape from the countertops. Clean the countertop seam with a knife and then vacuum the bits of dried grout. Caulk the seam with a siliconized latex caulk and wipe the excess away with a clean cloth to get a small profile joint. You may need to wipe several times with a damp cloth to get the desired effect.
Step 10: Install the new range hood
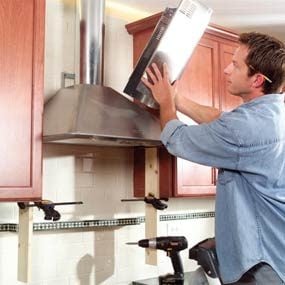
Photo 15: Install the range hood
Install your new range hood following the manufacturer’s instructions.
Follow the instructions that come with your new range hood. You may need special ducting reducers or enlargers to adapt the hood to your ducting. Be sure to anchor it firmly to the wall with wall anchors and follow the wiring diagrams. Most chimney-style hoods have a sleeve at the top that is adjustable to a variety of heights. We installed our hood (Photo 15) so the bottom is 29 in. above the cooktop.
Step 11: Building the shelf
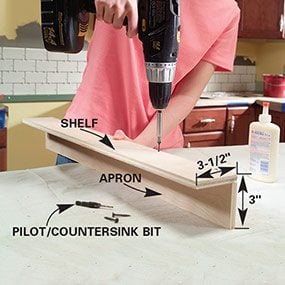
Photo 1: Assemble the shelf
Glue and screw the lower shelf to the apron with 1-5/8 in. screws. Use a pilot and countersink combination bit to predrill the holes.
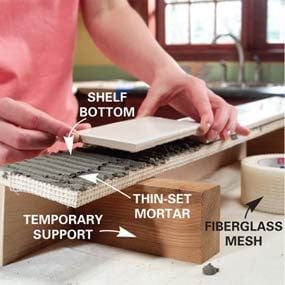
Photo 2: Mortar the plywood
Fold fiberglass mesh over the front of the shelf and apply thin-set mortar to the bottom of the shelf. Set the tile.
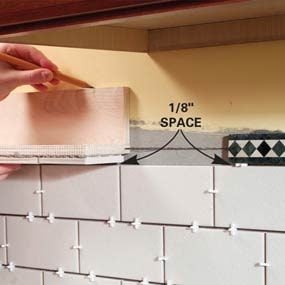
Photo 3: Mark the shelf location
Center the shelf assembly in the range opening and mark the center of the shelf even with the center of the patterned trim tile.
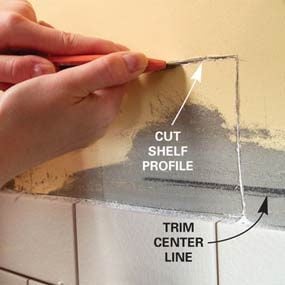
Photo 4: Remove the drywall
Cut out the drywall along your traced outline using a new blade in your utility knife, making several passes.
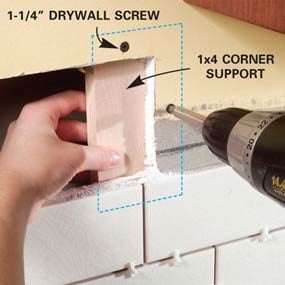
Photo 5: Add extra support
Slip a board behind the drywall at the corners for extra backing support, then glue and screw it in place.
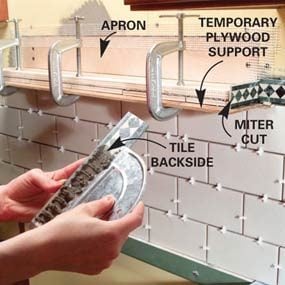
Photo 6: Screw the shelf to the wall
Screw the shelf apron to the studs. Clamp a 1/4-in. piece of plywood onto the bottom of the shelf to support the trim tiles.
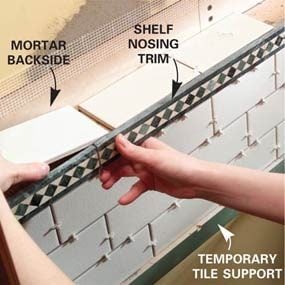
We made our shelf above the stove by applying tile to 1/2-in. plywood. We chose the length so it would fit nicely above the stove once the wall was tiled on both sides. The apron section of the shelf replaces the drywall underneath and is screwed directly to the studs and at the corners as shown in Photo 6. To make the bottom of the shelf easier to tile, tile it first, let the mortar set overnight and install the shelf the next day. If you choose narrower or wider shelf trim, you may need to change the thickness of the plywood.
CAUTION!
This shelf is designed for ranges with a heat deflector backsplash, so plan your shelf to be at least 12 in. above the countertop and limit it to just a 3-in. projection to keep it from trapping excess heat coming off the range. This design will accommodate most freestanding ranges.
Required Tools for this Project
Have the necessary tools for this DIY project lined up before you start—you’ll save time and frustration.
- Cordless drill
- Grout float
- Level
- Nippers
- Notched trowel
- Utility knife
Tiling sponge
Tile saw
Required Materials for this Project
Avoid last-minute shopping trips by having all your materials ready ahead of time. Here’s a list.
- Acrylic caulk
- Grout
- Thin-set mortar
- Tile
- Tile spacers
