
How to Replace a Sink Base Cabinet Floor
Updated: Sep. 02, 2021
Clean up the moldy mess under the sink.

Introduction
The flimsy particleboard bottoms in most kitchen and bathroom sink bases are often swollen and moldy from leaks. The best fix is to cut them out and replace them.Tools Required
- Caulk gun
- Circular saw
- Cordless drill
- Countersink drill bit
- Framing square
- Jigsaw
- Paintbrush
- Pipe wrench
- Safety glasses
- Slip joint pliers
- Tape measure
Materials Required
- 1-1/4-in. galvanized screws
- 1/2-in. exterior grade plywood
- Caulk
- Urethane varnish
Replacing the floor
Let’s face it—it’s easy to get water on the floor of your sink base cabinet. We’ll never understand why cabinetmakers use particleboard for the base, but they do. And once it starts swelling, your only option is to replace it. But you don’t have to cut out the entire bottom. Here’s an easier way to install a new sink base bottom.
Project step-by-step (3)
Remove the middle section
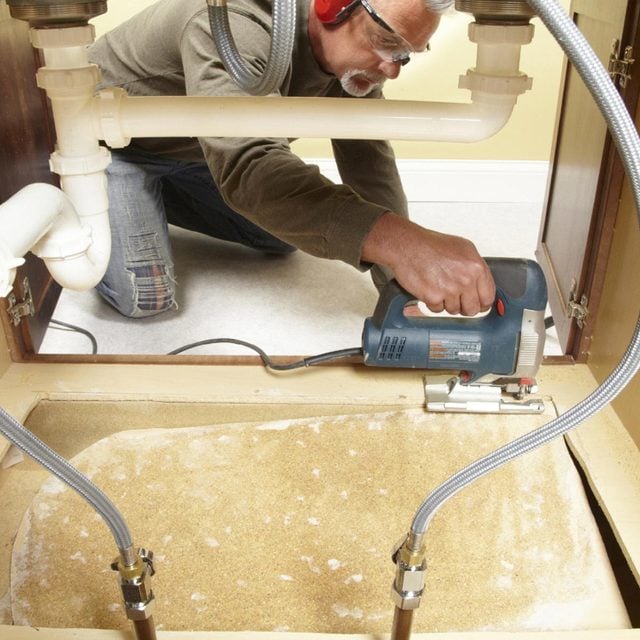
Drill a 3/4-in. hole in each corner of the traced cutout line. Then run your jigsaw along the line. Remove the old, swollen floor. Remove the drain lines (and garbage disposer, if there is one) to get maneuvering room. Then trace a cutting line about 3 in. in from all four edges. Then cut out the middle section of the swollen sink base with a jigsaw. Next, cut a piece of 1/2-in. plywood to the interior size of the sink base. Cut slots for the water supply tubes. Seal the edges and face of the plywood with urethane varnish. Also check out: 11 Pitfalls of Sink Replacement.
Drop in the new floor and screw it into place

Predrill holes around the perimeter using a countersink bit. Then install brass-colored drywall screws. Then install the new plywood floor and fasten it to the old floor.
Caulk around the edges
Caulk around the edges and pipes to prevent water from seeping under the new floor. Finally, reattach the P-trap and garbage disposer. Next, check out out tips for caulking here.