
Convert Wood Cabinet Doors to Glass
Updated: Jan. 02, 2020Add a designer touch to your kitchen in a few hours with glass cabinet doors

- Time
- Complexity
- Cost
- A full day
- Intermediate
- $51–100
Glass Cabinet Doors Step 1: Rout out the wood panel
Glass front cabinet overview
A pair of glass cabinet doors can add a designer touch to any kitchen. They can turn an ordinary cabinet into a decorative showcase or simply break up an otherwise monotonous row of solid doors. We recommend this alteration only for frame-and-panel cabinet doors (see Figure A), where you can replace the inset wood panels with glass to make kitchen cabinets with glass doors. Converting the two doors shown here took about two hours.
To get started on glass cabinet doors, remove the doors from the cabinets and remove all hardware from the doors. Examine the back side of each door; you might find a few tiny nails where the panel meets the frame. If so, gouge away wood with a utility knife to expose the nail heads and pull the nails with a pliers. Look carefully; just one leftover nail will chip your expensive router bit.
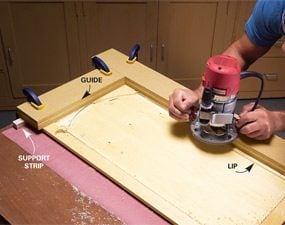
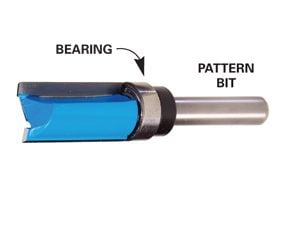
Cut away the lips using a router and a 1/2-in. pattern bit (Photo 1). A pattern bit is simply a straight bit equipped with a bearing that rolls along a guide. Most home centers and hardware stores don’t carry pattern bits. To find a retailer, check the yellow pages under “woodworking” or order one at www.pricecutter.com. Be sure to choose a bit that has the bearing on the top, not at the bottom.
Use any straight, smooth material (solid wood, plywood or MDF) to make two 3-1/2-in.-wide guides. To allow for the 1-in. cutting depth of our pattern bit, we nailed layers of plywood and MDF together to make 1-3/8-in.-thick guides. Position the guides 1/2 in. from the inner edges of the lips and clamp them firmly in place over the door. Support the outer edges of the guides with strips of wood that match the thickness of the door to keep them level (Photo 1). Before you start routing, make sure the door itself is clamped firmly in place.
Set the router on the guide and adjust the cutting depth so that the bit just touches the panel. Cut away the lips on two sides, then reposition the guides to cut away the other two. With the lips removed, lift the panel out of the frame. If the panel is stuck, a few light hammer taps will free it.
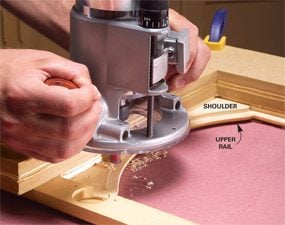
If your door frame has a rectangular opening, it’s now ready for glass. If it has an arched upper rail, cut a square recess above the arch (Photo 2). This allows you to use a rectangular piece of glass rather than a curved piece (curved cuts are expensive).
Figure A: Panel Door Profile
Most cabinet doors are made like this one: A raised or flat panel fits into grooves in the rails-and-stile frame. To remove the panel, just cut away the lips on the back side of the door.
Glass Cabinet Doors Step 2: Set the glass
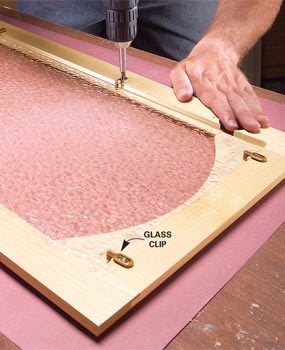
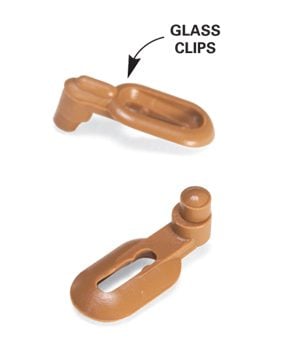
Simply lay the glass in and anchor it with glass clips (Photo 3). Clips are available from the glass supplier or at www.woodworkershardware.com. If the glass rattles in the frame, add pea-size blobs of hot-melt glue every 12 in.
Buying Glass
Most hardware stores carry clear glass ($3 per sq. ft.) and will cut it for free or a small fee. Ask for 3/16-in.-thick “double strength” glass. Order glass panels 1/8 in. smaller than the recess in the frame. To find tempered, textured or colored glass (more expensive), check online. We bought clear textured glass and paid the supplier extra to have the two panels tempered. Building codes require tempered glass for locations within 5 ft. of the floor.
Required Tools for this Glass Cabinet Doors Project
Have the necessary tools for this glass cabinet doors DIY project lined up before you start—you’ll save time and frustration.
- Clamps
- Drill/driver - cordless
- Router
- Utility knife
Required Materials for this kitchen cabinets with glass doors Project
Avoid last-minute shopping trips by having all your materials ready ahead of time for a glass cabinet doors project. Here’s a list.
- Glass
- Glass clips
