
Installing Tile Countertops
Updated: Jun. 02, 2023
Complete how-to for laying a tile countertop and backsplash, from preparing the surface to cutting and placing the tile in mortar, grouting, sealing and maintenance.
Multiple Days
Intermediate
Varies
Introduction
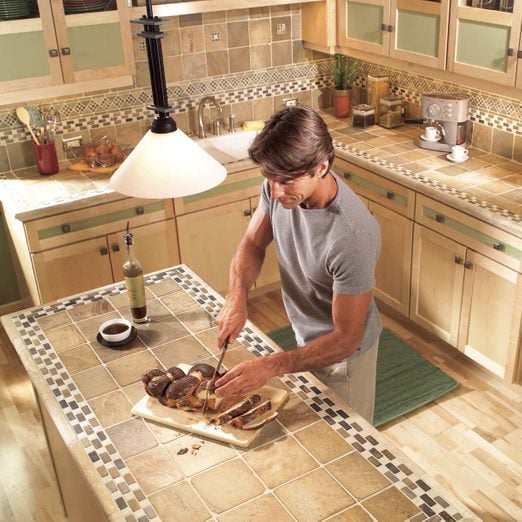
Give your countertops and backslash the timeless beauty of stone for a modest price. We'll show you everything you need to complete a DIY tile job in your kitchen, from prepping the surface to setting the tile to caring for it after it's installed. Whether you want an intriguing pattern that intermixes several shapes and colors, like we did, or a simple design, we'll show you how to get the job done right.Tools Required
- 4-in-1 screwdriver
- Bucket
- Caulk gun
- Chalk line
- Circular saw
- Clamps
- Cordless drill
- Drill bit set
- Framing square
- Grout float
- Hammer
- Jigsaw
- Level
- Nippers
- Notched trowel
- Pneumatic stapler
- Straightedge
- Tape measure
- Taping knife
- Tile saw
- Utility knife
Materials Required
- 1-1/4 in. galvanized nails
- 1-5/8-in. screws
- Cement board
- Construction adhesive
- Fiberglass tape
- Grout
- Grout sealer
- Sealer
- Thin-set mortar
- Tile
Installing Ceramic Tile Kitchen Countertops Starts with Selecting Your Tile
Stone tile
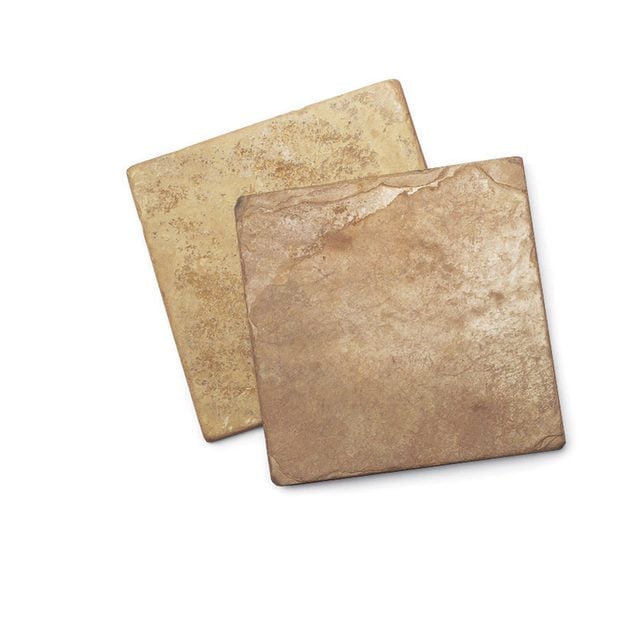
We used stone tile for this ceramic tile kitchen countertops project. Want to give your kitchen a timeless natural beauty? Put in your own tumbled stone or ceramic tile countertops and backsplash. You can choose any tile, any color and any size, but if all the choices seem daunting, do what we did. We chose a natural slate tile with predesigned accent pieces and a marble edge for a custom look. Setting kitchen tile is a project that’s definitely within reach of the average do-it-yourselfer. In this article, we’ll show you how to build your countertop from start to finish.
Our project took three days, but you might want to reserve more time. Also, plan on eating sandwiches or take-out during the process, since your kitchen will be down for several days. And don’t even think about starting it until all your tile and the new sink and faucet are on hand so you won’t have downtime waiting for special orders.
We purchased our stone tile at a specialty tile shop, which gave us the option of design help and choices we wouldn’t have considered, but you can also cruise the aisles of your home center for inspiration. We purchased all the plywood, cement board, thin-set mortar, grout and hand tools at a home center while we waited for our tile order to arrive.
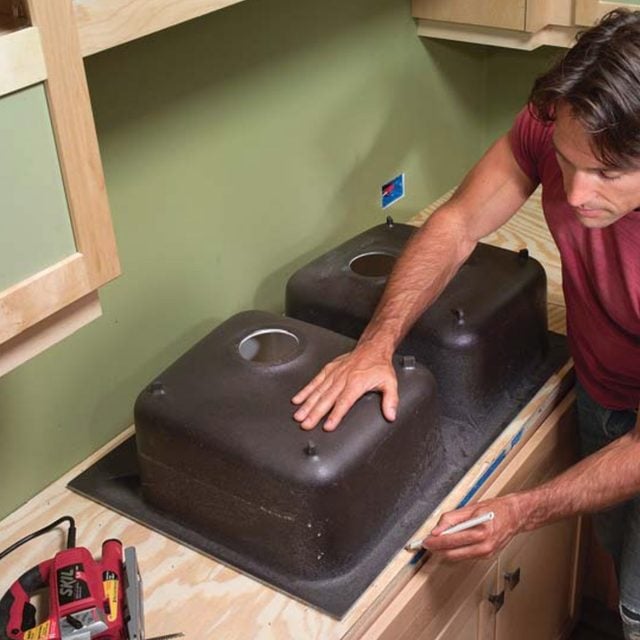
This project features a special “tile rim” cast iron sink. It rests on top of the cement board and plywood, leaving about a 3/8-in. squared edge so your tile sits perfectly flush with the top edge of the sink for a nice, even, wipe-clean surface.
Project step-by-step (17)
Determine your cabinet dimensions
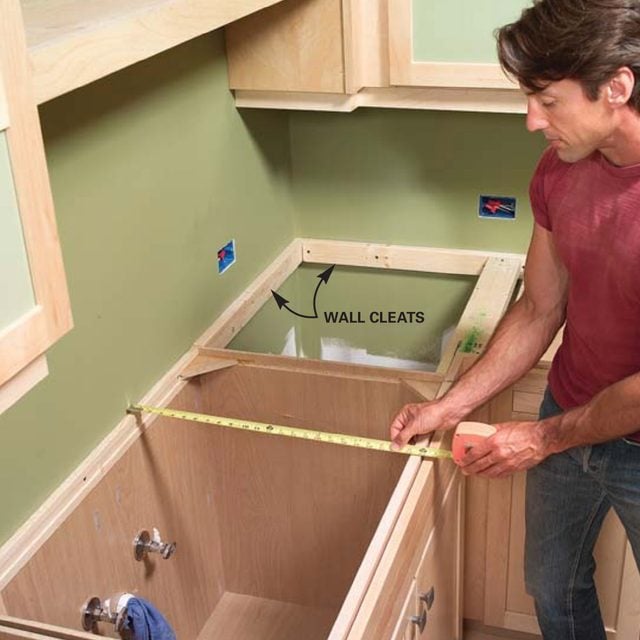
Measure your cabinets from the wall to the front edge of the face frame, then measure left and right. Install support cleats along unsupported edges.
Install plywood countertops
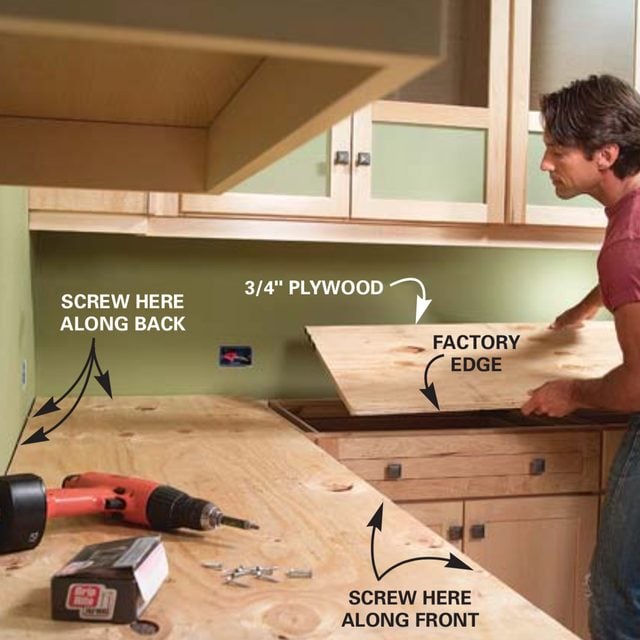
Cut your plywood and screw it to the tops of the cabinet with 1-5/8 in. screws. Keep the front edge even with the face frame.
Install a second layer of plywood
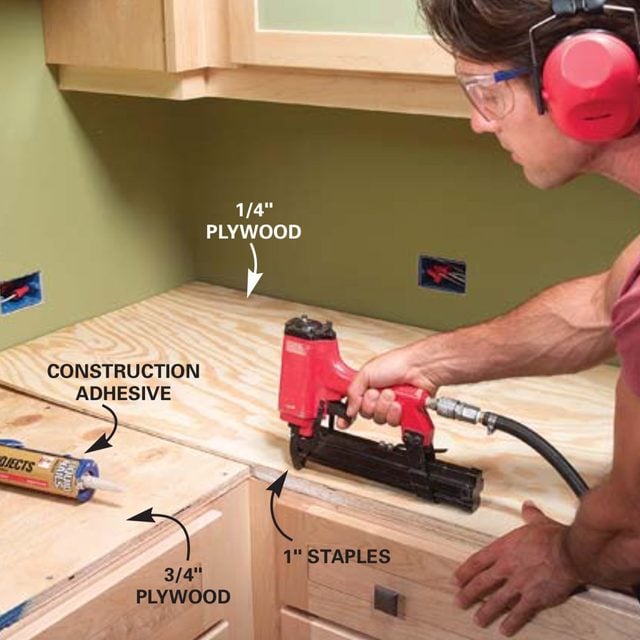
Glue and staple another layer of plywood (1/4 in.) over the 3/4-in. plywood if necessary to build up the thickness to match the edge tile.
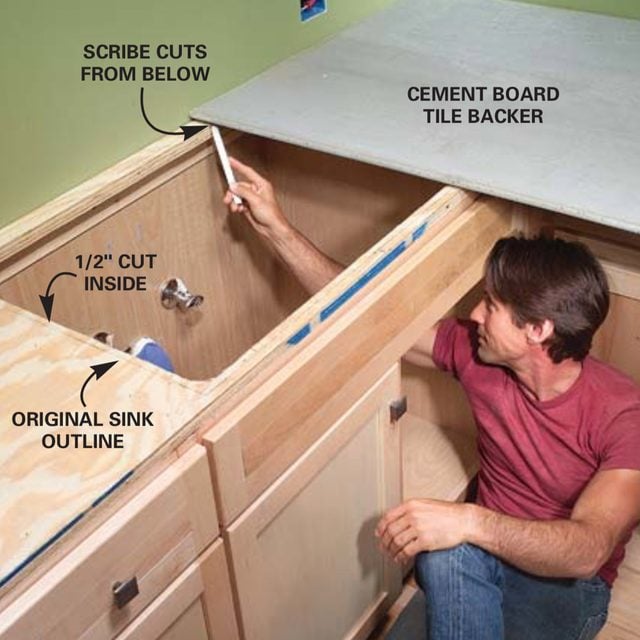
Trace the sink and cut out the opening
Center the sink in the sink base cabinet and trace the perimeter. Draw another mark 1/2 in. inside this mark, radius the corners and cut it out with a jigsaw.
With the old countertop stripped completely off, and the wall behind in good condition, measure your cabinets from the back wall to the front edge of your face frame. If you have frameless cabinets, measure to the front just behind the doors or drawer fronts. Subtract 1/8 in. from the measurement to allow for slight deviations in the wall and then measure the length. Transfer the measurements to the plywood and cut it with a circular saw and a straightedge guide for a clean, even cut.
Before you screw the plywood to the top of the cabinets, attach 2×2 wall cleats to the studs where there isn’t any cabinet support. If you have a dishwasher opening, cut thinner 1×3 pine to length and screw it to the studs to make sure you’ve got plenty of room for the backside of the dishwasher.
Choose screws that will penetrate the drywall and go into the studs about 1 in. Longer screws could hit water pipes or electrical wires behind the wall. Screw the plywood (drill a pilot hole) to the face-frame fronts every 8 in. and along the back of the cabinets and into the cleats as well. Be sure you have a nice, even front edge; a small gap in the back against the wall won’t matter.
Our front marble edge measured 1-7/8 in. high, so to keep the edge from interfering with the drawer fronts, we added a layer of 1/4-in. plywood. If you need to do the same, lap the 1/4 in. over the previous seam of 3/4-in. plywood near the corner for extra strength. Lay several beads of construction adhesive between the plywood sheets for a permanent bond. Staple the top layer to the one below with 1-in. staples. If you don’t have access to a stapler, use 1-in.wood screws and drive them in with your power screwdriver. Be sure the pieces are fastened every 6 in. and that there aren’t any humps in the plywood.
Next, set your sink onto the plywood top and position it carefully with your tile layout in mind (remember, you’ll be adding 1/2 in. of cement board and tile to the front edge and a layer of tile on the backsplash). Then mark it, allow for the sink rim and cut it out.
Add a solid tile backer for a permanent installation: Mark the cement board for cutting
Set the cement board onto the plywood and trace the shapes with a fine-tip marker or carpenter’s pencil.
Use a jigsaw to cut the cement board
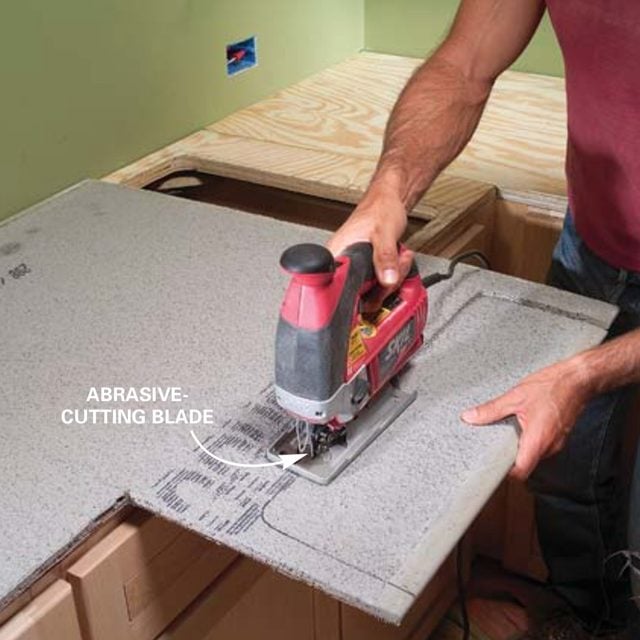
Cut the cement board with your jigsaw outfitted with an abrasive-cutting blade.
Buying Countertops: Plastic Laminates, Granite, and Solid Surfaces
Trowel mortar onto the countertop
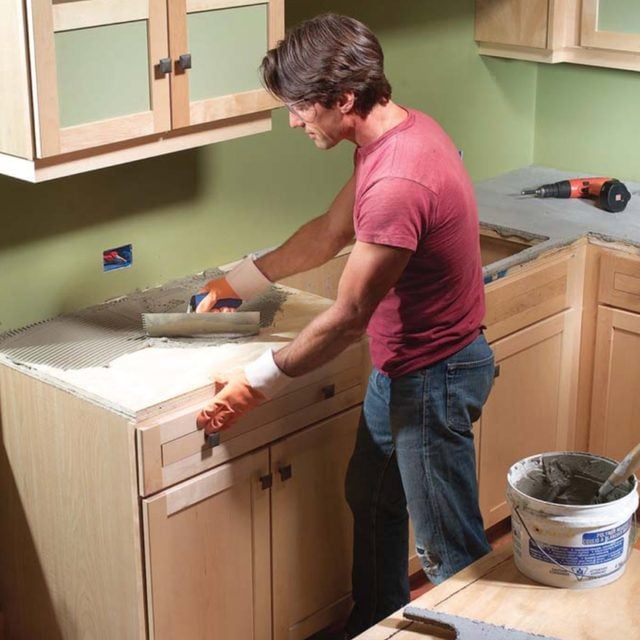
Spread a thin layer of thin-set mortar over the plywood with a 1/4-in. notched trowel. Embed the cement board into the mortar and screw it to the plywood with cement board screws.
Install cement board along the counter edges
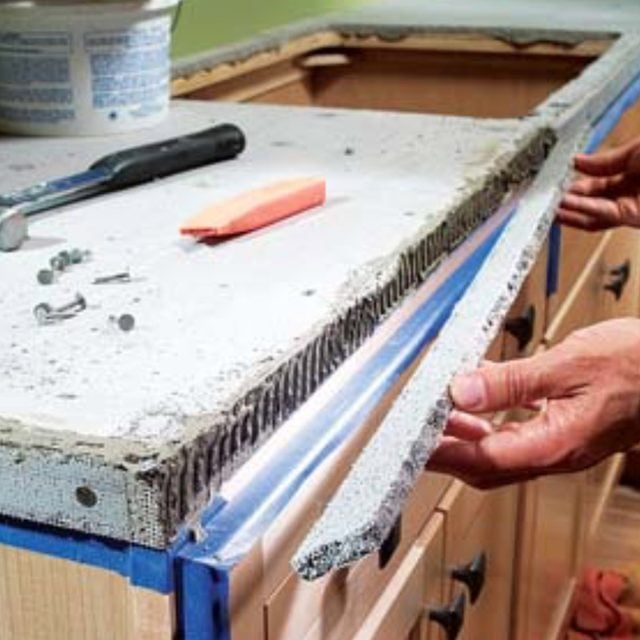
Score and snap thin strips of cement board and embed them into thin-set mortar along the edges. Nail the strips with 1-1/4 in. galvanized nails.
Tape the corners and edges
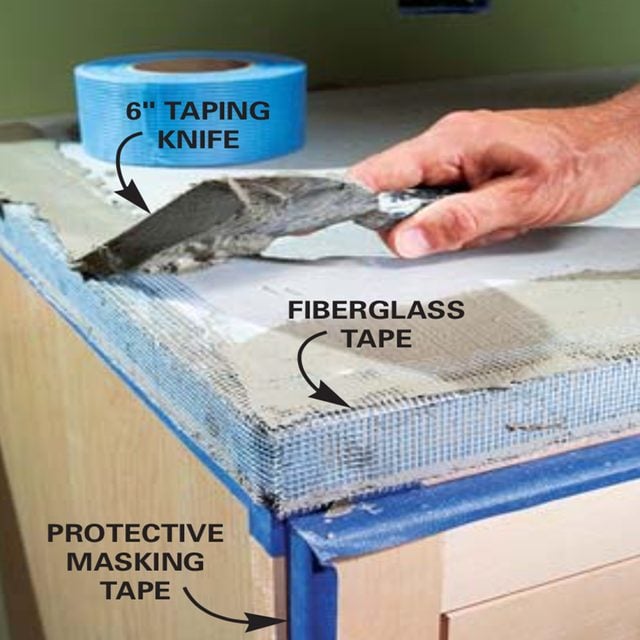
Reinforce the outside corners and edges with strips of fiberglass tape. Embed the tape with a thin, even topping of thinset mortar.
Home centers and tile shops carry several choices for tile underlayment. My favorite is old-fashioned cement board. This stuff is dense and impervious to water, and it will last for decades. It may be a little more difficult to work with than other materials, but it cuts fairly easily once you get the hang of it.
The secret to a solid foundation for tile is to bond the cement board to the plywood below. Mix up a batch of latex-fortified (check the label) thin-set mortar to a soft, mashed potato consistency. Trowel it onto the plywood with a 1/4-in. notched trowel and then embed the cement board right into the mortar. Screw it every 8 in. to the plywood below with 1-1/4 in. cement board screws. The mortar will fill any voids between the surfaces and bond them into a monolithic surface.
To cut narrow strips of cement board, score both sides and gently pry up the edge. Once the top surface is covered, cut cement board strips to cover the exposed plywood edge. Again mix a small batch of thin-set mortar, spread it over the plywood edge and push the cement board into the edge. Nail the edge (Photo 8) every 6 in. to hold it in place. Next, apply fiberglass mesh tape over the corners. Just peel the mesh off the roll and press it over the corner edges. Once the mesh is in place, trowel a thin layer of thin-set mortar over it. Let the mortar set up for a few hours before continuing.
Check your layout and start tiling: Lay the tile on a bed of mortar
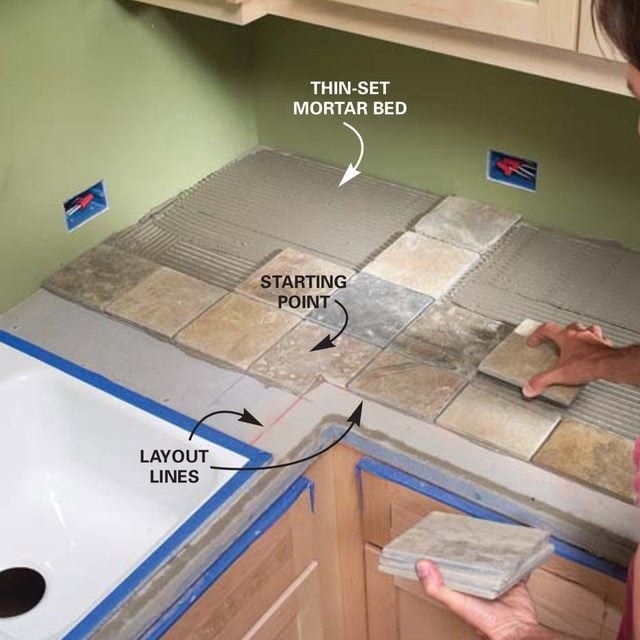
Snap chalk lines for your layout, then precut some of the field tiles to fit. Spread a bed of thin-set mortar with your 1/4-in. notched trowel and lightly press the tiles into place.
Never Use This One Cleaning Product on Your Granite Countertops
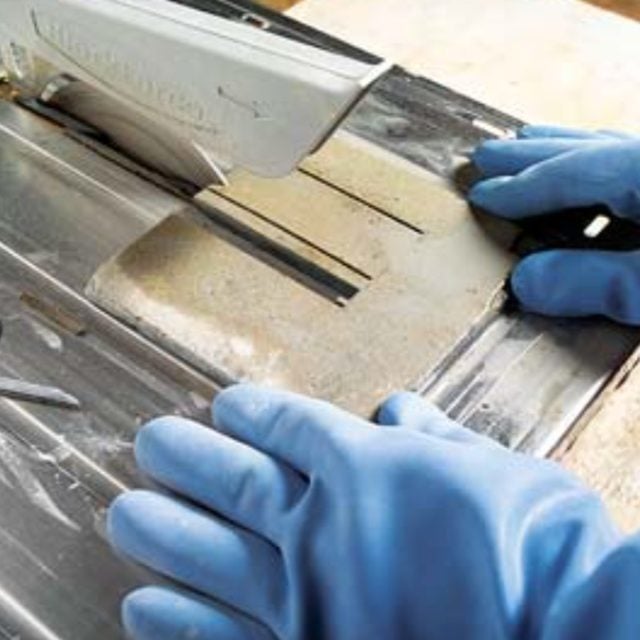
Use a saw to cut the tiles for your ceramic tile kitchen countertops
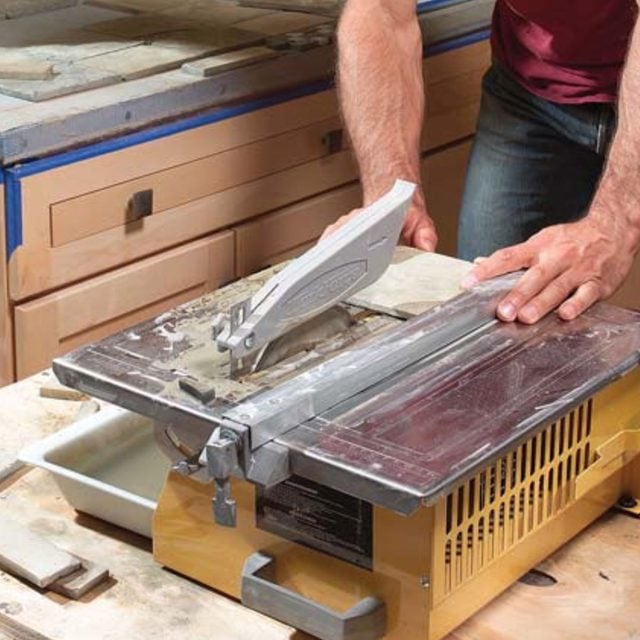
Cut the tiles to fit with a wet-cut tile saw. Push the tiles gently through the diamond blade; don’t force them.
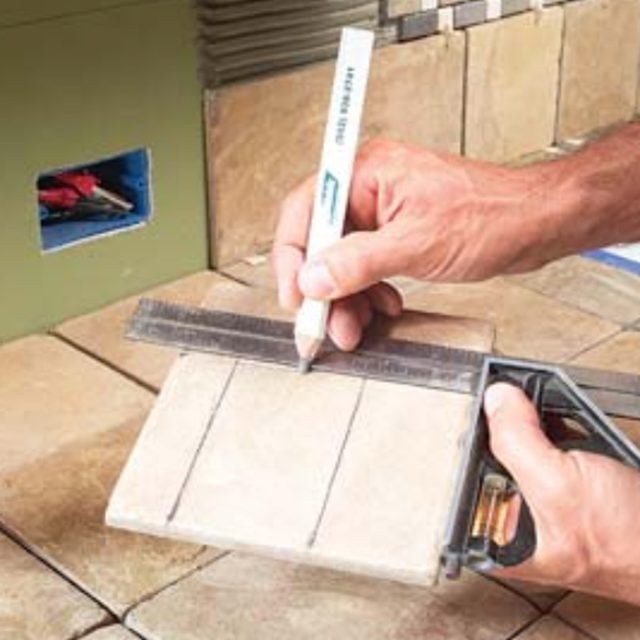
It’s best to draw lines right on the top using a framing square as a guide. Before you mix your thin-set mortar, place the tiles and determine grout line widths. If you have an inside corner like ours, start your pattern there so you’ll be sure it will track symmetrically from this point in both directions.
You’ll notice that we marked our decorative border coming out from the corner and then determined how much we needed to cut from the first row of field tile. Plan cuts and the positions to avoid thin pieces. Shift your pattern as needed.
Also check the backsplash layout at this time. Never have the grout lines “almost” match up with those in the countertop. It’ll look like a mistake. Either follow the grout lines of the countertop or offset them by half a tile. See what works best for your situation. From your layout, you’ll be able to predict several cuts that you can make ahead of time. Don’t precut all the tile. Wait and see how things look at the end of the run.
Mix some latex-fortified thin-set mortar in a plastic pail to a smooth, mashed potato consistency. Mix enough (about a quart) to cover about 6 to 8 sq. ft. at a time. Spread the mortar with a 1/4-in. notched trowel, leaving your layout lines exposed to guide the tile placement. Start setting the tiles. Place them on the mortar bed and lightly press them into place. Pay close attention to the grout spaces and use tile spacers if necessary to maintain even grout lines. Our slate tile varied slightly in size, so we decided to just “eyeball” the spacing to maintain about 3/16 in. between the tiles. It’s OK to shoot from the hip like this with a rustic-looking countertop like ours.
Once you’re finished with one section, take a close look at the tile, check the spacing and look for any crooked tiles or extra-wide or narrow grout lines. If it looks good, mix another batch of mortar and tackle the next 6- to 8-sq.-ft. section. Continue this until you lay all the field tile in place, and scrape away any excess mortar where you’ll be running the front accent border. Take a break.
Cutting the Tile or Stone
I rarely use a score-and-snap tile cutter these days, since wet saws are so available and cheap. Besides, most stone and thick, dense ceramics won’t cut with a score-and-snap method. We bought an inexpensive tile saw that worked great for this job. However, the small, 4-in. blade was a drawback when we cut the thick stone edging.
We had to cut it one direction halfway through and then flip the piece and complete the cut in the other direction. Otherwise we were more than happy to use the small saw instead of renting a larger one so that we wouldn’t feel rushed.
Countertop Options: The Pros and Cons of Countertop Materials
Lay the accent border after the field tile: Install the decorative trim tiles
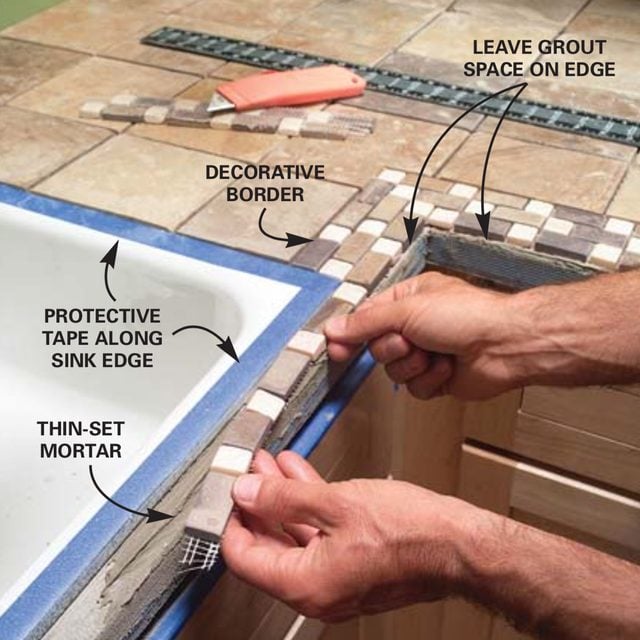
Cut the webbed backing on the decorative trim tiles and fit them around the front of the sink. Make sure they sit flat in the mortar. Lay out your pieces for the accent border. Lay them end to end and figure where the best spot on the sheet may be to splice the sections. These sections are placed on a backing to maintain the pattern and correct spacing. Keep in mind that if your border allows it, you can even miter the sections with your wet saw.
As you did with the other pieces of tile, spread your mortar and embed the accent tile. Once you finish setting all the tiles and the mortar has had a few hours to set, go back with a utility knife or wood chisel and lightly scrape away any mortar that may have oozed proud of the tile or caught on the edges. It’s a lot tougher once the mortar dries hard as concrete, so a bit of attention now will ensure you won’t see ugly mortar patches on your nicely grouted surface later.
Clamp a ledger to support the front edge pieces: Install the front edge
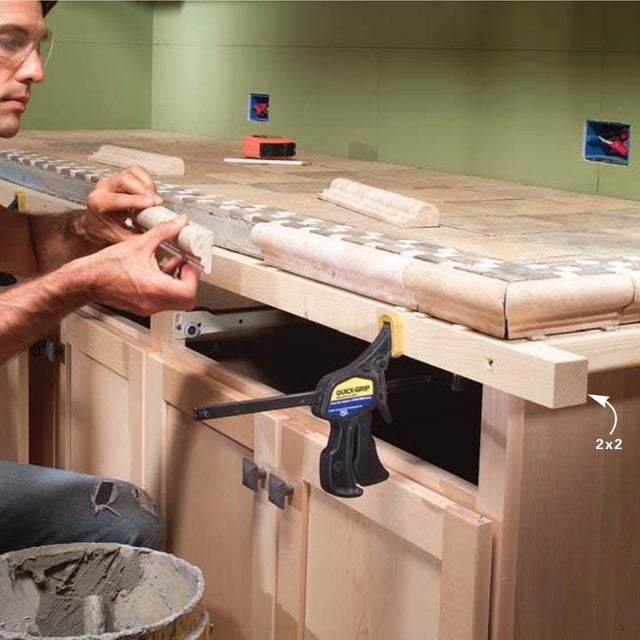
Clamp straight 2x2s to the front edge of the face frame to support the weight of the marble edge until the mortar sets. Set the edge pieces. Then draw layout lines on the backsplash and lay in tile according to your design. Clamp straight 2x2s to the front of your cabinets as shown to act as supports for the heavy edge pieces. For the sides, cut some return 2×2 pieces and screw those to the overhanging front supports. To support the backside of the returns, cut some upright supports and place them against the walls.
Cut the mitered angles of tile edging on your wet saw. First set them in place and then mark the locations of the rest of the pieces by placing them end to end. If you end up with a small piece in the inside corner, you’ll need to cut a few inches off the outside corner piece to avoid the “tiny tile” look.
Once you’ve got the pieces cut, butter the backside of your pieces with mortar and stick them to the front edge. You may need to use small tile shims (available at your tile store or on Amazon) to lift some pieces slightly off your temporary ledger for a nice, straight edge. When you’ve finished laying the edge pieces, look down the edge from end to end and straighten them if necessary. If the heavy edge pieces want to fall or tip, support them with masking tape from above. Let these tiles set overnight before going any further.
Set your backsplash tile: Mark the tile for height

Hold the backsplash tile in position and mark it for height to fit around the receptacle.
Mark the tile for width
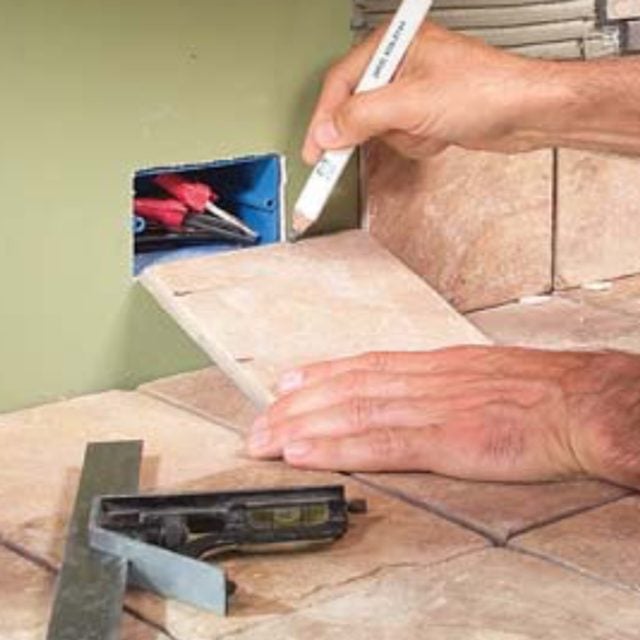
Mark the outlet width on the tile.
Connect the marks
Use a straightedge to mark the entire cutout.
Cutout the opening
Cut the opening with multiple passes on your wet saw. Again, check the layout and mark the back wall with a fine-tip marker. Check your pattern and make cuts if you need to downsize the first row. Mix some mortar and trowel it onto the wall just high enough for the first two rows on one section. Lay the first row and remember to leave a small 1/8-in. gap between the countertop and the first row.
Because gravity works 24 hours a day, you’ll probably need spacers to keep the tile from sliding. Position the tiles and gently tap them with the side of your fist to set them as you go. When you get to an electrical receptacle, mark the piece in place and cut it on your wet saw.
Start setting the second row and add spacers to keep the tile in place. With the second row complete, keep tiling and add your pattern pieces as your layout demands. Remember, you can stop at any point as long as you clean the mortar from the wall along the edges you’ve just laid. Stop every once in a while and look for sags, goofs or oozing mortar. They’re easy to fix now.
If you have porous tile or stone, seal it before grouting
Coat the face of the porous tile and stone with a sealer before grouting to prevent the grout from sticking to the tile surface. Once the mortar has set overnight, pick up sealer at the tile shop (ask for the right stuff for your tile). Roll or brush the sealer on and let it dry for about an hour before grouting. (You can skip this step if you have fully glazed tile with a matte or gloss finish.) The sealer penetrates a porous finish and prevents the grout from being absorbed. If you don’t seal porous tile and stone, it will absorb grout and look hazy no matter how many times you scrub it.
Grout the tile: Work the grout into the joints
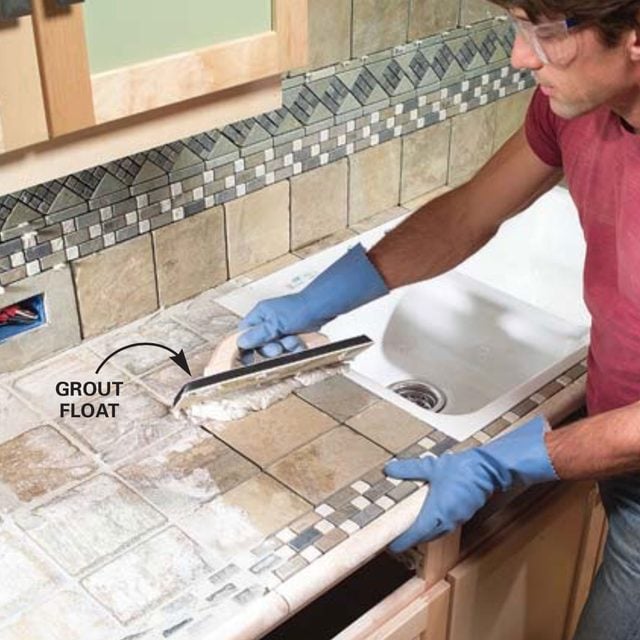
Mix the grout to a toothpaste consistency and push it into the joints with a grout float. Mix enough for 6-ft. square sections and then wipe each section down as you go.
Use a sponge to wipe away excess grout
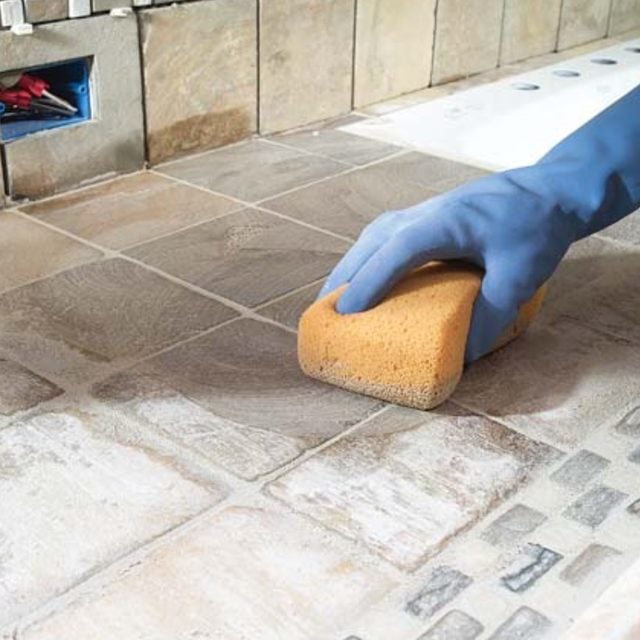
Wipe the excess grout from the tile with a clean, wrung-out sponge. Several passes are necessary to clean the grout from the tile. Polish with a cotton towel. Mix your grout to a toothpaste consistency according to the manufacturer’s guidelines. Some grouts have a special latex additive, while others mix only with water. It’s best to mix just what you need. Mix about the volume of a quart and scoop a lump out about the size of a baseball. Push it into the spaces between the tile with a grout float. Work it in from several directions and squeegee the excess off with the edge of the grout float.
When you’ve filled about a 6- to 8-sq.-ft. area, start wiping it with a clean, damp sponge. Rinse out the sponge in clean water and keep rotating it to a fresh, clean side. Change the water in your pail often! Don’t have the sponge too wet. You don’t want to constantly add water to the grout and weaken it. This also shapes the grout lines. Take care not to wipe too much out. Once you get the tile or stone clean, move on to the next section and repeat the process.
Look back and check for grout haze where you started. Wipe the tile or stone with a clean, dry cloth if you detect a slight haze. You may need to use a little elbow grease to get it clean.
Apply the grout to the walls the same as you did for the top. You’ll notice we left our faucet off while we did the grouting. We found it a lot easier to get behind the sink and wipe the grout. Once you’re finished but while the grout is still soft, dig out the grout between the backsplash and the countertop. The grout here will most likely crack after a few weeks, so it’s best to get a color-match caulk and fill the gap the day after grouting. The caulk will flex a bit as your house expands and contracts slightly with seasonal changes.
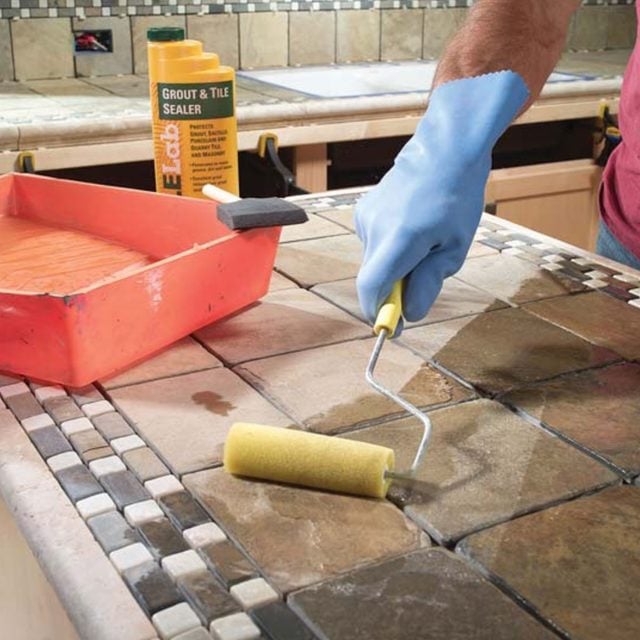
Wait three days for your grout to cure and then apply a grout sealer as you did before. The sealer will penetrate the grout and help block food and juice stains. Apply the sealer liberally to the surface, let it be absorbed and then wipe away the excess with a clean, lint-free cloth. In a year or so, you can purchase special grout cleaners at your tile store and apply them. After you clean the grout, follow it with another coat of sealer.