
A How-To Guide on Electric Heater Installation
Updated: Aug. 25, 2023
Learn about running a separate electrical circuit for the heater, running cables, plus how to size the electric heater for the size of your room.

Multiple Days
Intermediate
$101–250
Introduction
An electric heater with thermostat can be a good option for warming up a cold room. We'll show strategies for adding an in-wall electric heater wherever you need it.Tools Required
- 4-in-1 screwdriver
- Circular saw
- Clamps
- Cordless drill
- Drill bit set
- Drywall saw
- Extension cord
- Lineman's pliers
- Non-contact voltage tester
- Stud finder
- Utility knife
Materials Required
- 14-2 or 12-2 cable
- Drywall screws
- Electrical tape
- Heater
- Plywood
- Remodeling boxes
- Thermostat
- Wire nuts
How to Install an Electric Heater with Thermostat: The big picture
Does your home have a room or two that just don’t stay warm in cold weather? If you can’t adjust the central heating system to warm the room, consider adding an electric heater. You can conveniently mount electric heaters in walls, in floors (between joists), or along the baseboard. And heater installation doesn’t have to be intimidating.
While electric heat is more expensive than gas, the heaters and materials for installation are much less expensive. Keep in mind that these are for auxiliary heat, not the main source. We recommend that you put the heater on a separate setback thermostat that automatically turns it on when you’re home and using the room.
DIY Wall Mounted Electric Heater with Thermostat
In this article, we’ll show you how to hard-wire a wall-mounted heater, which means you have to run a separate circuit to the main panel. This is safer than using a plug-in portable heater, which can overload an existing circuit. We’ll show you how to size the heater, run a new, safe 240-volt circuit and install a programmable thermostat. We won’t show you how to hook the circuit into the main electrical panel. Hire a licensed electrician for that step.
Most homes have sufficient capacity for the new circuit in the service panel for an electric heater with thermostat. If you have circuit breakers, you’ll need two empty breaker spaces. A fuse box can be more difficult to read. Have the electrician you hire check your panel before you start the project and confirm the planned hookup. Be sure to apply for a local electrical permit so an inspector will check your work.
Electric heaters are sized by wattage. See “Sizing Your Heater, below” to determine the right one for your space. For a heater up to 2,880 watts, run a cable with two 14-gauge wires and one ground wire (called 14-2 with ground); run 12-2 cable with ground to handle up to 3,840 watts.
Figure A: Typical Wiring Plan for Heater Installation
This is a standard, simple plan for wiring an electric heater.

Project step-by-step (16)
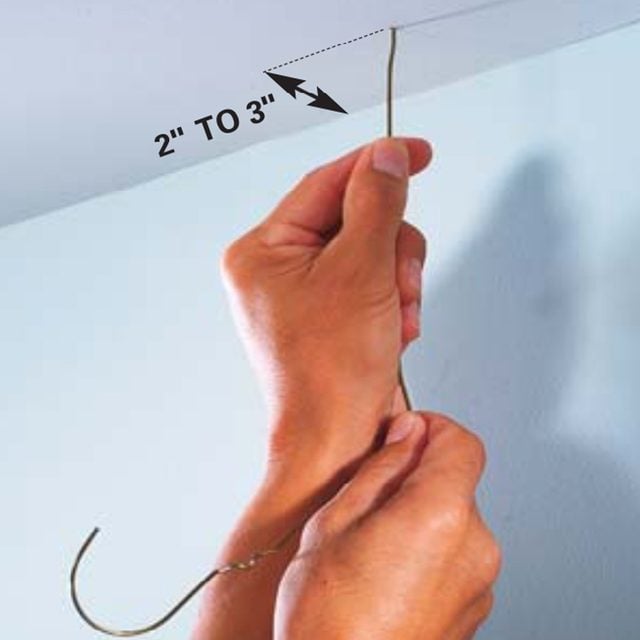
Find the easiest cable route
Find a location for the heater and thermostat on the wall. Push about 12 in. of wire, such as a coat hanger, through the ceiling drywall directly above the heater and thermostat locations.
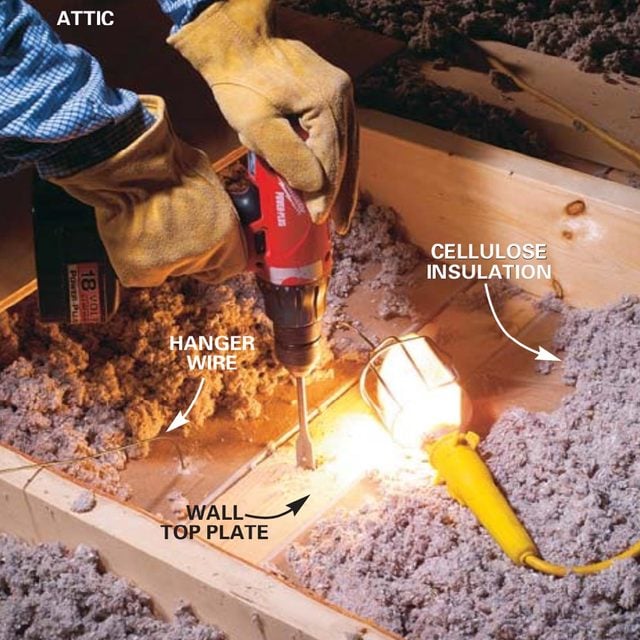
Drill through the top plate
Push aside the insulation to locate the coat hanger wire and the wall top plates. Drill a 3/4-in. hole through the center of the top plates at the heater and thermostat locations.
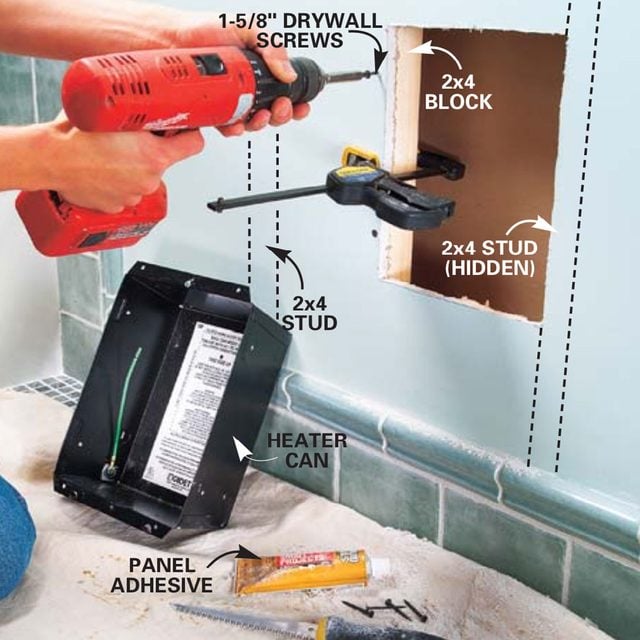
Cut the heater installation hole
Locate the wall studs with a stud finder and cut a hole sized for the heater can along one stud. Glue and screw a 12-in. 2×4 block to the drywall at the other side of the opening.
Caution: Cut a small hole in the drywall first and check for electrical wires before sawing the big hole.
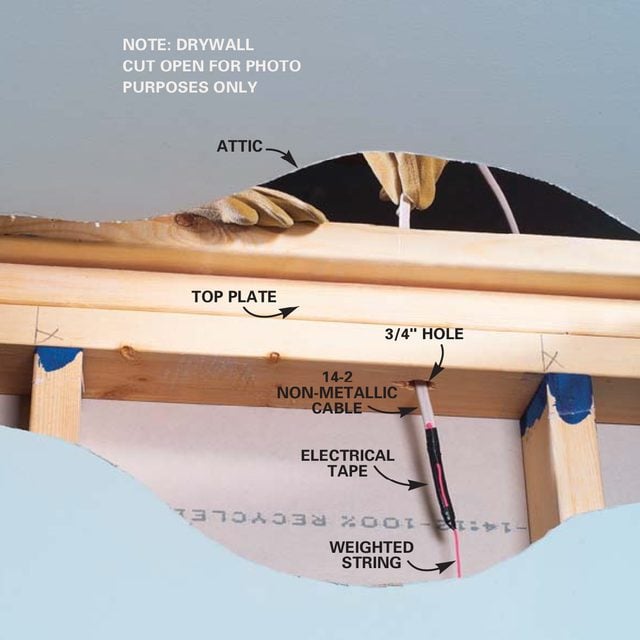
Run the wire for the electric heater with the thermostat
Tape the end of the cable to an 8-ft. weighted string. Drop the entire string through the hole, then push through about 7 ft. of cable. Pull the string and cable down from below, leaving about 2 ft. of cable hanging through the cutout hole.
Each heater installation is unique, so first plan the route of your new circuit. Take advantage of open spaces such as an unfinished attic or basement to get the cable close, then fish it through the wall.
First find a spot on an interior wall to mount the heater. Locate the studs to be sure there’s enough space between them. Stay away from heat vents and walls with plumbing fixtures on them to avoid ducts and pipes. The heater requires a depth of 4 in. so the wall cavity must be at least 2×4 framing. Read the manufacturer’s instructions and confirm the clearances around the heater. Don’t install it below a towel bar or near curtains or any other fabrics that can catch on fire. Make sure that nothing flammable sits within 3 ft. in front of the heater.
Locate the thermostat away from the hot air. One foot above an existing light switch is a good choice. Avoid the wall directly above the heater and any exterior walls.
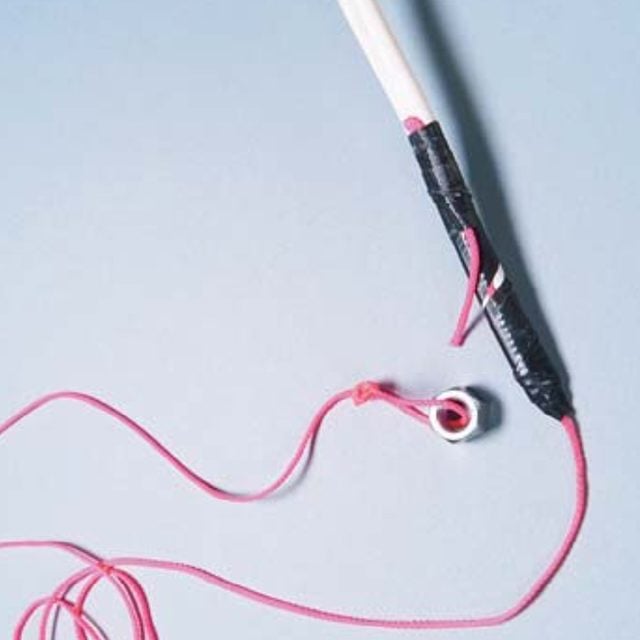
Fishing Tip
For easy pulling, tie a heavy nut to one end of the string and tape the string to the cable, tapering the tape at the cable end.
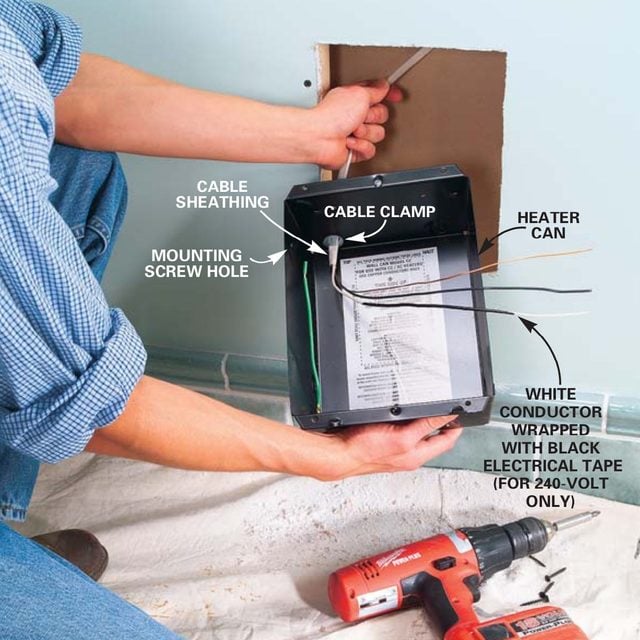
Wire the Heater Prior to Installation
Remove one knockout from the top of the heater can and install a 1/2-in. cable clamp. Strip 12 in. of sheathing from the cable. Push it through the clamp into the heater can until 1/4 in. to 1 in. of sheathing extends into the box. Push the can and cable into the stud space and fasten the can to the framing with four 1-in. screws.
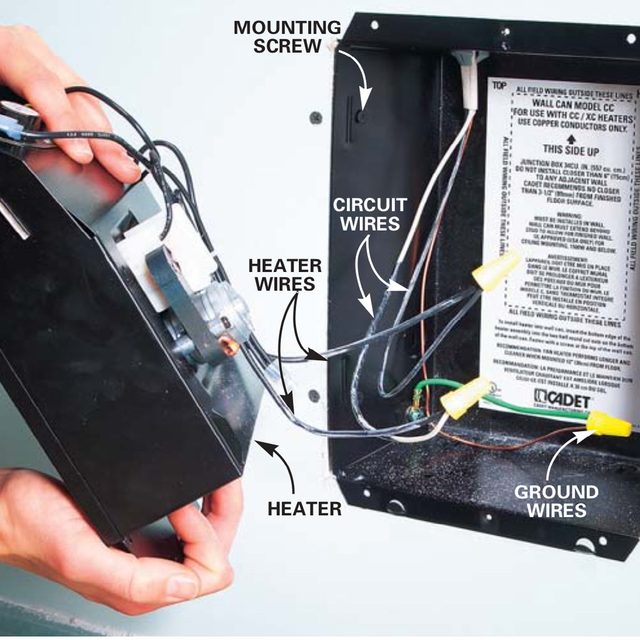
Install the Heater
Strip 5/8 in. of insulation from each wire’s end, then connect the black and taped white wires to the black heater wires using wire connectors. Connect the cable’s bare ground wire to the green heater ground wire. Push the heater into the can and fasten it. Install the cover grille.
Drill a small hole in the ceiling about 3 in. out from the wall directly above the heater and thermostat locations. Push about 12 in. of coat hanger or other stiff wire through the drywall into the attic.
Next, go into the attic and find the top plates of the bath walls using the wires as a guide. Push the insulation temporarily aside, giving yourself plenty of room to work. Drill 3/4-in. holes completely through the plates, then drop a weighted string through the hole to make sure there are no impassable obstructions in the wall.
Now go down into the bath and make the cutout in the wall for the heater can.
Fish for the cable
Back in the attic, tape the weighted string to the end of the heater cable. While fishing, you may need to pull hard on the string, so be sure to tape the string and cable securely. Drop the string through the hole in the top plate and start the cable into the hole. It’s easiest to have a helper pull on the string and guide the cable as you push it down. Otherwise, you may have to go up and down a couple of times from the attic.
You don’t have to staple the cable to the side of the studs when fishing through an enclosed space, but you must clamp the cable to the can. Make sure the cable is secure and can’t pull out.
Connect the circuit wires to the heater wires. Because this is a 240-volt circuit, both the black and white wires are hot feeds. Be sure to wrap black electrical tape around the white wire to identify it as a hot wire. Check the package labeling to be sure the wire connectors are the right size for the number and size of wires you’re connecting.
Run cables to the wall heater thermostat and main panel
Cut the hole for the remodeling switch box with a drywall saw. Go back into the attic and tape the heater cable to the cable going to the main panel (labeled “line”). Push about 5 ft. through the 3/4-in. hole drilled through the top plate. Go back to the room below, reach through the switch box hole and pull out about 2 ft. of cable.
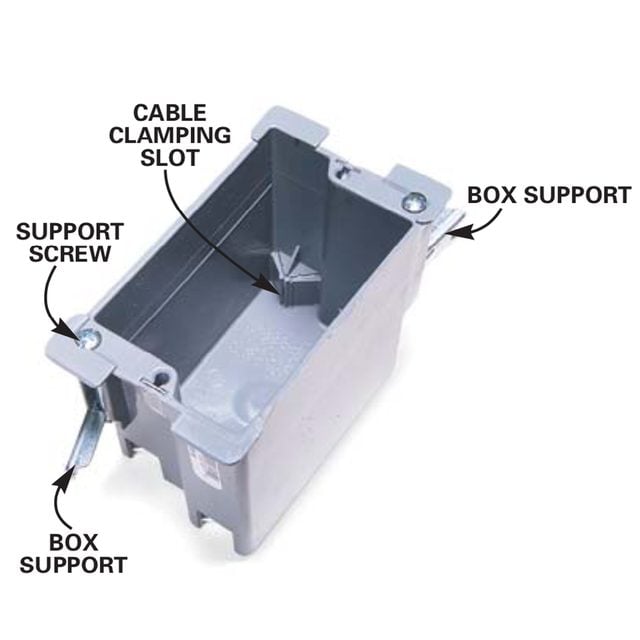
Remodeling switch box
A “remodeling” switch box is ideal for the wall heater thermostat. Cut the drywall to precisely fit the box, push the stripped cables through the bottom cable clamping slots, then slip the box into the wall. Turn the two support screws until the supports are tight against the drywall.
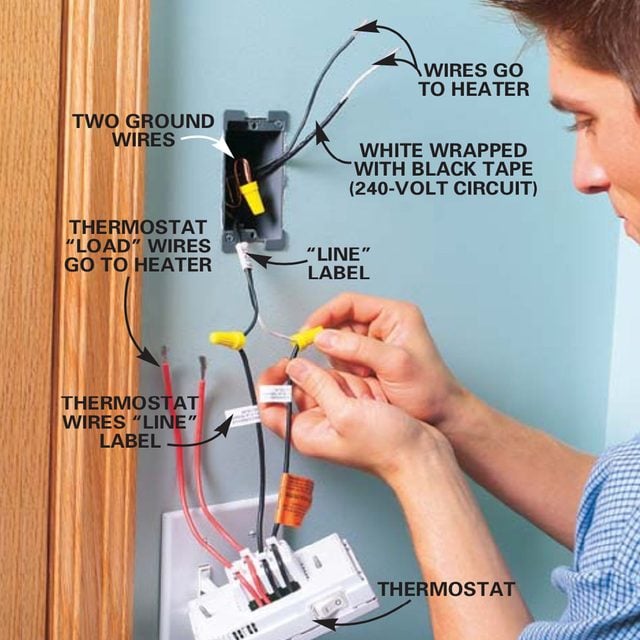
Connect the wires
Connect the two cable wires from the main panel to the wall heater thermostat’s “line” wires (they’ll be marked). Next, connect the two wires from the heater to the “load” wires on the thermostat. Then, connect the two bare ground wires. Fold the wires into the box, slide the thermostat in and secure with the two mounting screws.
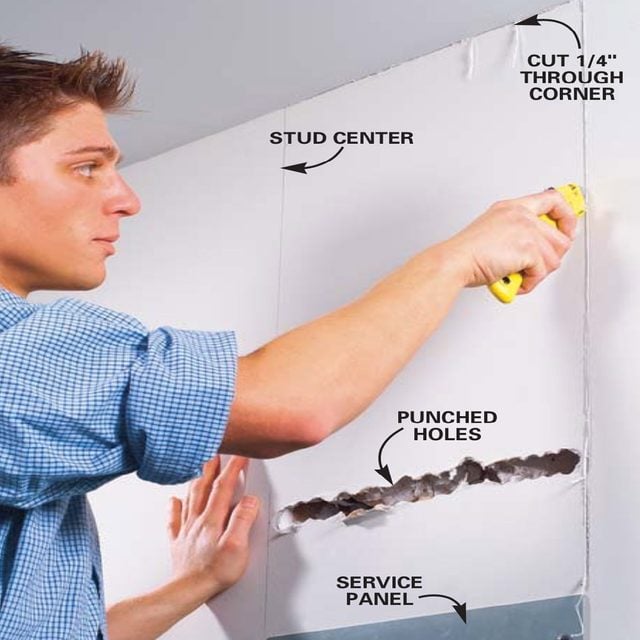
Cut above service panel
Punch a horizontal slot in the drywall above the service panel with a hammer to locate the studs. Mark out a straight line centered on each stud and cut through the drywall with a utility knife. It’ll take several repeated cuts to get through. Score along the wall/ceiling joint and remove the drywall.
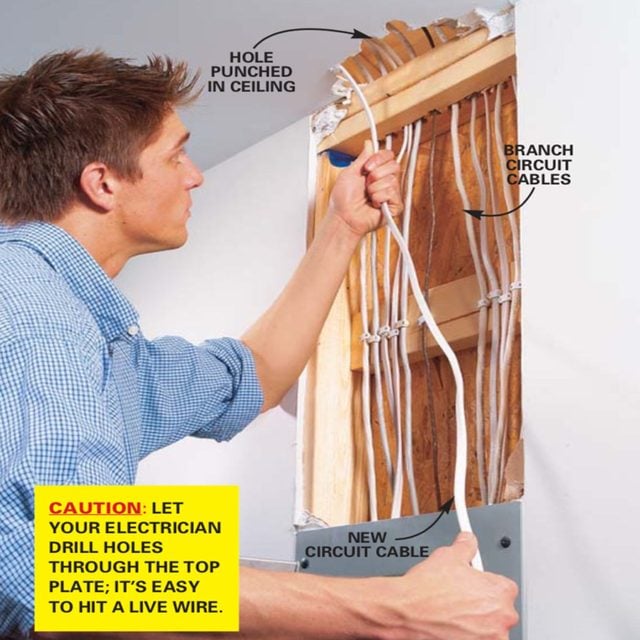
Pull cables to the service panel
Punch a hole in the ceiling to expose the top plate and electric cables. Pull the cable from the thermostat through the hole and let it hang to the floor. At this point, hire an electrician to finish the hookup to the service panel.
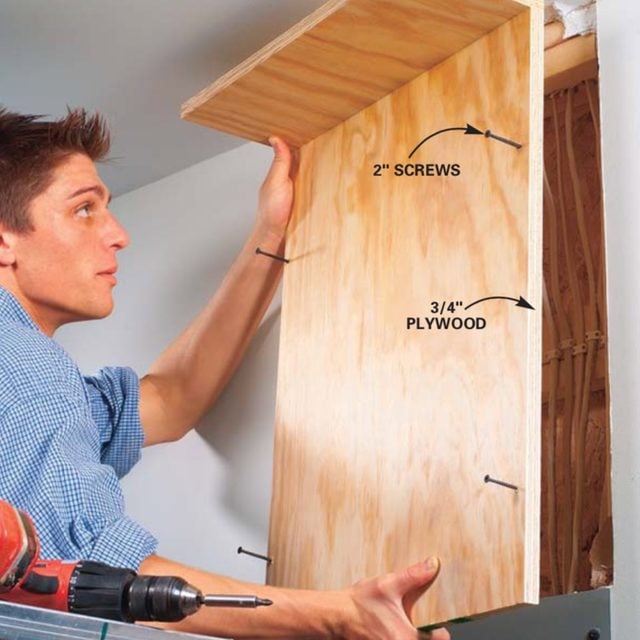
Build an access panel after heater installation
AFTER HOOKUP, build a cover from 3/4-in. plywood and screw it over the opening for easy future access.
Next stretch the cable from the ceiling above the service panel to the ceiling over the bath. Leave at least 10 ft. of extra cable at each end.
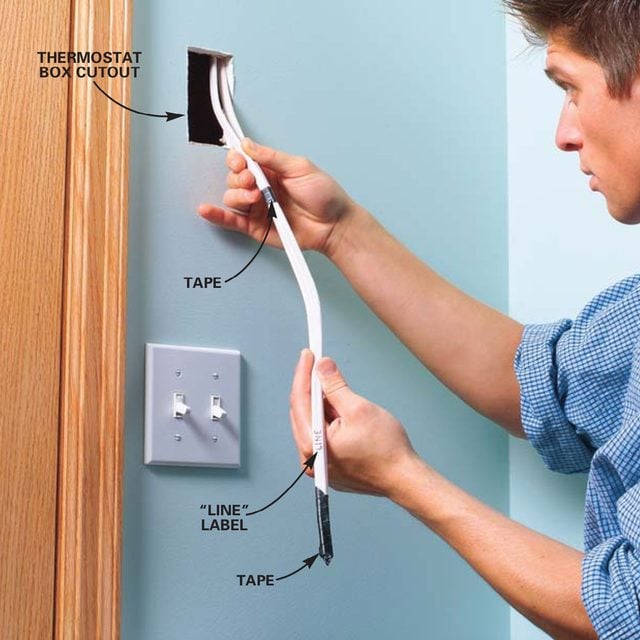
Mark the cable from the service panel as the “line” cable. Tape the two cables together face to face. This will make them stiffer and aid in pushing them straight down through the wall. Taper the tape over the ends to prevent them from snagging. You’ll be able to push these cables through the 3/4-in. hole to the thermostat location without a fish line unless there’s a partial obstruction. Pull 2 ft. of cable out of the wall.
Strip 12 in. of sheathing from the two cables, but keep the “line” label on the wires from the main panel to avoid confusion. It’s easier to install the remodeling box if you push the cables through the bottom clamps, then insert the remodeling box into the hole and tighten its support screws.
Be sure that the thermostat’s “line” wires connect to the wires from the main panel, marked “line”. Connect the thermostat’s “load” wires to the wires that run to the heater. This is a non-grounded thermostat, so just connect the two new circuit ground wires together.
Pull the cables through
Go back up into the attic and drive a wire staple within 12 in. of where the cables emerge from the top plates. Work from the bath toward the service panel, stapling the cable to the top of the joists. Drive staples no more than 4 ft. 6 in. apart and keep the cable taut. For a neat job, run the cable in straight lines parallel with or perpendicular to the joists. Stay at least 6 ft. away from any attic storage areas and the access or scuttle hole. Stop when you get above the service panel.
Often the wall around the service panel is covered by drywall. If that’s the case, then remove the drywall above it. Work carefully. First, break a horizontal slot through the drywall with a hammer, locate the studs and cut through the drywall with a utility knife exactly over the center of the studs. This ensures that you won’t hit any wires. Break open a section of ceiling to expose the wall top plates. Pull the cable through this hole, and leave enough cable to hang to the floor. Hire an electrician to make the final run and connect the wires in the service panel.
The safest way to handle this next step of heater installation is to hire a professional. Let your electrician drill holes through the top plate over the main electrical panel; it’s easy to hit a live wire.
Sizing Your Heater Before Installation
In most cases, you can roughly size the electric heater (in watts, that is, a measure of heat output) according to the size of the room. The chart below shows our “rule of thumb” guidelines. It assumes that you only need to raise the room temperature 5 to 10 degrees F for comfort. And we’ve oversized the heaters a bit to handle extra-cold periods.
| Room Floor | Area Heater Size |
| Less than 100 sq. ft. | 1,000 watts |
| 100 to 150 sq. ft. | 1,500 watts |
| 150 to 250 sq. ft. | 2,500 watts |