
Cleaning Air Conditioners in the Spring
Updated: Dec. 11, 2023This central air conditioner maintenance guide helps you get lower cooling bills while staying comfortable in summer.
- Time
- Complexity
- Cost
- A full day
- Beginner
- Free
The most important step: Clean the outdoor air conditioner condenser unit
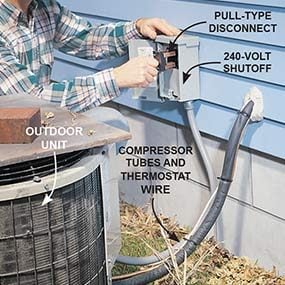
Shutoff power to the air conditioner
Turn off the 240-volt power at the appliance shutoff box. It’s usually outside within sight of the outdoor unit. Some shutoffs simply pull out; others have a handle to pull down or a fuse to remove. If there isn’t one, turn off the power at the circuit breaker at the main panel that controls the outdoor unit.
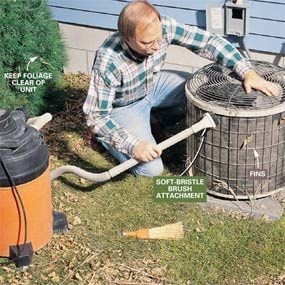
Remove the outer case and vacuum the fins.
Vacuum the condenser fins with a soft-bristle brush attachment. The metal fins are delicate; avoid bending them. Clear away weeds, grass and other debris that block airflow through the coil. You often have to unscrew a protective metal case and lift it off to get at the air conditioner condenser fins.
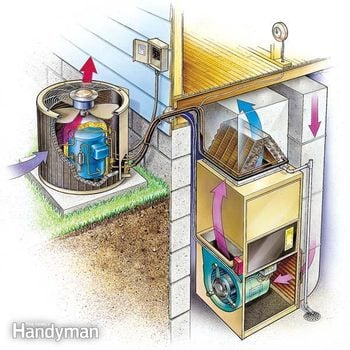
In this article, we’ll show you how to clean ac coils and maintain your central air conditioner to keep it running efficiently. We won’t demonstrate the maintenance steps for a window-mounted model here. Most central air conditioners have two basic parts: an outdoor unit (compressor/condenser) that sits next to your home and an indoor unit (evaporator) that’s located in a central duct near your furnace (Fig. A). If you have a heat pump instead of a furnace, the indoor unit will be in the air handler. Use the same ac maintenance steps we show here. If your furnace looks different from the one in Fig. A, or you have a heat pump, use the owner’s manual to find your way around it. The basic parts will be the same.
The most important maintenance steps are fairly simple, but if this is the first time you’ve cleaned the unit, allow about a half day to carefully work through the steps. If you’re not up to the task, call a pro (look under “Air Conditioning Contractors” in your Yellow Pages).
Fig. A shows a typical central air conditioning/furnace setup. Two copper tubes connect the outdoor compressor and its air conditioner condenser ac coil (a “coil” is a combination of fins and tubes) to the indoor evaporator ac coil that’s located in the plenum (Fig. A) above the furnace blower. One tube is covered with foam insulation. If you have a heat pump, both tubes will be insulated.
Outside, your main job is to clean the air conditioner condenser coil (Photos 2 – 4). The fan inside the condenser coil sucks air through the fins, and as a result, pulls dirt and debris with it. Dust, leaves, dead grass and anything else that collects on the fins will block airflow and reduce the unit’s efficiency. Grass clippings thrown by the lawn mower and “cotton” from cottonwood trees and dandelions are particularly bad offenders. You might have to clear the fins weekly or even daily during the spring “cotton” season! Always begin by shutting off the electrical power (Photo 1).
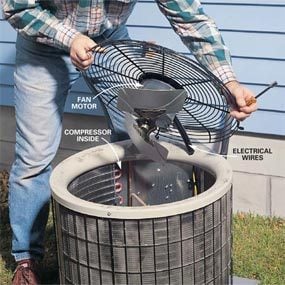
Then proceed with the cleaning (Photos 2 – 4). If the fan motor (Photo 3) has lubrication ports, apply five drops of special oil for electric motors (not penetrating or all-purpose oil). You can find oil for electric motors at hardware stores. Many fan motors are maintenance-free—they don’t have oil ports (ours doesn’t) and can’t be lubricated. Check your owner’s manual if unsure.
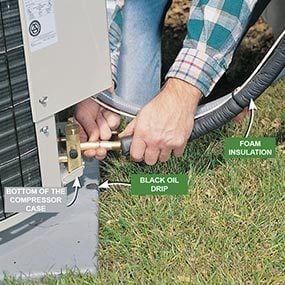
The compressor and its motor sit inside the ac coil (Fig. A). They’re usually sealed and won’t need maintenance. However, if you have an older compressor that’s belt-driven by a separate motor, lubricate the motor through its oil ports. In every case, keep an eye out for dark drip marks on the bottom of the compressor case or pad (Photo 5). This indicates an oil leak; the compressor or tubes might be leaking coolant (refrigerant) as well. If you find a leak, call in a pro to check the problem. Don’t tighten joints to try to stop leaks yourself! Over-tightening can make the problem worse. And only a pro with proper equipment can recharge the system to the proper level of coolant. Here are a few tips for fixing an air conditioner that’s leaking water inside.
Tip:
Cover your outdoor unit in winter with plywood (Photo 1) to prevent damage from falling ice. Don’t wrap it with plastic or any other material that completely blocks airflow. Moisture that’s trapped inside will promote corrosion.
Figure A: Central Air Conditioning System
Refrigerant in the copper tubes absorbs heat at the evaporator coil inside, cools indoor air and then releases heat at the condenser coil outdoors.
A printable version of this illustration is available in the Additional Information at the end of this story.
Important outside startup guidelines
Feel the pipes to see if they’re warm and cool.
Turn the power back on and adjust the thermostat so the outdoor unit comes on. Listen for odd noises that might indicate damage or wear. After 10 minutes, pull back the insulation on the insulated pipe (or pipes, if you have a heat pump). It should feel cool, about 60 degrees. The other pipe should feel warm, about skin temperature. If either doesn’t feel right, call in a pro to check the refrigerant level. Learn how to fix a noisy air conditioner.
Compressors are surprisingly fragile. Follow these precautions when restoring the power:
If the 240-volt power to your compressor (Photo 1) has been off for more than four hours, don’t start the outdoor unit immediately after cleaning. Instead:
1. Move the switch from “Cool” to “Off” at your inside thermostat.
2. Switch the 240-volt power back on and let the outdoor unit sit for 24 hours. (This allows a warming element to heat the compressor’s internal lubricant.)
3. Switch the thermostat to its cooling mode and set the temperature so that the outdoor unit comes on. Then check the outdoor unit like we show in Photo 5.
If you switch off the air conditioner (at the thermostat) at any time, wait at least five minutes before switching it back on. Once off, the compressor needs time to “decompress.” If you restart it too soon, you’ll stress the motor. Many thermostats have automatic time delays built into the circuitry to protect the compressor from this problem.
Clean the outdoor unit when the temperature is 60 degrees F or higher. Compressors won’t work properly in temperatures below 60 degrees.
Clean the indoor unit
Replace a dirty filter
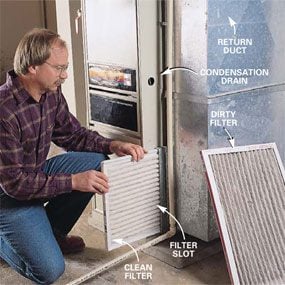
Check the furnace filter and change it if it’s dirty to keep dust from collecting on the evaporator ac coil fins. Turn off the power to the furnace before pulling the filter so the blower doesn’t come on and blow dust throughout the system. Orient the filter according to the instructions printed on it. Here’s what you need to know about central air conditioner filters.
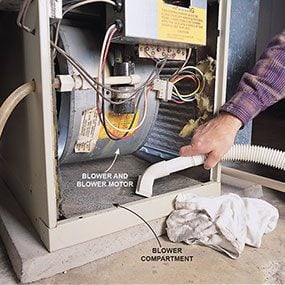
Vacuum the blower compartment
Open the blower compartment (with the power turned off) and lubricate any accessible ports on the blower motor with electric motor oil. Many newer blowers don’t have ports, or if they do, they’re inaccessible. Vacuum up any dust that has collected in the compartment.
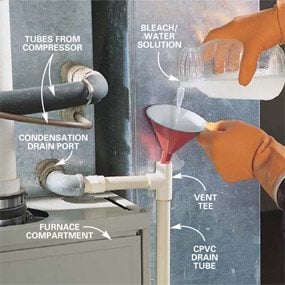
Photo 8: Clean a clogged drain
Check the Condensation drain for sludge and algae growth. If it’s partially clogged, pour a bleach solution (1 part bleach to 16 parts water) through the tube. This rigid plastic tube can’t be removed unless you cut it. Flexible tubes should be removed and cleaned. If possible, poke a wire into the drain port to make sure it’s not blocked.
You usually don’t have easy access to the evaporator coil that’s inside the plenum or a main duct near the furnace (Fig. A). If you can get to it, vacuum the bottom side of its fins with a soft brush attachment. Get to know the cost of air duct cleaning.
Otherwise, have a pro clean it every few years. The best prevention is to keep the air that flows through it clean. Begin by turning off the furnace.
There’s usually a switch mounted on, or close to it. (On heat pumps, the switch might be a circuit breaker.) Or shut off the power to the furnace at the main electrical panel. Then replace the furnace filter if it’s dirty (Photo 6) and vacuum up any dust in the blower cabinet (Photo 7).
The blower compartments of newer furnaces are so tight (Photo 7) that you usually can’t lubricate the blower. Have a pro do it during periodic furnace maintenance.
The evaporator coil in the plenum dehumidifies your indoor air as it cools it during the summer. The water that condenses on the coil flows out through a condensation tube.
Check it to make sure the tube isn’t clogged by sludge and algae, especially at the drain port (Photo 8). A flexible tube is easy to pull off and clean, but you might have to saw off a rigid plastic tube with a hacksaw to check it. Then reweld it with the proper pipe joint solvent and coupling.
Air conditioner compressors and heat exchanger pumps sitting on concrete pads may settle and tip over time. Here are a few tips to fix a sinking air conditioner pad.
Additional Information
Required Tools for this cleaning ac coils Project
Have the necessary tools for this DIY project lined up before you start—you’ll save time and frustration.
- 4-in-1 screwdriver
- Safety glasses
- Shop vacuum
Funnel
Wisk broom
