
How to Build a Latticework Porch Trellis
Updated: Jun. 13, 2023Create a beautiful partition of privacy for your front porch.

- Time
- Complexity
- Cost
- Multiple Days
- Intermediate
- $51–100
Porch Trellis overview: Time, tools and materials
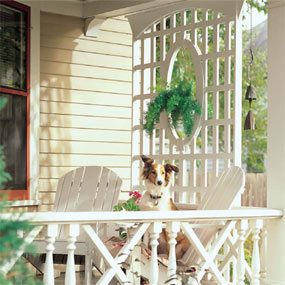
Like lace curtains on an interior window, this latticework trellis offers the best of both worlds: It gives the illusion of privacy, but at the same time, it allows a connection between the outdoors and in. And its graceful pattern blends in beautifully with any setting.
At first, you might ask, “Why not use ordinary diamond-shaped lattice for the main structure?” Although this porch lattice project might be easier to assemble using ordinary overlapping garden lattice, it would look clunky and out of proportion. Our porch lattice is constructed with lap joints for a flat, even surface, and its tall rectangular openings are designed to complement the tall oval cutout.
Before you start, measure the height of your porch opening. You may have to adjust our measurements to fit your situation. Although this design works best for homes with front porches, you could adapt it for use in smaller front entries or even as a garden trellis.
Since you’ll be painting this porch lattice project, you could use almost any kind of wood. But to ensure its longevity, we recommend a naturally decay-resistant wood like cedar, redwood, cypress or treated pine. We used cedar because it was locally available. Once you decide on wood, buy straight pieces of lumber that are as knot-free as possible. Knots will weaken the lattice, especially at the lap joints.
This project is time-consuming. Plan to spend a day making the jig, routing and cutting the pieces, plus a couple of hours the next day assembling it. You’ll spend a third day sanding, priming and painting.
You’ll need special router bits, basic tools and router know-how. You should have some router experience under your belt before you try this project. Beyond that, assembling the parts is easy, somewhat like building a fence.
For each router operation pictured, we’ll show or describe the type of bit we used. You also need a table saw, jigsaw, router and doweling jig (or a biscuit joiner), along with basic carpentry tools such as a hammer, handsaw, circular saw, framing square, tape measure and drill.
Figure B: Porch Trellis
You can download Figure B and print it. Go to ‘Additional Information’ below.
Step 1: Mass produce the lap joint dadoes
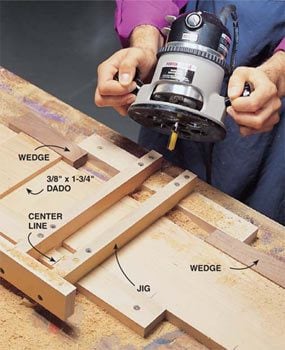
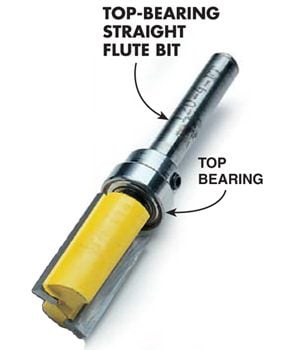
Cut the lattice pieces and rout the lap joints first. Lap joints can be made several ways, but building this simple jig and using a top-bearing straight flute bit is the most efficient because we also use the same bit for making the oval blanks. Follow the instructions in Fig. A to make your lap joint jig.
You’ll notice that in Photo 2 the dadoes for the lap joints are first routed into 1×6 boards and then the boards are ripped (cut lengthwise) into individual strips that make up the lattice. This method will improve your accuracy and make this tedious task go quickly.
To accurately locate your lap joints, mark the centers of joints (see Fig. B) on the 1×6 pieces that make up parts A and B (see Cutting List). Later, you’ll align these center marks with the center of the jig. But before you rout these joints, try out your jig. Routing these joints can be a little tricky, so practice on a scrap piece of 1×6.
To begin, screw the jig to your work surface. Tap the wedges (Photo 1) with a hammer to hold the workpiece firmly in the jig. Set your router so the bit will cut half the depth (about 3/8 in.) of the 1×6. Rout along the left side of the jig about 1/2 in. into the workpiece. Pull the router back toward you and then rout slowly against the right side of the jig. You’re just establishing the front left and right boundaries of the dado. This is necessary to prevent tear-out of the edges. Now rout along the left side until the router base hits the stop, then move the router from left to right against the stop and pull the router back toward you along the right side of the jig.
You’ll find a patch of wood left in the middle; remove this by taking a few more passes. Now that you’ve got the feel of routing the dadoes, wedge your workpiece into the jig and rout the dadoes for all the pieces. Be sure you tap the wedges into place with a hammer to hold the workpiece firmly against the jig. Any shift in the workpiece will spell disaster.
Figure A: Jig for Routing Lap Joints
Use this simple jig and rout all the lap joints perfectly in less than two hours. Use scrap hardwood to build your jig, and make sure the parts are square. Soft wood like cedar, redwood or pine will wear too quickly and make the joint less accurate with each pass. Screw the jig to your workbench. Leave enough space to the right and left of the jig to slide the long pieces (A) through as you rout the dadoes.
Note: You can download Figure A and print it. Go to ‘Additional Information’ below.
Step 2: Cut the lattice strips to width
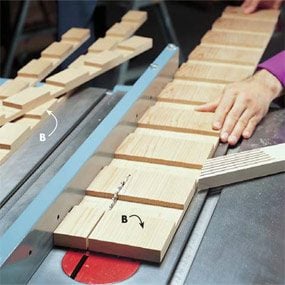
Set your table saw to rip the lattice into three equal 1-3/4 in. strips. Since the 1×6 is 5-1/2 in. wide, you’ll get three 1-3/4 in. wide strips from each 1×6 using a 1/8-in. kerf saw blade. Make adjustments if your 1×6 is a hair narrower than 5-1/2 in. Even if your strips end up 1/16 in. narrower, the assembly will still work.
Note: Use caution as you rip the pieces on your table saw. You’ll find the workpiece will glide easily through the routed areas and resist a bit where it’s not routed, causing a jerky rip. Keep your hands a safe distance from the blade.
Step 3: Assemble the lattice with adhesive and nails
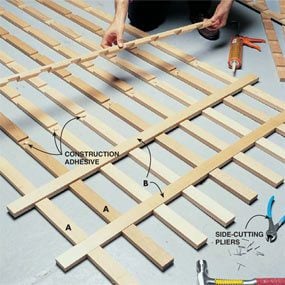
Find some elbow room, preferably a flat area on the floor (Photo 3), to assemble the lattice. Lay out the long pieces (A) with the dadoes facing up.
Tip: Test the depth of your dadoes by assembling two test pieces. They should be flush when you put them together.
Put a dab of construction adhesive in the middle of each bottom dado and tap the shorter pieces (B) into the longer pieces. Next, install the top horizontal strip to keep the spacing uniform from top to bottom. Glue and tap each horizontal strip into place until the lattice is complete.
To firmly bond the lap joints, nail the intersections together with galvanized finish nails. I couldn’t find 5/8- in. long galvanized nails, so I nipped my nails to the right length using a side-cutting pliers (Photo 3).
An air nailer that shoots small rust-resistant nails will really speed the process. Use two nails at each lap joint. Make sure all the joints are pinned tightly, then set the assembly aside.
Step 4: Make a frame around the lattice

Rip the frame pieces (C, D and E) 2-1/2 in. wide from 1×6 board. Cut them to length (see Cutting List, below). Also rip 7/8-in. wide shims (Photo 4) from 1×6 board and set them under the lattice.
The shims elevate and center the lattice to the frame, making alignment and nailing easier. Nail the frame sides, top and bottom to each leg of the lattice. Use 4d galvanized box nails. Also nail the intersecting corners of each frame piece.
Step 5: Cut and install the cornice
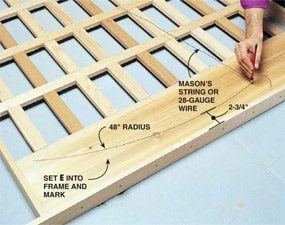
The curved 1×8 pieces (E) at the top and the outer corbels (F) make up the cornice (Fig. B). Cut pieces E to length. Set them in place as shown in Photo 5.
Measure 50-3/4 in. down from the top of D along the center of the middle strip. Drive a 4d nail 1/2 in. deep at that point. Cut a piece of wire about 5 ft. long. Twist one end of the wire around the nail and the other around a pencil to make a 48-in. arc onto E, as shown.
Cut along your curved mark with a jigsaw, then trace it onto the other 1×8 piece and cut it for the other side. Use the cutout portion to trace the curve onto the 8-in. long corbel pieces (F). Cut the curves of the corbels with a jigsaw. To complete the cornice, nail the pieces you’ve just cut as shown in Fig. B.
Step 6: Make an oval template from hardboard
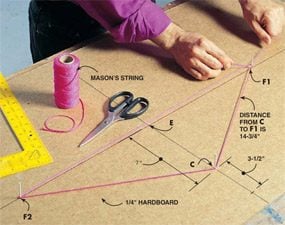
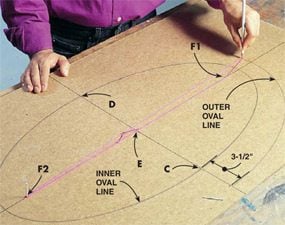
Photo 6: Lay out the oval
Make your oval template from 1/4-in. hardboard (often referred to by the brand name Masonite). Mark the focal points of your oval and tie a string or thin wire around the nails.
Remember how it felt when you skipped your first rock across a pond? Well, setting up and then drawing the oval will evoke a similar feeling. You’ll soon want to try this new skill on other projects. I’m thinking of using the same technique to lay out an oval-shaped perimeter for a flower garden.
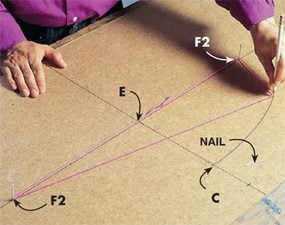
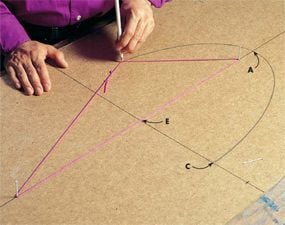
To make the oval template, you’ll need to buy a 2 x 2-ft. piece of 1/4-in. thick hardboard from a home center. Mark a line down the middle of the width and the length as shown in Photo 6. Pound 1-1/4 in. nails into the hardboard at the locations shown. Twist a piece of 28-gauge wire (we used brightly colored string for photo clarity) around the nails. Keep a consistent firmness on the wire as you trace. Follow the instructions in Photos 6 – 8.
Then carefully cut out your template with a fine-tooth blade in your jigsaw. Make your cut as exact as possible. After cutting out the oval template, sand any irregularities along the edges because, as you later guide your router along the edge, any imperfections will be duplicated.
Figure C: Laying out an oval
Making an oval or ellipse is fool-proof. All you need is a square, a few nails, string and a pencil. Ovals, or ellipses, follow a simple mathematical principle. F1 and F2 are called foci. To make your ellipse, establish the length AB and the width CD. Use half the length (AE or EB) to find the points F1 and F2. It’s the same distance from C to F1 as it is from A to E. It’s also the same distance from C to F2 as it is from A to E or from E to B.
Note: You can download Figure C and print it. Go to “Additional Information” below.
Step 7: Build the multi-piece oval
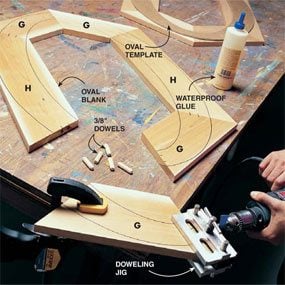
Photo 9: Dowel and glue the hexagonal segments
Dowel the pieces that make up the hexagonal blank that will later be transformed into the finished oval.
Tip: Don’t take shortcuts here. This is the best way to glue up an oval blank.
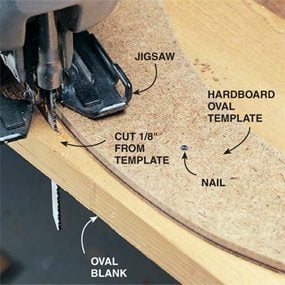
Photo 10: Cut out the oval
Cut along the outside and inside of the template. Stay approximately 1/8 in. away from the edge of the template. You’ll use a router with a top-bearing guide bit to get the oval blank to match the template exactly. See Photo 11.

Photo 11: Trim with a router
Trim the oval blank using the oval template as a guide. See text for tips on setting the bit and router.
Cut the pieces (G and H) for the two hexagonal-shaped blanks with your circular saw. The miters are exactly 30 degrees. Butt the pieces together, set your template over the pieces and trace around the template as shown in Photo 9. This tracing will show you where to drill for the dowels. If you have a biscuit jointer, this is the perfect time to use it. It’ll give you a strong joint and save time.
If you’re using a doweling jig, mark the 3/8-in. dowel locations about 3/4 in. apart and drill them using a self-centering doweling jig as shown. Using Tite-Bond II waterproof glue, glue the pieces together to form two hexagonal blanks. Make sure the joints are tight. Use a band clamp around the perimeter. A band clamp is a web that ratchets tightly around odd shapes. Set each of these assemblies aside on a flat surface to dry.
Once the glue is dry (overnight) nail the template over the blank. Use 3/4-in. common wire nails, one nail per section. Now cut the oval blank with your jigsaw, using the template as your guide, as shown in Photo 10. Cut 1/8 in. from the sides of the template.
Set up your router so the top of your bearing rides along the oval template. Be sure the bit is placed exactly. The bearing needs to ride along the top half of the template for the cutting portion of the bit to cut the wood blank.
Note: If the bit is too low, the wood surface won’t cut the top edge of the wood completely. If the bit is too high, it’ll jump onto the template surface.
To begin routing the wood blank flush with the template, first clamp the template and blank to the bench, leaving a bit less than half overhanging your bench as shown in Photo 11.
Normally you’d cut counterclockwise around the outside of the template, but that can cause tear-out on the blank. Rout clockwise on the outer side of the template and counterclockwise on the inside. Once you’ve got it routed, go back over the piece in the opposite direction for a final close shave. Keep the router tight to the top of the template and move slowly!
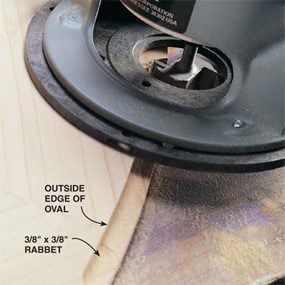
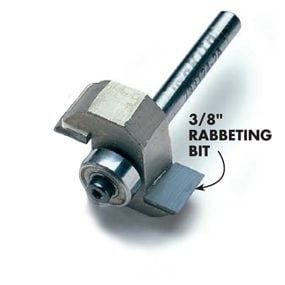
Now that you’ve got the two oval blanks cut, stack them. Make sure they’re exactly the same. You may have to flip one end for end to match them. Once they’re matched, mark the outer surface of each blank. Flip the blank over and rout a 3/8-in. x 3/8-in. rabbet on the outer edge (Photo 12). Here again, go clockwise to avoid tear-out. These rabbets will fit into the lattice once you mark and cut the lattice.
Step 8: Mark and cut the oval hole in the lattice
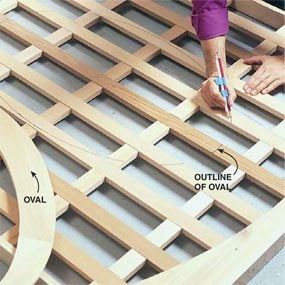
Lay one of the oval blanks onto the lattice. Make sure the center of the oval intersects with the third horizontal lattice strip from the top and is centered from left to right. Trace the outside of the oval blank. Next, tape two pencils together (Photo 13) with a 1/8-in. shim between them.
Now use this setup to trace your original mark while simultaneously drawing an inner mark. Cut along the inner mark with your jigsaw.
Step 9: Add the keystones, install the oval and paint the project
The wooden keystones on the top and bottom of the oval blank are purely decorative, of course, but give the ovals a distinctive traditional look. To make them, you’ll need to resaw a 4-in. wide piece of lumber on your table saw from 3/4 in. to 1/2 in. thick.
For safety, use a 4-ft. long board, push it through the saw, flip it end for end and run the other side through the saw. Take your time. Once the piece is resawed, cut 4-in. long pieces and then mark a 10-degree angle on each side (Fig. B) and cut the angled marks. This cut is easy to make with a 10-in. power miter saw, but a handsaw works fine.
Glue the keystone parts to the top and bottom of each oval blank with construction adhesive. Also nail them to the wood oval surface with a pair of 4d galvanized finish nails, snipped to 1 in. long.
Then stand the lattice up and put the two halves of the oval into the opening. Screw them together with four 1-1/4 in. deck screws to lock the oval into the opening.
While the trellis is propped up, prime and paint it. If you have spray-painting equipment, don’t hesitate to use it. I primed and painted everything with a brush and liked the results, but halfway through I wished I’d sprung for that spray equipment last year.
If you’re brushing, keep your eye out for runs and catch them as they show up. Use the best exterior latex you can find; it’ll last much longer than the cheap stuff.
Tip: If you make your trellis from redwood or cedar, use a stain-blocking primer to eliminate any bleed-through.
I hung the top of the lattice from the outside header of my porch with 3/8-in. eye screws and hooks and secured the bottom with screen door hook and eyes screws. Every situation is different, so explore at your hardware store to find what will work best for you.
Additional Information
- Figure A: Jig detail
- Figure B: Porch trellis
- Figure C: Laying out an oval
- Trellis Shopping List
- Trellis Cutting List
Required Tools for this Porch Lattice Project
Have the necessary tools for this DIY project lined up before you start—you’ll save time and frustration.
- Band clamp
- Caulk gun
- Circular saw
- Clamps
- Drill/driver - cordless
- Framing square
- Hammer
- Handsaw
- Jigsaw
- Router
- Side cutting pliers
- Table saw
- Tape measure
- Waterproof glue
Required Materials for this Porch Lattice Project
Avoid last-minute shopping trips by having all your materials ready ahead of time. Here’s a list.
- Construction adhesive
- Paint
- Primer
