
Use Brick Borders for Path Edging
Updated: Feb. 22, 2023
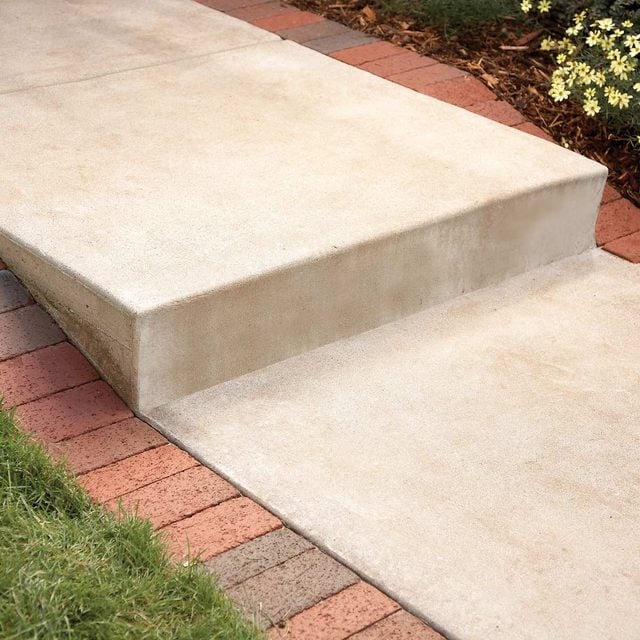
Transform a dull concrete path into an elegant entrance to your home

Multiple Days
Beginner
Varies
Introduction
Make an attractive border for a concrete walkway or patio using brick pavers set on a bed of gravel and sand. With a solid gravel base, a brick border will last for the life of your house.Tools Required
- Brick saw (if you have lots of cuts)
- Circular saw
- Hammer
- Hand maul
- Hand tamper
- Knee pads
- Safety glasses
- Sod cutter
- Spade
- Utility knife
- Wheelbarrow
Materials Required
- 2x4
- 2x6
- 3/4-in. plywood
- Brick pavers
- Crushed gravel
- Paver edging
- Sand
- Sod
Planning and Preparation
For this project, you’ll need bricks, compactable gravel for the base, washed sand, and plastic paver edging to hold the bricks in place. If you’re lucky enough to have a full-service landscape supplier in your area, you can order all your materials there. Otherwise, look for pavers and plastic paver edging at home centers, garden centers or brickyards, and gravel at a landscape supplier or at a sand and gravel quarry. Don’t forget to ask about delivery charges.
Clay pavers have a rich, authentic look, but cement pavers are a little less expensive. Both types are durable and long lasting. Most pavers are 4 x 8 in. and about 2-1/4 in. thick, but other sizes are available. Measure the total linear feet of edging you plan to install and multiply by 3 to arrive at the number of 4-in.-wide paver bricks you’ll need. The plastic paver edging is necessary to keep the bricks from drifting. Use the total linear feet of the border to order edging. You’ll also need enough 10-in.-long spikes to install one every 12 in. Plus: Check out these unexpected materials used for landscape borders.
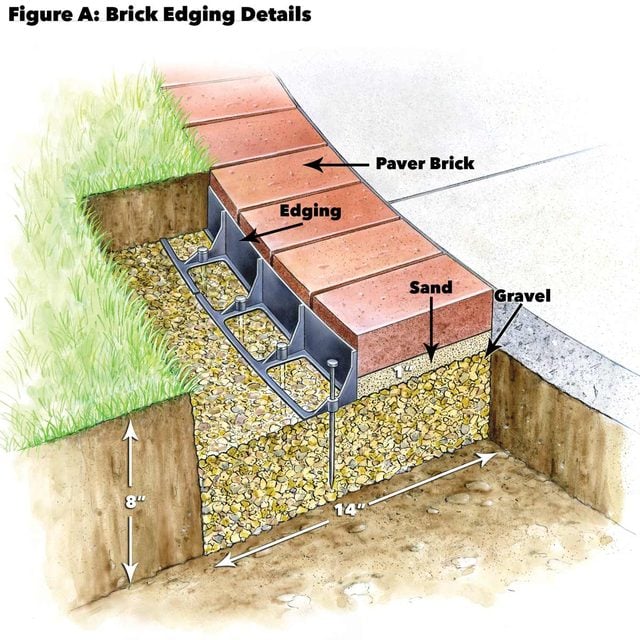
To ensure that the bricks remain stable and won’t tip when you wheel a lawn mower over them, the new compacted base should be 6 in. wider than the brick and extend 6 in. below the bottom of the brick. This means you’ll dig a 14 in. wide by 8-in. deep trench for typical paver bricks. To determine how much gravel you’ll need for this size trench, grab your calculator and multiply the linear feet of the trench by .02. The result is the number of cubic yards of gravel needed. Order gravel that ranges in size from 3/4 in. down to a powder (called 3/4-in.-minus). For our project, which was a total of 60 linear feet, we ordered 1-1/4 cu. yds. of 3/4-minus crushed limestone. Have the gravel dumped on the driveway where it’s easier to shovel up. You’ll also need a 1-in. layer of sand under the bricks. It’s usually cheaper and easier to simply order bags of sand rather than have a small quantity delivered. Divide the linear feet of the border by 5 to determine how many 50-lb. bags of sand you’ll need.
We rented a sod cutter to slice a neat layer of grass from along the edge of the sidewalk, but a flat shovel will also work. In addition to a shovel and rake, you’ll need a wheelbarrow, tamper and some scraps of lumber and basic carpentry tools to construct the screeds. If your sidewalk is straight and you only have a few bricks to cut, you can use a diamond blade mounted in a circular saw to cut the bricks. If your sidewalk is curved or you anticipate a lot of cutting, rent a brick saw.
We installed a deep compacted gravel base under the bricks. You could save a lot of work by simply digging a small trench and laying the bricks right on the soil, but you’d probably have to realign them every summer. The method we show takes longer initially but guarantees a long-lasting job that’ll look great for decades.
Project step-by-step (10)
Create a Trench

Two days before you start digging, call your local one-call number and ask to have the buried utility lines alongside your sidewalk located and marked. When you’re sure it’s safe to dig, start by removing a 14-in.-wide layer of grass along the sidewalk. If your grass is in good shape, slice it off carefully so you can use it to patch in along the new border. A sod cutter simplifies this job and leaves you with neat rolls of sod that are easy to reuse. If your grass isn’t worth saving, just dig it out and plan to buy a few rolls of sod instead. Next, dig a 14-in.-wide by 8-in.-deep trench along the sidewalk to accommodate the gravel, sand and pavers. The trench will provide space for the compacted fill along the walkway edging. The fill provides a stable base to keep the brick border from shifting. You’re going to have a lot of dirt to get rid of. Ask around the neighborhood to see if someone needs fill for a low spot, or consider building a raised bed garden or decorative earth berm. As a last resort, you can rent a 10-cu.-yd. trash bin. When you’re done digging, rake the bottom of the trench smooth and compact it with the hand tamper for driveway edging pavers.
Screed the Gravel
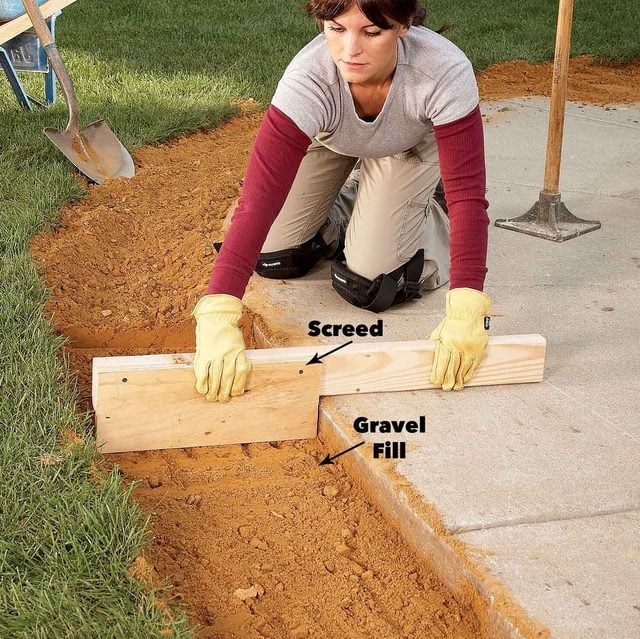
Since the purpose of the gravel fill is to provide a stable base, it’s important to compact it well. Start by spreading a 3-in.-deep layer of gravel in the trench. Pound every square inch with the hand tamper until it’s tightly packed. Then add another 3 in. of fill and drag a screed across the top to create a surface that’s parallel to the top of the sidewalk. Level the gravel about 3-1/2 in. below the top of the sidewalk to allow room for the bricks and about an inch of sand. Construct a screed by screwing a 14-in.-wide scrap of plywood to a 32-in. length of 2×4. The plywood should extend below the 2×4 the thickness of the paver brick plus 3/4 in.
Compact the Gravel
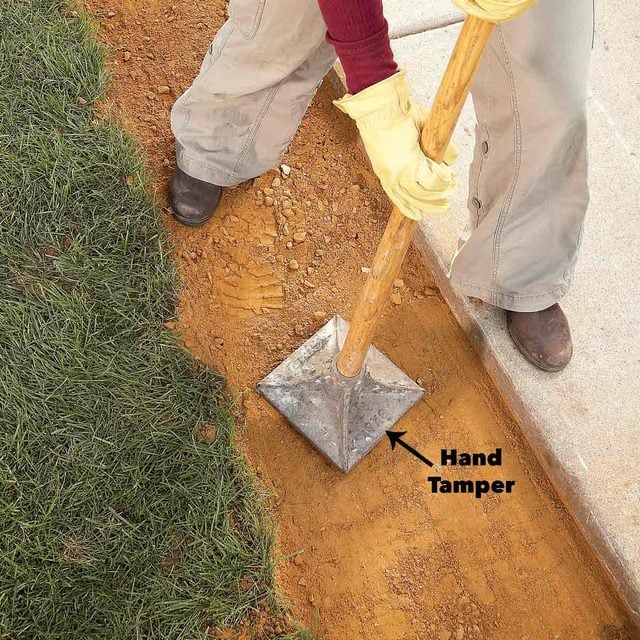
Pound the gravel with a hand tamper until it feels solid. The level will drop as the gravel settles, but that’s OK because you’ll add sand later to make up for it.
Screed the Sand
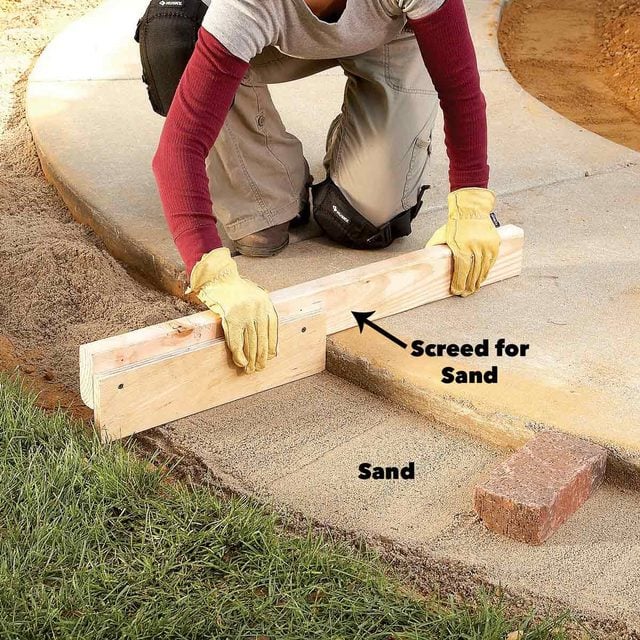
Next, spread a layer of sand a little deeper than 1 in. over the compacted base. If the sand is dry, dampen it with a mist from the garden hose. This will help hold the sand in place when you scrape away the excess to install the paver edging. Construct another screed and use it to level the sand. Figure the depth of the notch by subtracting 1/4 in. from the thickness of a brick. Set a paver on the screeded sand to test the depth. The paver should protrude about 1/4 to 1/2-in. above the surface of the sidewalk. You’ll make the pavers flush later by tamping them down into the sand bed.
Place the Bricks
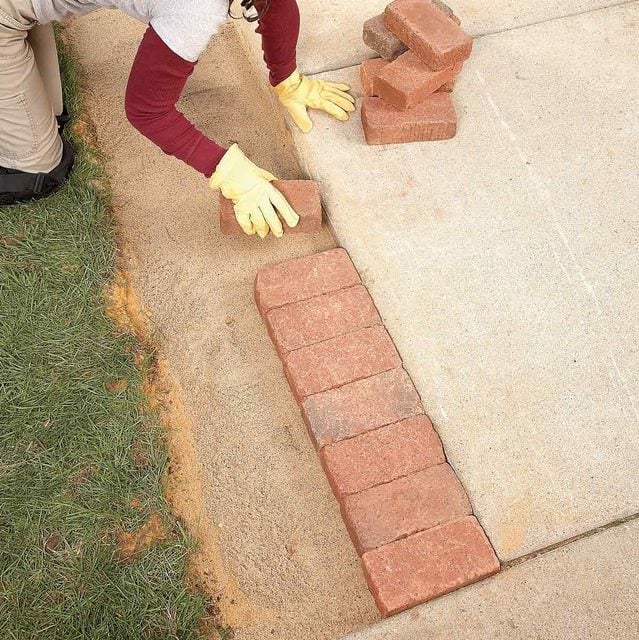
Here’s how to install paver edging. Start by setting the bricks on the sand bed. Don’t worry if the tops aren’t even. You’ll tamp them down later to level them out and make them flush to the sidewalk. Since there’s a good chance you’ll have to cut the last brick to fit, start with a full brick in the most visible location and plan to finish in the least conspicuous spot. If your edging turns a right angle corner, start at the corner and work out. The photo above shows how to get started on how to install paver edging.
Mark the Cut for Curves
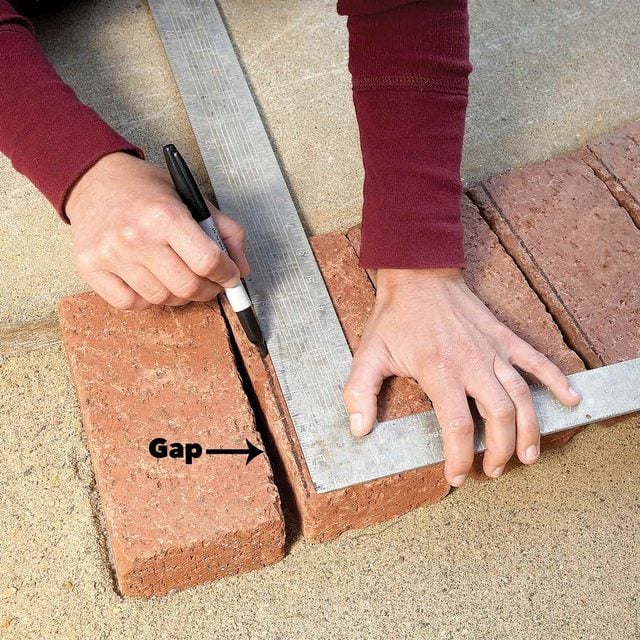
You’ll have to cut the pavers to go around curves. To figure out how much to cut from each, arrange a half-dozen pavers along the curve with the ends touching and estimate the gap between them. If the curve is very gradual, you can simply cut every third or fourth paver to fit. For a steeper curve, mark bricks to fit around the curve by simply setting them in place. Then estimate how much you’ll have to cut off to close the gap between bricks and draw a cutting line with a permanent marker.
Cut the Bricks

Rent a brick saw if you have a lot of bricks to cut. Water spraying on the diamond blade keeps dust to a minimum and speeds cutting. Cut and install several pavers, then repeat the process until the curved section is complete.
Nail the Edging
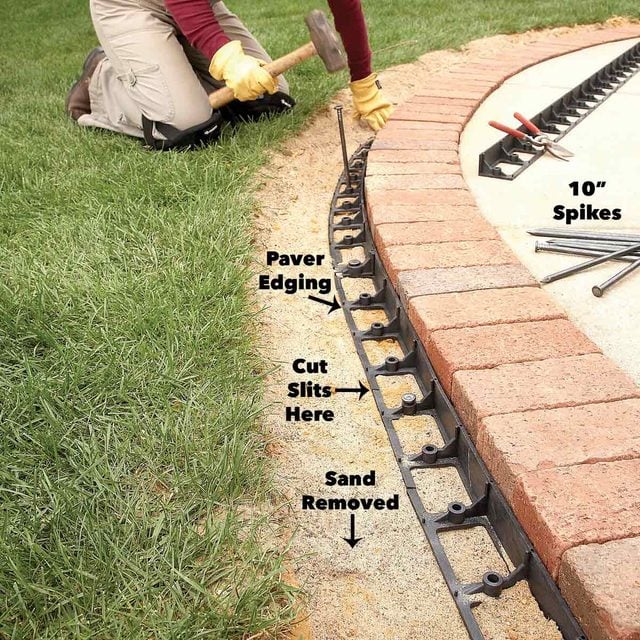
Next, install plastic paver edging behind the bricks to hold them in place. Start by scraping the extra sand out from behind the bricks so the edging will rest on the compacted fill. The edging we used required us to cut the outermost band with tin snips to allow the edging to bend around the curve. Press the edging against the bricks and drive 10-in. spikes every 12 in. to hold the edging in place.
Tamp the Bricks
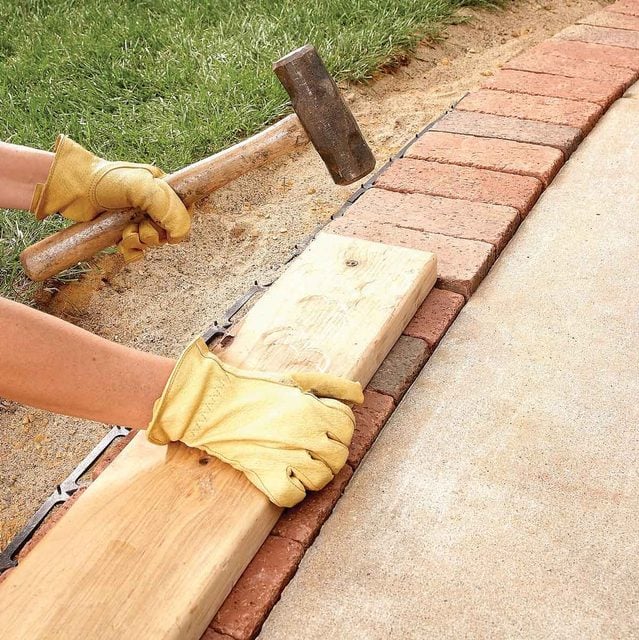
At this point, the bricks should protrude slightly above the surface of the sidewalk. Use a scrap of lumber and hand maul to embed the bricks in the sand and make them flush with the surface of the sidewalk. Embed all the bricks. Then spread sand over them and work it into the cracks with a broom. Be sure the sand is dry or it won’t settle into the cracks. Tamp the bricks again with the 2×6 board and hand maul. The vibration will cause the dry sand to fill the cracks and lock the bricks tightly together.
Complete the project by filling the trench behind the bricks with some of the soil you removed earlier. Leave the soil slightly below the surface of the lawn to allow room for the sod. You may have to experiment a little to get the level just right. Set the sod in place and trim it to fit with a utility knife.
Follow Slopes and Steps
Slope bricks alongside steps to make an attractive transition. Follow the grade of the adjacent lawn to determine the slope. This technique works whether you have one or several steps. In some cases, you may have to remove an additional strip of sod alongside the steps and regrade the soil slightly so the lawn lines up with the edge of the bricks, but it’s a neat-looking solution that’s worth the extra effort.
Fake it until you make it with these 20 cheap landscaping fixes that look expensive.