
Low-Voltage Outdoor Lighting
Updated: Apr. 05, 2023
Enjoy the beauty of your landscape (and sure footing) after sunset with low voltage lighting. We'll show you how to install it yourself.
Multiple Days
Beginner
$101–250
Introduction
Installing low-voltage outdoor lighting is a big-impact DIY project. And since it's low voltage lighting, it's safe to use and install, even for beginners. Outdoor lighting can be used to illuminate paths, steps and dark zones, plus it can add artfully dramatic emphasis to your yard's best features.Tools Required
- aluminum tent stakes
- Extension ladder
- Garden rake
- garden spade
- Level
- Posthole digger
- Safety glasses
- volt meter
- Voltage tester
- Wire stripper/cutter
- Wrench set
Materials Required
- #10 gauge outdoor wire
- #12 gauge outdoor wire
- 1-1/2 in. x 12-in. PVC pipe
- 1-1/2-in. PVC cap with ½-in. female thread
- 1/2 in. copper pipe
- For each ground light: 1-1/2-in. PVC coupler with ½-in. tee for wire opening
- Lights
- One box of weatherproof wire connectors
- Transformer
- Two ½-in. sweat-to thread copper adapters
Low Voltage Lighting Overview
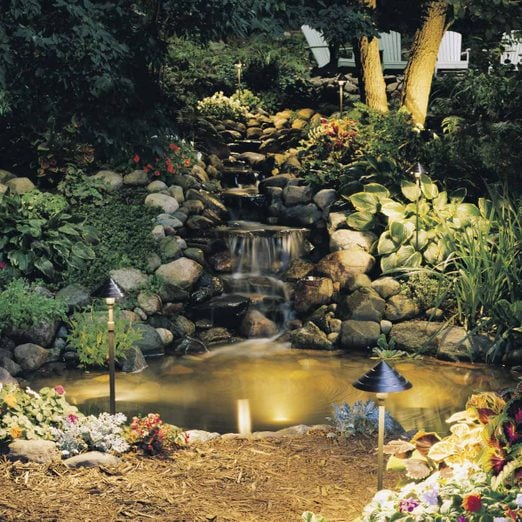
Outdoor low voltage lighting provide a pleasant alternative to glaring floodlights. They can be strategically positioned to accent the plants and features you want to highlight. They can be used for safety—to illuminate paths, steps and dark zones. When artfully placed, they can be as beautiful and natural looking as the landscape itself. And since they’re low voltage (you can literally add wires and lights to the system while it’s operating), they’re safe to use and install. Here we’ll show you the special tips and tricks the pros use to install them.
Selecting the right design and components for your landscape lighting installation
Figure A: Low voltage outdoor lighting plan
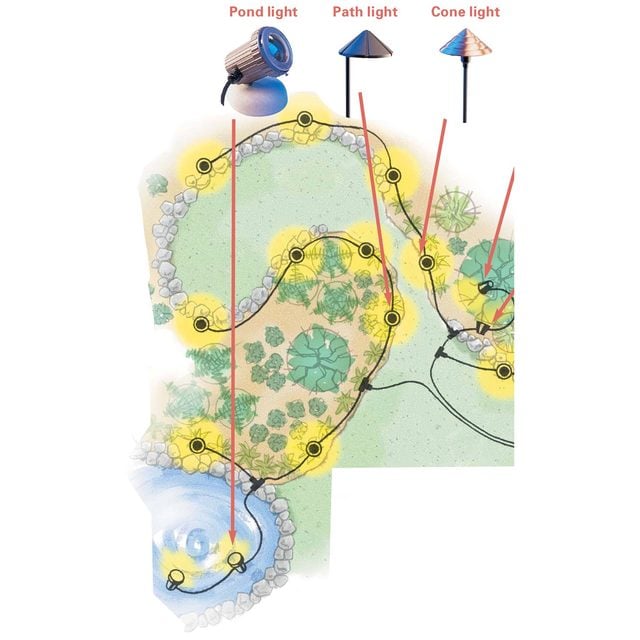
A successful low voltage outdoor lighting plan requires selecting the right fixtures, such as low voltage spotlights, then placing and wiring them correctly. Use waterproof pond lights for illuminating pools, fountains and other water features; offset path lights for lighting walkways; cone lights for highlighting both walkways and the surrounding plants; tree-mounted spotlights for simulating moonlight; and flood lights for illuminating trees, buildings and other large elements. Walk into any home center or garden center this spring and you’re guaranteed to run into a towering display of outdoor low voltage lighting. You’ll find $69 prepackaged sets and $100 individual lights; plastic fixtures and metal ones; lights you can shine down from trees and up from ponds. The bottom line is, you’ll get what you pay for. We decided to pay about $90 apiece for metal “architectural grade,” low-voltage halogen lights. The halogen bulbs cast a whiter, more focused beam than standard lights—almost like natural sunlight. And the bulbs last longer, some up to 10,000 hours. The metal construction of the fixtures means greater longevity for them too, and we loved the natural burnished look.
As you design and shop for your lighting system, keep in mind:
- Buy a larger transformer than you’ll initially need so you can add lights later as your landscape (and imagination) expands. If you’ll be installing 400 watts of lights, buy a 600-watt transformer.
- Avoid over lighting. Outdoor lights look best as accents, broadcasting pools of light. Flooding sitting or planting areas with “stadium lighting” can make them look washed out.
- When lighting a path, decide whether you want to light only the path or both the path and the features around it. As a rule, the broader the field you want to light, the higher the light pole you’ll need. Path lights with a 20-watt halogen bulb at a 24-in. height should be spaced every 10 ft.
- Consider seasonal factors when planning your landscape low voltage lighting installation. Install lights where they won’t be easily damaged by plows or shovels. And bear in mind that some plants, like hydrangea bushes, sumac and dogwoods with colorful stems, look cool lit up, even when they’re leafless.
CAUTION!
For safety’s sake, call 811 to have your utility companies mark the location of underground wires and pipes before you dig for your low voltage lighting. The service is usually free—and you’ll avoid dangerous and costly surprises.
Project step-by-step (6)
Install the low voltage lighting components
Position all the fixtures
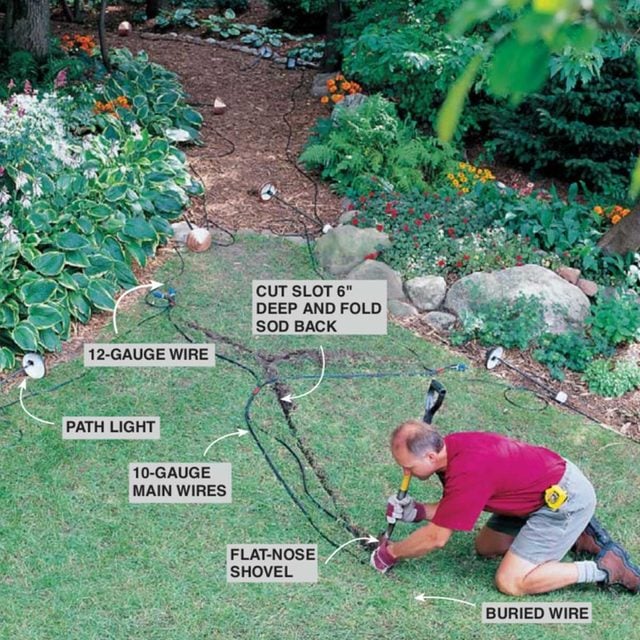
Before starting your landscape lighting installation, first lay out your light fixtures and landscape lighting wire. Use 10-gauge wire for the main lines from the transformer to where the lights begin, then switch to 12-gauge wire between the lights. To bury the wires where they cross the lawn, use a flat-nosed shovel to cut a slot and fold back the sod. Bury these wires at least 6 in. deep so they won’t be damaged if the lawn is aerated. In protected planting beds, the low-voltage wire can simply be covered by mulch or soil.
Mount the low voltage lighting transformer

Install the transformer in a central location near an outdoor GFCI outlet. Mounting it on a post allows you to easily change the photocell’s orientation. Connect the 10-gauge main wires to the transformer by stripping off 3/4 in. of insulation, twisting the small strands together, then attaching them to the terminals. The 600-watt transformer shown (about $300) has a built-in timer and photocell, two circuits, and a switch and terminals for setting voltage output to 12, 13 or 14 volts. Since the transformer will always be plugged in, you must replace the standard outlet cover shown with an in-use weatherproof cover, available at home centers and hardware stores.
Make a solid base
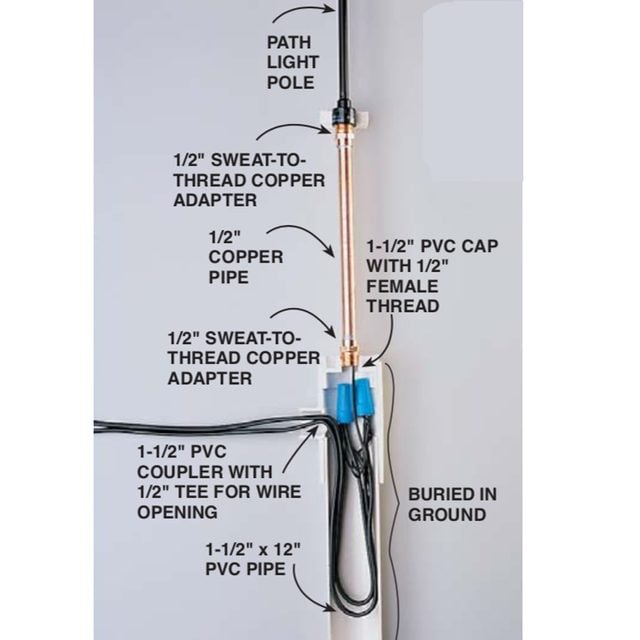
Construct rock-steady bases for top-heavy path and cone lights from plastic pipe. (The short ground stakes that come with most path lights don’t have enough ‘burying depth’ to hold them vertical over time.) This base gives the low voltage lighting an indestructible, sturdy footing; provides a housing for your wire connections; and allows you to make pole extensions of any length, from 1/2-in. copper pipe. Don’t glue the plastic pipe parts together or you won’t be able to make the connections shown in Photo 4.
Use weatherproof connectors
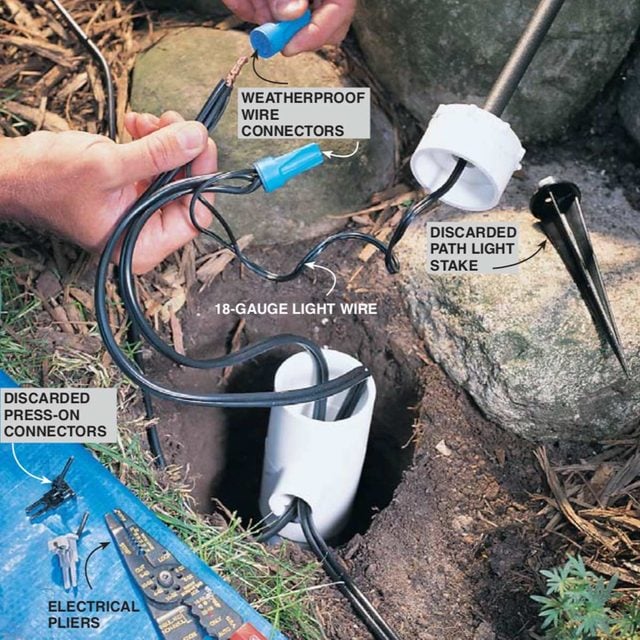
Connect the wires with weatherproof wire connectors. These wire connectors have a shield on the bottom and a blob of sealant inside that make them weatherproof. If your lights came with press-on connections, cut them off, strip off 1/2 in. of insulation, and install the connectors.
Close-up: Weatherproof landscape lighting wire connector
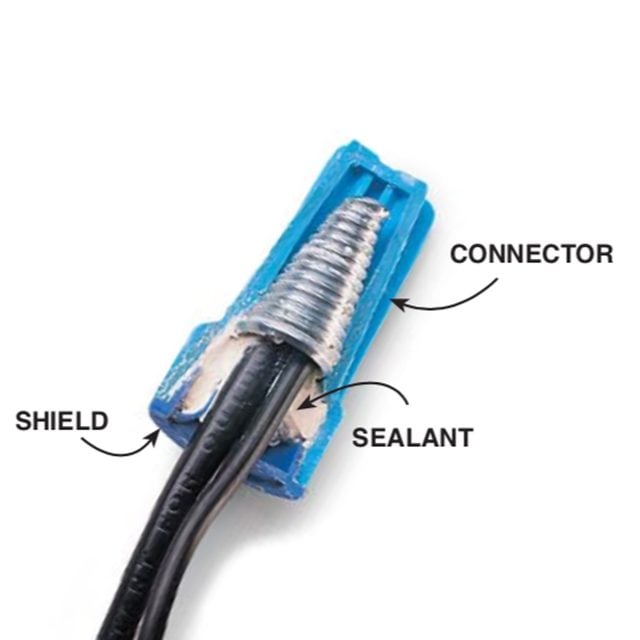
Use weatherproof connectors for a trouble-free installation
Make sure the fixtures are straight

Install the path light by digging a hole deep enough so the top of the PVC footing is level with the ground surface. Use a torpedo level to level the light pole and pack soil around the base. Use aluminum tent stakes to secure the unburied wire in the bedding areas, then cover it with mulch.
15 Ideas For Outdoor String Lights That Will Make You Want to Live Outside
Test each light
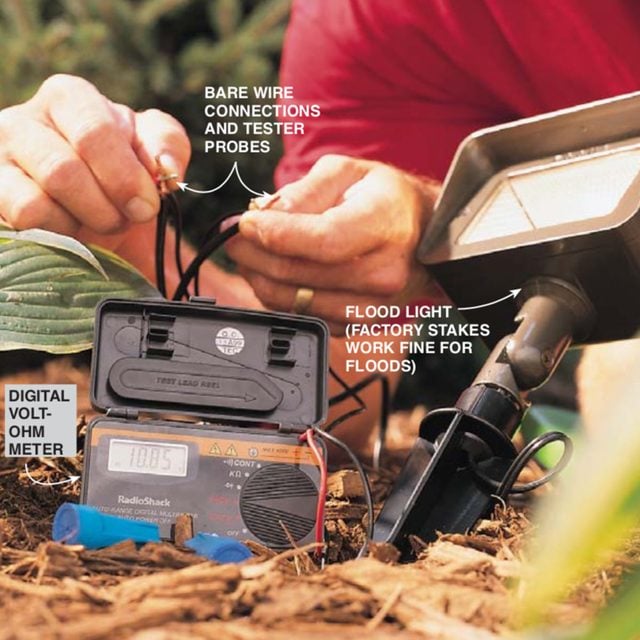
Test each light fixture for its voltage level with a digital voltage meter (about $25 at Radio Shack). Each halogen light should be receiving 10.5 to 12 volts for a consistent look and to avoid premature burnout. Extremely low readings indicate a bad connection somewhere in the system or too many lights on a circuit. Minor voltage adjustments can be made using the voltage controls on the transformer (Photo 2).
Pond light
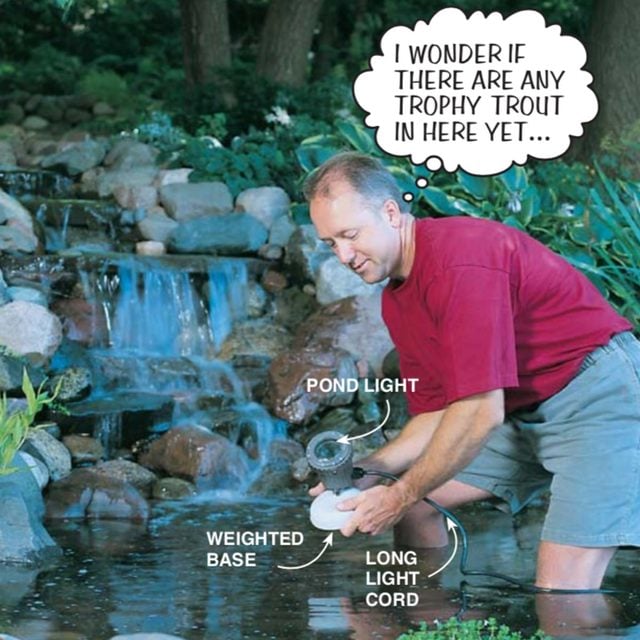
Pond lights are watertight and held in place on the pond bottom by a weighted base. They also have a long cord so you can bury your wire connections in the drier dirt at the pond’s edge. To get an idea of the pond light effect, see the opening photo. Pro tips for better design, layout and installation of low voltage lighting: Take the time to install your lights correctly and they’ll last longer, cast more light where you want it and require less maintenance. Get a first-class installation using these tips:
- If your lights come with press-on fittings—the type that bite through the insulation and into the landscape lighting wire to make their connection—cut them off and use the wire connectors shown in Photo 4. Your connections will be more solid and longer lasting.
- The farther a light is from the transformer (and the more lights installed between it and the transformer), the less light it will put out. Avoid this “voltage drop” by creating a tee (Fig. A) and running two short lines rather than one long one. A good rule of thumb is to put no more than 100 watts of lighting on one line. If you want to put ten 20-watt lights on a circuit, make a tee connection with five lights on one line and five on the other. You can also minimize voltage drop by using a thicker gauge wire.
- Always leave a little extra landscape lighting wire as you hook up the lights. This will give you the freedom to move a light after you’ve hooked it up for testing or after you’ve installed it.
- Burying the wires should be your last step. Lay everything out, hook up your lights, test your voltage, and look at your results at night before burying the lines.
- Purchase a transformer with a built-in photocell and timer. Orient the photocell with some western (sunset) orientation so it doesn’t turn lights on too early.
Special Lights for Special Effects
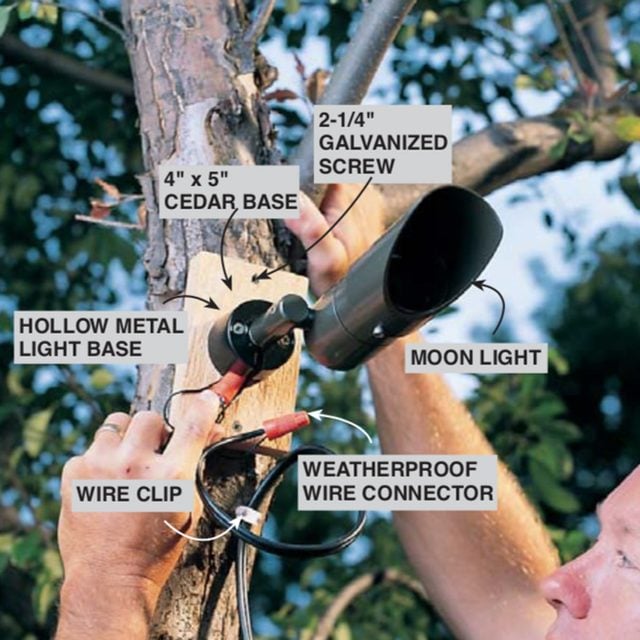
A moon light should be installed 15 to 30 ft. high and have one or more branches between it and the ground to simulate moon shadows. Provide at least 24 in. between the light and branches to prevent ‘hot spots.’ Make a 4 x 5-in. base from treated lumber or cedar, mount the light base to it and insert your wire connectors into the hollow light base. Attach the assembly to the tree with galvanized or stainless steel screws. Use plastic wire clips with stainless steel nails to secure the landscape lighting wire to the tree every 3 ft. Looking for more options? We’ve rounded up a list of the most breathtaking outdoor lighting.